Change Management in Jira – Case Study

We recently carried out a workshop session that focused on the change management processes in Jira with a Fintech organization.
The company needs to constantly adapt its systems to the evolving market requirements. Managing change serves as the most important communication channel between business and IT teams.
During the session, we discussed the problems in managing change in Jira and developed a brand new Jira solution for implementing an efficient change management process for the company.
Read on to find out more about the custom solution we developed for the organization.
The Problem
The organization’s change management process was inefficient and caused serious reporting problems. The main issue where a user requested the change would be moved from one project to another. The company’s reporting simply didn’t work – the issue disappeared from one project and then suddenly reappeared somewhere else.
Our Solution
Here’s the change management process we designed and implemented at the company. Imagine that a member of the company’s business department wants to request a change from the IT team.
The user can create a regular Jira issue:
In our example, the user added a summary and description to explain what kind of change they need.
Once the user creates the issue, they’ll see the following screen:
All the information inserted by the user is in its place. However, note a new section located at the bottom of the issue called Change Decomposition.
The analyst who will process that issue will add all the required changes into this table. The analyst will decompose the change requested by the business user into smaller chunks that will travel straight to the team responsible for bringing these functionalities to life.
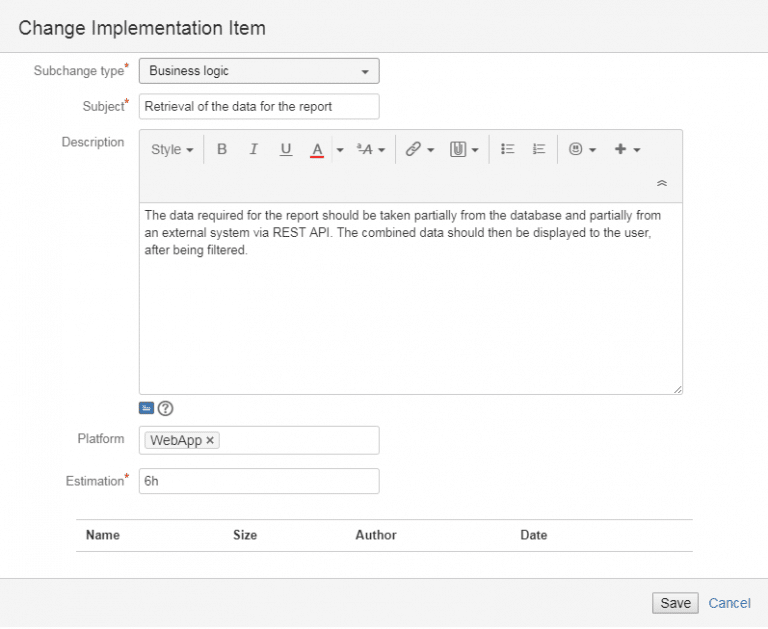
The analyst can add a new entry to the table by clicking on the blue button. They will see the following dialogue window:
The analyst can choose the subchange type from a drop-down list that has been preconfigured earlier.
They can add more information about the subchange in the Subject and Description fields, pick the appropriate platform (for example, iOS or Android), and fill in the time estimation for the subchange.
Note: The field Platform copies the value from the main issue to which the subchange belongs. However, when configuring the functionality, users can set a different value for that field. In that case, the field Platform will assume the value automatically copied from the configuration. Users can also overwrite the value of the Platform field by simply writing a new one and clicking Save.
It’s possible to add attachments to the subchage as well – in our example, the analyst added an image of the mockup screen.
By clicking Save, the analyst adds the subchange to the Change Decomposition area on the issue and then can proceed with adding another subchange – here’s another example:
Once all subchanges are saved, they will be displayed inside the issue in the Change Decomposition section.
It’s enough to place a cursor over a field to see more detailed information. For example, by placing your cursor over the attachment of a particular subchange, you’ll see the entire list of attachments. Similar details will be displayed for the field Description.
Users can also easily edit or delete selected subchanges.
At this point, the analyst can switch the status of the issue to proceed with the change implementation. Depending on the set workflow, that can be switching the issue’s status to In Progress.
Here’s what the issue will look like:
Note that the Change Decomposition section has disappeared and the subchanges are now listed under Issue links. Our solution will automatically create a Jira issue for each of the subchanges and link it to the original issue created by the business user at the beginning of the process.
Moreover, each of these issues will be located in the appropriate project without the analyst having to manually place them in different projects. That’s why the analyst needs to choose the subchange type when creating it – each type can be set to automatically land in a preselected project.
To make sure that everyone knows what’s going on with the issue, the change from To Do to In Progress in our example automatically generates a comment informing about the change decomposition.
Here’s what the completed issue will look like:
Note that all the subchanges displayed in the Issue links section have their statuses set to Done. When users change status of all the listed subchanges to Done, the parent issue’s status will be automatically changed to Done as well.
The person overseeing the change management process doesn’t need to control that all subchanges have been completed and then change the main issue status manually.
When the main issue status is changed to Done, both the process supervisor and the issue’s reporter will be notified about it via email.
For the solution to work properly, administrators need to configure it first.
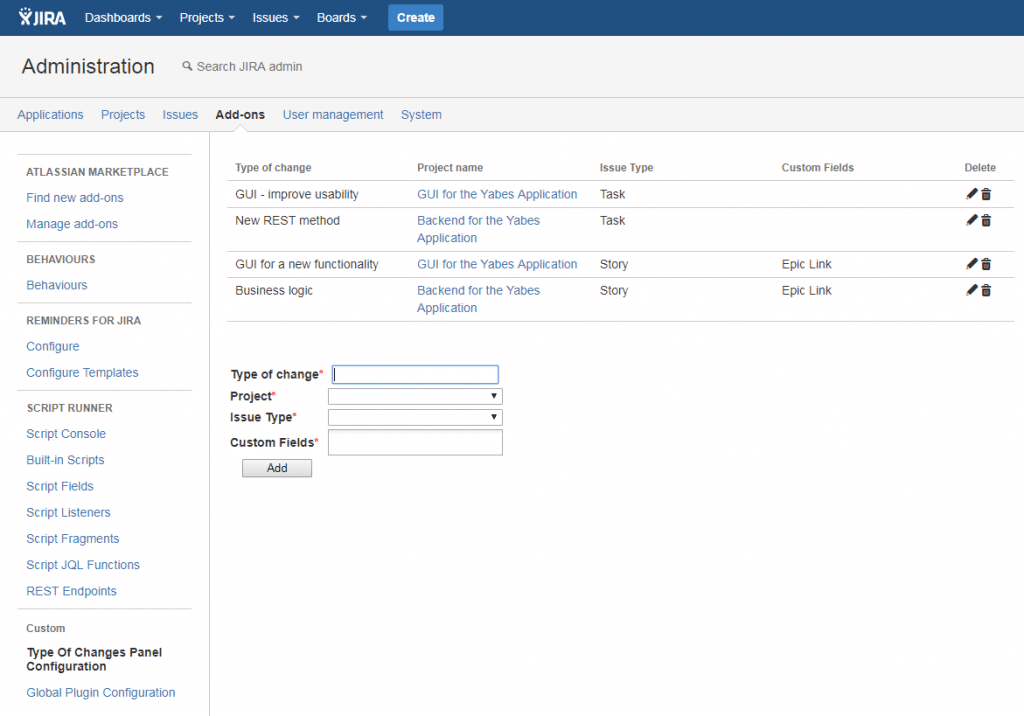
Here’s what the configuration screen looks like:
Heading over to Administration and Add-ons section, users will see a custom-made subsection with two configuration options.
The first configuration option (displayed above) is where users add types of subchanges that can be chosen by analysts who take over the issue.
Note that these subchange types can be different issue types (Task or Story) and contain different Custom Fields (in our example, it’s Epic Link). That column is important because it tells the users which fields will be copied from the main issue to the subchanges.
The second part of the configuration is the Global Plugin Configuration. Here’s what it looks like:
This configuration section controls when the panel Change Decomposition will be visible to users.
In our example, the panel Change Decomposition will appear in issues:
- belonging to the Business Initiatives project;
- only for issue type Task;
- to users with the project role of Business Analyst;
- if the issue status is To Do or In Progress.
If a user doesn’t have their role defined as Business Analyst, they won’t see the Change Decomposition panel and won’t be able to decompose the issue into smaller pieces.
Key Takeaway
By implementing the solution at the organization, we were able to build a user-friendly and transparent change management process.
Thanks to our solution:
- The organization can process a change request from the stage of a business idea, through business analysis, prioritization and acceptance, to decomposition for development teams without moving the issue to a different project.
- Managers are more efficient because the information required to make a decision is always up-to-date and available.
- The business analysts enjoy a consistent model of change processing and automation of activities previously performed manually in Jira.
As a result, the company noted better results in the quality and speed of change request processing.
At Deviniti, we help our clients make the most of their Jira applications and achieve key business objectives with smooth and well-designed Jira processes.
Have you got a question about developing a custom Jira solution?
Drop me a line at radoslaw.cichocki@deviniti.com, connect with me on LinkedIn, or leave a comment here – I’m always happy to help our organizations in improving their work with Jira.


