Jira 101: How to Create New Epics [Step-by-Step Tutorial]
Updated February 22, 2024
Starting with Jira can seem daunting, especially when it comes to organizing large projects. That’s where epics come into play. They are a key tool for grouping related tasks and keeping your project on track.
In this brief tutorial, we’ll walk you through the steps to create new epics in Jira. We’ll add some useful insights about how to link them with issues and measure their progress, too.
Whether you’re a new user or looking to refine your skills, mastering epics is key to leveraging Jira’s full potential. Let’s get started on simplifying your project management process.
What is an epic in Jira?
An epic is an issue type that accumulates stories or tasks on the same subject. This is a way to divide your larger piece of work into smaller ones. It also makes it easier for the particular tasks’ assignees to see the wider context of their tickets.
Let’s take the New product strategy as a Jira epic example. You can add stories to it. For example, Product positioning strategy, Pricing strategy, or Creating an ideal customer profile. Each story can have sub-tasks inside. Such structures are possible to build in all three: Jira Cloud, Server, and Data Center.

The view of an Epic in Jira Cloud with the stories assigned to it
Jira epic vs. story
Some people have a hard time recognizing the difference between epics and stories in Jira. Let’s go through them briefly.
Epic:
- Large work chunks that group related tasks.
- Broad scope, spanning multiple sprints.
- Long-term planning for major features or goals.
Story:
- Specific tasks describing a feature from the user’s perspective.
- Narrow scope, designed for completion in a single sprint.
- Short-term execution focusing on delivering value.
Key differences:
- Scale: Epics are larger and more general, while stories are detailed and focused.
- Duration: Epics are for long-term work; stories are short-term.
- Purpose: Epics organize related work; stories detail the work needed to achieve parts of epics.
Simply put, epics bundle related stories for big-picture goals, and stories break down these goals into actionable tasks.
Jira create new epic tutorial
There are different ways of creating epics in Jira Software. You can use the timeline for a visual overview. You can also use the global create button for quick access. Or, you can create epics from within the backlog for organized planning.
Let’s go through each of them step by step.
How to create epics in the timeline view
Step 1: Activate the timeline view
1. Access board settings: On your board, click the More option (three dots icon) located at the top right corner, then go to board settings.
2. Enable timeline: Find the Timeline section and turn on this feature for your project.
Step 2: Create an epic in a timeline
1. Open timeline: From the left-hand menu, select the Timeline option.
2. Initiate epic creation: Click on + Create epic directly on the Timeline. If it’s your first time, you can also start by typing where indicated to create your initial epic.
Creating an epic via navigation bar
1. Navigation bar: Use the Create button found in the global navigation bar at the top.
2. Issue type selection: Choose Epic as your issue type from the dropdown. Then, fill in all the blanks and click Create.

Creating an epic from the backlog
1. Navigate to the backlog: Look for the Backlog section in your project.
2. Filter epics in the backlog: Open the Epic filter and click the toggle.

3. Create your epic: Click on the + Create epic on the left.

By following these steps, you can efficiently create epics in Jira through different methods. Each method serves different planning needs and preferences. It allows for flexibility in managing your project’s large-scale tasks.
How to add an epic to a Jira ticket?
To add an epic to a Jira ticket, follow these simple steps:
1. Open the ticket: Navigate to the specific ticket (e.g., a story or task) you want to link to an epic.
2. Click on the Add epic.

3. Select the Epic from the list of recent epics, or click View all epics to choose an epic from the list of your epics.
Your ticket is now linked to the selected epic. This helps in organizing and tracking progress on related tasks and features.
How to remove the epic from the Jira issue?
To remove the epic:
1. Go to the chosen issue.
2. Find the Epic name (above the issue name) and click on the edit button.
3. Choose to Unlink parent.

Measuring the progress of epics
Once you create one or more epics, you’ll surely want to measure their progress. There are a few ways to do it.
Using Jira Epic Reports
This tool provides a detailed view of all incomplete issues within an epic. Using it, you can track the remaining work over time. It’s particularly useful for estimating when an epic will be fully completed. That way you make sure that you’re always informed of your progress and can adjust plans as needed.
Jira Epic Report Source: Atlassian
To learn more about it and see a step-by-step guide to create it, watch this video.
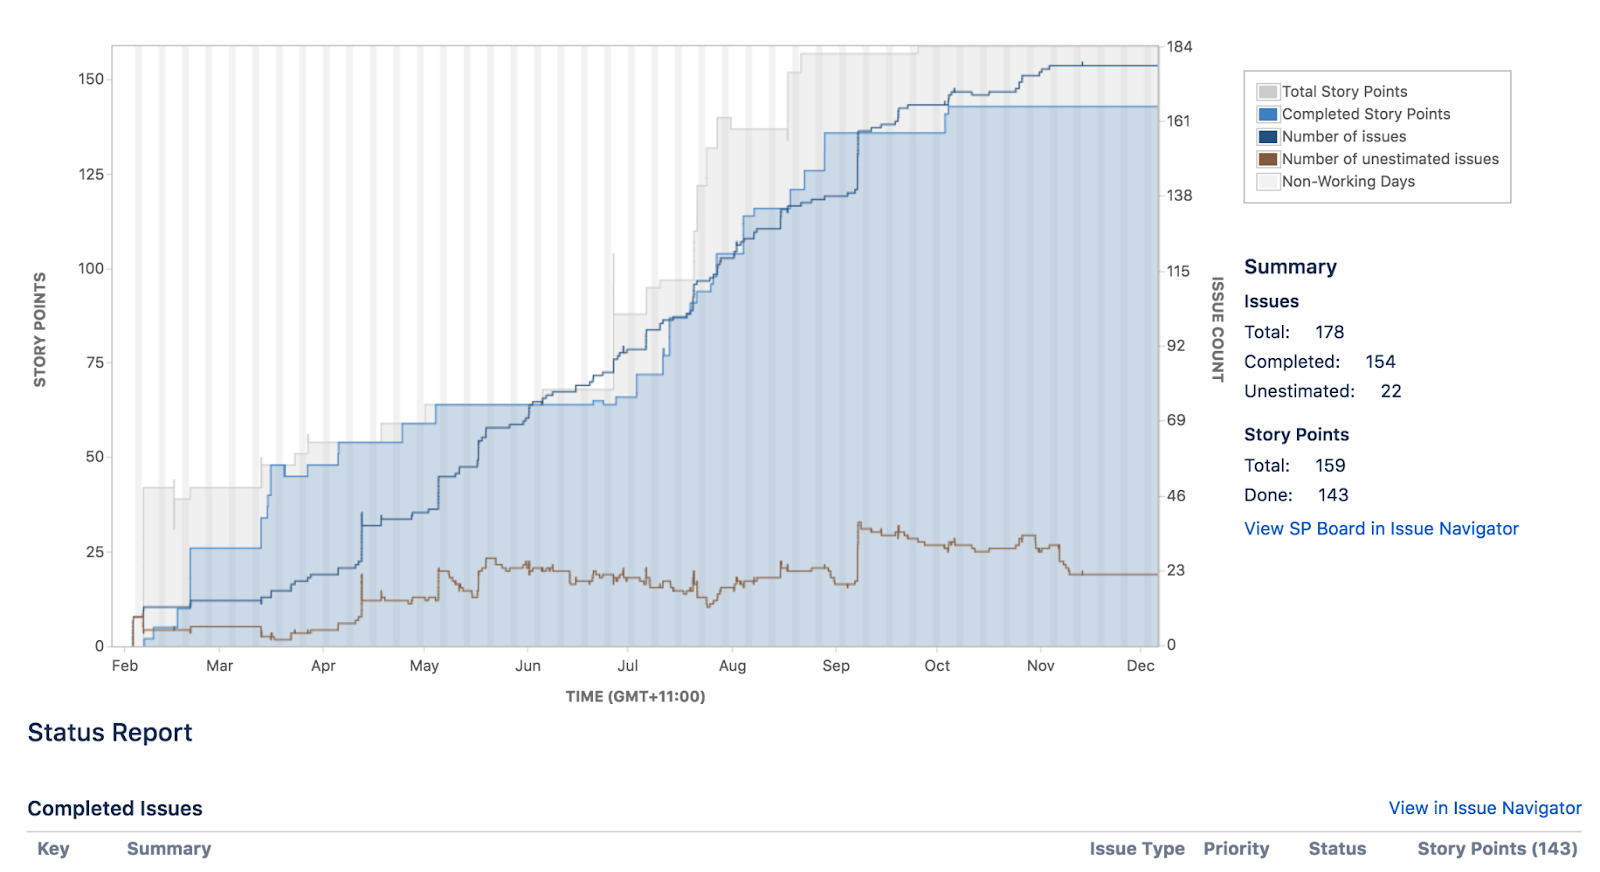
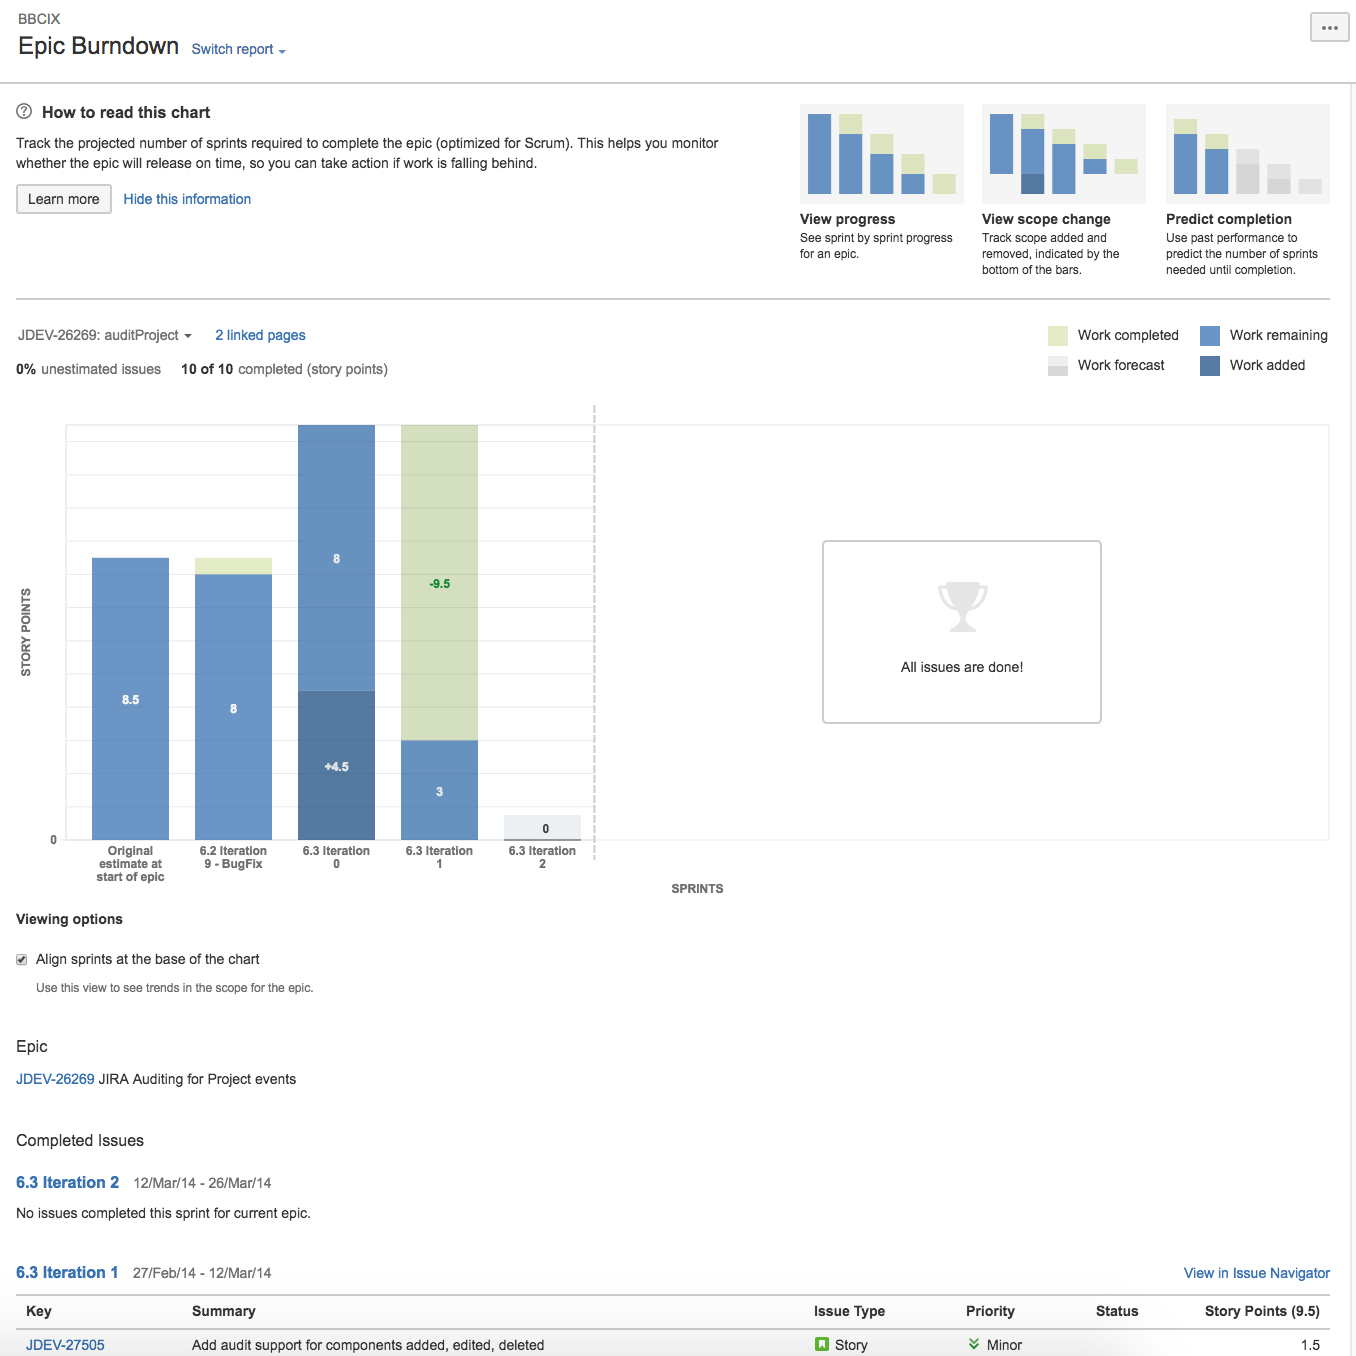
Using burndown charts
For a visual representation of your epic’s progress, the Epic Burndown Chart is your go-to. It illustrates both the actual and estimated amount of work over the course of a sprint or the entire epic.
The x-axis shows sprints, and the y-axis shows story points. It offers a clear snapshot of your team’s agility. By tracking the work left throughout the sprint, the team can gauge its progress, identify any blockers, and adapt to ensure goals are met. This visibility not only motivates the team but also keeps stakeholders in the loop.
Using Jira add-ons
The third way to measure your epics is to invest in Atlassian Marketplace add-ons. Some examples include:
- Mindpro Insights
- STAGIL Reports
- Epic-Manager
Jira epic examples and templates
Let’s see some epic examples in different areas.
Software Development
- Epic: Website Redesign
- Description: This epic covers all tasks related to redesigning and updating the company website, including UI/UX design, content update, and backend infrastructure overhaul.
- Stories: Redesign homepage layout, Update product pages, Improve site performance for mobile users.
- Tasks: Create wireframes for the new homepage design, Write new content for the About Us page, Optimize images and scripts for faster loading times.
Marketing Campaign
- Epic: Product Launch Campaign
- Description: This epic involves all activities for launching a new product, from market research to the execution of the launch event.
- Stories: Conduct market analysis, Develop marketing materials, Organize launch events.
- Tasks: Survey customers to gather product feedback, Design new brochures and banners, Book venue and caterers for the launch event.
HR Initiative
- Epic: Employee Onboarding Process Improvement
- Description: This epic aims to streamline and enhance the onboarding experience for new hires, making the process more efficient and welcoming.
- Stories: Update onboarding documentation, Implement a mentorship program, Revise training sessions.
- Tasks: Rewrite the employee handbook with updated policies, Pair new hires with mentors in their department, Create an interactive training module on company culture.
IT and Infrastructure
- Epic: Migration to Cloud Services
- Description: This epic details the process of moving the company’s data and applications from on-premise servers to a cloud-based infrastructure.
- Stories: Evaluate cloud providers, Plan data migration strategy, Train staff on new systems.
- Tasks: Compare pricing and features of leading cloud providers, Develop a checklist for data backup and migration, Schedule training sessions on cloud tools for employees.
Customer Service Improvement
- Epic: Enhancing Customer Support Channels
- Description: Focuses on improving the quality and accessibility of customer support, aiming to increase customer satisfaction.
- Stories: Implement a live chat system, Develop a self-service knowledge base, Train support team on new tools.
- Tasks: Integrate a live chat widget on the website, Compile FAQs and troubleshooting guides for the knowledge base, Conduct a workshop on effective live chat support techniques.
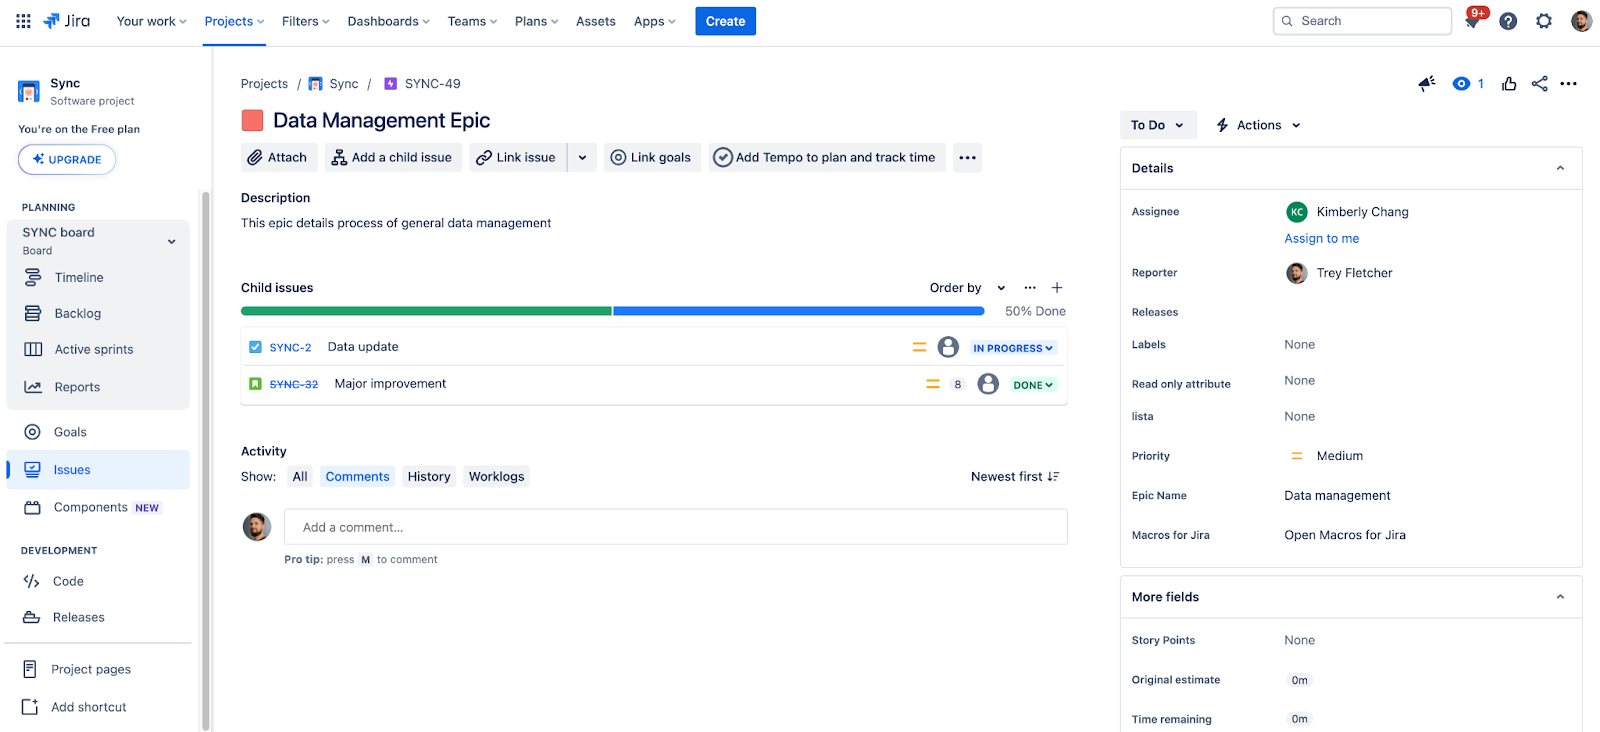
Now let’s see how the epics look in action. Here’s an example of an epic in Jira Software Cloud.
Jira Epic Template
Below is a simple template for creating an epic in Jira. While the exact fields can vary based on your Jira configuration and any customizations your team has applied, this template covers the common elements you’ll see or need to consider when creating an epic.
Epic name: [A concise title for the epic, providing a clear overview of the objective]
Summary: [A brief description summarizing the epic’s goal and its importance to the project or organization]
Description:
- Objective: [A detailed explanation of what this epic aims to achieve]
- Background: [Any relevant background information or context that explains why this epic is necessary]
- Scope: [Outline of the work that will be covered under this epic, including any known tasks or areas it will touch]
- Out of Scope: [Clarification of what will not be included in this epic, if applicable]
Acceptance criteria:
- [A list of conditions that must be met for the epic to be considered complete]
Dependencies:
- [Any dependencies on other projects, epics, or external factors]
Stakeholders:
- [List of people or teams with a vested interest in the outcome of this epic]
Timeline:
- Start Date: [Planned start date]
- End Date: [Planned or estimated completion date]
Status: [Current status of the epic, e.g., To Do, In Progress, Acceptance]
Links:
- [Any relevant links to documents, designs, or external references related to the epic]
Notes:
- Remember to attach any related documents or images that can provide additional context or information.
- Regularly update the epic with progress notes, changes in scope, or adjustments to the timeline as the work progresses.
This template is just a starting point. You may need to adjust it based on your specific project needs and the practices your team follows.
How to create epic issue templates in Jira Cloud?
Project configuration
Go to the Configuration section of Apps → Issue Templates for Jira. Then, choose a project where you will store all your templates or create it right from this screen.

You can choose a company-managed or team-managed project for the Templates repository. Keep in mind that they have different predefined issue types.
Template configuration
Templates look just like regular issues. The only difference is that the first ones have the Template configuration section. Let’s see how to use it and prepare the right issue template. To create a template:
- Create a new Epic issue in the Templates Repository as you would normally do in Jira, it will automatically become a template.
- You can also use Recreate issue action ( issue view > action buttons ) in order to effortlessly clone and move your existing epic structure to the repository
- Created templates are ready to use, by default they are configured as follows:
- Template name: is copied from an issue’s Summary, it will be visible in Template picker.
- Scope: All fields except Reporter, including issue links, will be copied from this template.
- Sub-tasks, if any, will be copied.
- Child issues, e.g. stories under epic are always copied
- You can edit the Template configuration by opening a dedicated panel in the issue view.
A Scope is a set of fields that defines which values will be copied from your template to the target issue. The default Scope is configured to copy all fields (including issue links) except the Reporter. You can create your own Scopes with all system and custom fields, including Attachments. For this purpose, we recommend using All fields or All fields except options.

Default Scope settings are set up to copy links as well. If a link is configured as a template, the Issue Templates app will create a new issue in your target project based on it. You can decide whether the plugin should copy links by adding or deleting the Linked Issues field from Scope.
Create issues from templates
You don’t have to spend time creating the same Epics with Stories and sub-tasks again and again. You create needed templates only once, adjust their settings and you’re able to create target issues in less than 10 seconds in Jira Cloud, Server, and Data Center.
Conclusion
As you can see, there are many ways to create new epics in Jira. You can do that from the create screen, using the epic panel in the backlog, or going to the timeline view. If you’re in a rush, we recommend you try apps for Jira that let you create epic templates. It simplifies and speeds up the whole process.
FAQ
-
How do I create an epic on a Jira software project?
To create an epic in a Jira Software project, log into your account and navigate to your project. Click the Create button in the top navigation bar and select Epic as the issue type. Fill in the details for your epic, such as the name, summary, and description, along with any other required fields like assignee or priority. Once completed, click the Create button to save your epic. You can then link existing issues to this epic or create new ones in it. Use the backlog for Scrum projects or the roadmap for Next-gen projects. This lets you manage and track progress toward your larger project goals well.
-
How do you make an epic?
To make an epic in Jira, you can use three methods: the create issue screen, the epic panel in the backlog, or the timeline view.
-
Why can’t I create an epic in Jira?
If you’re unable to create an epic in Jira, there could be a lot of reasons why. You may not have sufficient permissions, the epic issue type may not be included in your project’s issue type scheme, or you may be working in a team-managed project where epics are managed differently, such as under the Roadmap section. Project configurations or specific workflows might also restrict the creation of epics. Technical issues, like browser problems or Jira glitches, could be another cause.
Make sure you have the needed permissions. Check the project’s issue type scheme. Clear your browser cache. Or, consult with a Jira administrator for project settings and help.
-
Can you have two epics in Jira?
Yes, you can have multiple epics in Jira. There is no inherent limit to the number of epics you can create within a Jira project. Epics organize large amounts of work, and it’s common for projects to have several epics. That way, teams can manage different aspects or features of the project. Each epic can contain many stories, tasks, and bugs that contribute to achieving the broader goal defined by the epic.
-
How do I add an epic to an existing issue in Jira?
To add an epic to an existing issue in Jira, follow these steps:
- Open the issue: Navigate to the issue you want to add to an epic. This can be any issue type like a story, task, or bug..
- Click on the Add epic button. A dropdown menu will appear with a list of available epics. Choose the epic you want to link your issue to. If the desired epic is not listed, make sure it exists in the project or create a new epic if needed.
Your issue is now linked to the chosen epic, contributing to the larger body of work defined by that epic.
-
How to create an epic on a Jira board?
To create an epic on a Jira Kanban board, follow these steps:
In the Company-Managed projects:
- Go to the Backlog: Open your project and find the Backlog section.
- Click on the Epics filter and turn the toggle on.
- Next, click on + Create epic.
- Enter details: Fill in the epic’s name and any other required information, then save it.
In the Team-Managed projects:
- Open the Timeline: Select Timeline from the project sidebar.
- Add an epic: Click + Create epic on an empty space on the timeline, provide the epics details, and save.
After creating your epic, link issues to it by editing their Epic Link field.
-
What’s a Jira epic link?
A Jira epic link is a field in Jira issues that connects individual tasks, stories, bugs, or other issue types to an epic. It helps organize and track related work under a common objective or theme defined by the epic. When you link an issue to an epic using the epic link field, it becomes part of that epic’s scope. It lets teams easily see how smaller tasks contribute to the overarching goals of the project.
Using the epic link helps with project management by:
- Grouping related issues, making them easier to manage and track.
- Providing a clear overview of progress towards completing significant project milestones.
- Helping prioritize work by showing how individual issues fit into the bigger picture.