Connecting app to Azure AD
Learn how to synchronize Azure AD Attributes Sync and Azure Active Directory (AD)
Connecting Jira internal directory to Microsoft Azure AD allows you to match user accounts, so that their Azure AD attributes can be displayed in Jira and on the Customer portal.
We’ve updated the authorization logic. Make sure to follow instruction below, to gain benefits of the new solution.
Benefits of the new authorization logic
With the introduction of the automatic authorization method, we can distinguish several advantages over the previous, manual authorization logic:
- Increased safety: The new automatic authorization method enhances the security of your Jira Cloud and Microsoft Azure integration. By leveraging modern authorization protocols and mechanisms, it provides a robust and secure framework, mitigating potential vulnerabilities and safeguarding sensitive data.
- No manual API permissions: With the new method, the cumbersome task of manually setting API permissions is eliminated. The automatic authorization streamlines the configuration process by handling the necessary permissions and access controls automatically. This saves time and effort for administrators, ensuring a smoother integration experience.
- Elimination of authorization key copying: The new method removes the need to manually copy authorization keys between Jira Cloud and Microsoft Azure AD. It simplifies the setup process, reducing the chances of errors and minimizing potential security risks associated with manual key handling. This simplification promotes a more efficient and hassle-free integration workflow.
- Elimination of the client secret: New method completely removes the need of generating the client secret. You no longer have to worry about the expiration date of the client secret.
Connecting for the first time
Steps
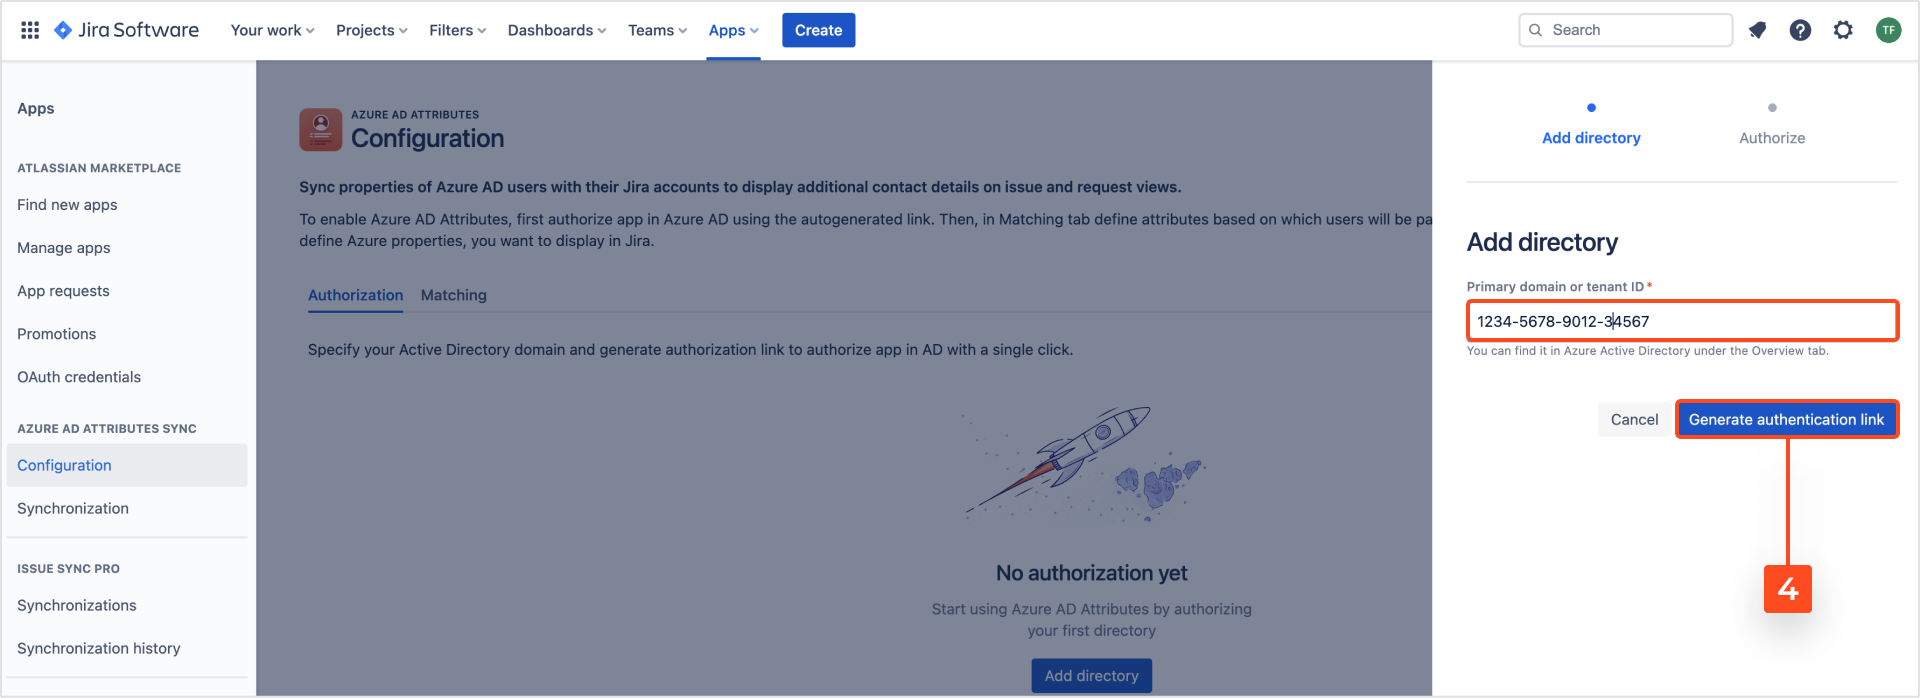
To connect Azure AD to Jira:
-
In Jira, navigate to Jira settings > Apps.
-
In the Azure AD Attributes section, click Configuration.
-
Click Add directory

-
Provide primary domain, or tenant ID and click Generate authentication link
Learn how to obtain tenant ID in the Tenant ID chapter.
-
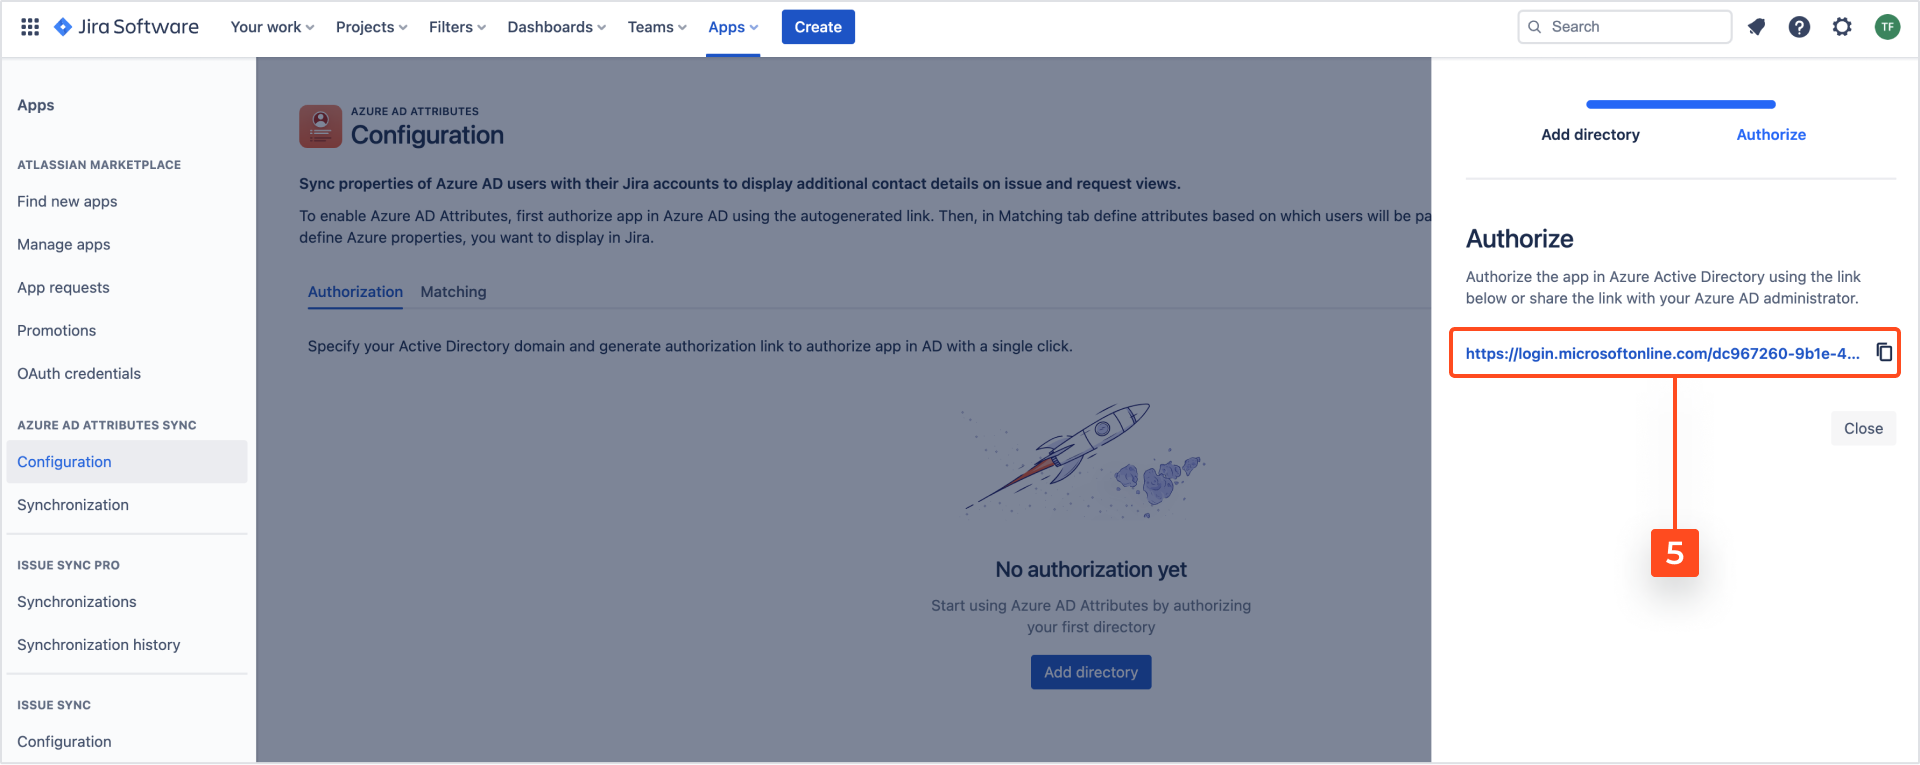
Follow the newly generated link, to authorize the app in the Azure Active Directory. If you are not an Azure admin, provide this link to a proper person.
-
The link will take you (or the Azure admin) to the authorization site in the Azure Active Directory. To finish the authorization process click Accept.
Clicking Accept on the Microsoft Azure side will result in the installation of our app on the Azure instance. It will be visible in the Azure Enterprise applications section. This is a proper behavior for all marketplace apps.
Results
The Azure AD Attributes Sync app is connected to Microsoft Azure AD.
Updating connection (connection created before 10.07.2023)
As the manual authorization method has been deprecated, if a connection was created before 10th July 2023, you will have to update your authorization method.
If you don’t update your method now your connection won’t stop running and data will continue to be exchanged between Jira and Azure Portal, still we strongly recommend updating the authorization method now, for safer and more efficient process.
To update the authorization method:
Steps
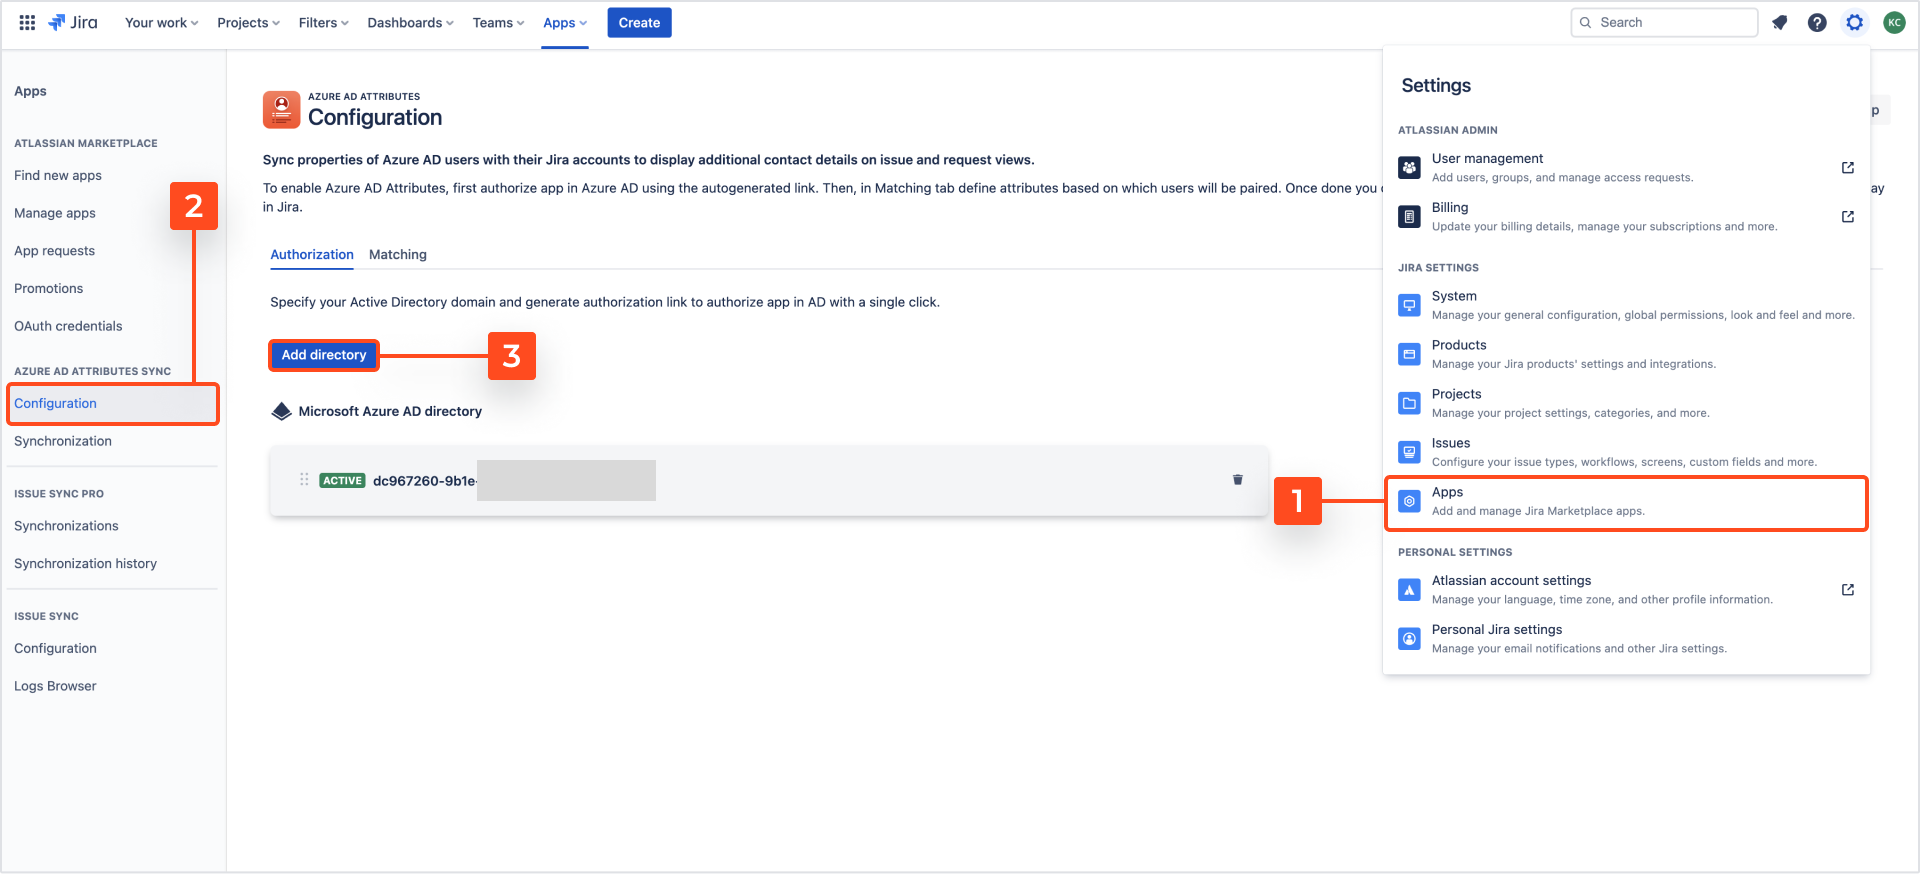
- In Jira, navigate to Jira settings > Apps.
- In the Azure AD Attributes section, click Configuration.
- Click Update authorization
- Confirm the directory by providing a tenant ID and clicking Generate authentication link
Note
Learn how to obtain tenant ID in the Tenant ID chapter.
- Follow the newly generated link, to authorize the app in the Azure Active Directory. If you are not an Azure admin, provide this link to a proper person.
- The link will take you (or the Azure admin) to the authorization site in the Azure Active Directory. To finish the authorization process click Accept.
Clicking Accept on the Microsoft Azure side will result in the installation of our app on the Azure instance. It will be visible in the Azure Enterprise applications section in Azure Portal. This is a proper behavior for all marketplace apps.
You can try the live demo below to click through the new setup.
Results
The authorization method has been updated.
Multiple directories
You can include more than one Microsoft Azure directory.
Multiple directories feature follows the logic described below:
- Application searches all directories for a user with selected attributes, starting with the topmost directory on the list
- Application fetches the data from the first directory that contains given user
- Application stops searching the directories at the moment of the first successful mapping
- All authorized directories share the same configuration
Steps
-
Navigate to Jira settings > Apps.
-
In the Azure AD Attributes section, click Configuration.
-
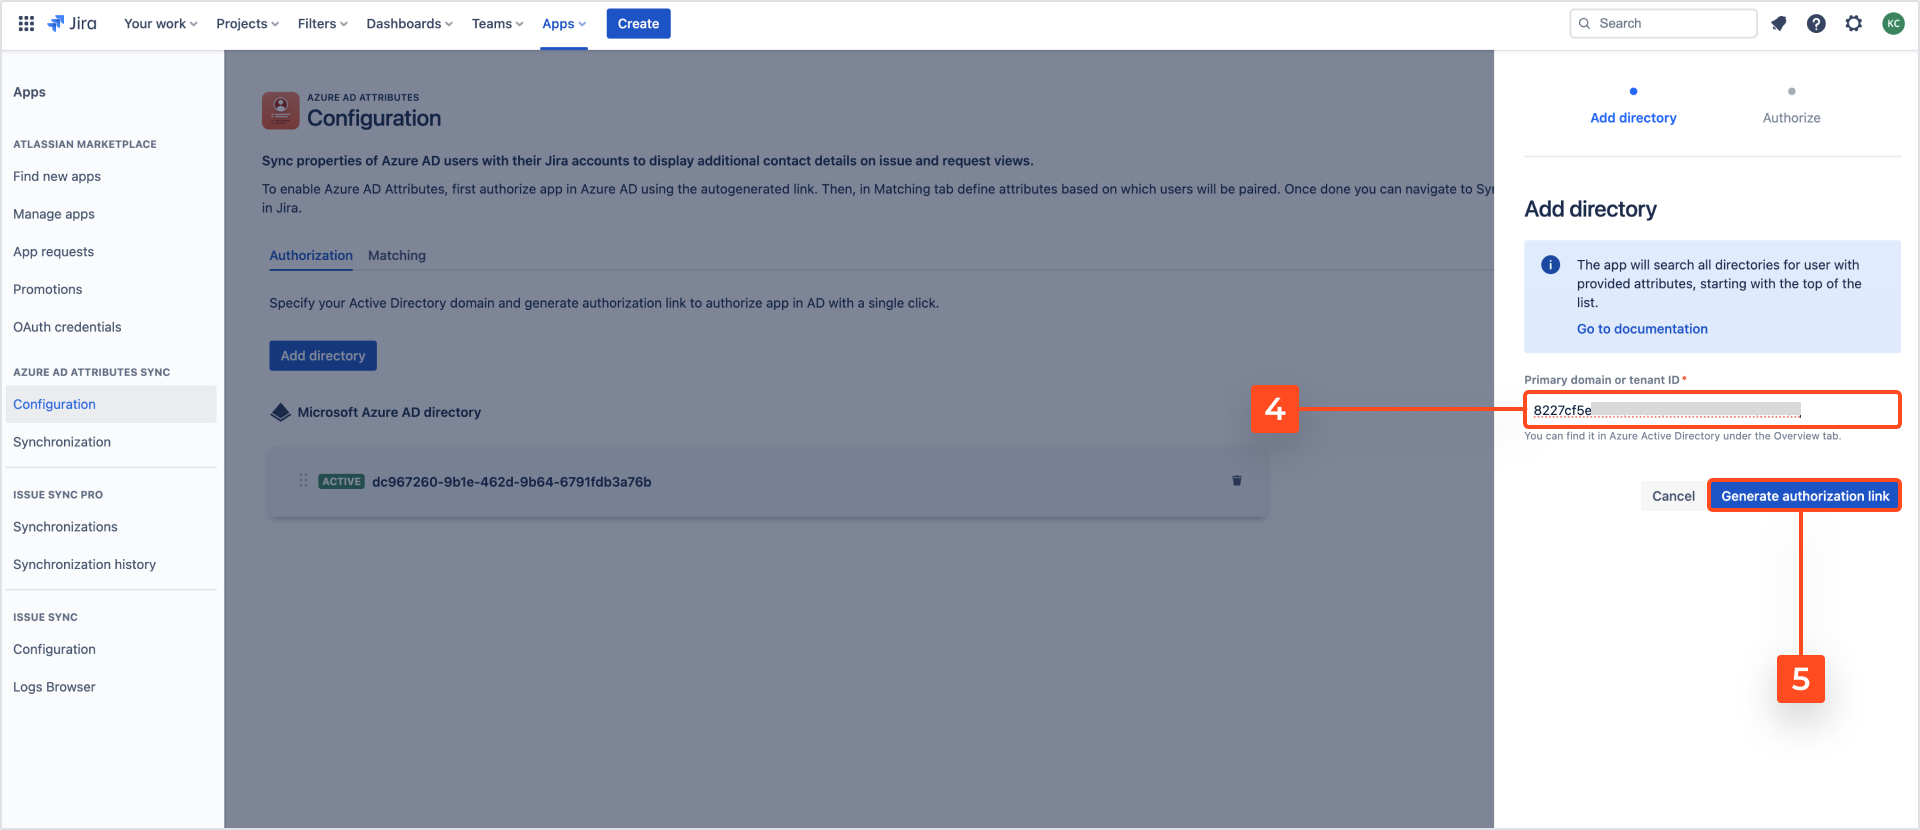
Click Add directory.
-
Provide primary domain or Tenant ID of your Azure instance.
-
Click Generate authorization link
-
Follow the newly generated link, to authorize the app in the Azure Active Directory. If you are not an Azure admin, provide this link to a proper person.
-
The link will take you (or the Azure admin) to the authorization site in the Azure Active Directory. To finish the authorization process click Accept.
Result
Additional directory has been added to list of your directories:
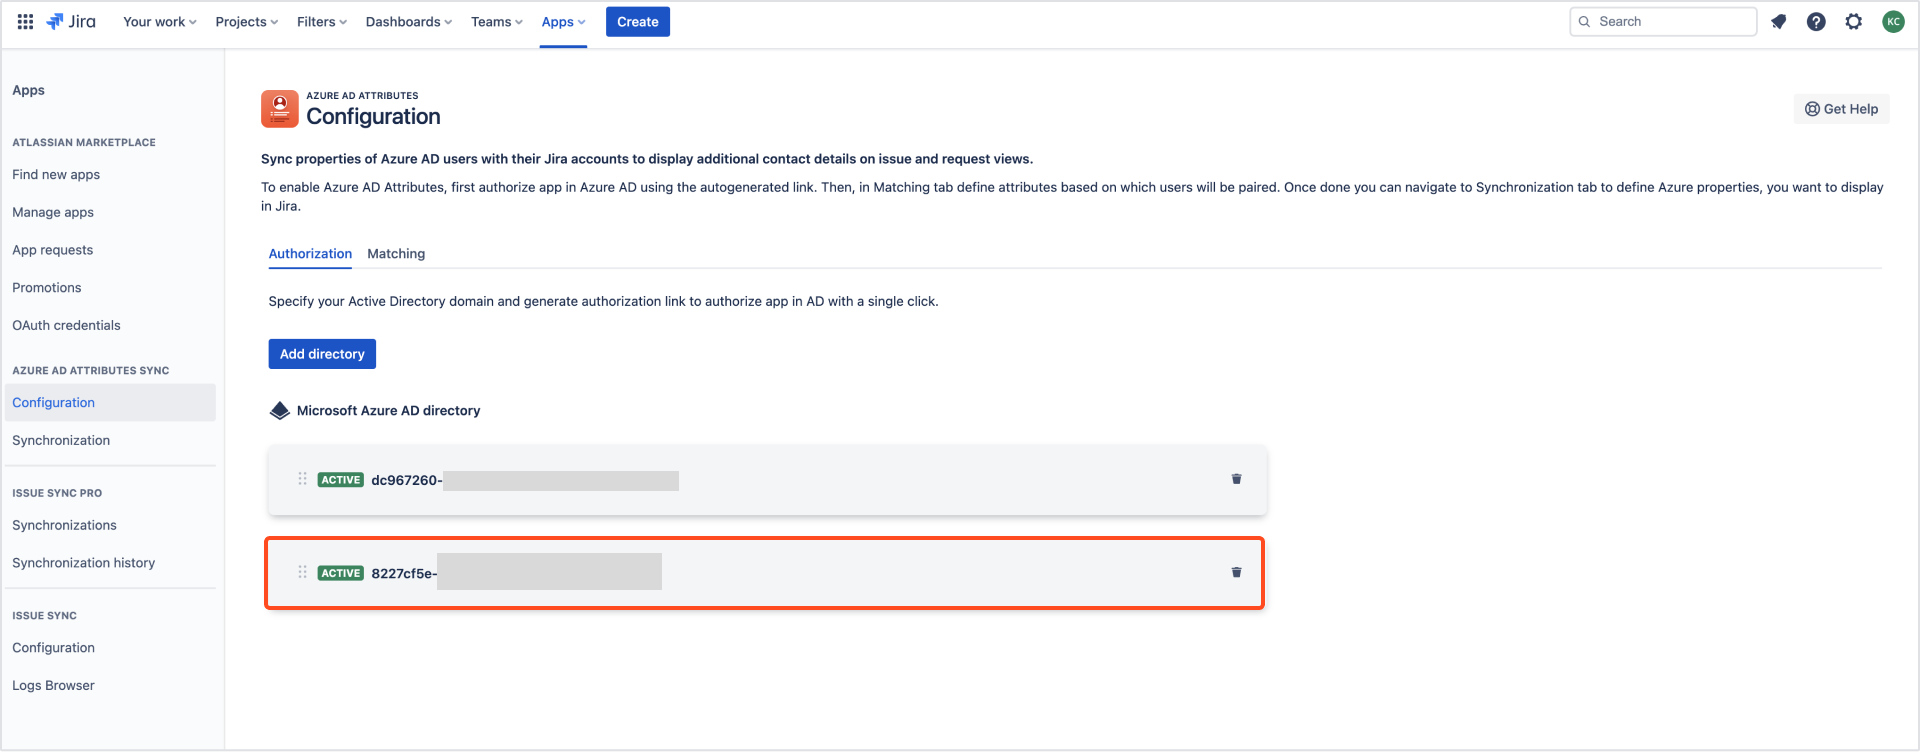
- You can rearrange the order of your directories with the drag and drop functionality
- You can include up to 4 additional directories. After exceeding the limit of 5 directories, the Add directory option will become unavailable
Directories panel
Newly added directories will be visible in the directories panel.
There are two distinguishable directory statuses:
- Active - when a directory has been configured properly and the synchronization is running
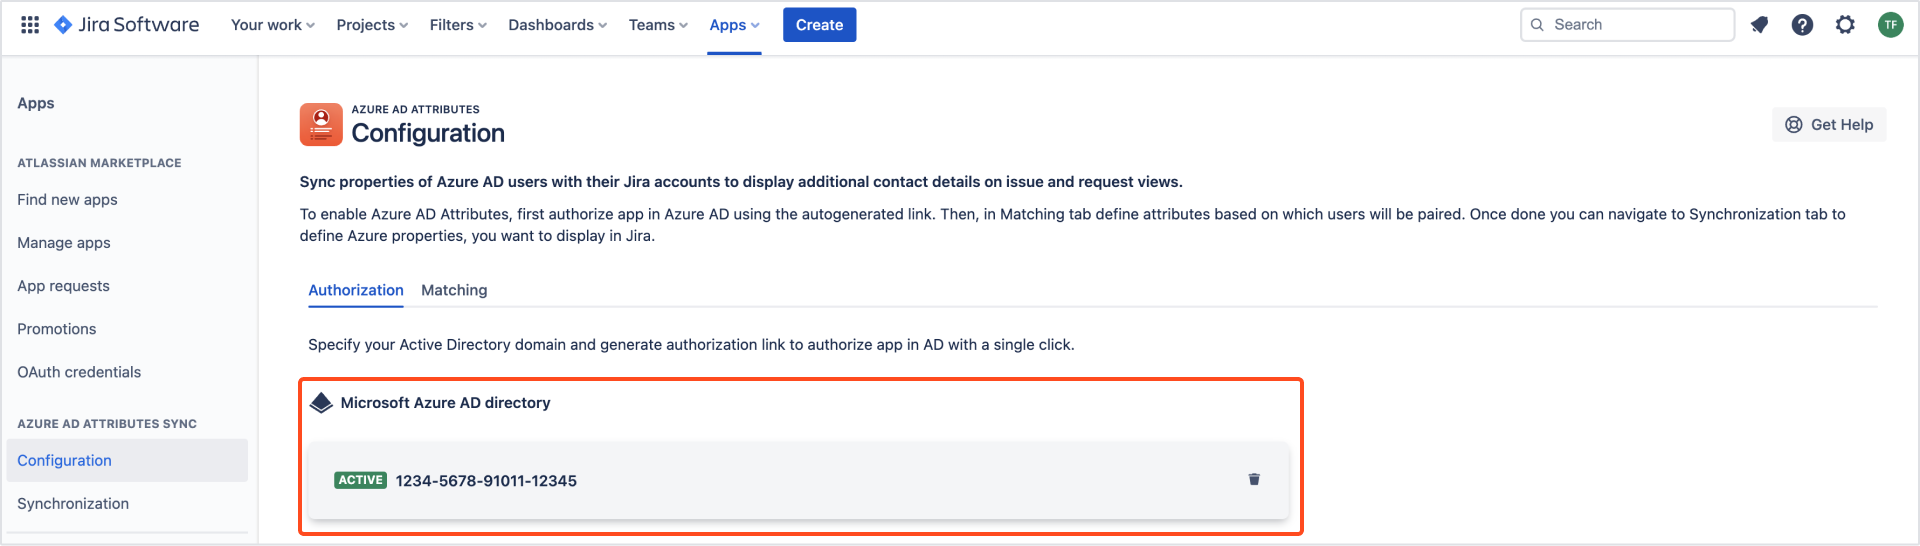
- Inactive - when a user removes app from the Azure instance, or when the user revokes the permission in the Azure instance, or when the Azure admin does not accept the authorization.
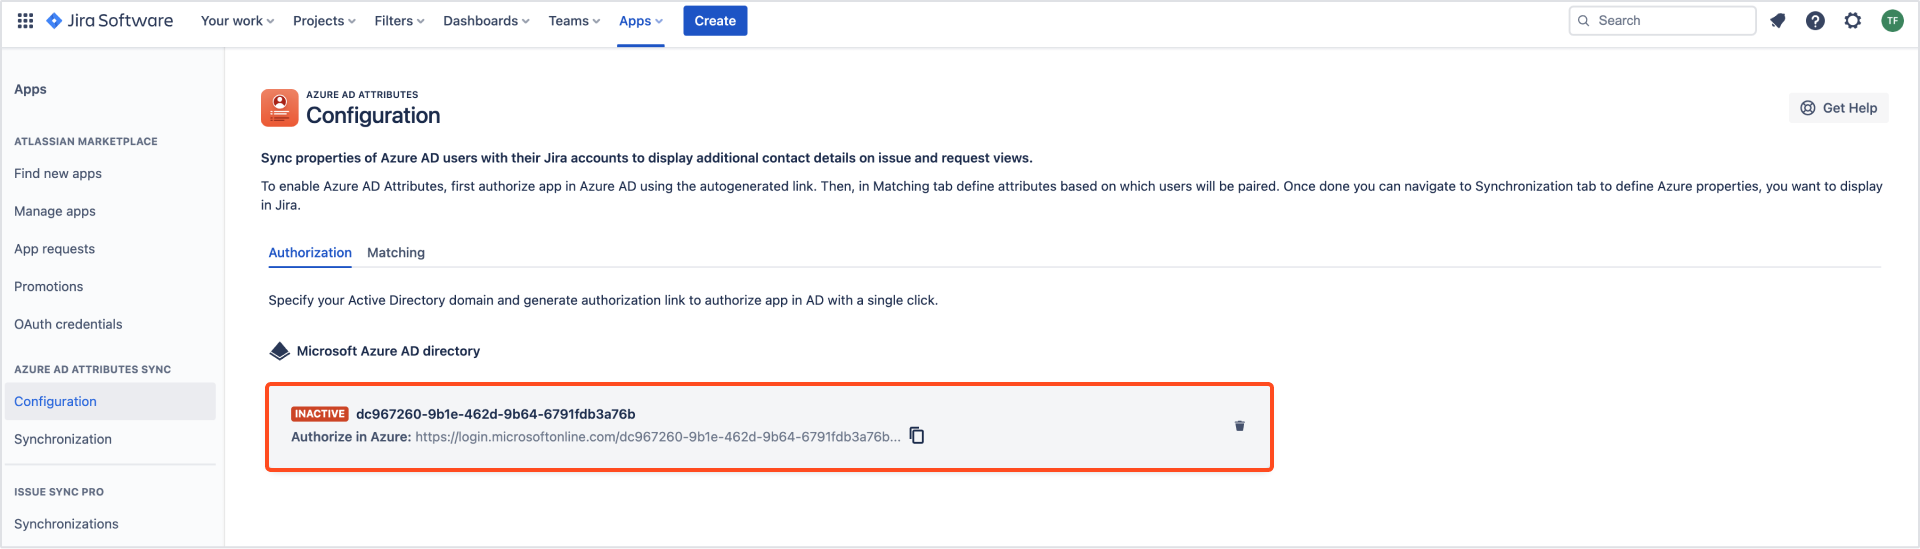
You can troubleshoot the inactivity issue by clicking on the generated link, to authorize app in the Azure AD again.
Removing directories
Steps
- In Jira, navigate to Jira settings > Apps.
- In the Azure AD Attributes section, click Configuration.
- Click on the bin icon next to the directory you wish to remove.
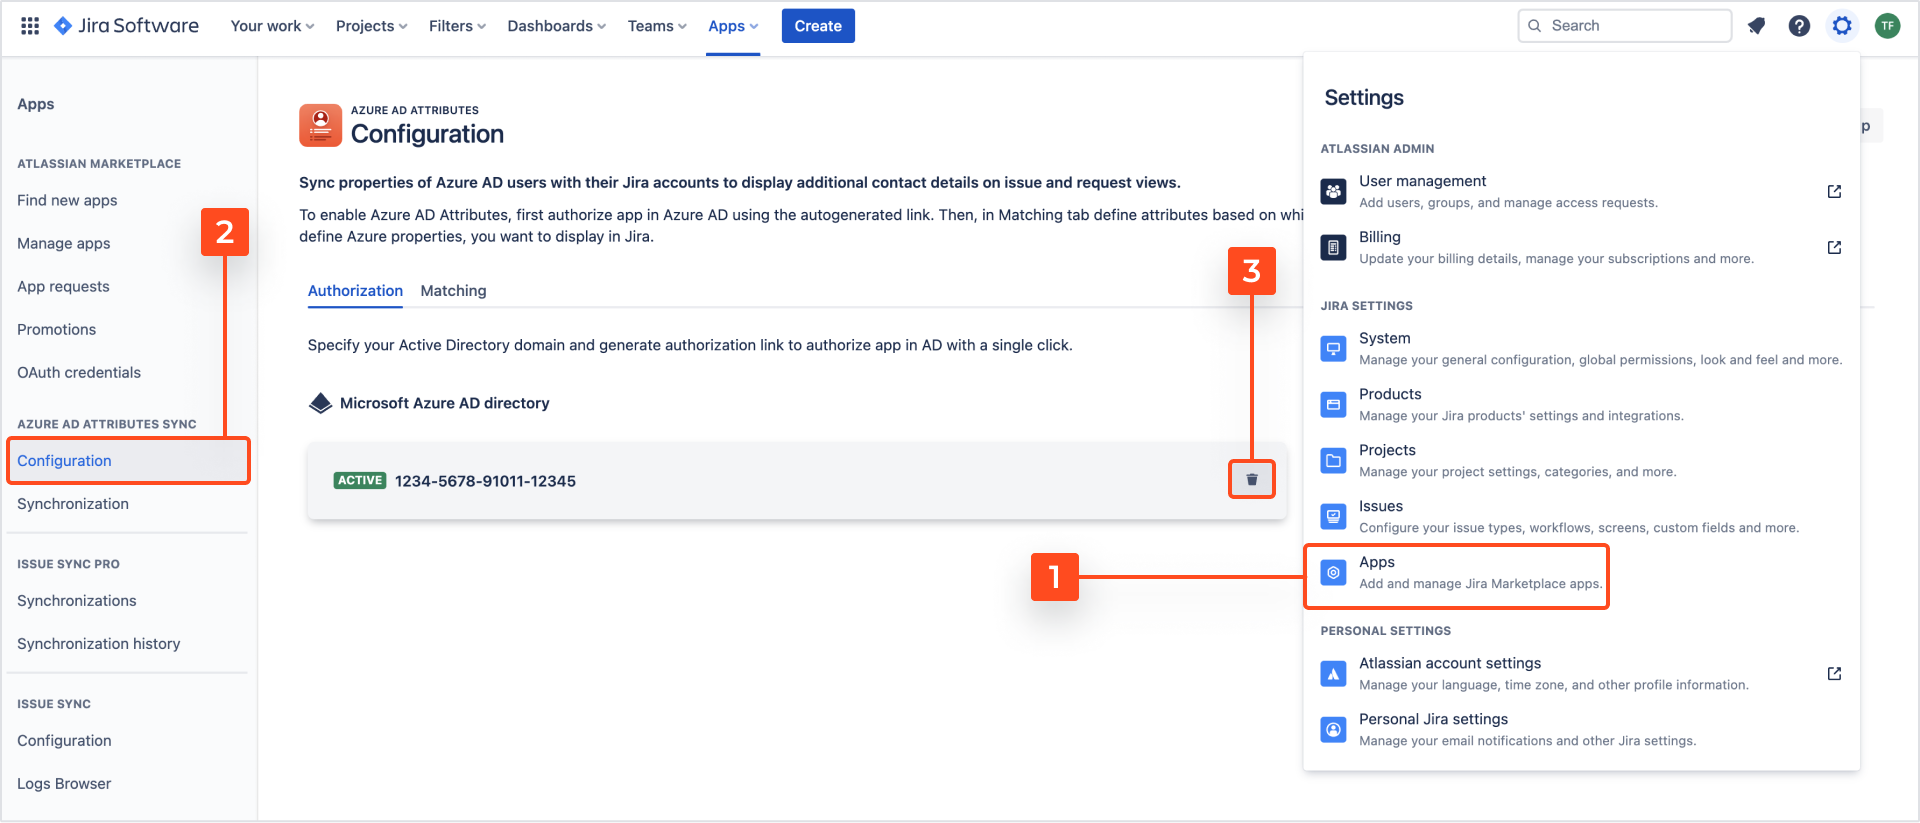
- Click Delete on the confirmation screen.
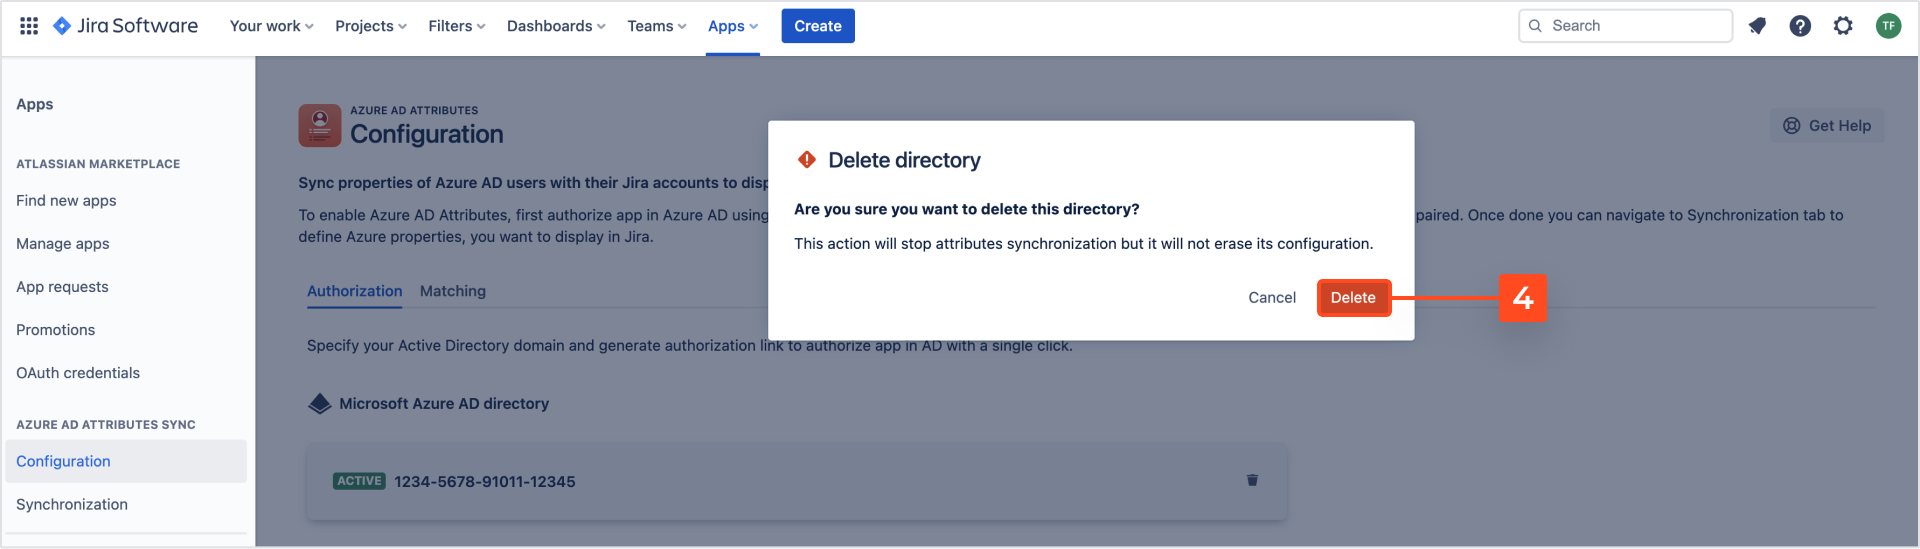
Results
The directory has been removed. The synchronization of attributes will be stopped, but its configuration will remain intact.