- Working with synchronized data
- Presenting synchronized data
- Hiding attributes based on group memberships
- Using synchronized data in workflow
- Using synchronized data in JQL
- Using synchronized data in notification
Configuring connection settings
This page provides information on configuring the connection settings using Active Directory Attributes Sync app. It is required to start synchronization data between Jira and an LDAP server.
Connection contains configuration of a single LDAP server to work with Active Directory Attributes Sync app which fetches data. It is possible to have as many connections as a user wants what allows to synchronize data from many LDAP servers.
Please keep in mind that the synchronization works only in one direction – from Active Directory to Jira. If you want to make changes to the data in your AD, you can use one of our post functions.
We support Okta as a separate directory. It is possible to display additional user attributes through:
- User profile
- Hover profile
- Custom field
Keep in mind, that due to the technical limitations, when using Octa as a directory, the post-functions we provide won’t work.
Prerequisites
Prepare Active Directory related data listed below:
- LDAP server URL - the URL address or host name with the port number of the running Active Directory server, such as ldap://example.com:389.
- Username - used to log in to the Active Directory server, for example: user@domain.name, cn=administrator,cn=users,dc=ad,dc=example,dc=com, or cn=user,dc=domain,dc=name.
- Password - used to log in to the Active Directory server.
Before you start, log in as a user with the Jira Administrators global permission.
Steps
To configure the connection settings:
-
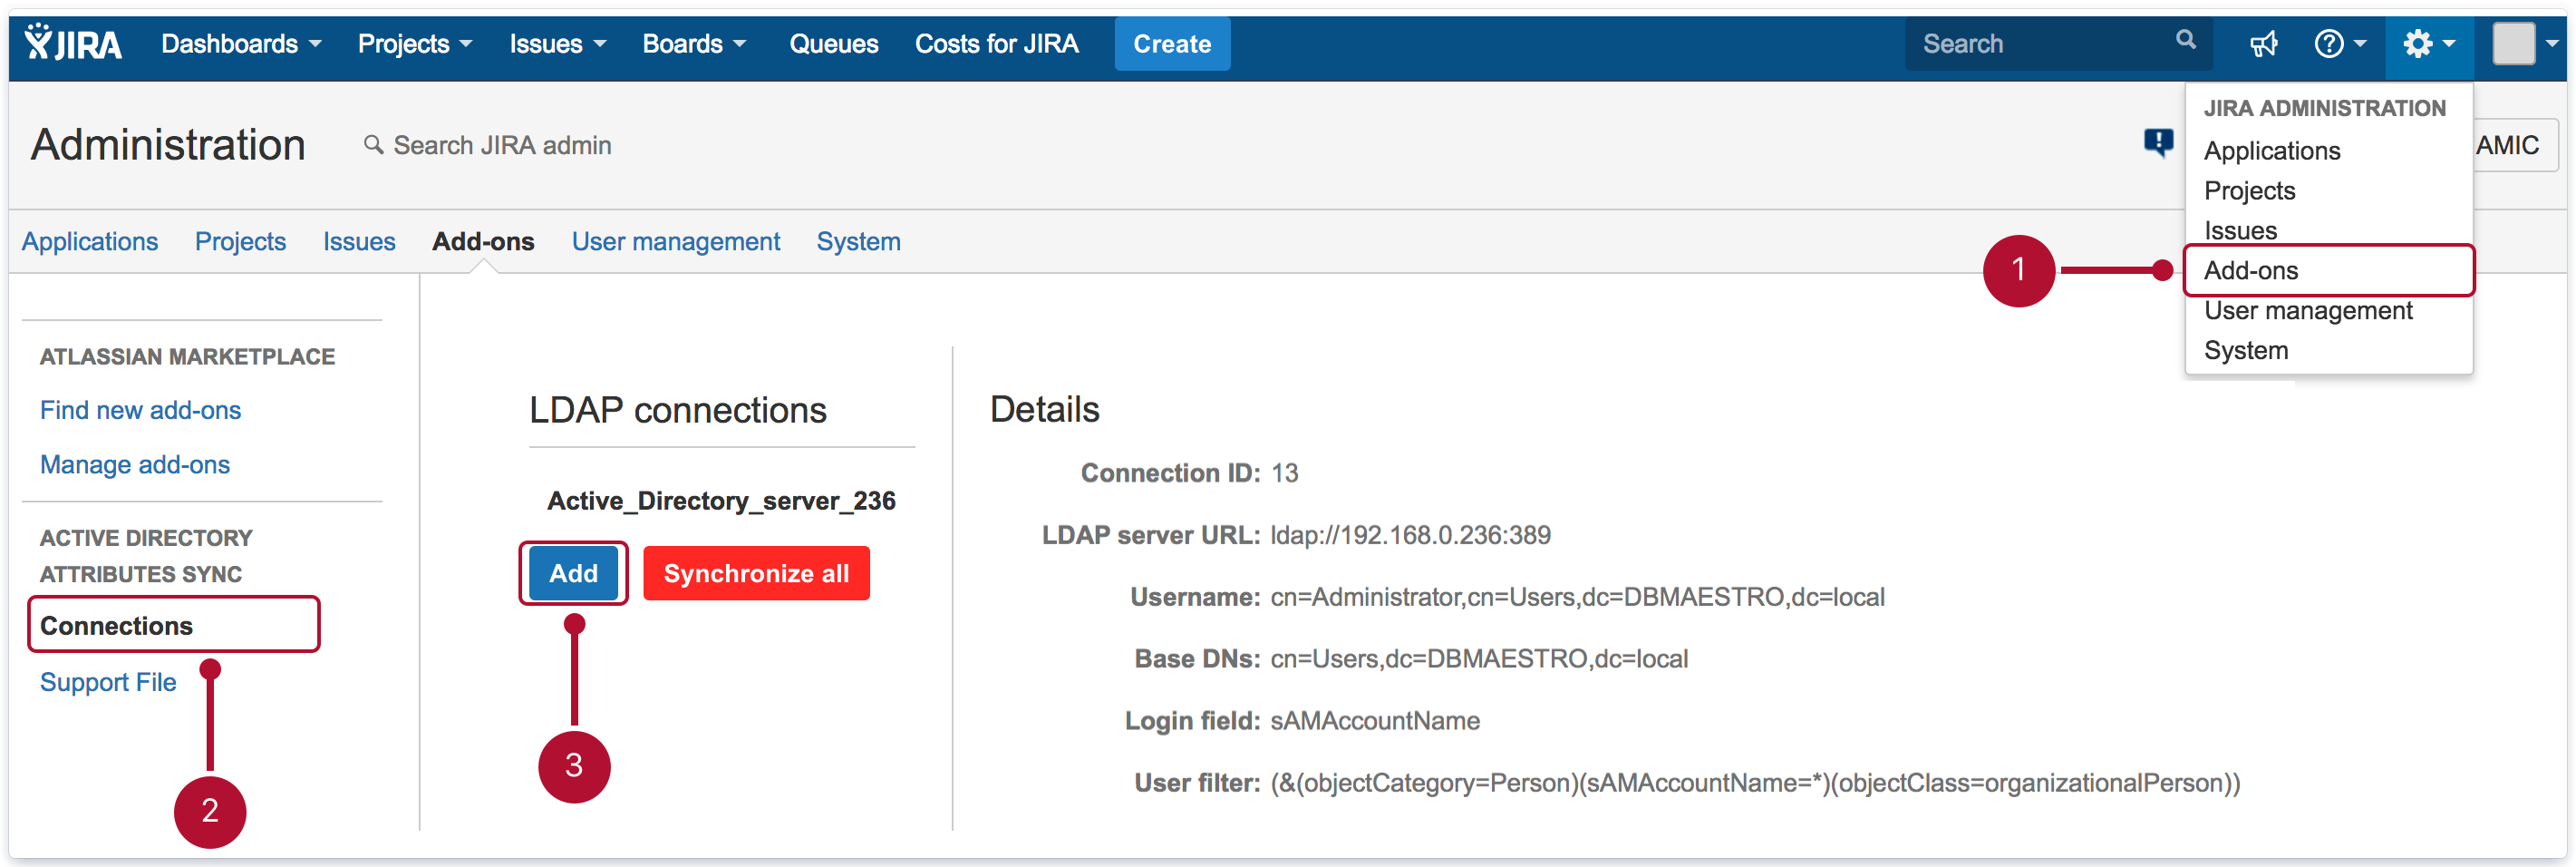
Go to Jira Administration > Add-ons.
-
Select Connections from the menu in the app section.
-
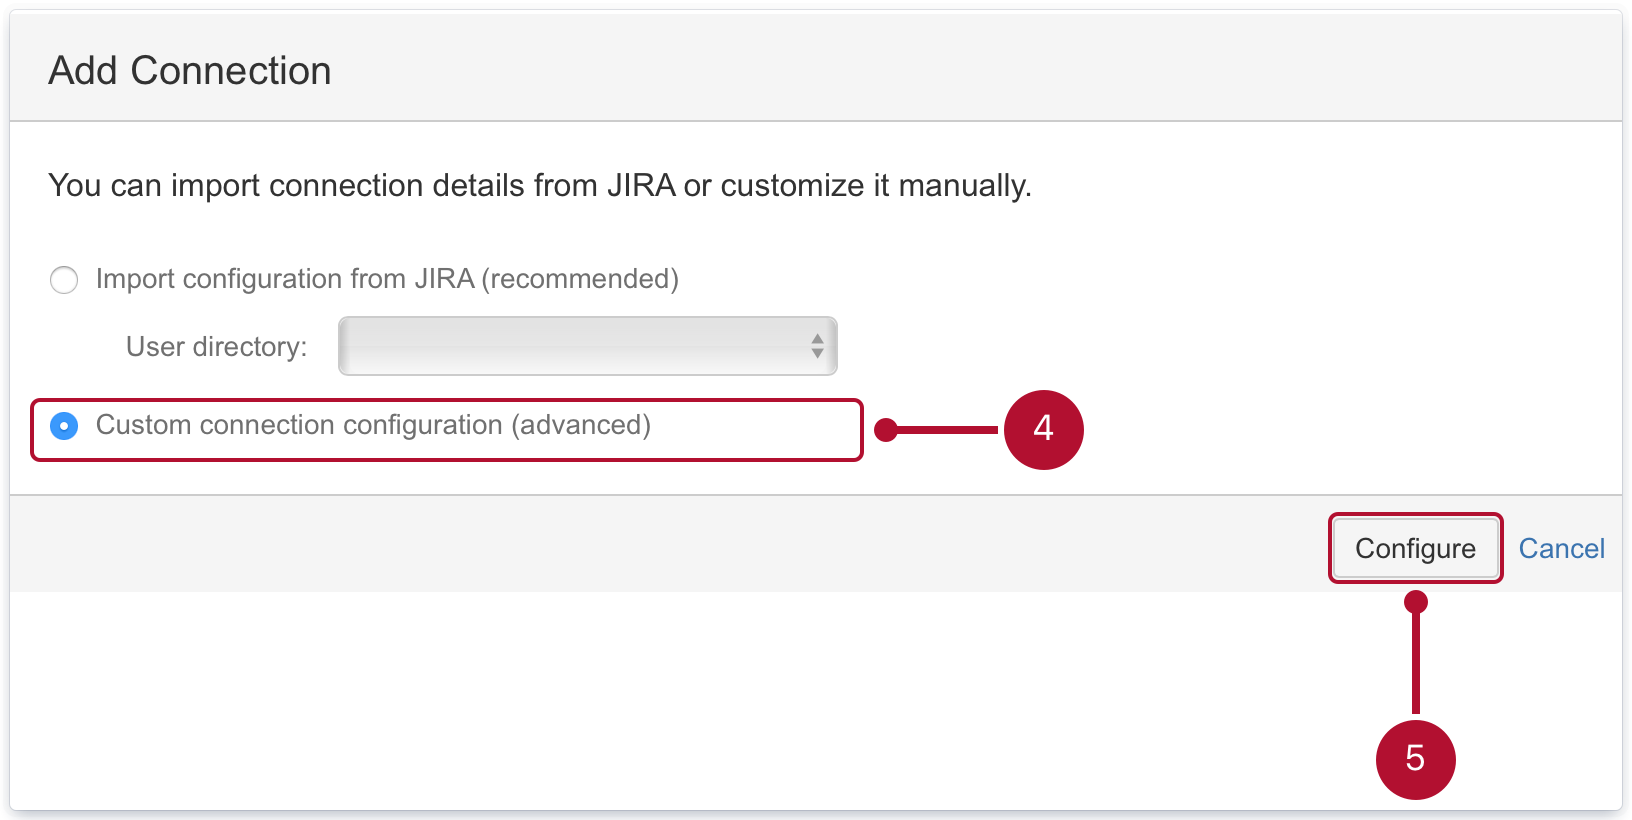
Select between simple and advanced wizard.
- Import configuration from Jira: It is a recommended option. Select User directory, which has been configured in Jira.
- Click Configure.
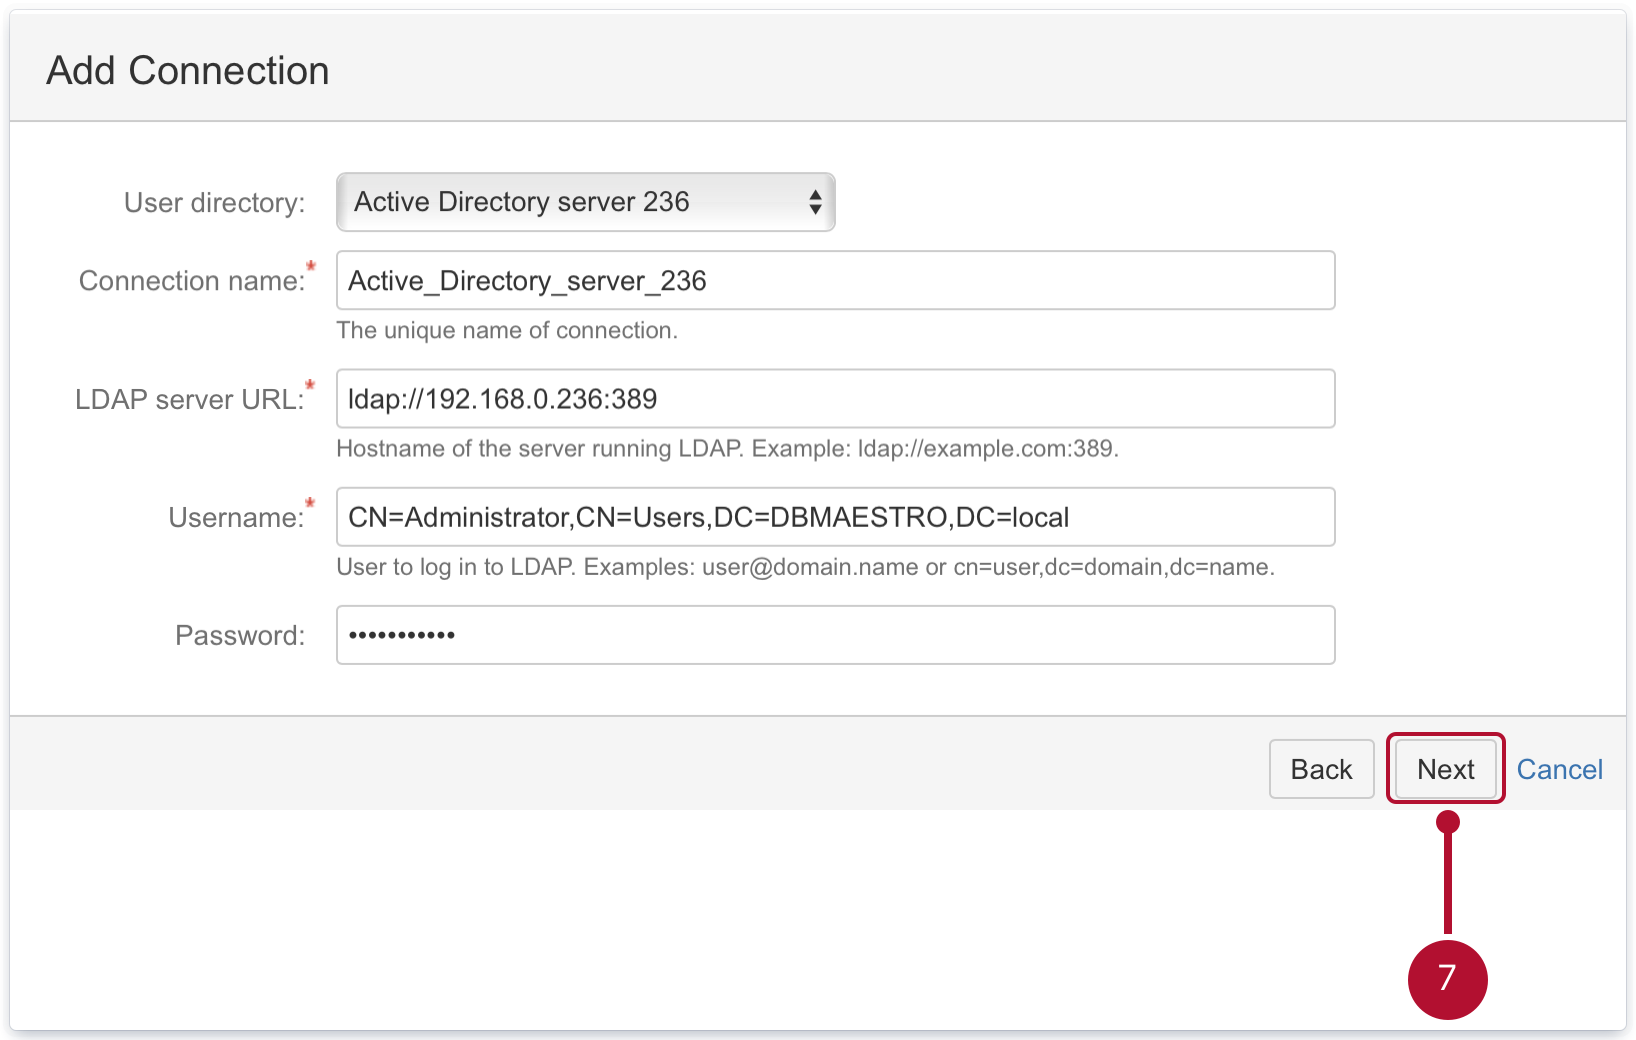
- Configure the following:
- Connection name: Enter a unique name of connection.
- LDAP server URL: Enter LDAP server address.
- Username: Enter username used to log in to the Active Directory server.
- Password: Enter password used to log in to the Active Directory server. It is not a mandatory field.
-
Click Next.
-
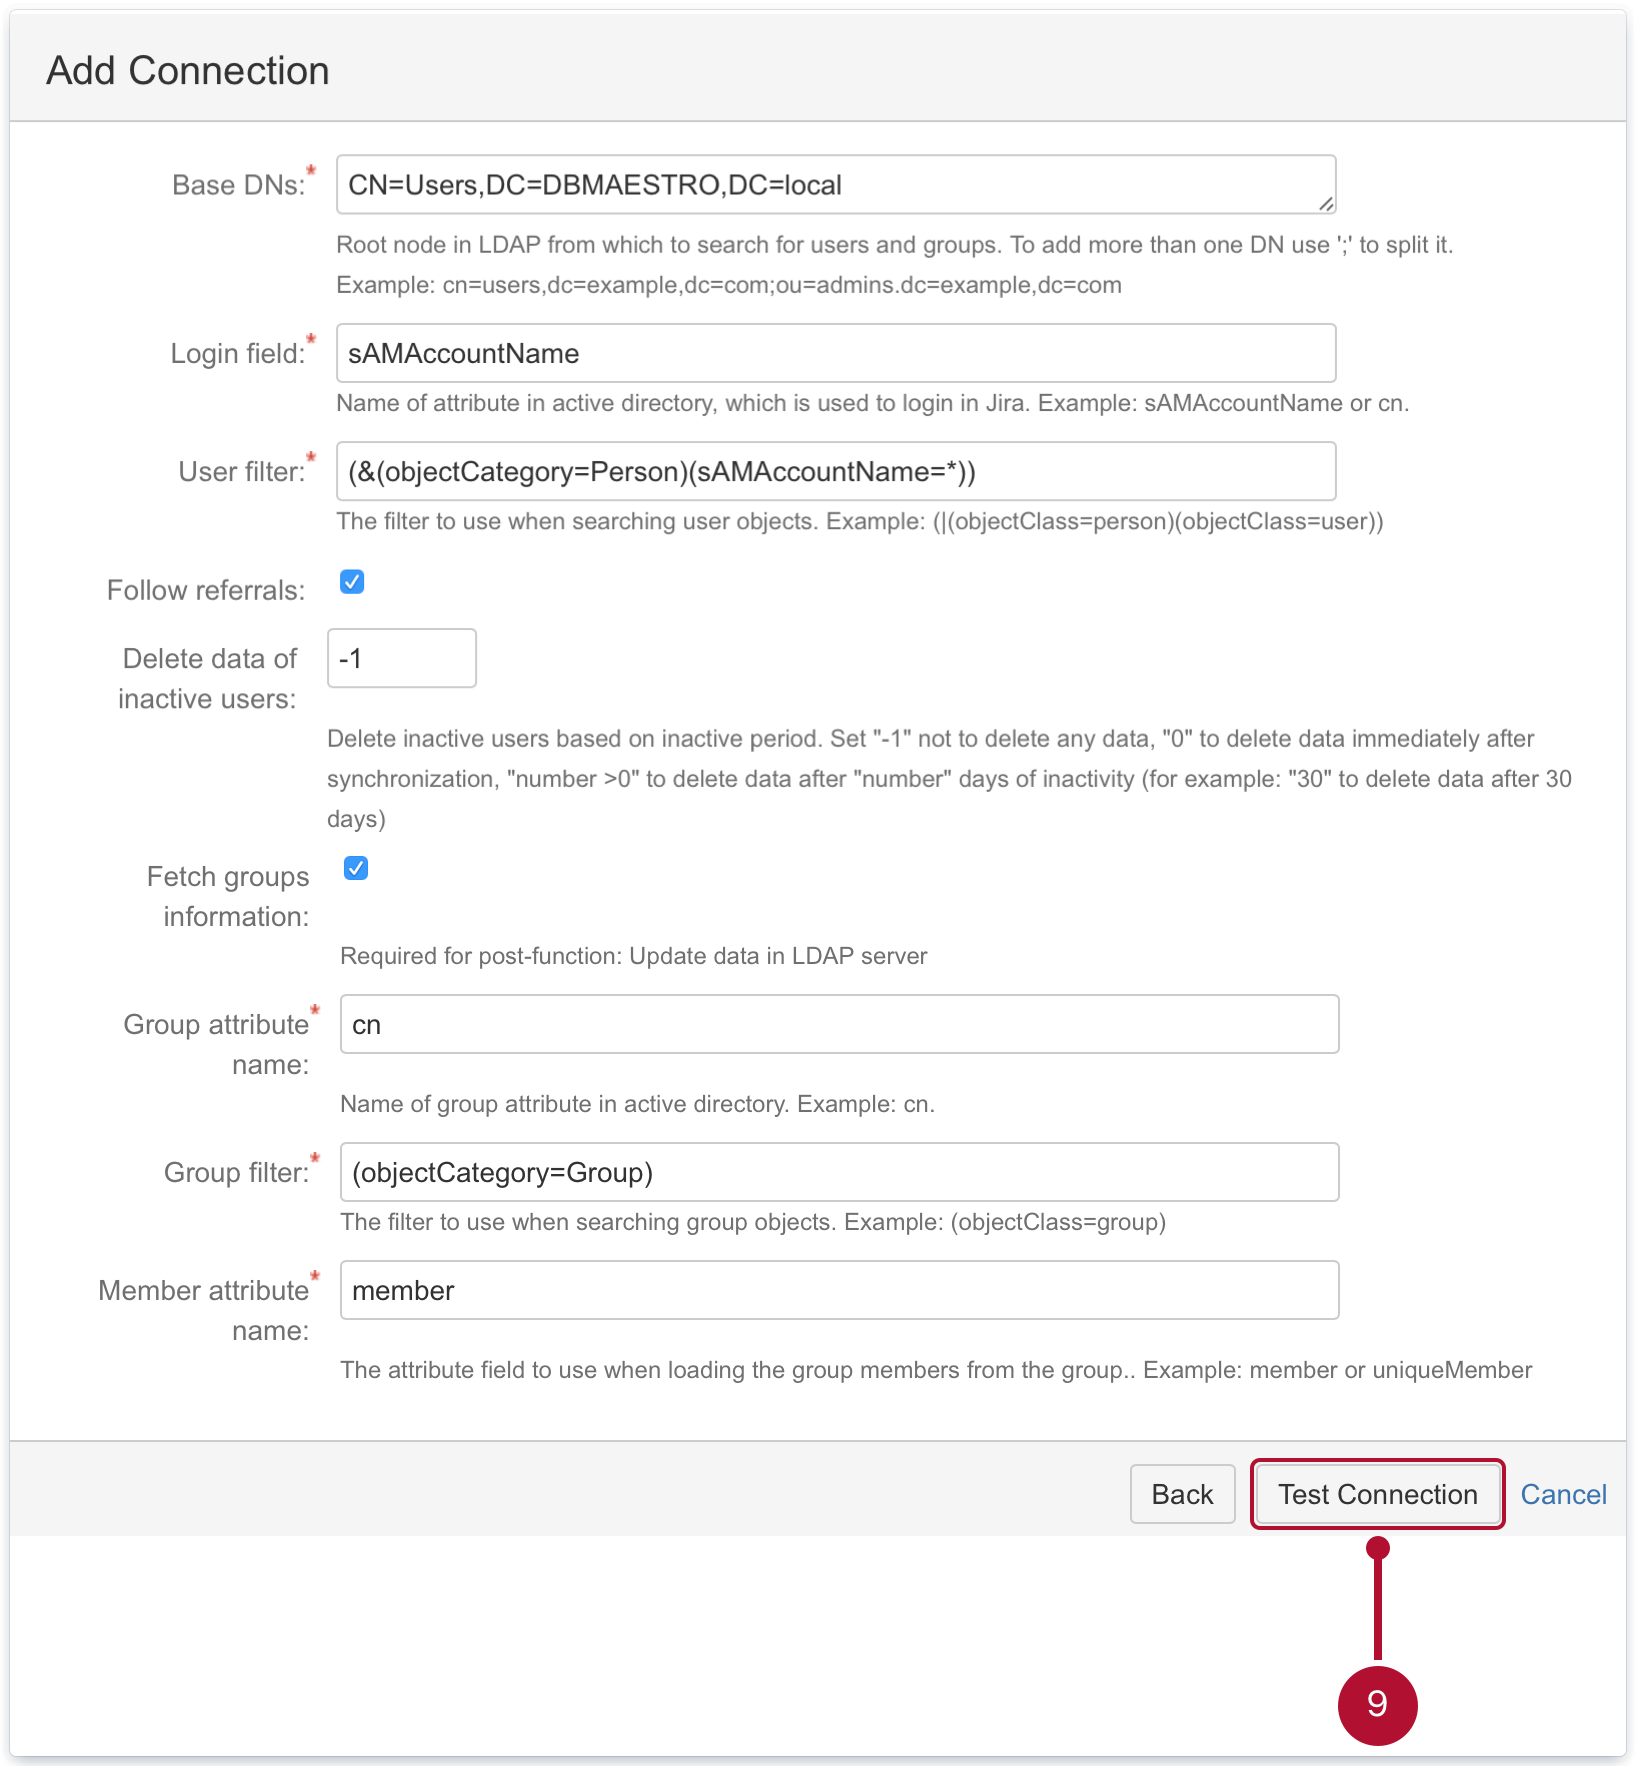
Define where app should look for users object:
- Base DNs: Enter node in Active Directory which allows to search for users and groups. To add more than one DN, use semicolon (;). For example: cn=users,dc=example,dc=com;ou=admins.dc=example,dc=com.
- Login field: Enter name of an attribute in Active Directory which is used to log in to Jira. For example: sAMAccountName or cn.
- User filter: Enter the filter to use when searching user objects in Active Directory. For example: (|(objectClass=person)(objectClass=user)).
- Follow referrals: Select to follow or clear to ignore any referrals automatically.
- Delete data of inactive users:
Delete all synchronized data of inactive users based on inactive period. Set “-1” not to delete any data, “0” to delete data immediately after synchronization, “number >0” to delete data after “number” days of inactivity (for example: “30” to delete data after 30 days).
- Fetch groups information: Select to fetch information about Active Directory group.
- Group attribute name: Enter name of group attribute in Active Directory which is used to log in to Jira. For example: cn.
- Group filter: Enter the filter to use when searching group objects in Active Directory. For example: (objectClass=group).
- Member attribute name: Enter the attribute field to use when loading the group members from the group in Active Directory. For example: member or uniqueMember.
-
Note
Despite problems with connection, it is possible to continue configuration and save connection.
 Info
InfoFor more information on Active Directory errors, see LDAP Error Codes.
-
Click Next.
-
Select fields to synchronize from Active Directory. Select All fields to synchronize data from all the most popular Active Directory fields.
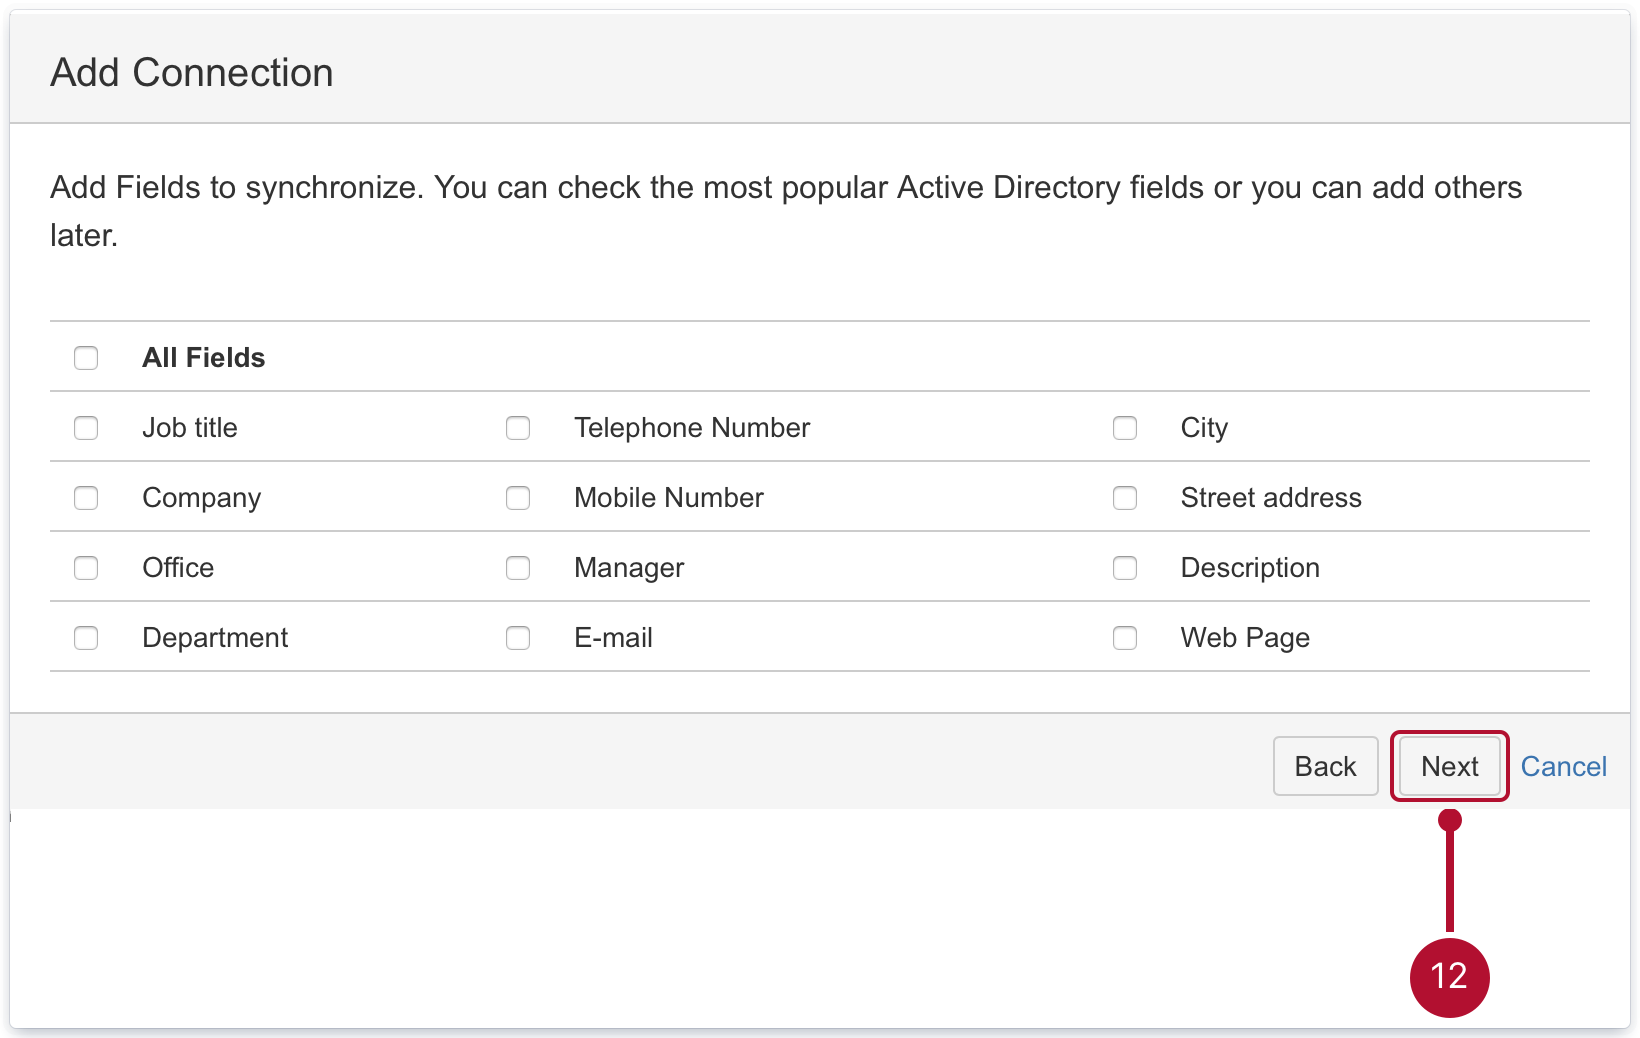 Note
NoteSelecting fields is also possible after setting connection. For more information, see Working with connection.
-
Click Next.
-
Define how often the data should be synchronized:
- Profile title: Enter the title in the User Profile page.
- Periodically synchronize: Select to periodically synchronize data from Active Directory.
- CRON Expression: Set time synchronization with Active Directory. The period between synchronizations cannot be shorter than time of single synchronization.
This option is only available if Periodically synchronize has been selected. For more information on CRON Expression, see CronTrigger Tutorial.
- Enabled: Select to enable connection.
- Synchronize on finish: Select to start synchronization immediately after clicking
- Finish: This option is unavailable if test connection has failed.
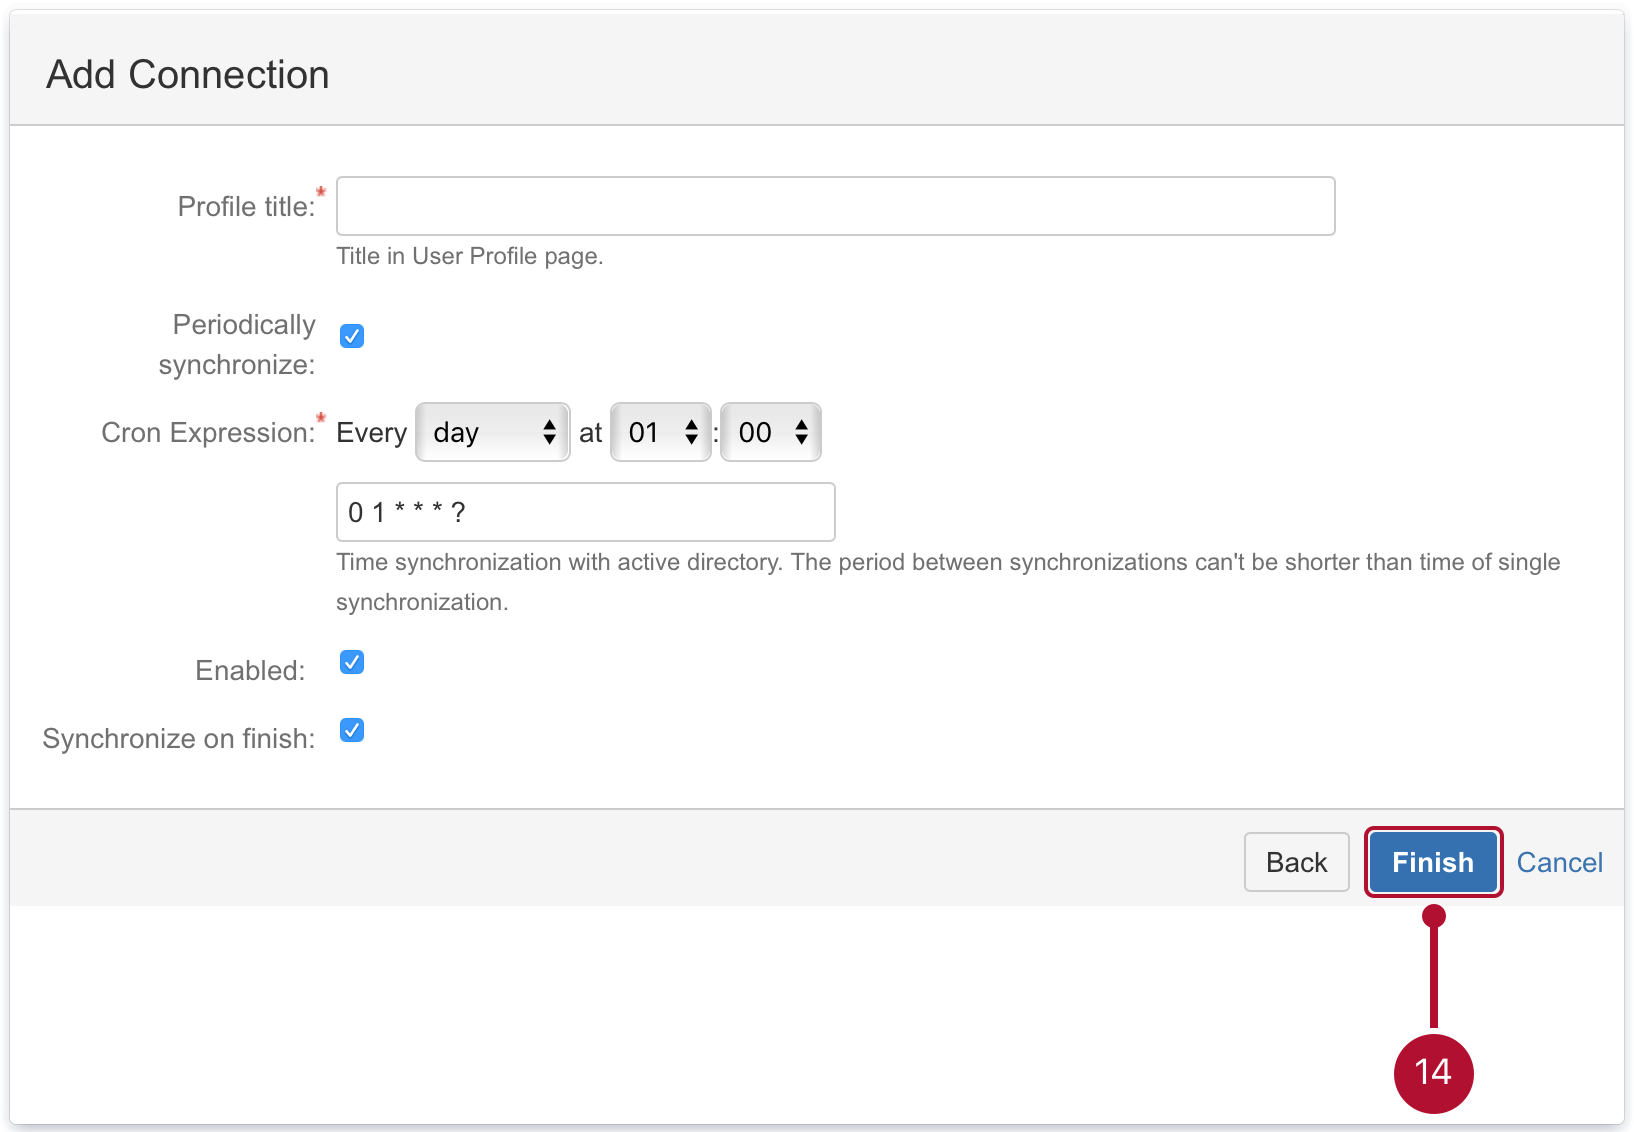
- Click Finish.
Result
New connection is added.
Editing connection
In order to edit your connection settings, go to Global Administration > Manage Apps > Connections > LDAP connections > Details > Edit.
Scroll down to see the descriptions of each option:
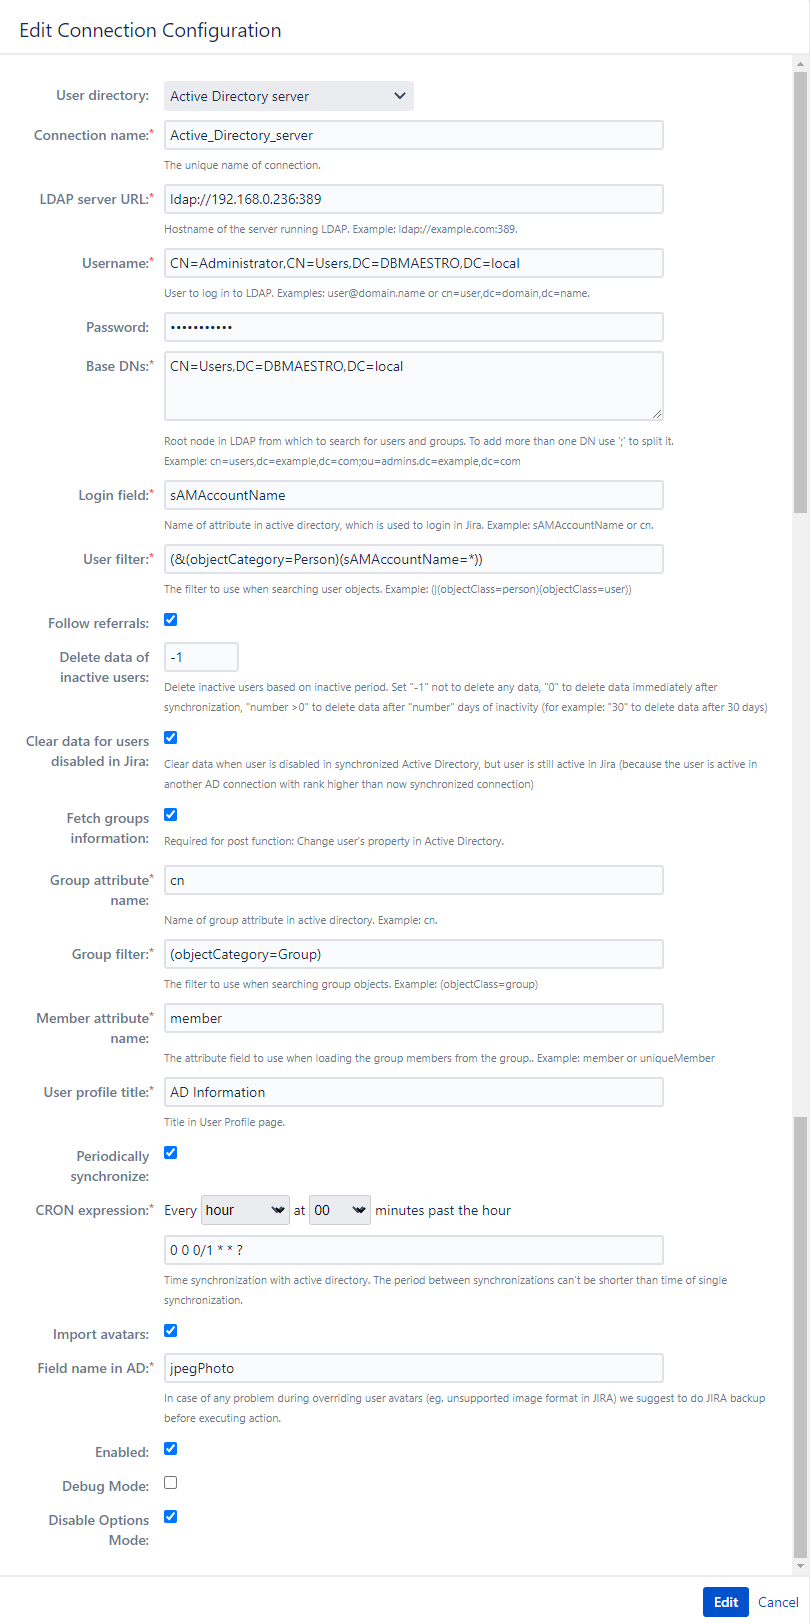
- User directory: You can choose one of the previously configured connections.
- Connection name is inherited from the connection settings of the chosen User directory.
- LDAP server URL is inherited from the connection settings of the chosen User directory.
- Username is inherited from the connection settings of the chosen User directory.
- Password is inherited from the connection settings of the chosen User directory.
- Base DNs is inherited from the connection settings of the chosen User directory.
- Login field is inherited from the connection settings of the chosen User directory.
- User filter is inherited from the connection settings of the chosen User directory.
- Follow referrals: Select to follow any referrals automatically or keep the box unselected to ignore them.
- Delete data of inactive users: Delete all synchronized data of inactive users based on their inactivity period. Set “-1” to skip deleting any data, “0” to delete data immediately after synchronization, “number >0” to delete data after a given “number” of days of inactivity (for example: “30” to delete data after 30 days).
- Clear data for users disabled in Jira: Turn it on if you want to hide information about disabled users. This way, the AD synchronized data won’t be visible on both the user’s profile page and in the Jira issues, upon hovering over the user’s name.
- Fetch groups information: Select to fetch information about the AD group. This checkbox is required for the post function Change user’s property in Active Directory.
- Group attribute name is inherited from the connection settings of the chosen User directory.
- Group filter is inherited from the connection settings of the chosen User directory.
- Member attribute name is inherited from the connection settings of the chosen User directory.
- Profile title: Here you can change the header that appears above the user’s AD information on their profile page.
- Periodically synchronize: Check this box to make sure that the data gets synchronized with AD information with the frequency chosen below.
- CRON Expression: Here you can adjust the synchronization frequency. For more information on CRON Expression, see CronTrigger Tutorial.
- Import avatars: Keep it checked to make sure new avatars (user profile photos) get synchronized with the chosen frequency.
- Field name in AD: Choose the field in your AD where the user’s photos are stored.
- Enabled: Keep it checked to make sure the connection is active.
- Debug mode: Check it if you need to gather more information on your connection’s performance. It is especially useful while troubleshooting any errors - just turn it on and provide us with the error logs. However, this mode might slow down the performance, so consider keeping it unchecked it if you don’t experience any issues.
- Disable options: By default, the options (custom fields for certain AD attributes, like “City” or “Job title”) you’ve chosen for a different connection will disappear after synchronizing a new directory. If you want to combine options for many different connections, uncheck this box. Keep it selected, if you want the old options to be disabled.
If you can’t find the answer you need in our documentation, raise a support request.
