- Introduction
- About
- Get started
- Migration to Cloud
- Bundled Fields
- Overview
- Add Bundled Field
- Bundled Fields Configuration
- Format and validation
- Using Bundled Fields
- Advanced settings
- Bundled Fields Searcher
- Java API (ScriptRunner)
- Data Sources
- Email notifications
- Bundled Fields v.6.8.x - 6.9.x
- Bundled Fields v.6.7.x
- Dynamic Forms
- Dynamic Forms
- Supported fields
- Visibility
- Request Types visibility
- Fields visibility
- Customer Portal visibility
- Options visibility
- Requirements visibility
- SLAs visibility
- Java API
- Multilevel Structure
- Configuration
- Using a multilevel structure on the Customer Portal
- User Synchronization
- Organizations and Groups Synchronization
- Issue View
- Issue View
- Add user's IP address post function
- Restart SLA post function
- Update SLA to date post function
- Customer Portal
- Links
- Export list
- Split column
- Request details view
- Additional fields
- Additional options
- Compatibility
- Configuration Manager
Adding a data source
Learn how to configure a data source
To better understand how Data Sources work, let’s use data from Jira itself - an example everyone is most familiar with. In the following configuration we’ll retrieve the issue summary, status, and assignee using Jira REST API. Then, we’ll display the values in Bundled Fields’ subfields.
Get started
Steps
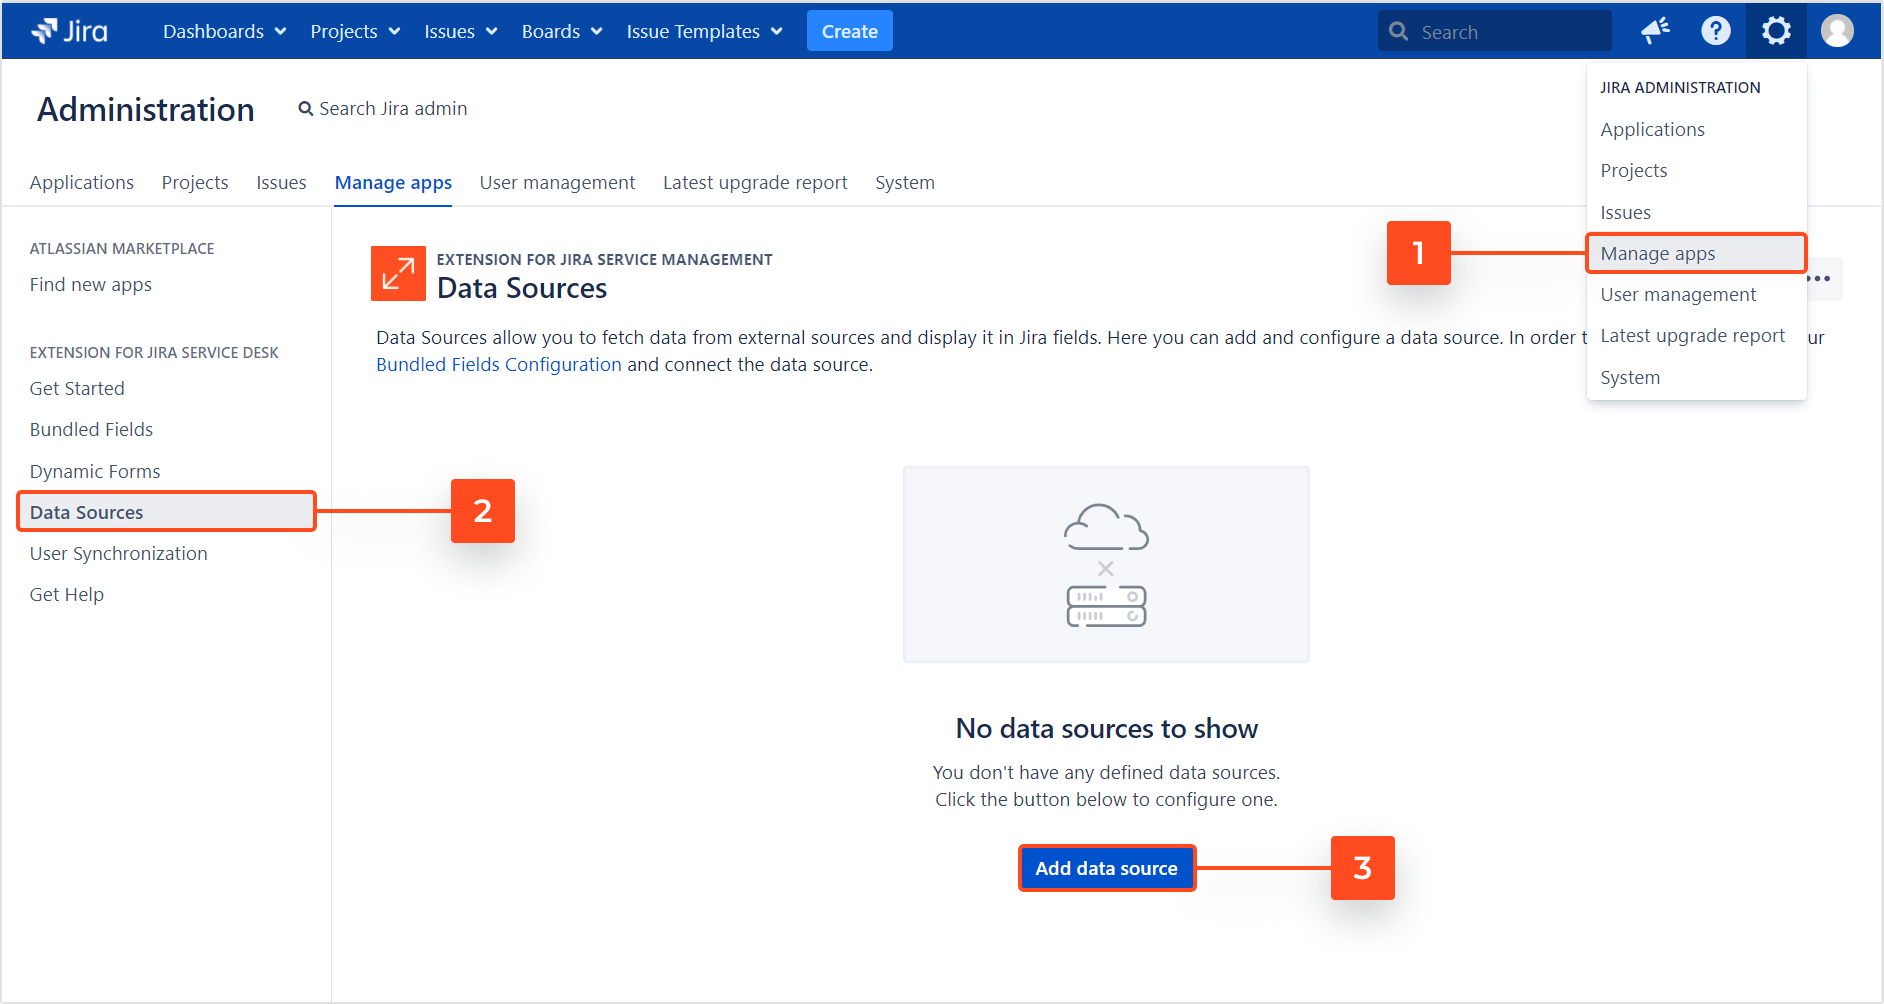
- Go to Jira Administration > Manage apps.
- Select Data Sources from the Extension for Jira Service Desk app navigation.
- Click Add data source.
Result
The Data Sources Configuration wizard opens.
Configuration
On this screen you’ll define the basic details of your data source.
Steps
-
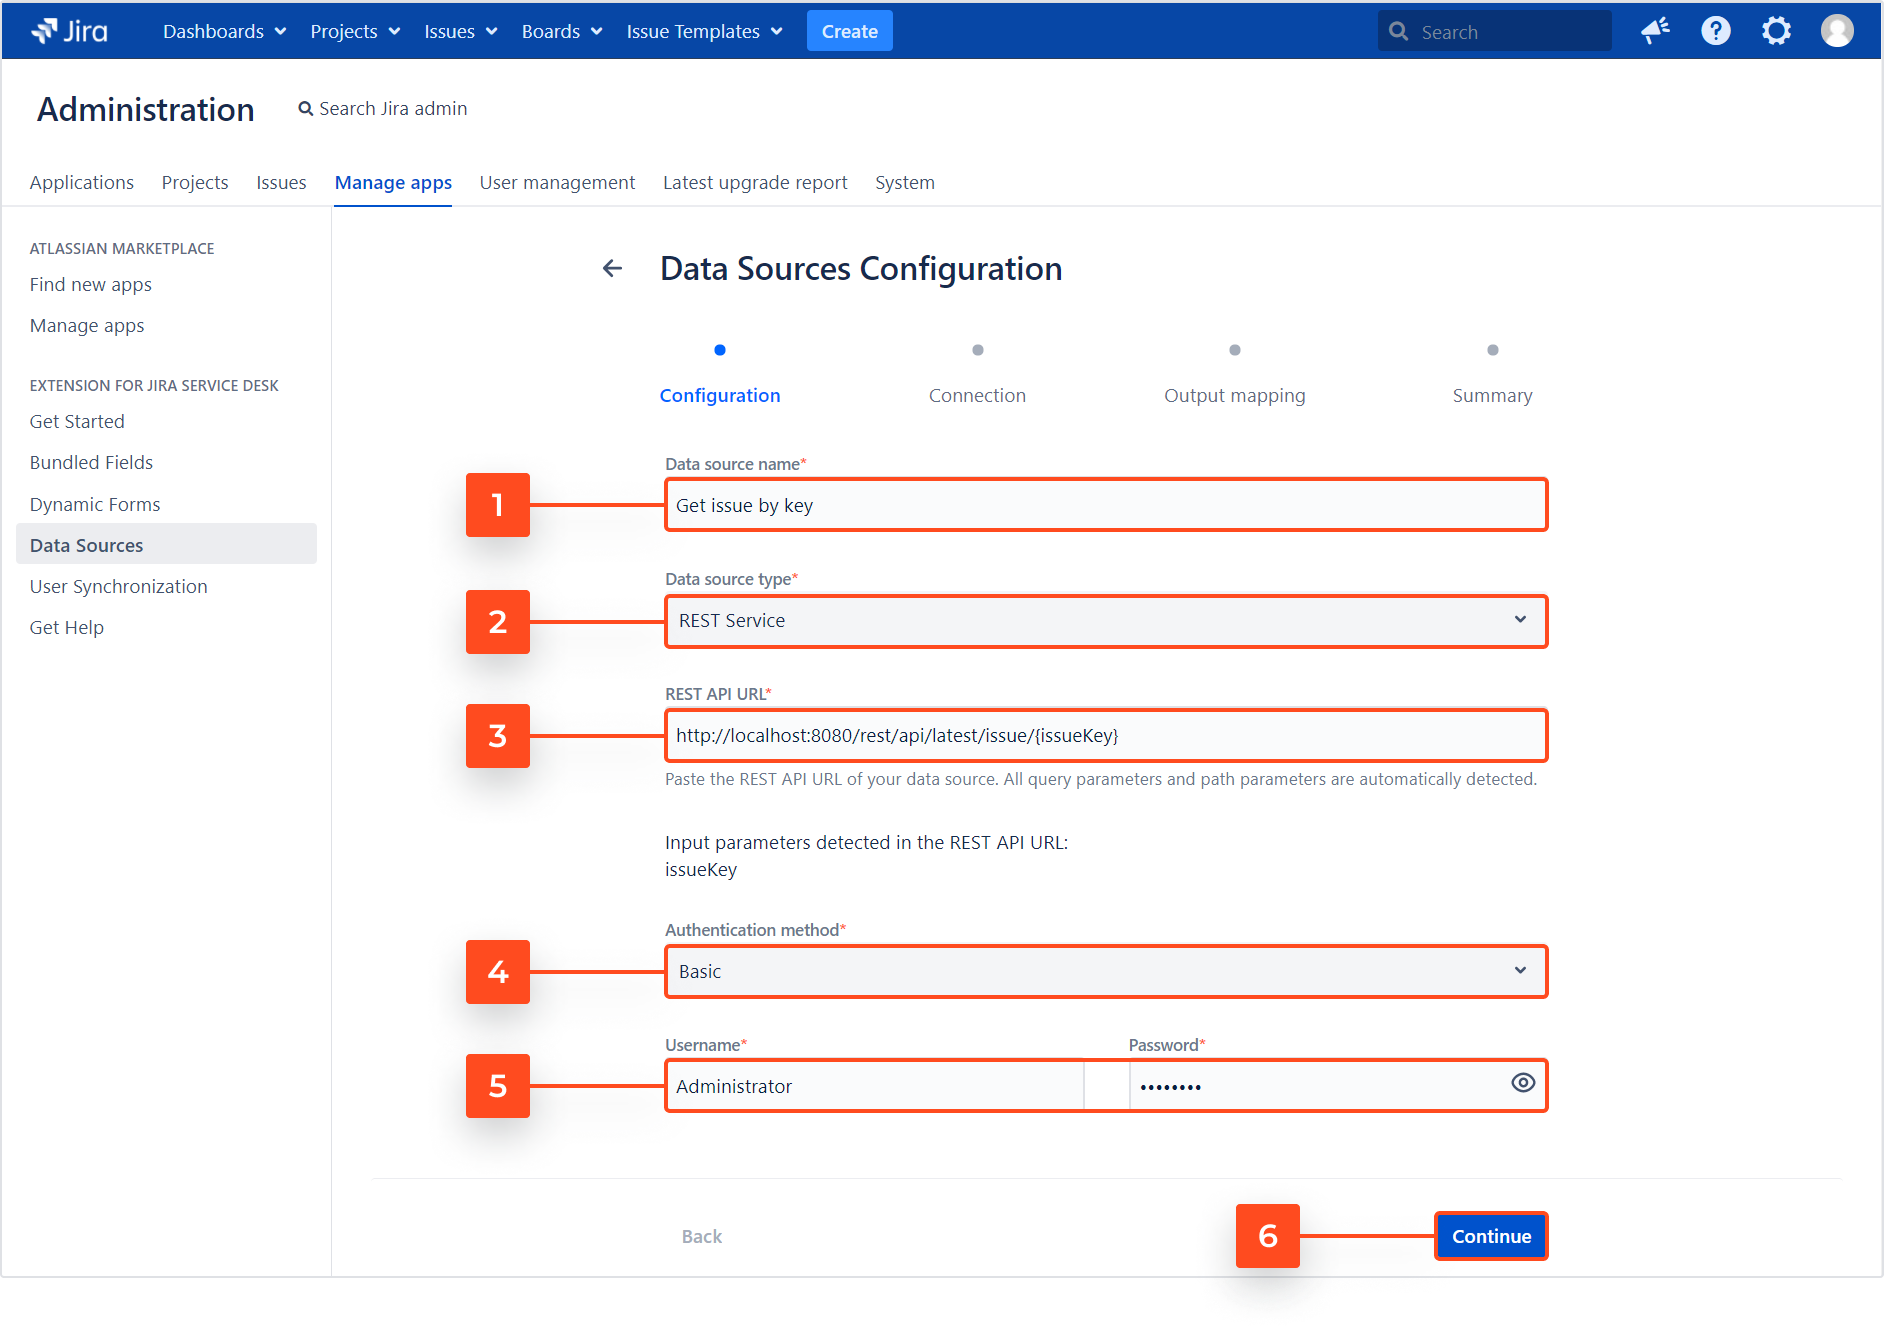
Add a Data source name. It will be displayed:
- in the Data Sources list
- while connecting this data source in the Bundled Fields Configuration
-
Choose the Data source type according to the format of your data source.
- Currently we support only REST Services.
-
Paste the REST API URL of your data source.
NoteIf you’d like to configure your Rest API URL to use changing parameters, put the parameters in curly quotes. Examples:
Path parameter
https://jsonplaceholder.typicode.com/users/{param}Query parameter
http://universities.hipolabs.com/search?name={param1}&country={param2} -
Select the Authentication method:
- No Auth
- Basic (authorization with a username and password)
- If you selected Basic, provide your login credentials.
- Click Continue.
Result
The Connection configuration screen opens.
Test connection
Now it’s time to test the connection to your external data. Depending on whether your REST API URL includes additional parameters, you have two options for testing the connection:
- No additional parameters
- Additional parameters in the URL
No additional parameters
Steps
- Click Test connection.
- After receiving a confirmation that the connection has been established, click Save connection.

Additional parameters in the URL
If you provided a URL with additional parameters, the app will display a list of them to verify their values.
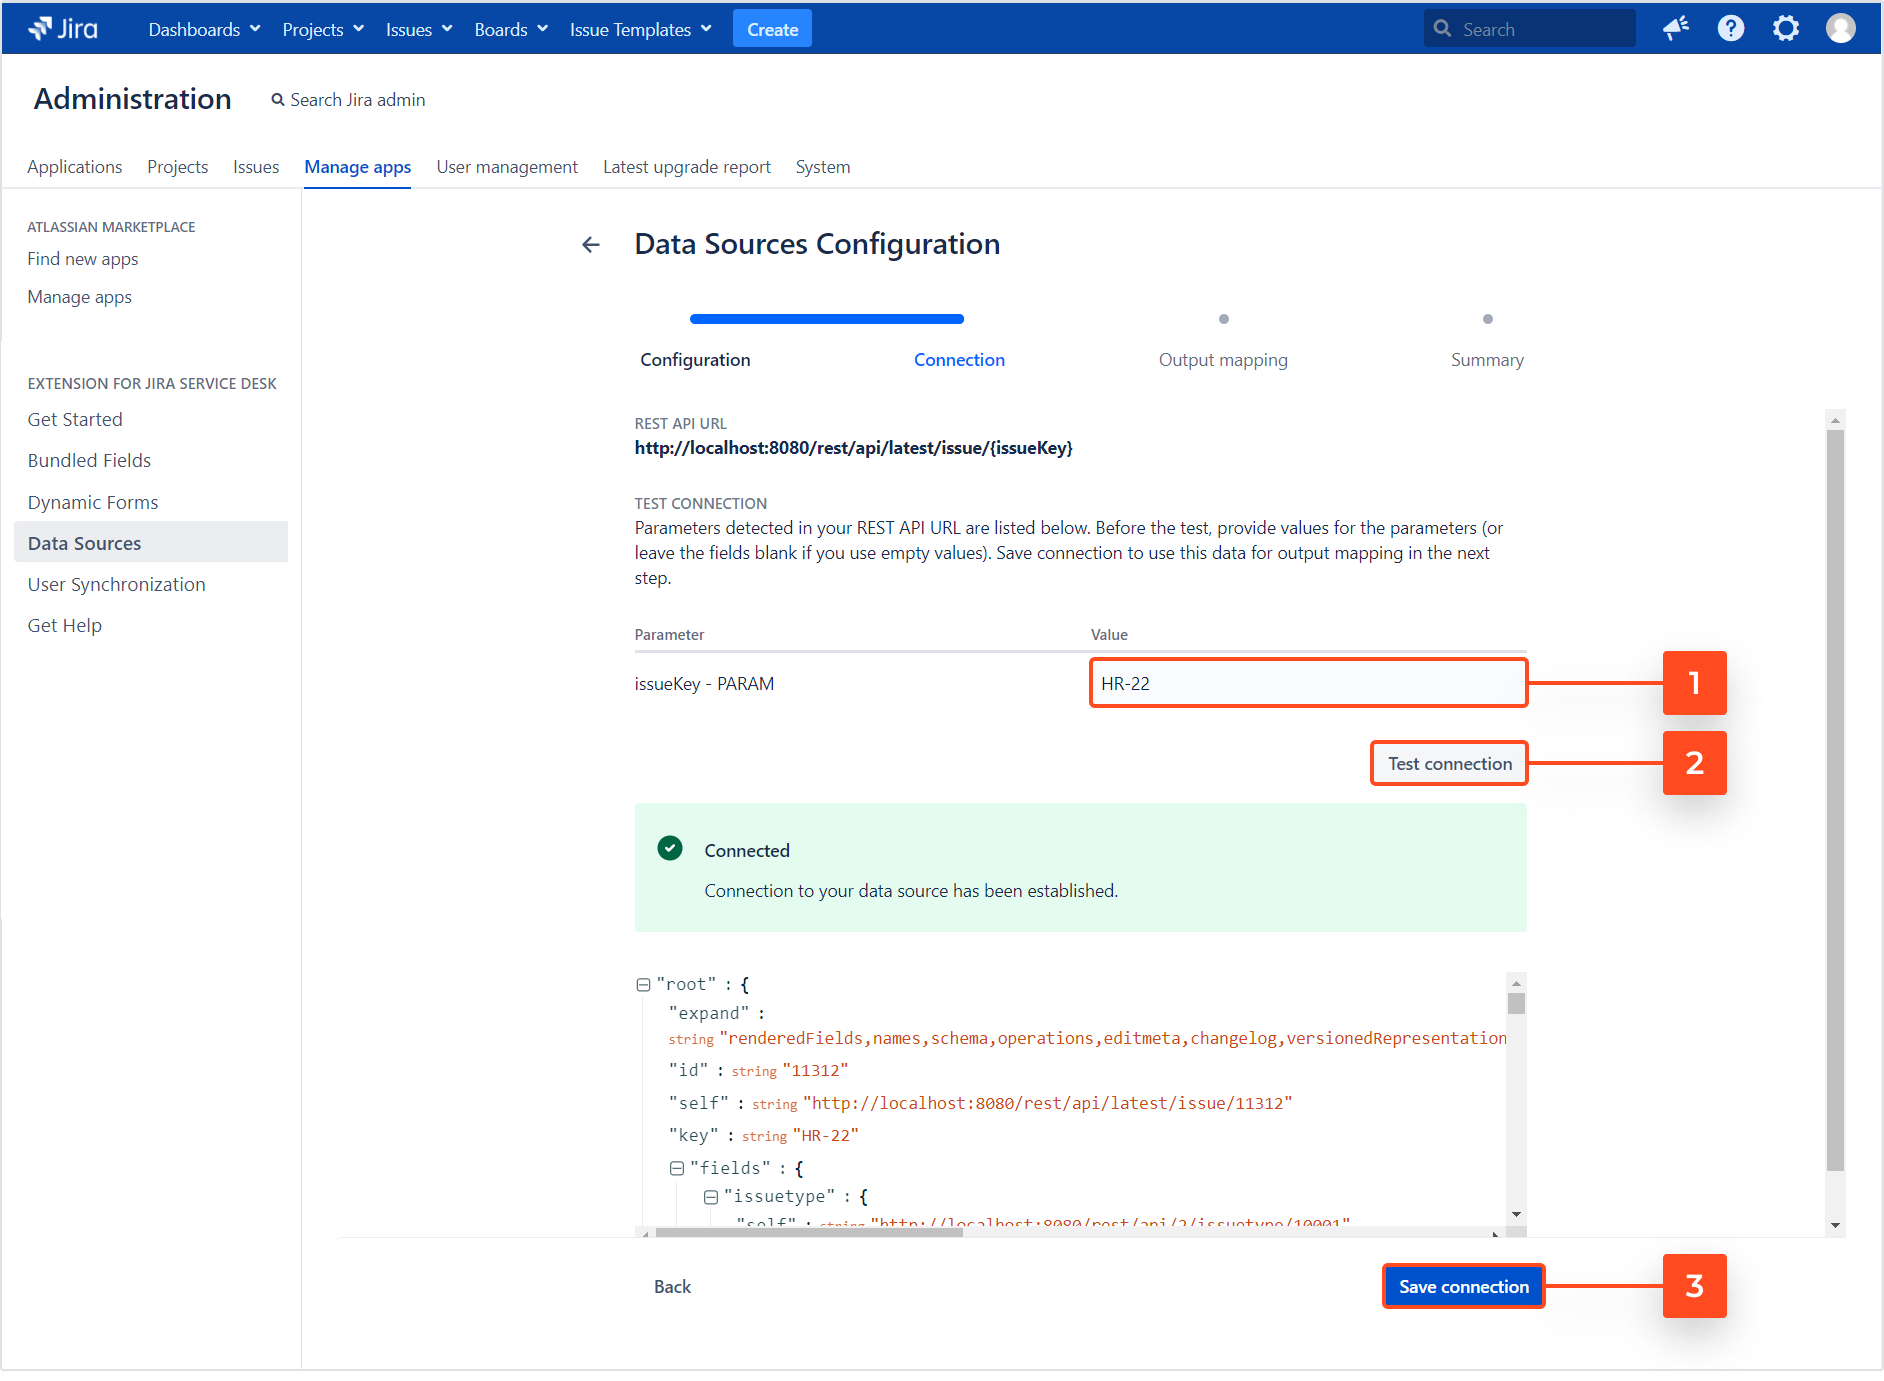
If you’d like to display chosen values of specific Jira issues, you may use the issueKey parameter in your URL. At this point you will be asked to provide a valid issue key as a value. This will cover two necessary steps:
- testing if the URL path you provided is correct
- fetching the data that will be used later for mapping parameters of your data source to Bundled Fields’ subfields
Steps
- Provide values for the parameters.
- Click Test connection.
- After receiving a confirmation that the connection has been established, click Save connection.
Result
You progress to the next configuration step - the Output mapping.
Output mapping
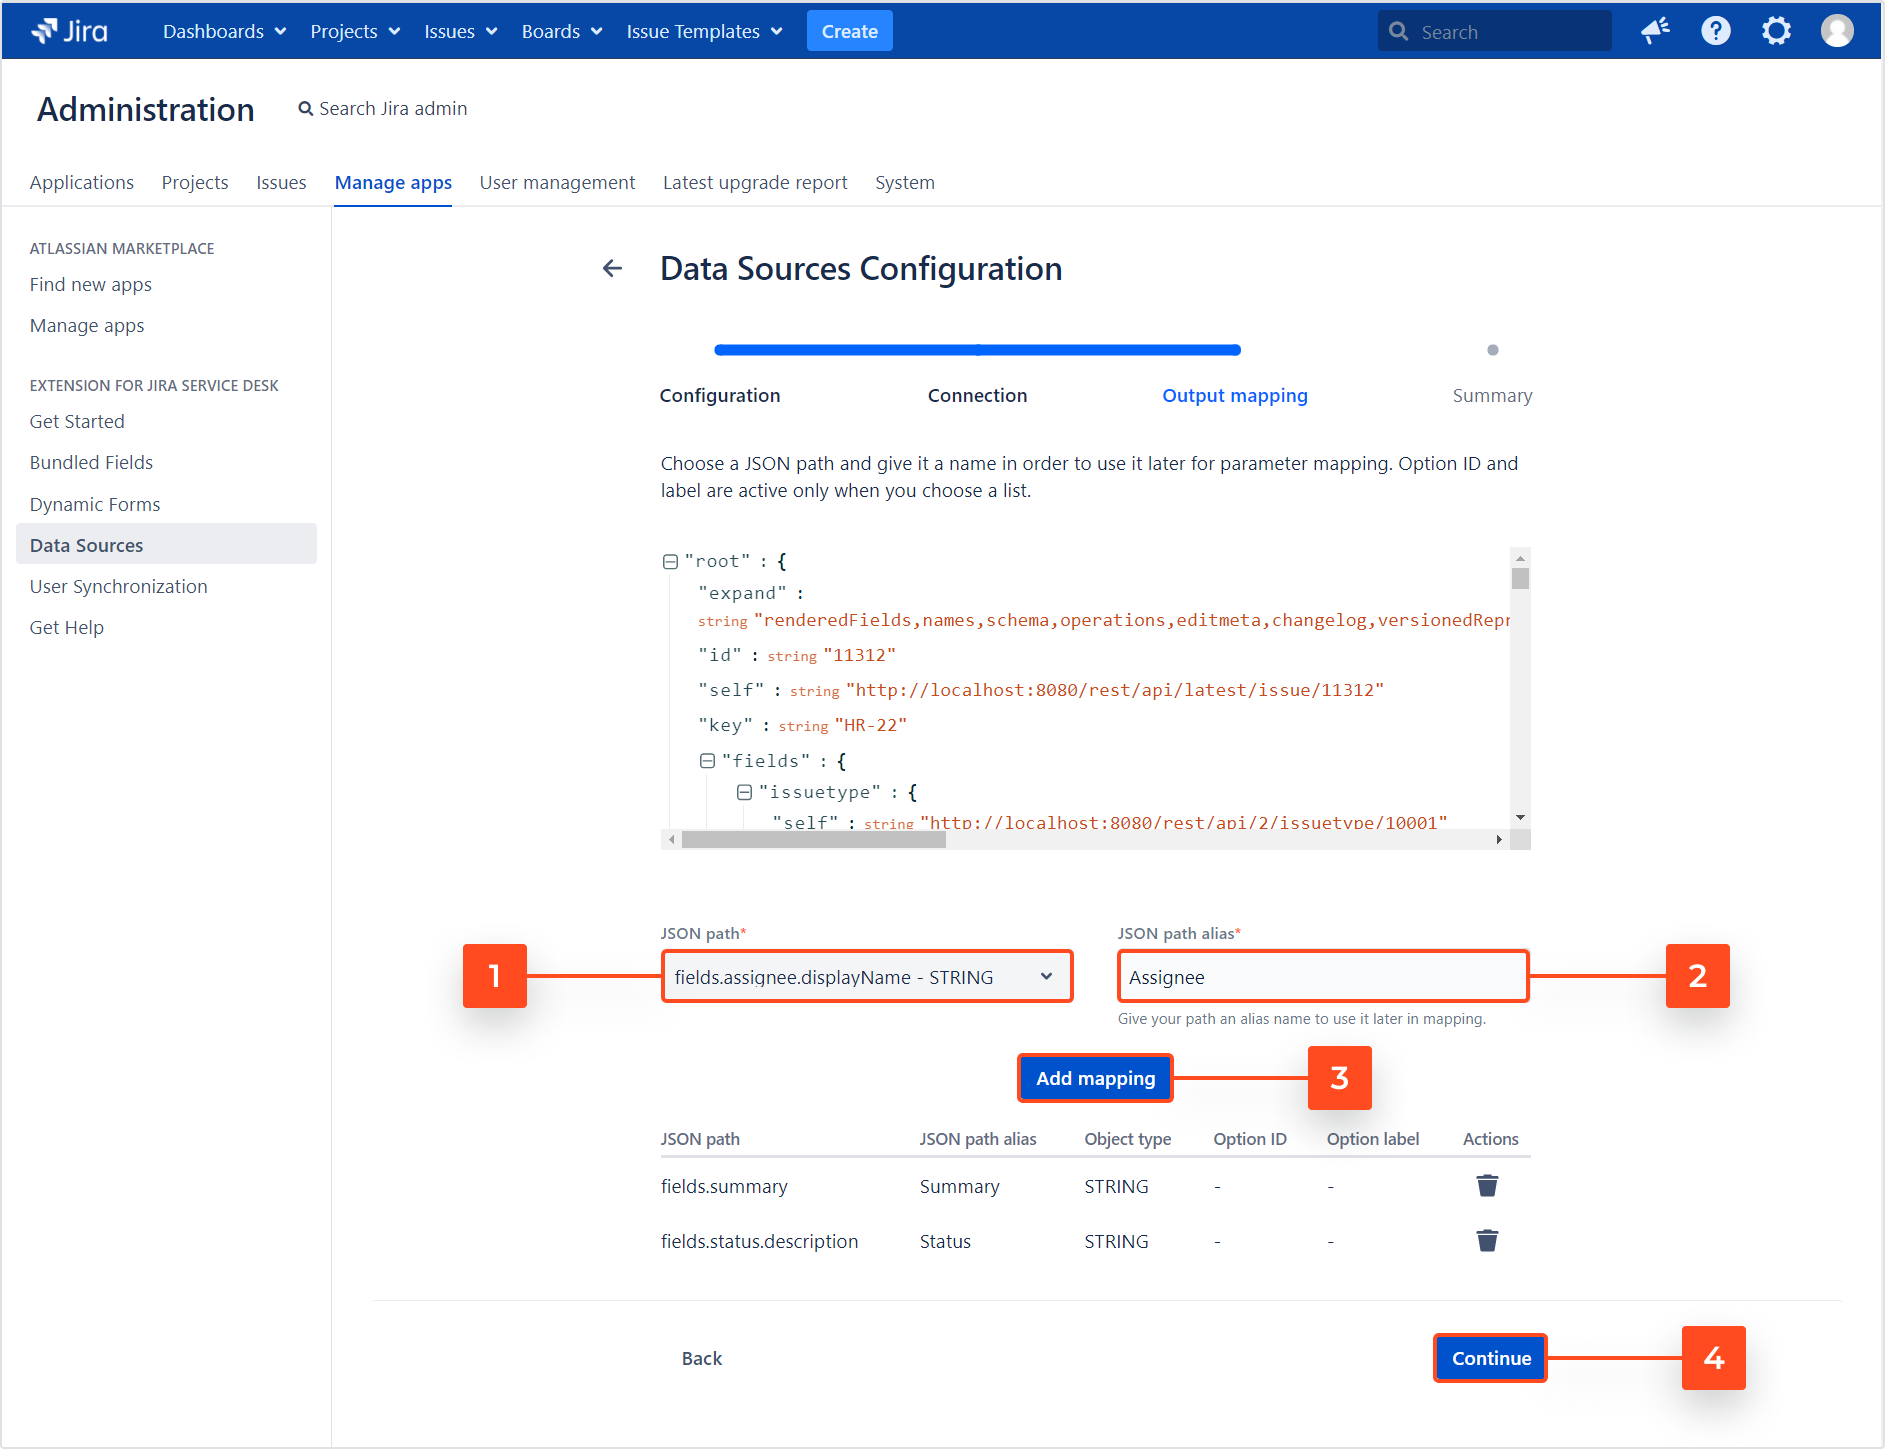
On this screen you’ll see a preview of your data source. The names you provide for JSON paths and objects will be used later for connecting them to Bundled Fields’ subfields. Scroll down to read the descriptions.
Steps
- Select a JSON path to be mapped.
- Provide an alias name for your JSON path. If the JSON path you’ve selected is a list, additional fields for mapping the options will appear:
- option ID (the attribute that identifies the object on the list)
- option label (attribute that is the object’s label)
- Click Add mapping. It will appear in the list below.
- When all mappings are ready, click Continue.
Result
You progress to the final configuration screen - Summary.
Summary
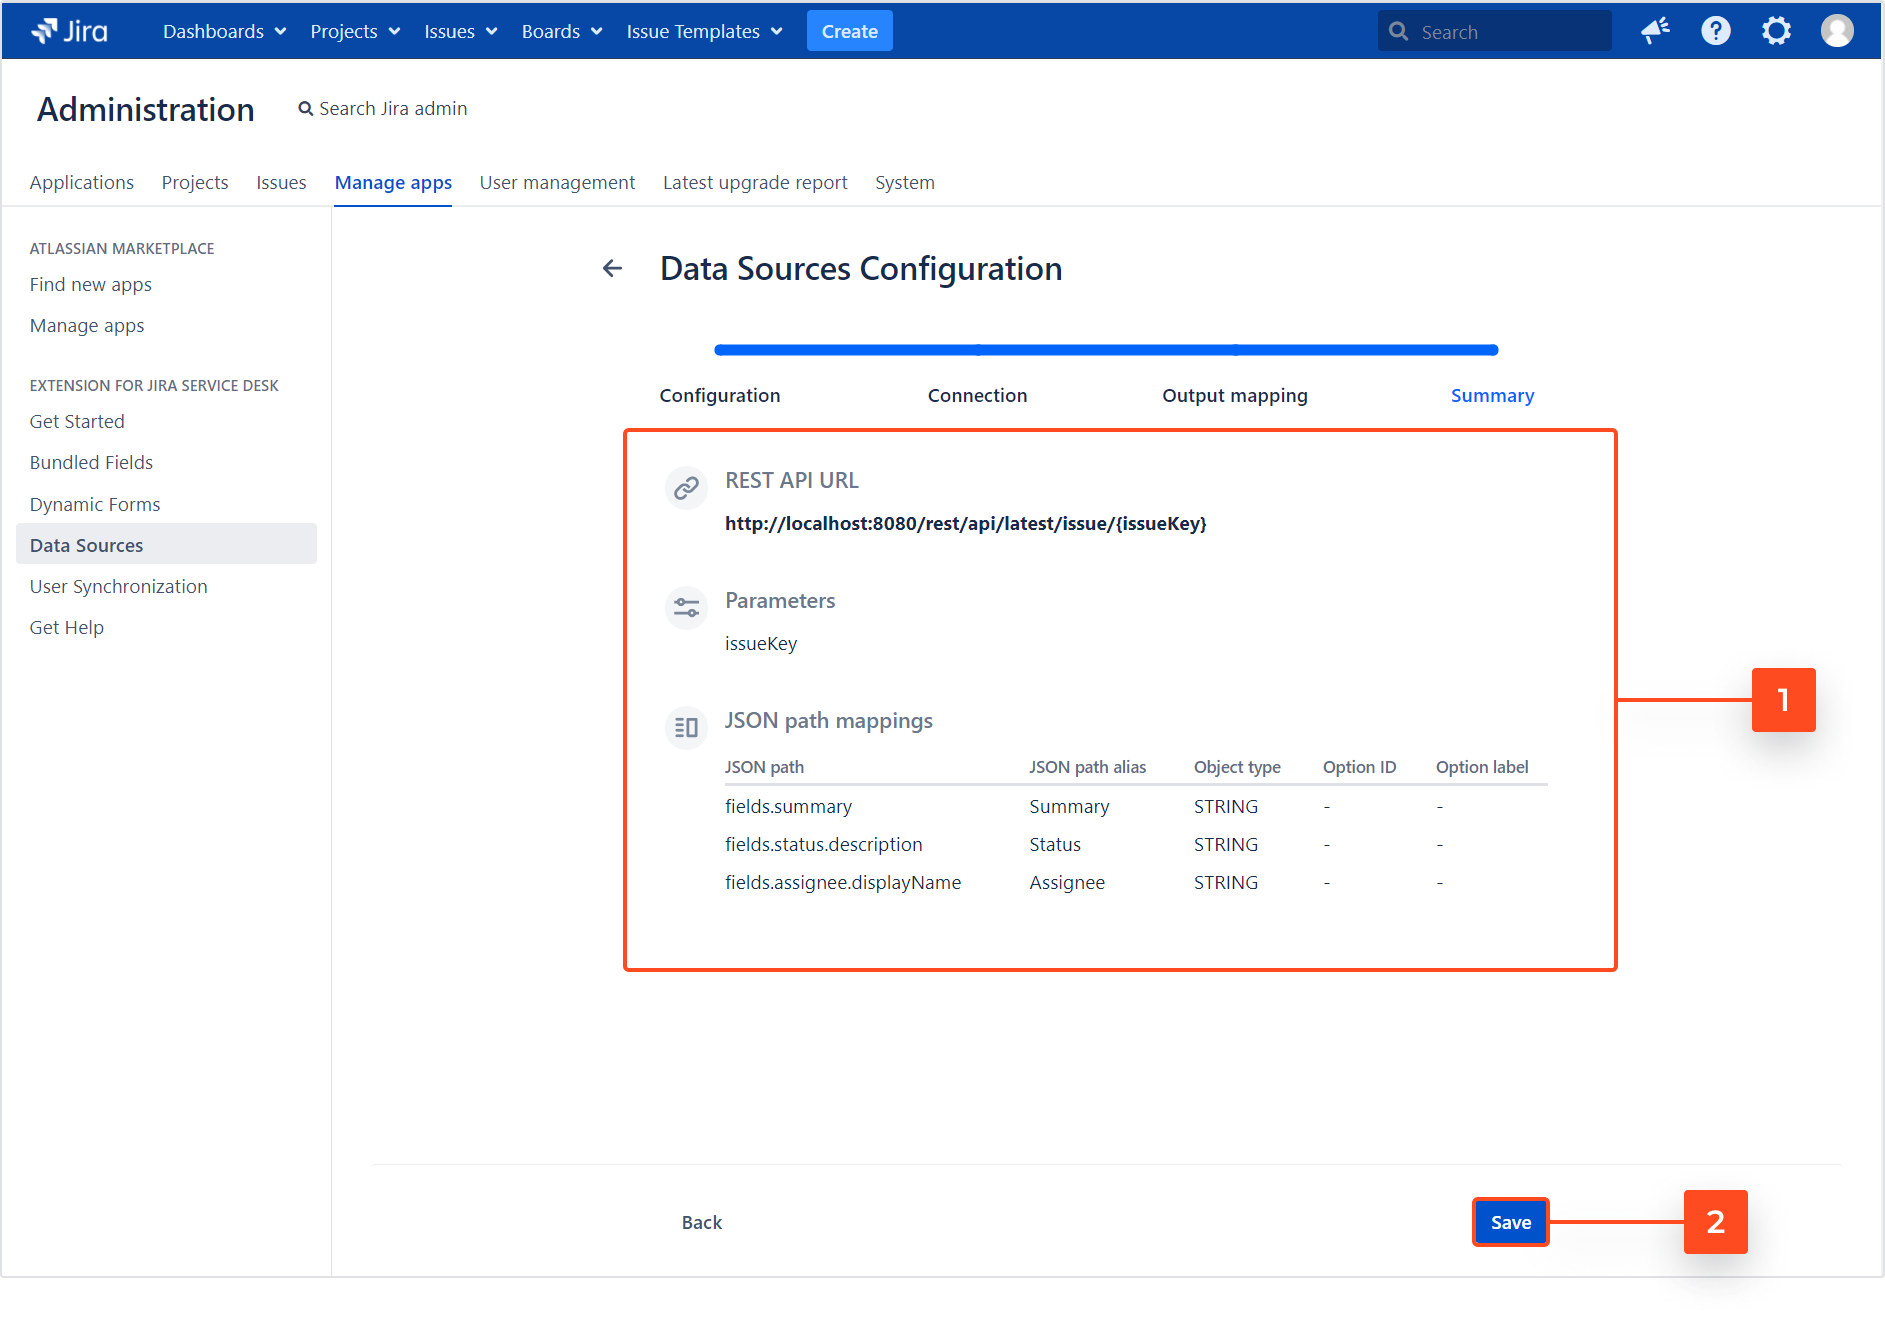
The last screen is a summary of you configuration. It allows you to check all the details before the final confirmation.
Steps
- Review the following details (if anything isn’t right, click Back to make a correction):
- REST API URL of your data source
- Parameteres detected in your URL (if you added any)
- JSON path mappings created for the JSON paths of your source data
- Click Save to confirm creating the data source.
Result
The data source is added to the Data Sources list.
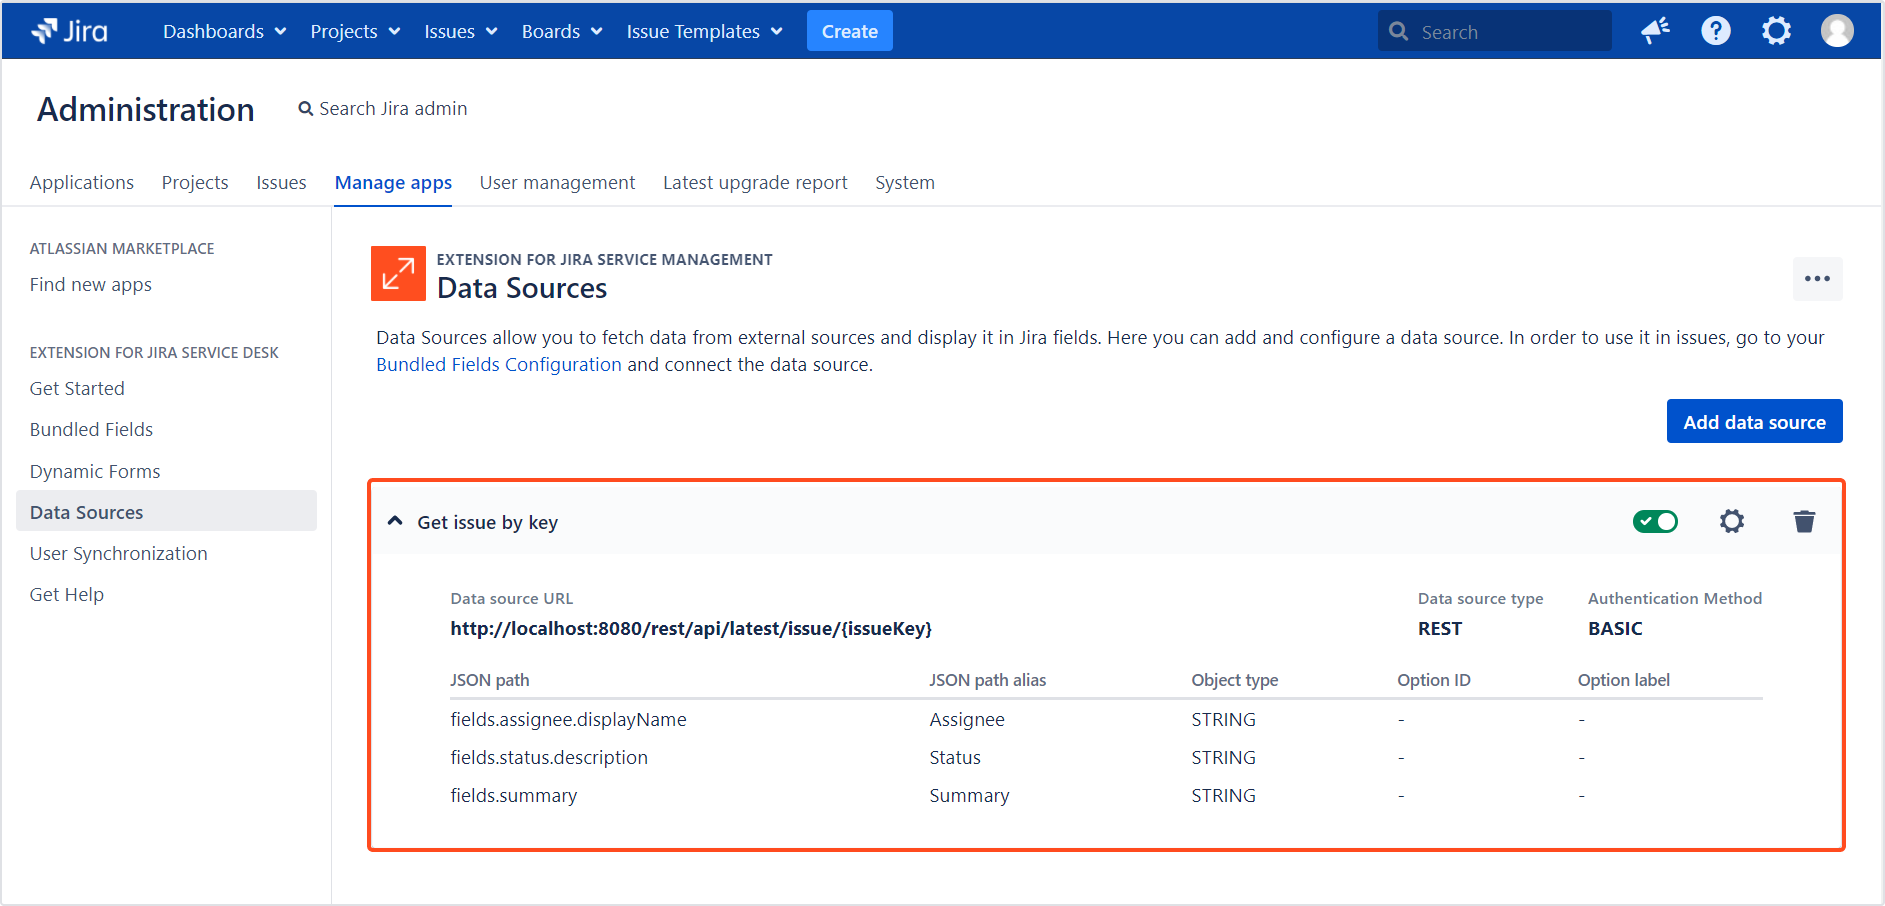
The data source is active, but you still need to connect it to a Bundled Fields’ subfield to make it work.
Next steps
- To connect your data source to Bundled Fields’ subfields, proceed to Connecting a data source.
- To update an existing data source, see Updating a data source.
- To use synchronized options, see Synchronizing options.
- For more information about Bundled Fields, see Bundled Fields Configuration.
If you can’t find the answer you need in our documentation, raise
a support request.
Include as much information as possible to help our support team resolve your issue faster.
