- Configuration
- First steps
- Project setup
- Sample templates
- Migration to Cloud
- Supported fields
- Permissions
- Jira Service Management
- Template management
- Create a template
- Template configuration
- Variables
- Template Navigator
- Delete a template
- Use as a template
- Set of Fields - advanced features
- Using template
- Autocomplete
- Default Template
- Apply template
- Use Template in Jira Automation
- Automatic create and close
- JQL Searchers
- Direct links
- Create Structure post function
- About Create Structure
- Create Structure configuration
- App integrations
- REST API
- ScriptRunner and Groovy scripts
User variables
Learn about user variables and their configuration options
User variables are placeholders you can create and configure yourself. Additionally, as the administrator of the Template Repository (TEMP) project you can make them available in all the templates.
Overview
To manage User variables you need to open a particular template. In order to do so, select the template in the Issue Navigator and click its issue key:

Here are all the possible actions you can take there (scroll down to read their descriptions):

- Search for available variables.
- Preview variables added to this template.
- Configure the variable (option available only for administrators of the Template Repository (TEMP) project).
- Expand additional options.
- Add a new variable (available for project administrators).
- Manage variables in the Variables Library (available only for Jira administrators).
- Some configuration options are only available for administrators of the Template Repository (TEMP) project.
- If you only have the Create issue permission, you can still create your own user variables - only in this case you need to create the variables separately for each issue.
Configuration options
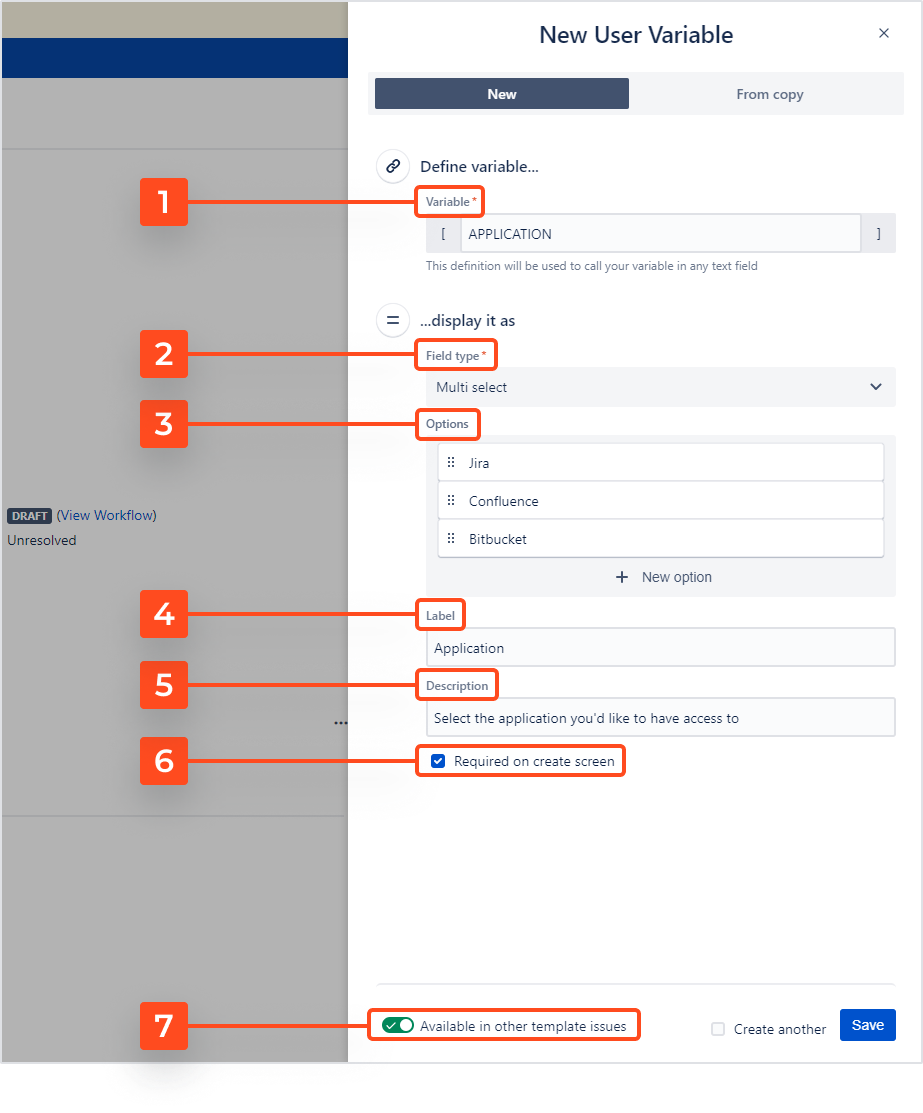
This panel opens up after clicking New variable or Configure variable. Scroll down to read descriptions of the configuration options:

- Define variable
- Field type
- Text (single line)
- Text (multi-line)
- Select
- Multi-select
- Cascading select
- Options
- Label
- Description
- Required on create screen
- Available in other template issues (option available only for administrators of the Template Repository (TEMP) project)
In other words, give it a name. You will be able to search for your variable using the key typed within square brackets.
Here you can select the type of the field that should appear every time you use the variable in issues built on your template. There are four types available:
If you decide to use select or multi-select, you can define which options should be available. You may also rearrange them by drag and drop.
It's a good idea to add a label to your variable in order to make your templates look more elegant. Example: to avoid showing a generic START_DATE in your final issue, just type in Start date in here and it will be replaced in all the issues built on your template.
You may want to give other users a hint about what your variable does. The description will appear right below the variable's field.
Use this option if you want to make your variable mandatory on the create screen. Then, every user creating an issue using your template will be prompted to fill in the variable's field with the required information.
By switching the toggle you can share your variable across all template issues. It will then have the label "GLOBAL" next to it, but it doesn't mean it's now available in all projects - just in templates (TEMP).
Panel options
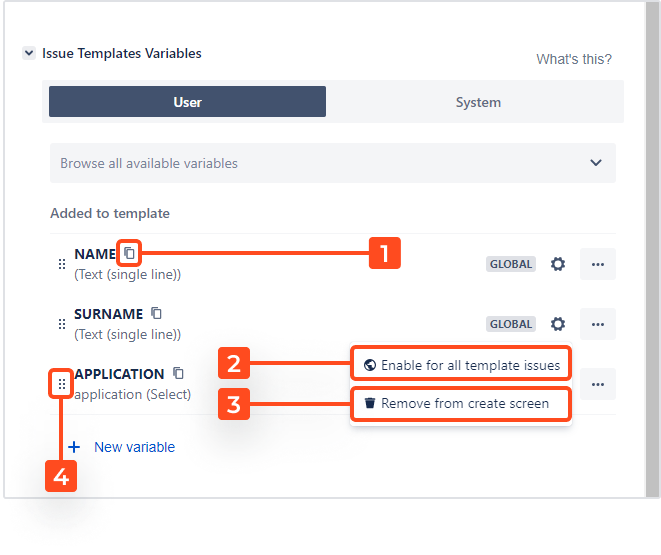
After saving, your new variable will appear in the Variables panel. You can apply some options directly from there, too:

- Copy
- Enable for all template issues (option available only for administrators of the Template Repository (TEMP) project)
- Remove from Create screen
- Reorder variables
Copy your variable's key to clipboard. You just need to paste it wherever you want to use it.
Change your variable's status to "GLOBAL", which means that it will become available for all templates in your Template Repository (TEMP).
Use this option if you don't want the variable to be mandatory every time someone creates an issue using your template.
Drag and drop this element to change the variable's position. The order specified here will be reflected on the Create issue screen.
Most of the options are also available in the User variables tab in the Template details view.
Using user variables
Here’s how to insert system variables into a template:
Steps
- Open the template by clicking its issue key.

- Select User in the Variables panel.
- Copy the variable to clipboard by clicking the copy icon.
- Paste it into the Summary, Description or any other text field.

Result
After selecting the template on the Create issue screen, a form with your chosen variables will be displayed. There, users will be able to provide values for the variables.
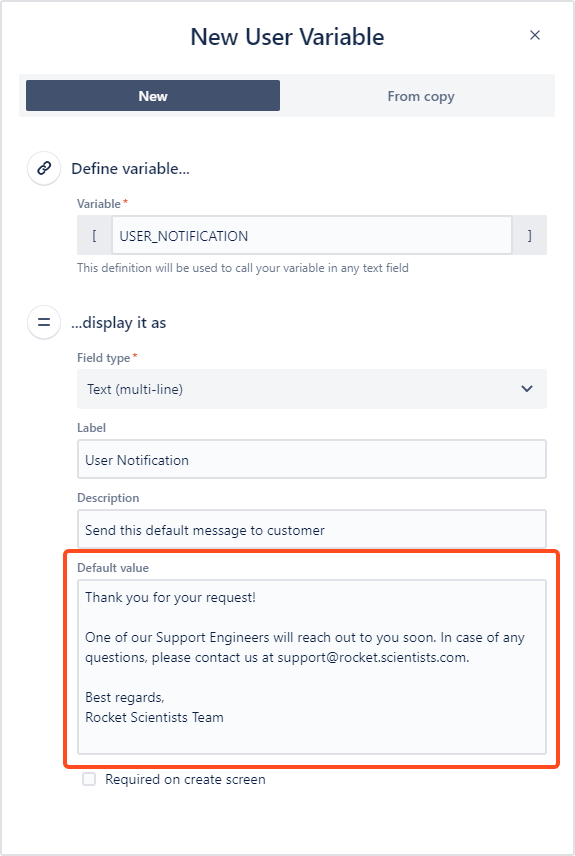
Default values
As an Administrator, you can set default values in the variables’ fields. They will be displayed to your template’s users as recommended input. It can be a simple word or a longer Multi-line text, for example a “Thank you for contacting us” note:

You may also set default values in the Select and Multi-select fields. For example, suggest the most commonly used options in a list of available applications. You just need to click Set as default on the chosen field:

If you can’t find the answer you need in our documentation, raise a support request.