Apps documentation
Actions for Jira Service Management
Cloud Server/Data Center
Actions for Jira Service Management

Cloud

Server/Data Center

Documentation
FAQ
Release notes
Articles & Videos
Last updated Aug 11, 2024

Request actions

See how to create and configure Request actions.

Warning

Before you start, log in as a user with Jira Administrators project permissions. For more information, see Atlassian documentation.

Request actions are designed to allow users to edit requests. They can be customized and displayed on your Customer Portal.

By setting the configuration of Request actions, you can adjust the editing of requests to your customers’ needs. Create a branded title that will be displayed on the Customer Portal, select particular request types or fields for editing, and decide when and by whom requests can be edited.

Creating and Configuring

Follow the below steps to create your Request action and configure its:

Steps

  1. Go to the Project settings section.
  2. Select the Request actions option.
  3. Click Add Request action.
Jira change request form for Jira Service Management
Edit forms Actions for Jira Service Management
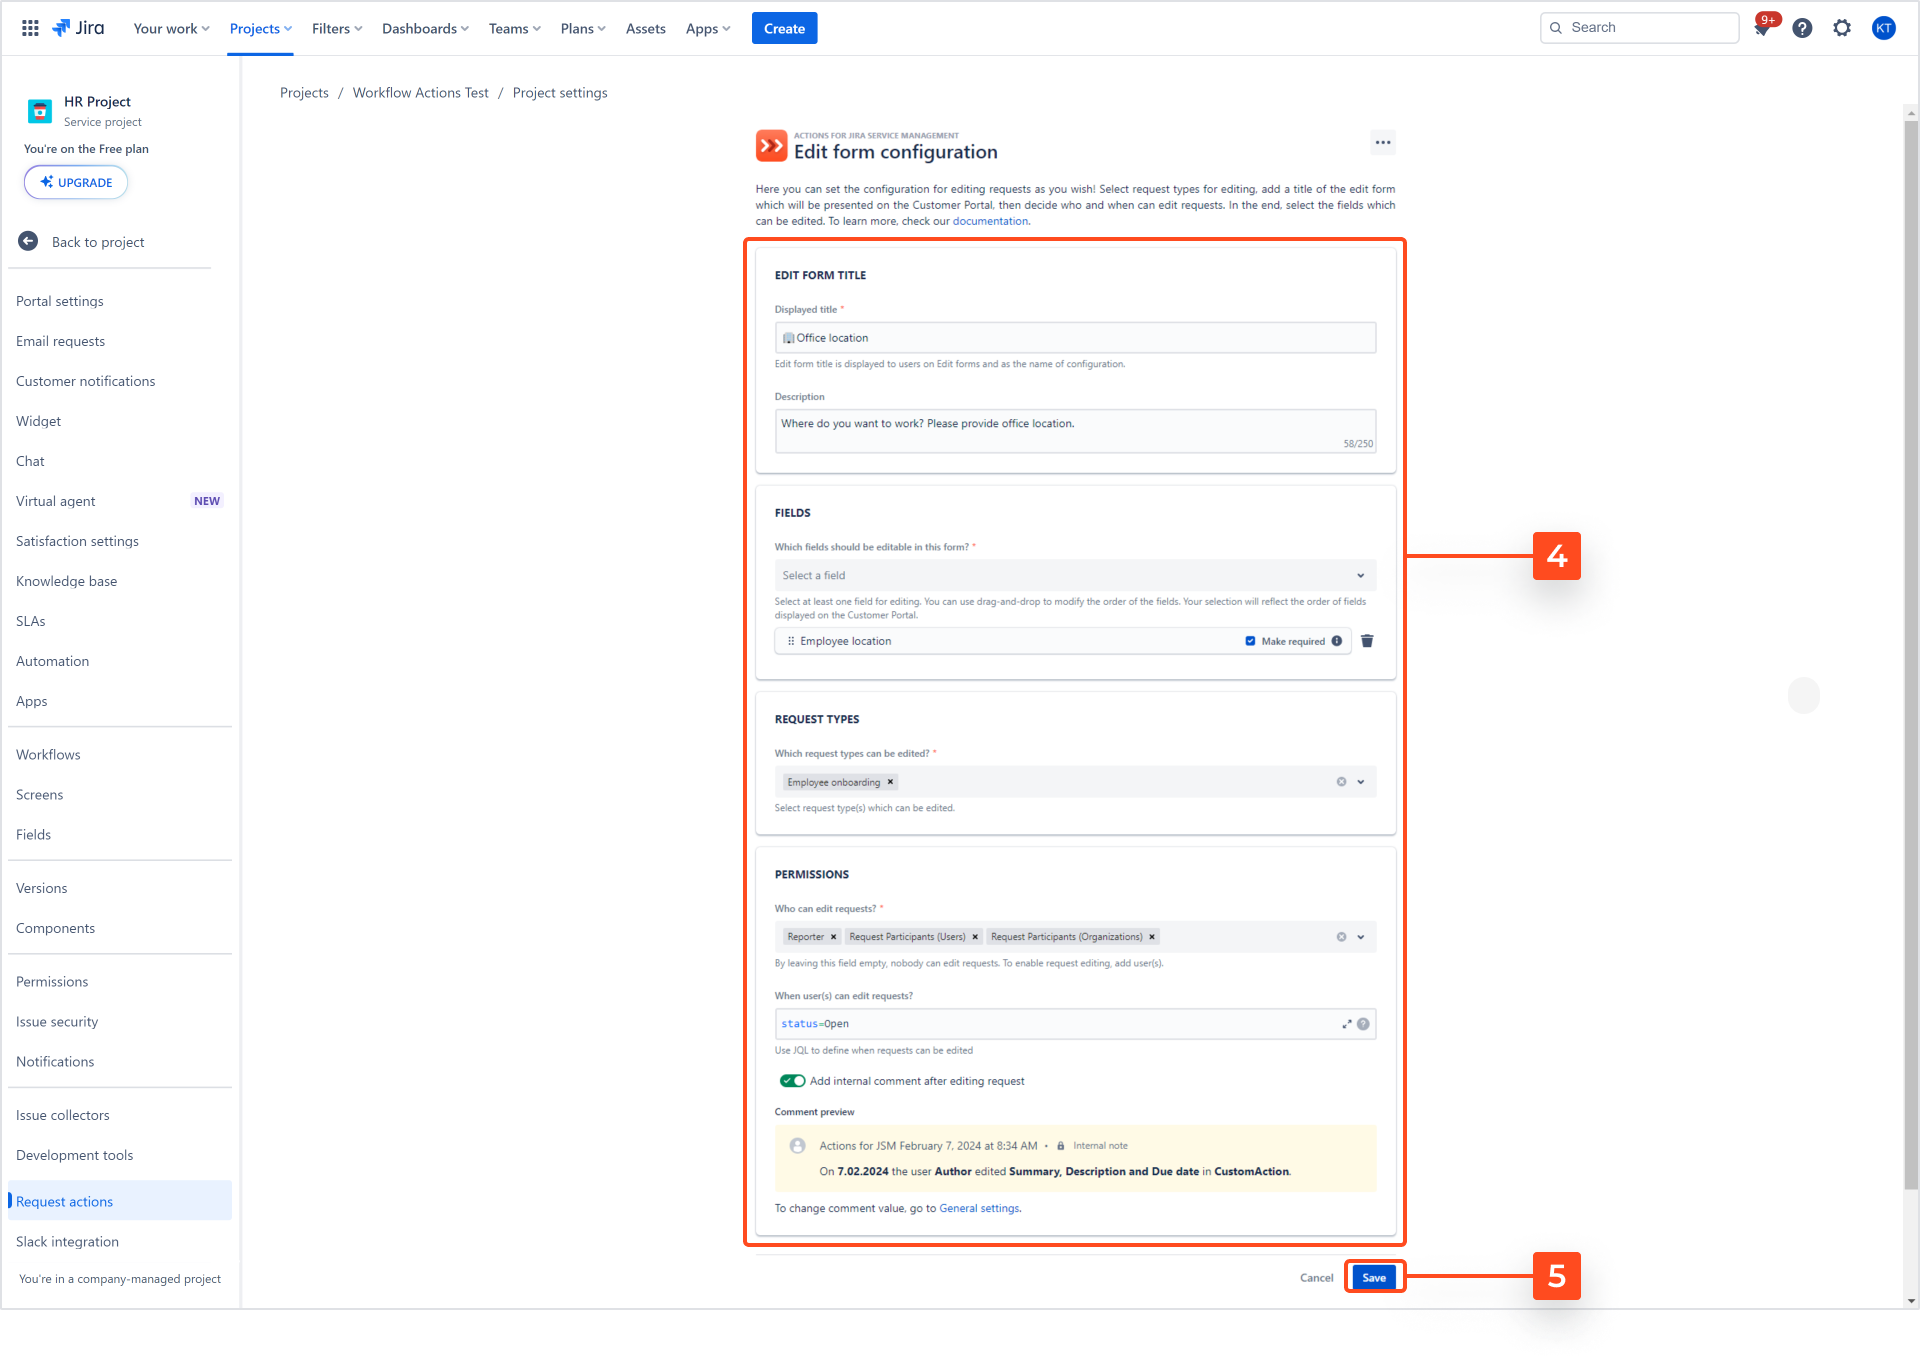
  1. You are redirected to the Configuration view, where you can design the content of your Request action by determining the following:
Note

The fields marked with an asterisk must appear on your Request action, that’s why it is required to fill in such fields.

  1. To store the configuration of your Request action, click Save.
    Jira change request form for Jira Service Management
    Edit forms configuration Actions for Jira Service Management
Warning

By clicking Cancel, the configuration of your Request action can be permanently deleted.

Request action title

Give your Request action a name (up to 30 characters) visible to users as a Displayed title on the Customer Portal and in Jira.

Optionally, you can add a description of your Request action by creating a text containing up to 250 characters.

Tip

Customize the title of your Request action by adding an emoji. There are several ways you can do it:

  • Access emojis through the right mouse button using the Emoji option (on Windows).
  • Use the Windows logo key + period (.) combination (on Windows).
  • Use the Fn + E combination (on Mac).
  • Use an external emoji copy tool.
Edit forms title Actions for Jira Service Management

Fields

Determine which fields should be editable

You can select which fields are editable on requests on the Customer Portal and organize them in the preferred sequence.

To select a specific field, select it from the dropdown or begin typing its name and then click it. When selecting multiple fields, you can use drag-and-drop to modify their order on the Customer Portal.

Edit forms fields Actions for Jira Service Management

Customize selected fields

You can define the Display name and Help text of your fields visible on the Customer Portal and determine which fields are required, read only, or hidden on the requests.

Note

When any customizations are made to any field, this field is given the purple Customized label.

To customize a field, click on it and adjust available settings, which include:

  1. Display tab where you can define:
  • Display name - You can enter a Display name for your field. Customers will see this name on the form instead of the field name. The name cannot exceed 250 characters.
  • Help text - You can enter Help text to guide customers through filling out the field while editing the request. The text cannot exceed 400 characters.
    Edit forms fields Actions for Jira Service Management
    Edit forms fields Actions for Jira Service Management
  1. Options tab where you can adjust the following options:
  • Make required - The project settings determine if the field is required or not by default. You can select the Make required option to ensure that the field is displayed as required in the form. When you tick this option, all the remaining options related to this field will be disabled.
  • Read only - This option allows the user to see information in the field but does not allow them to change it. Ticking this option disables the Make required option.
  • Hide empty - This option makes the field invisible in the form if it doesn’t contain any data. Ticking this option disables the Make required option.
    Edit forms fields Actions for Jira Service Management
    Edit forms fields Actions for Jira Service Management
Tip

You can expand or collapse the settings views of all chosen fields using the button above them. The Expand all button is visible when all fields’ settings are hidden, and the Collapse all button is visible when any field’s settings are shown.

Decide whether the Comment field should be saved before or after other fields

If your form includes the Comment field, select when to save it to ensure that fields that are more important for you are saved first in case any error appears while saving.

Edit forms fields Actions for Jira Service Management
Note

When the form includes the Comment field, Actions for JSM adds comments on behalf of the customer. If the project has automation rules for request status change after a non-customer adds a comment, the request status may change when the app comments for the customer.

Request types

Click the expand arrow icon on the Which request types can be edited? field to choose which types of requests should be available for editing.

Edit forms request types Actions for Jira Service Management

Permissions

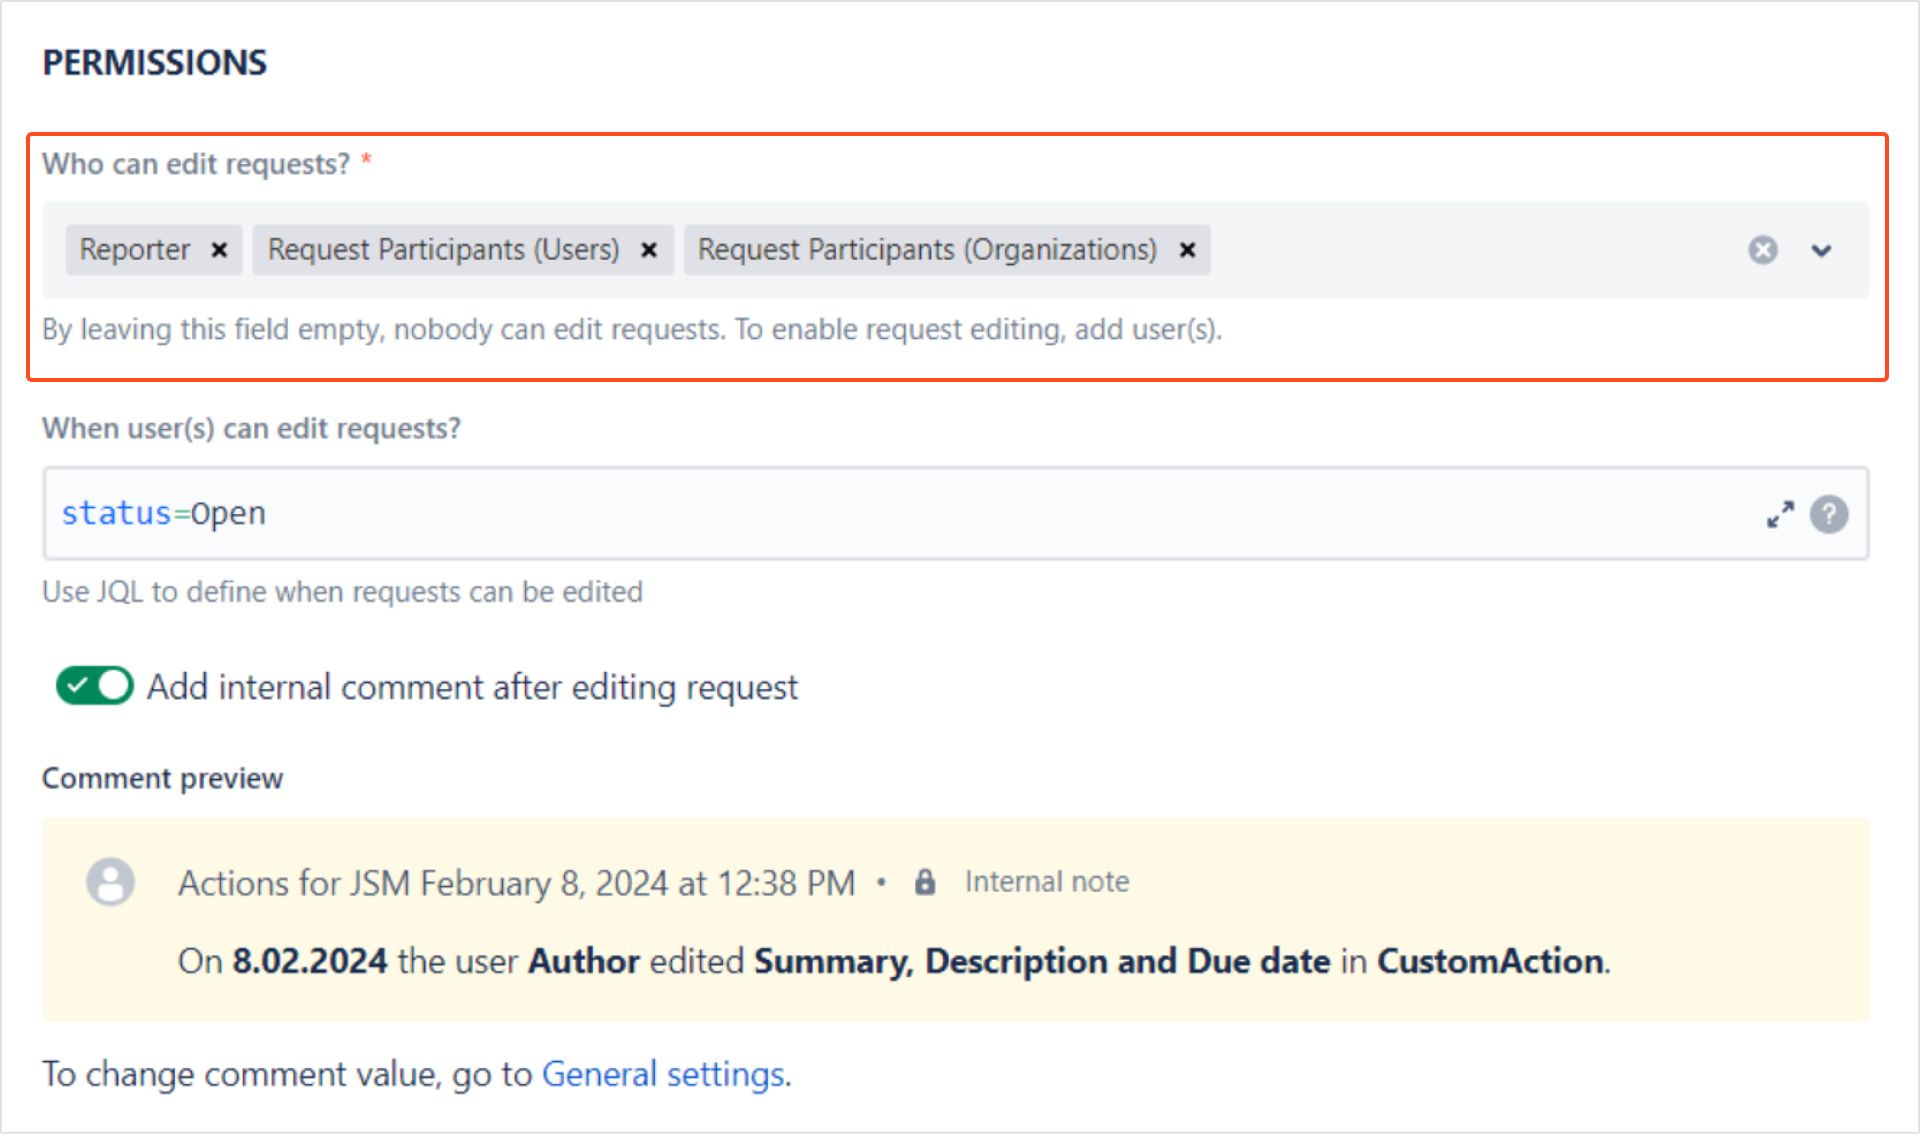
Decide who can edit requests

Grant edit permissions to relevant users by clicking the expand arrow icon on the Which request participant can edit requests? field and selecting user(s) for whom editing of requests will be enabled.

There are 5 user groups to be selected:

  • Anyone with request access
  • Reporter
  • User
  • Organization
  • Group
Note

By choosing the Anyone with request access option, you grant edit permissions to anyone with access to the specific request and disable the other options.
Selecting any of the other options disables the Anyone with request access option.

Edit forms permissions Actions for Jira Service Management
Note

When you choose the Group option, an additional dropdown appears, allowing you to select a specific user group(s) to specify the permissions in more detail.
Remember that if group members didn’t create the request, you must also add them to the Organization or as Request participants to allow them to see the request.

Add Fields - Actions for Jira Service Management
Note
  • By granting edit permissions, you can select more than one user group.
  • To revoke edit permissions from a particular user group, click the cross icon next to the unwanted user group.

Determine when requests can be edited

To decide when user(s) can edit requests, use JQL to write queries.

Edit forms permissions Actions for Jira Service Management
Note

Your JQL queries are automatically verified. An incorrect JQL query is marked in red.

Info

If you want to learn more about JQL, take a look here.

Agent informing options

Single user picker(s) for assigning the customer after request edit

Choose the single user picker(s) to which the app will assign customer(s) once they edit the request using the particular action. The information about who made the most recent edit will be displayed to Jira agents on the specific issue.

Leaving this field empty results in the customer not being assigned to any single user picker.

Note
  • In the Actions for JSM’s context, a customer is anyone who uses it on the Service Desk.
  • If the single user picker(s) selected here match the fields chosen to be editable in the form, they will override them.
Jira change request form for Jira Service Management
Edit forms configuration Actions for Jira Service Management

Control editing with internal comments

Note

The option to enable internal comments after editing requests is switched off by default. Use the toggle to control editing with comments.

Turn on the toggle to enable the Add internal comment appearing to Jira agents after request edit option.
You can track all requests’ updates, as an internal comment will follow every request’s editing. The comment will only be visible to Jira Agents.

Edit forms permissions Actions for Jira Service Management

You can use the default comment message or edit its content by accessing Global settings.

To create a personalized comment message, introduce the content of your message. You can include the following variables:

  • Date
  • Editor
  • Fields
  • Action Name
Note

You can always check the introduced values and see a preview of the internal comment message that will be displayed on an issue in Jira.

Next up

Once your first Request action has been created and configured, you can manage its settings and use it to allow customers for editing requests on your Customer Portal.

Need help?

If you can’t find the answer you need in our documentation, raise a support request.
Include as much information as possible to help our support team resolve your issue faster.