

- User's guide
- Project view
- Navigation
- Relations
- Requirement
- Test Case
- Test Plan
- Test Execution
- Defect
- REST API
- REST API
- Authentication
- Jira REST API
- Requirements
- Test Case
- Test Plan
- Test Execution
- Test Case Execution
- Defects
- Tree Structure
- Example of use
First steps
This chapter provides information on what happens after enabling RTM app.
Jira settings
You can start RTM Onboarding from the following places:
- Jira settings > Manage apps > Get Started
- Project settings > RTM Configuration
In both ways you will be able to set up RTM for Jira app in your project.
Steps
To get started:
- Go to Jira Administration > Manage apps.
- Select Get Started from the menu in the RTM section.
- Choose project you want to use.
- Click Enable.
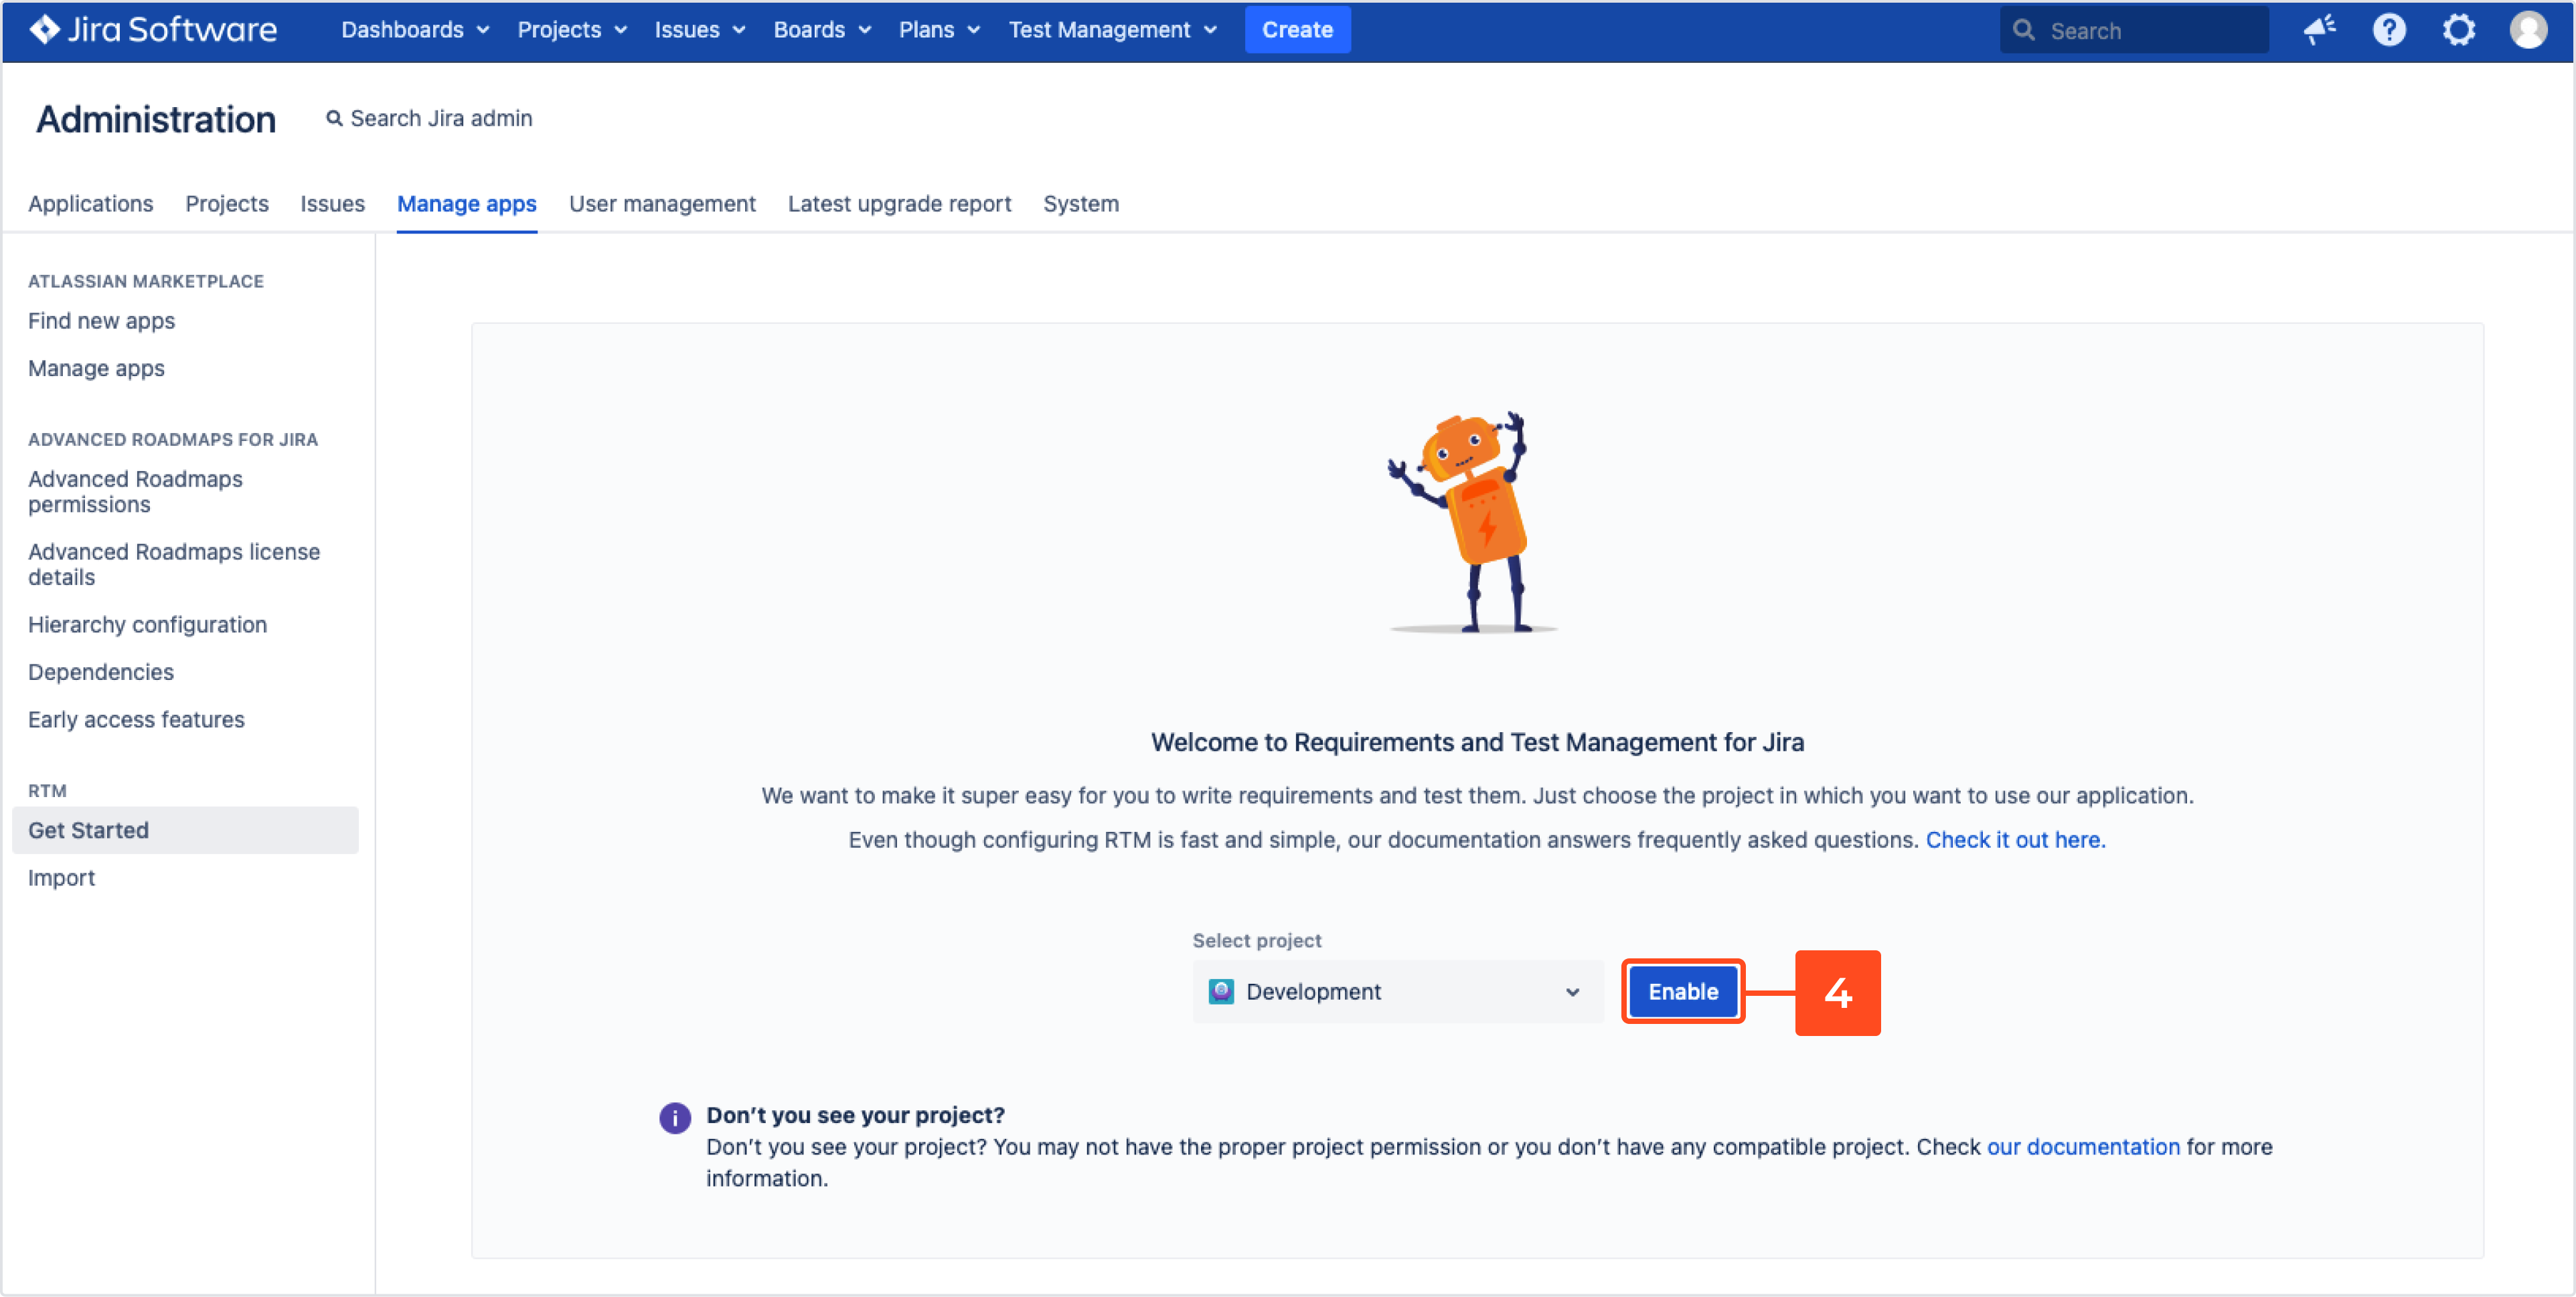
Result
You are redirected to the project configuration of the application, where you can manage RTM elements. Learn more in the Project settings chapter below.
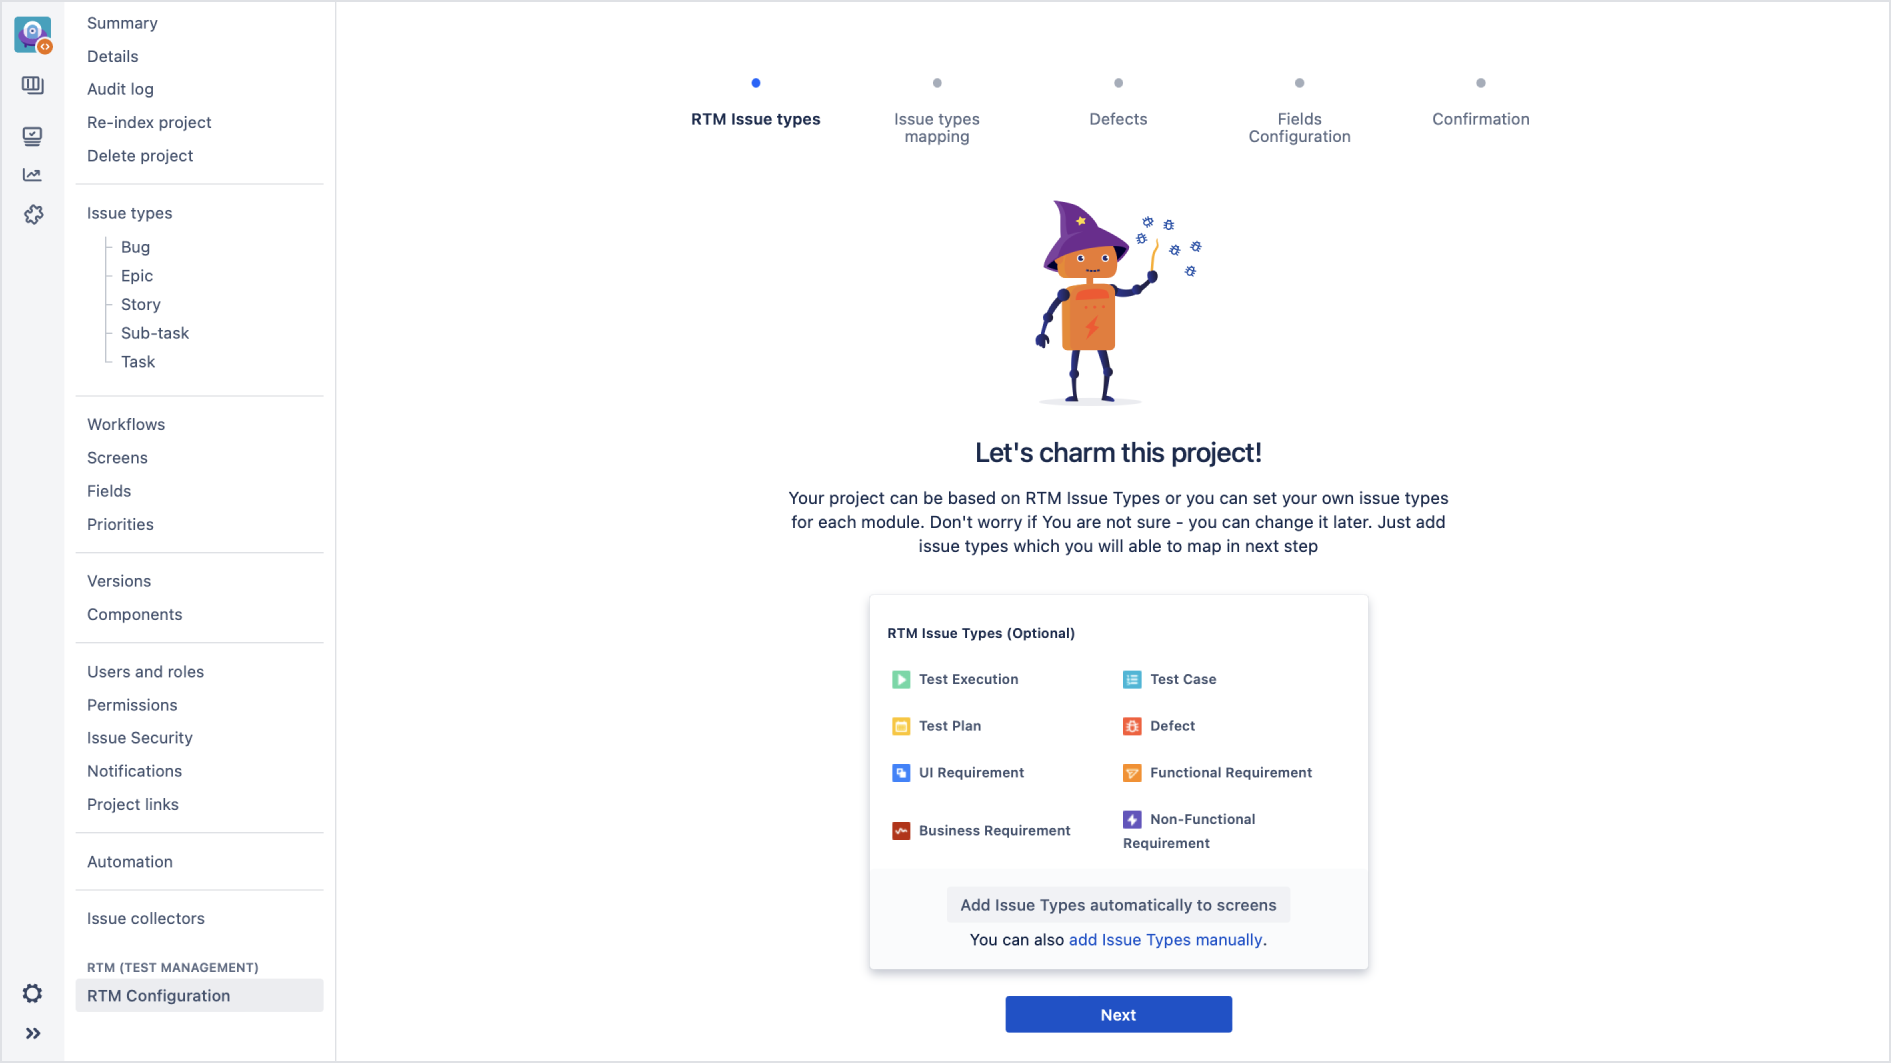
Project settings
Requirements and Test Management for Jira app provides an extra RTM configuration section that appears in project settings. Here you can configure RTM module in project.
- Remember, log in as a user with the Jira Administrators global permissions.
- Onboarding guide is shown only for projects which are using for the first time.
Before you start using RTM app:
- Add issue types to project (select RTM issue types or add your own)
- Map issue types to objects
- Choose project and issue type for defects
- Add fields to the screen.
RTM Issue Types
Your project can be based on RTM Issue Types or you can set your own issue types for each module.
Steps
To add issue types:
- Go to Issue Types.
- Click Add Manually to add RTM issue types by your own or
a. Use Add automatically button if you want to add all RTM Issue Types without further interference in project settings.InfoIf you’re not sure how to add RTM issue types to project, click here. - Click Next.
Result
RTM Issue Types have been added to the project.
Fields in RTM app are predefined and you cannot configure them.
Issue Types mapping
Map issue types to objects. Your issue types must be added in the project settings. If you forgot to add it earlier, go to Issue Type settings.
Steps
To map issue types:
- Configure the following:
- Requirements: Define up to several issue types.
- Test Case: Define one issue type.
- Test Plan: Define one issue type.
- Test Execution: Define one issue type.
- Click Next.
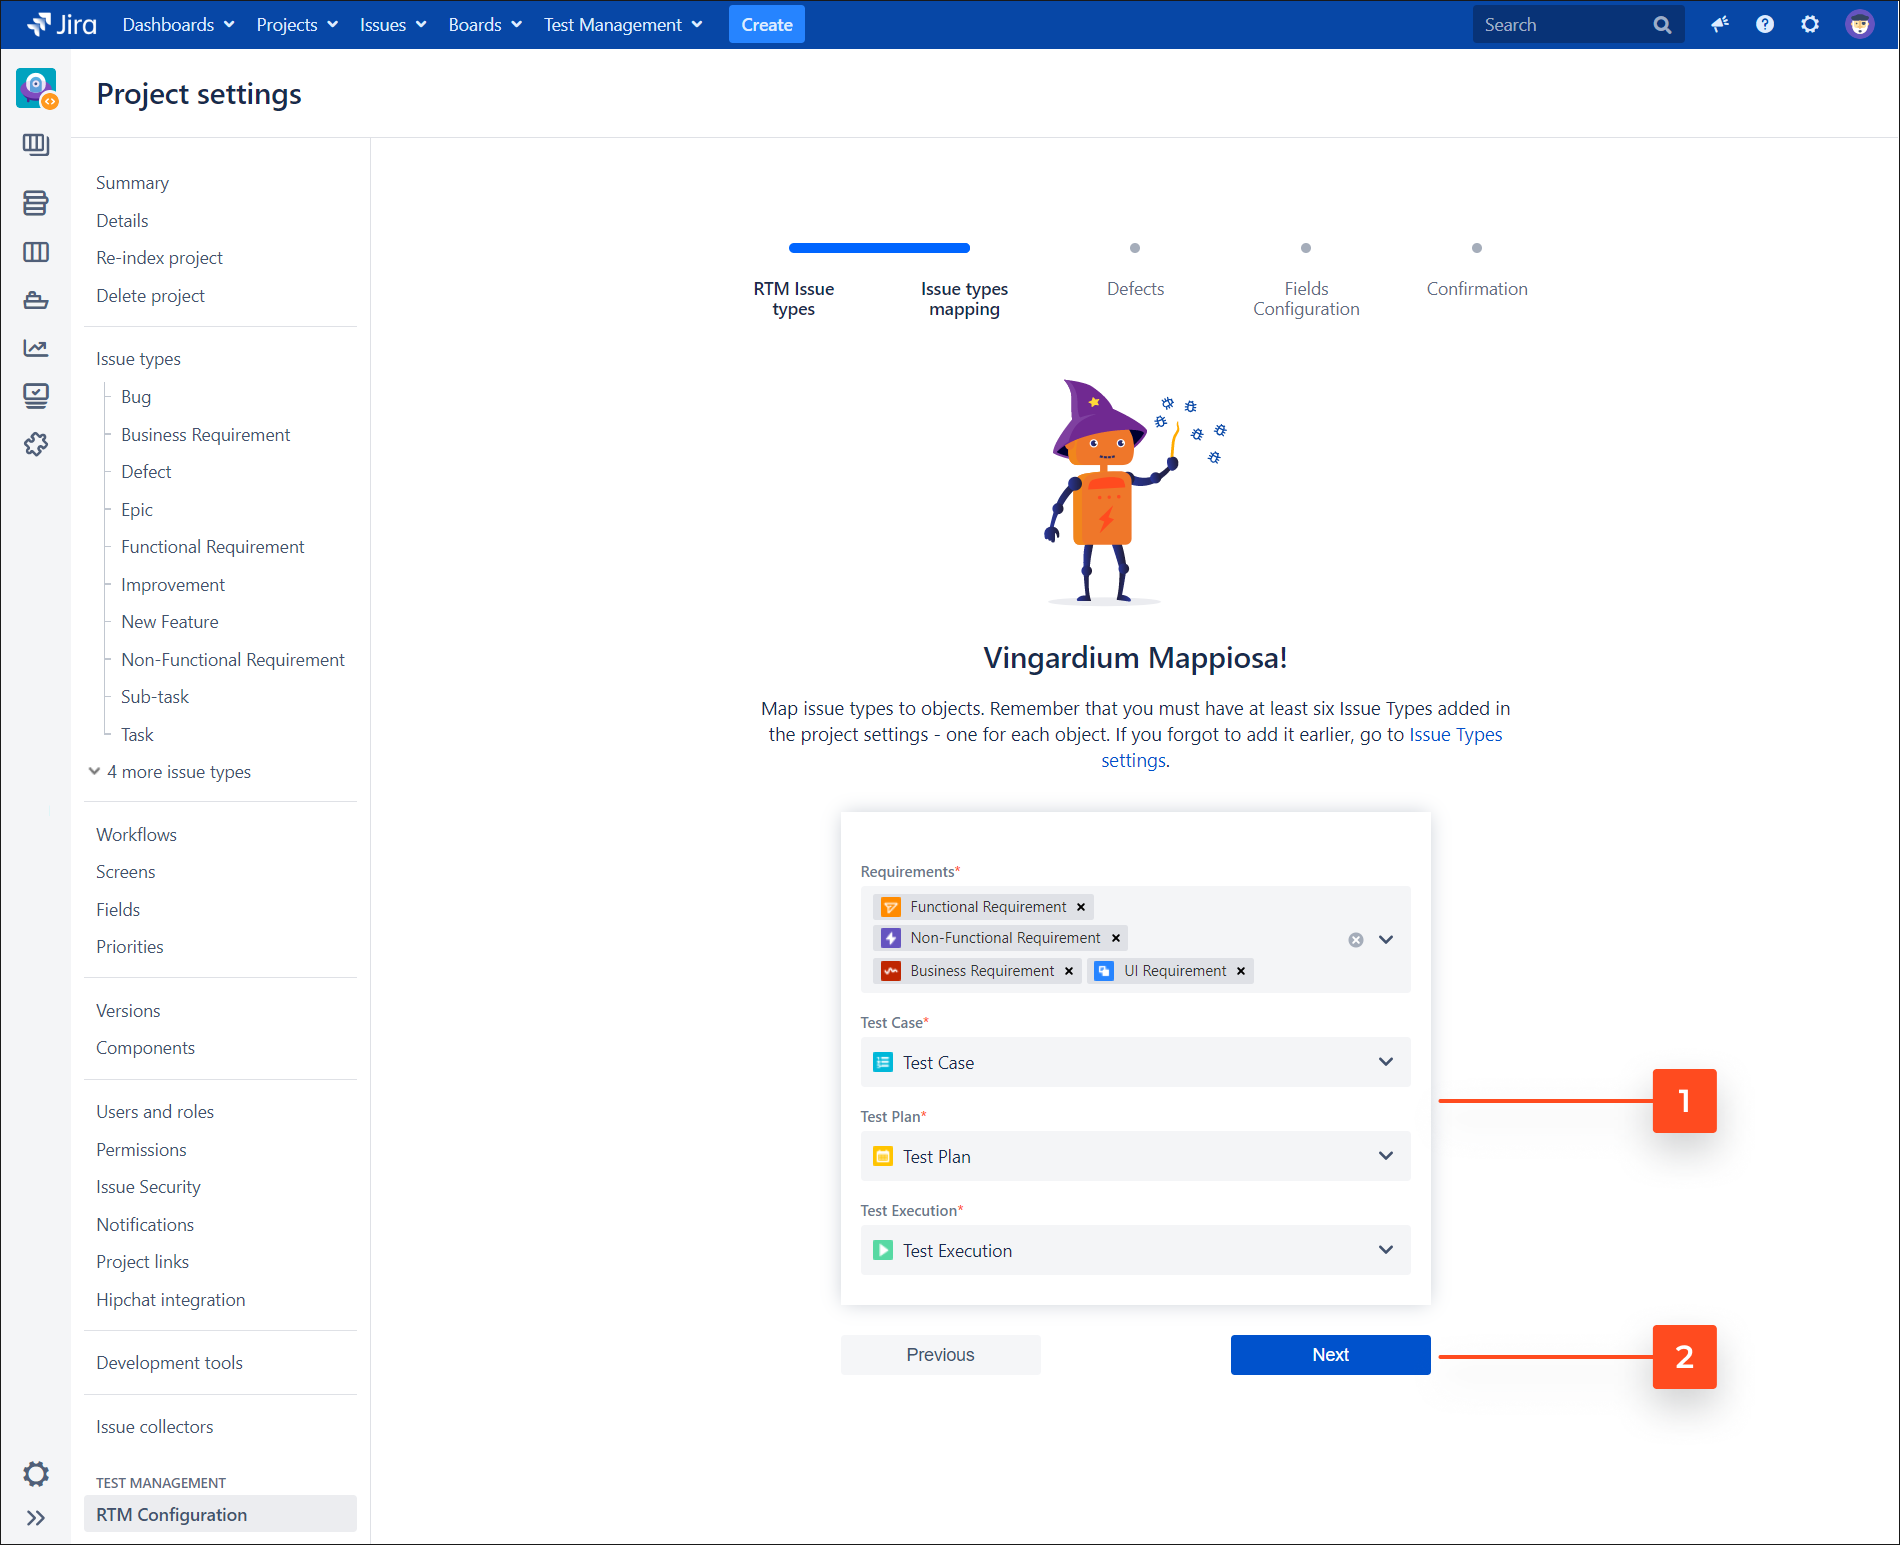
Result
Issue types have been mapped to the project.
Defects
You can store all defects in current project or you can set couple different projects where you create and store defects.
Steps
To add defects:
- Go to Defects.
- Configure the following:
- Project: Choose a project.
- Issue Types: Define up to several issue types.
Note- You can add other projects and defects by clicking Add next project. If user chooses other projects, not default RTM project, defects tree will not be available.
- If you want to remove them, click the trash icon.
- Click Next.
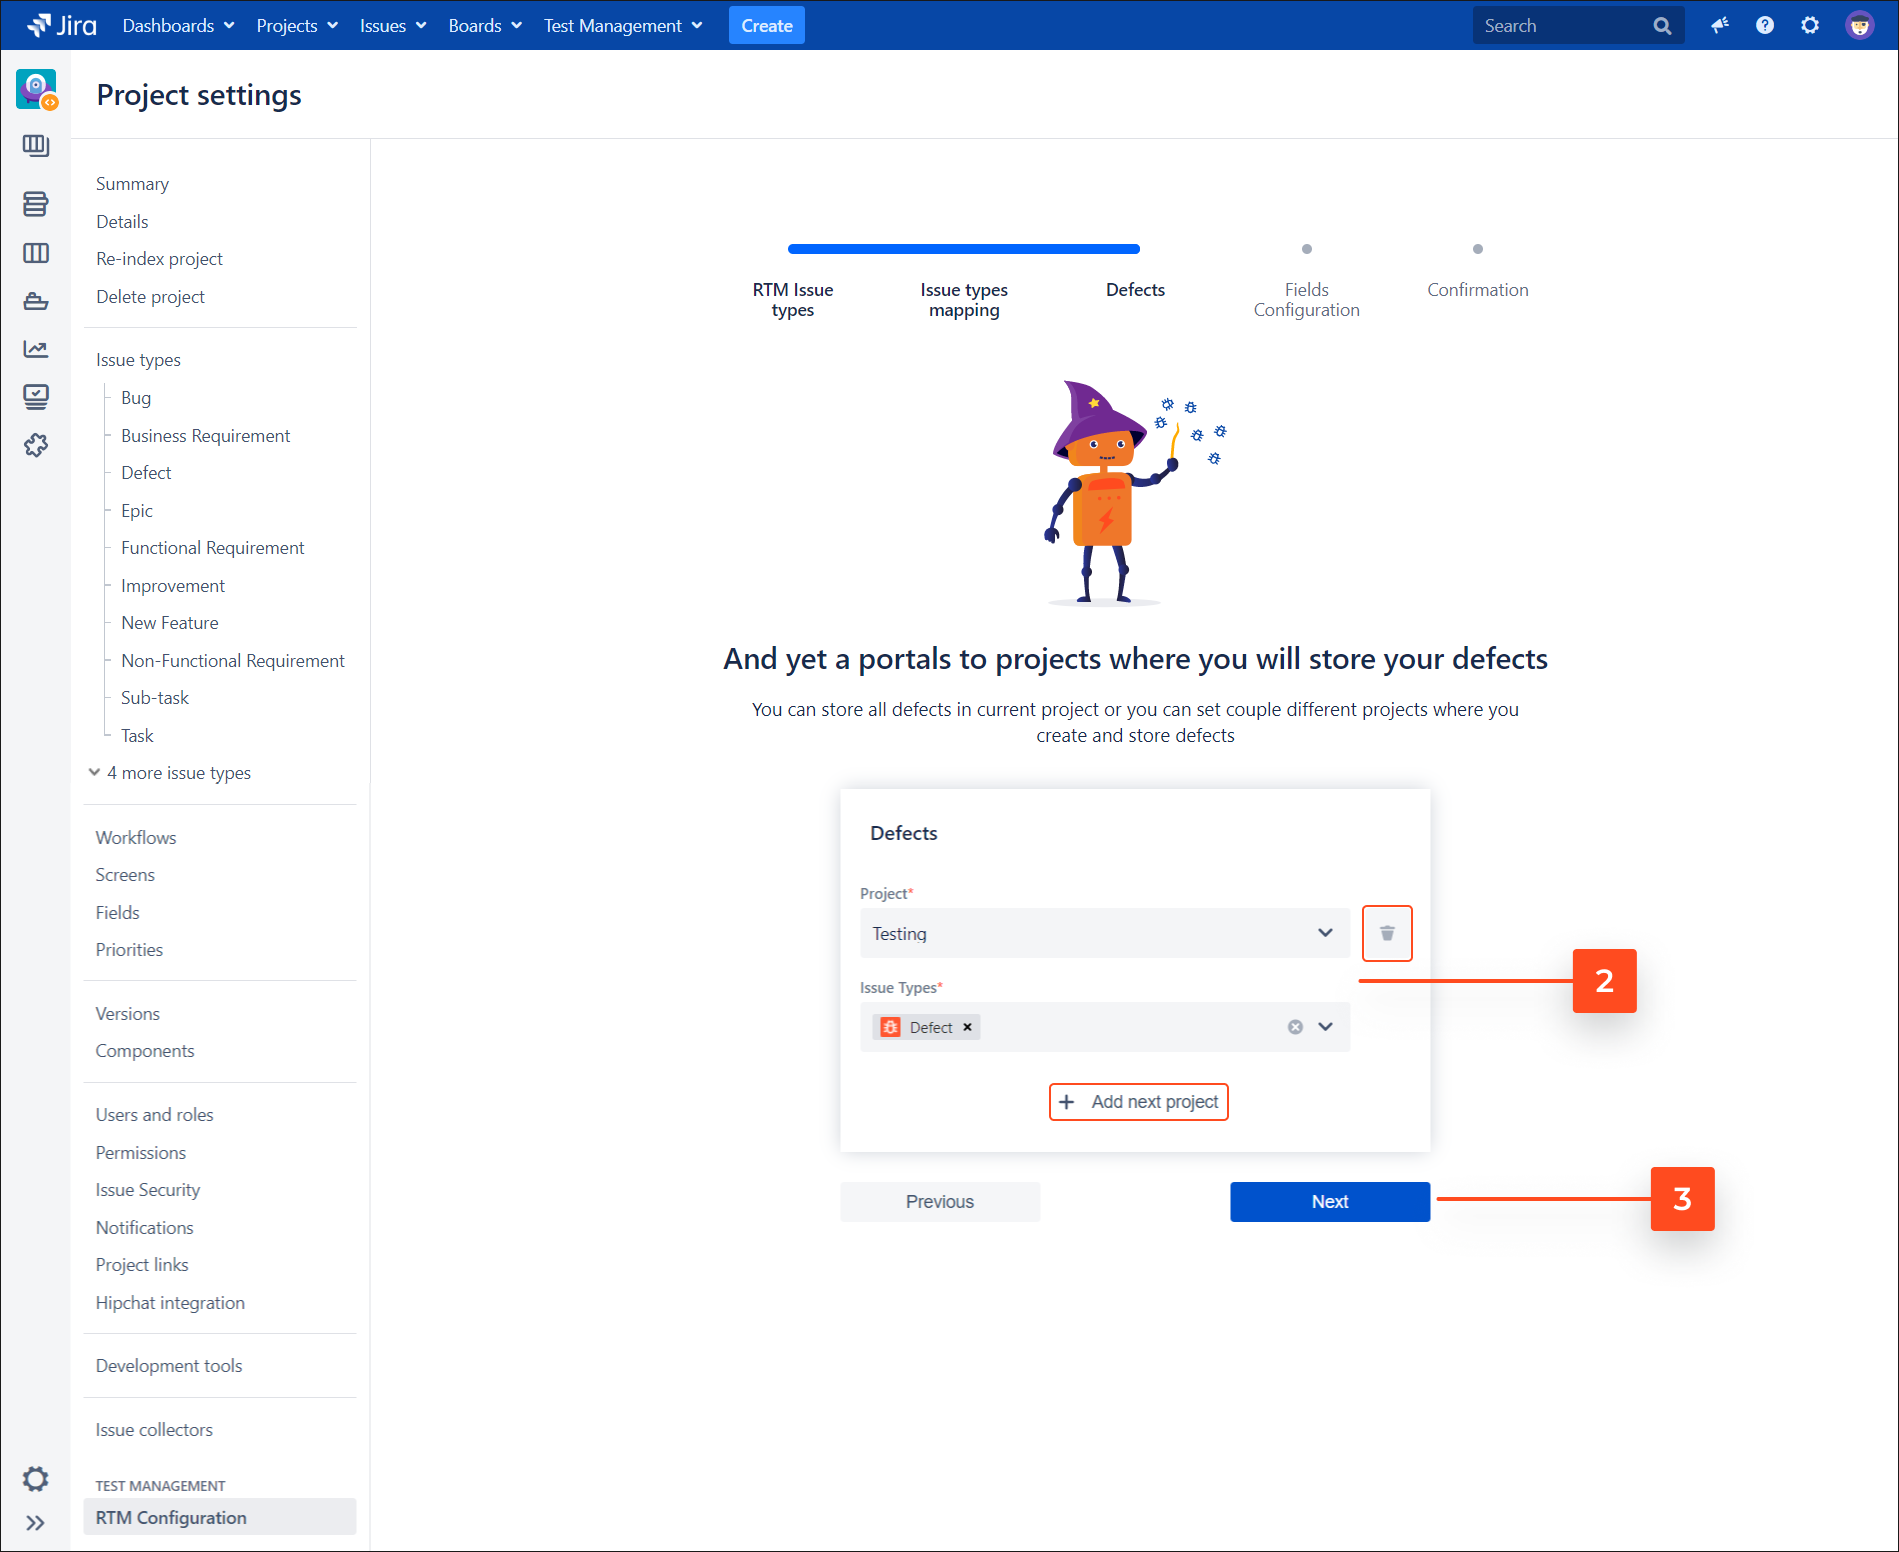
Result
Selected defect is added.
Fields configuration
Add missing fields to RTM screens
Some Jira fields are required for app to work properly. In this step the RTM app will inform you which of them should be added to screen configuration.
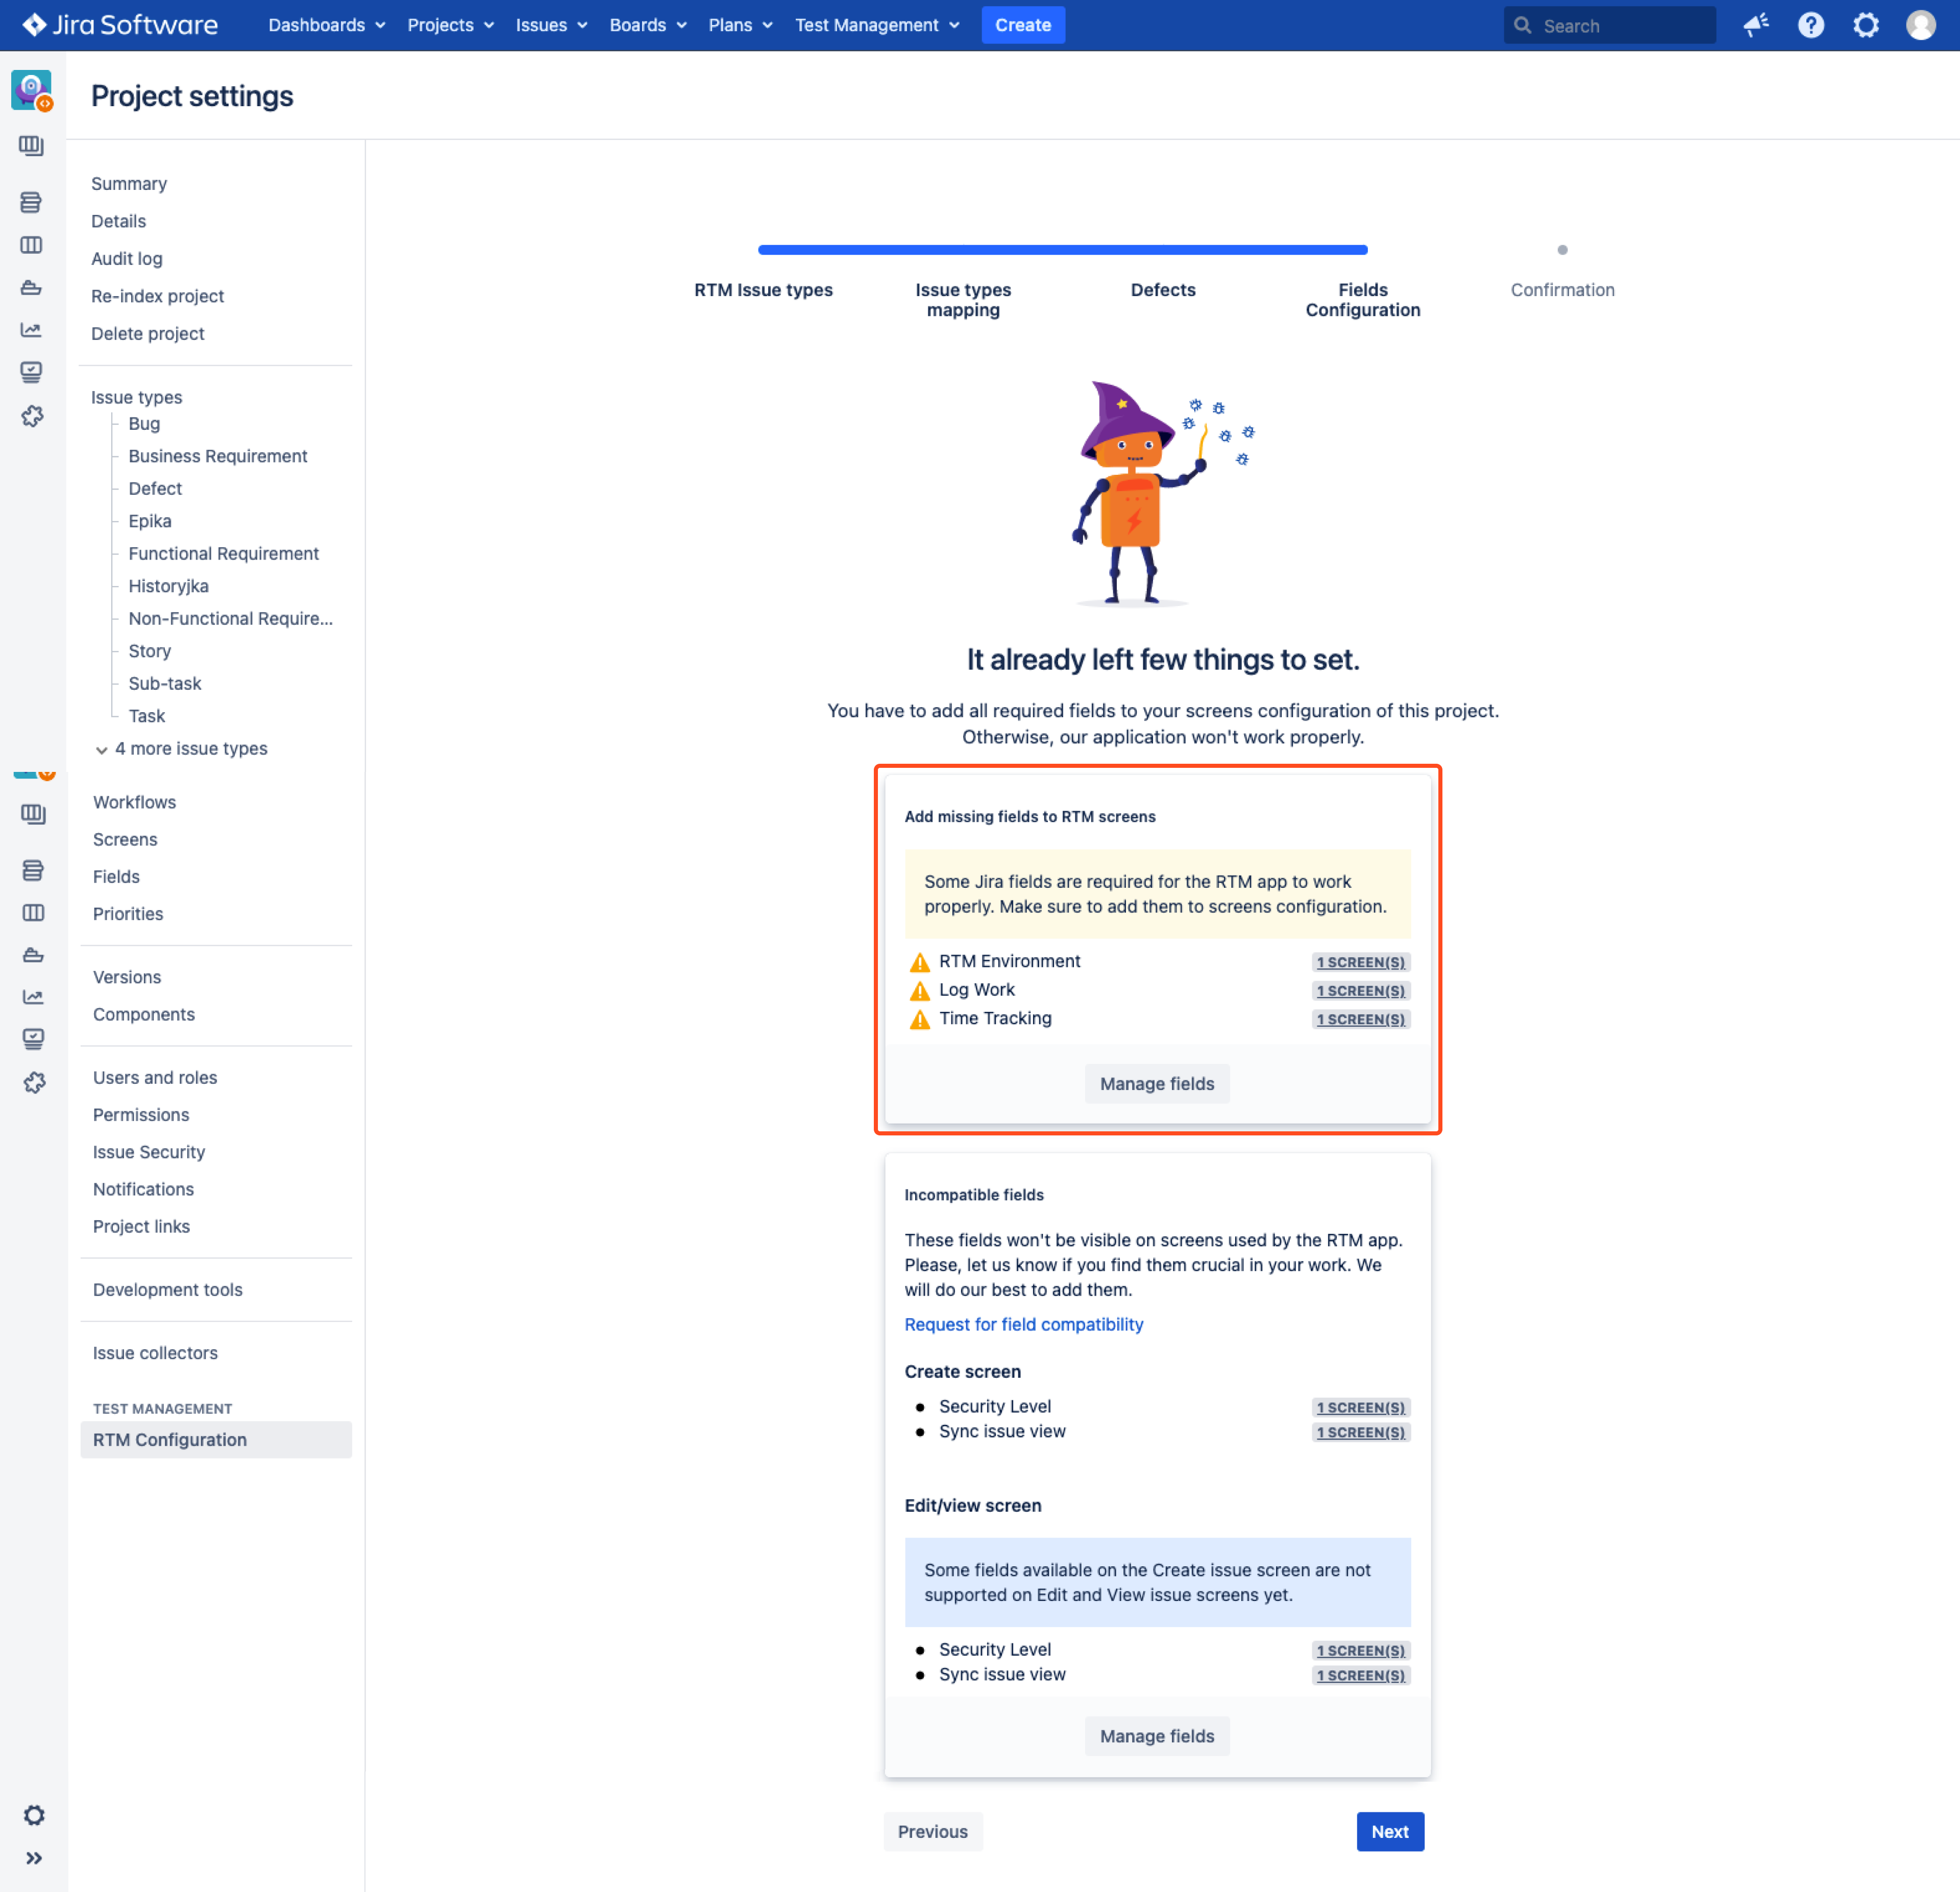
If the system detects missing fields, click Manage fields. You will be redirected to the Screen settings, where you can add required fields.
Information about missing fields also appears on the Configuration page. You can raise a support request for field’s compatibility right from the Configuration page.
Incompatible fields
The RTM app supports most of the fields available in Jira. However, it may happen that your fields won’t be visible on screens used by app. In Incompatible fields section you’ll find fields, that are not supported on the Create, Edit and View issue screens yet.
You can let us know if you find them crucial in your work. Simply click Request for field compatibility and raise a support request. We will do our best to add them.
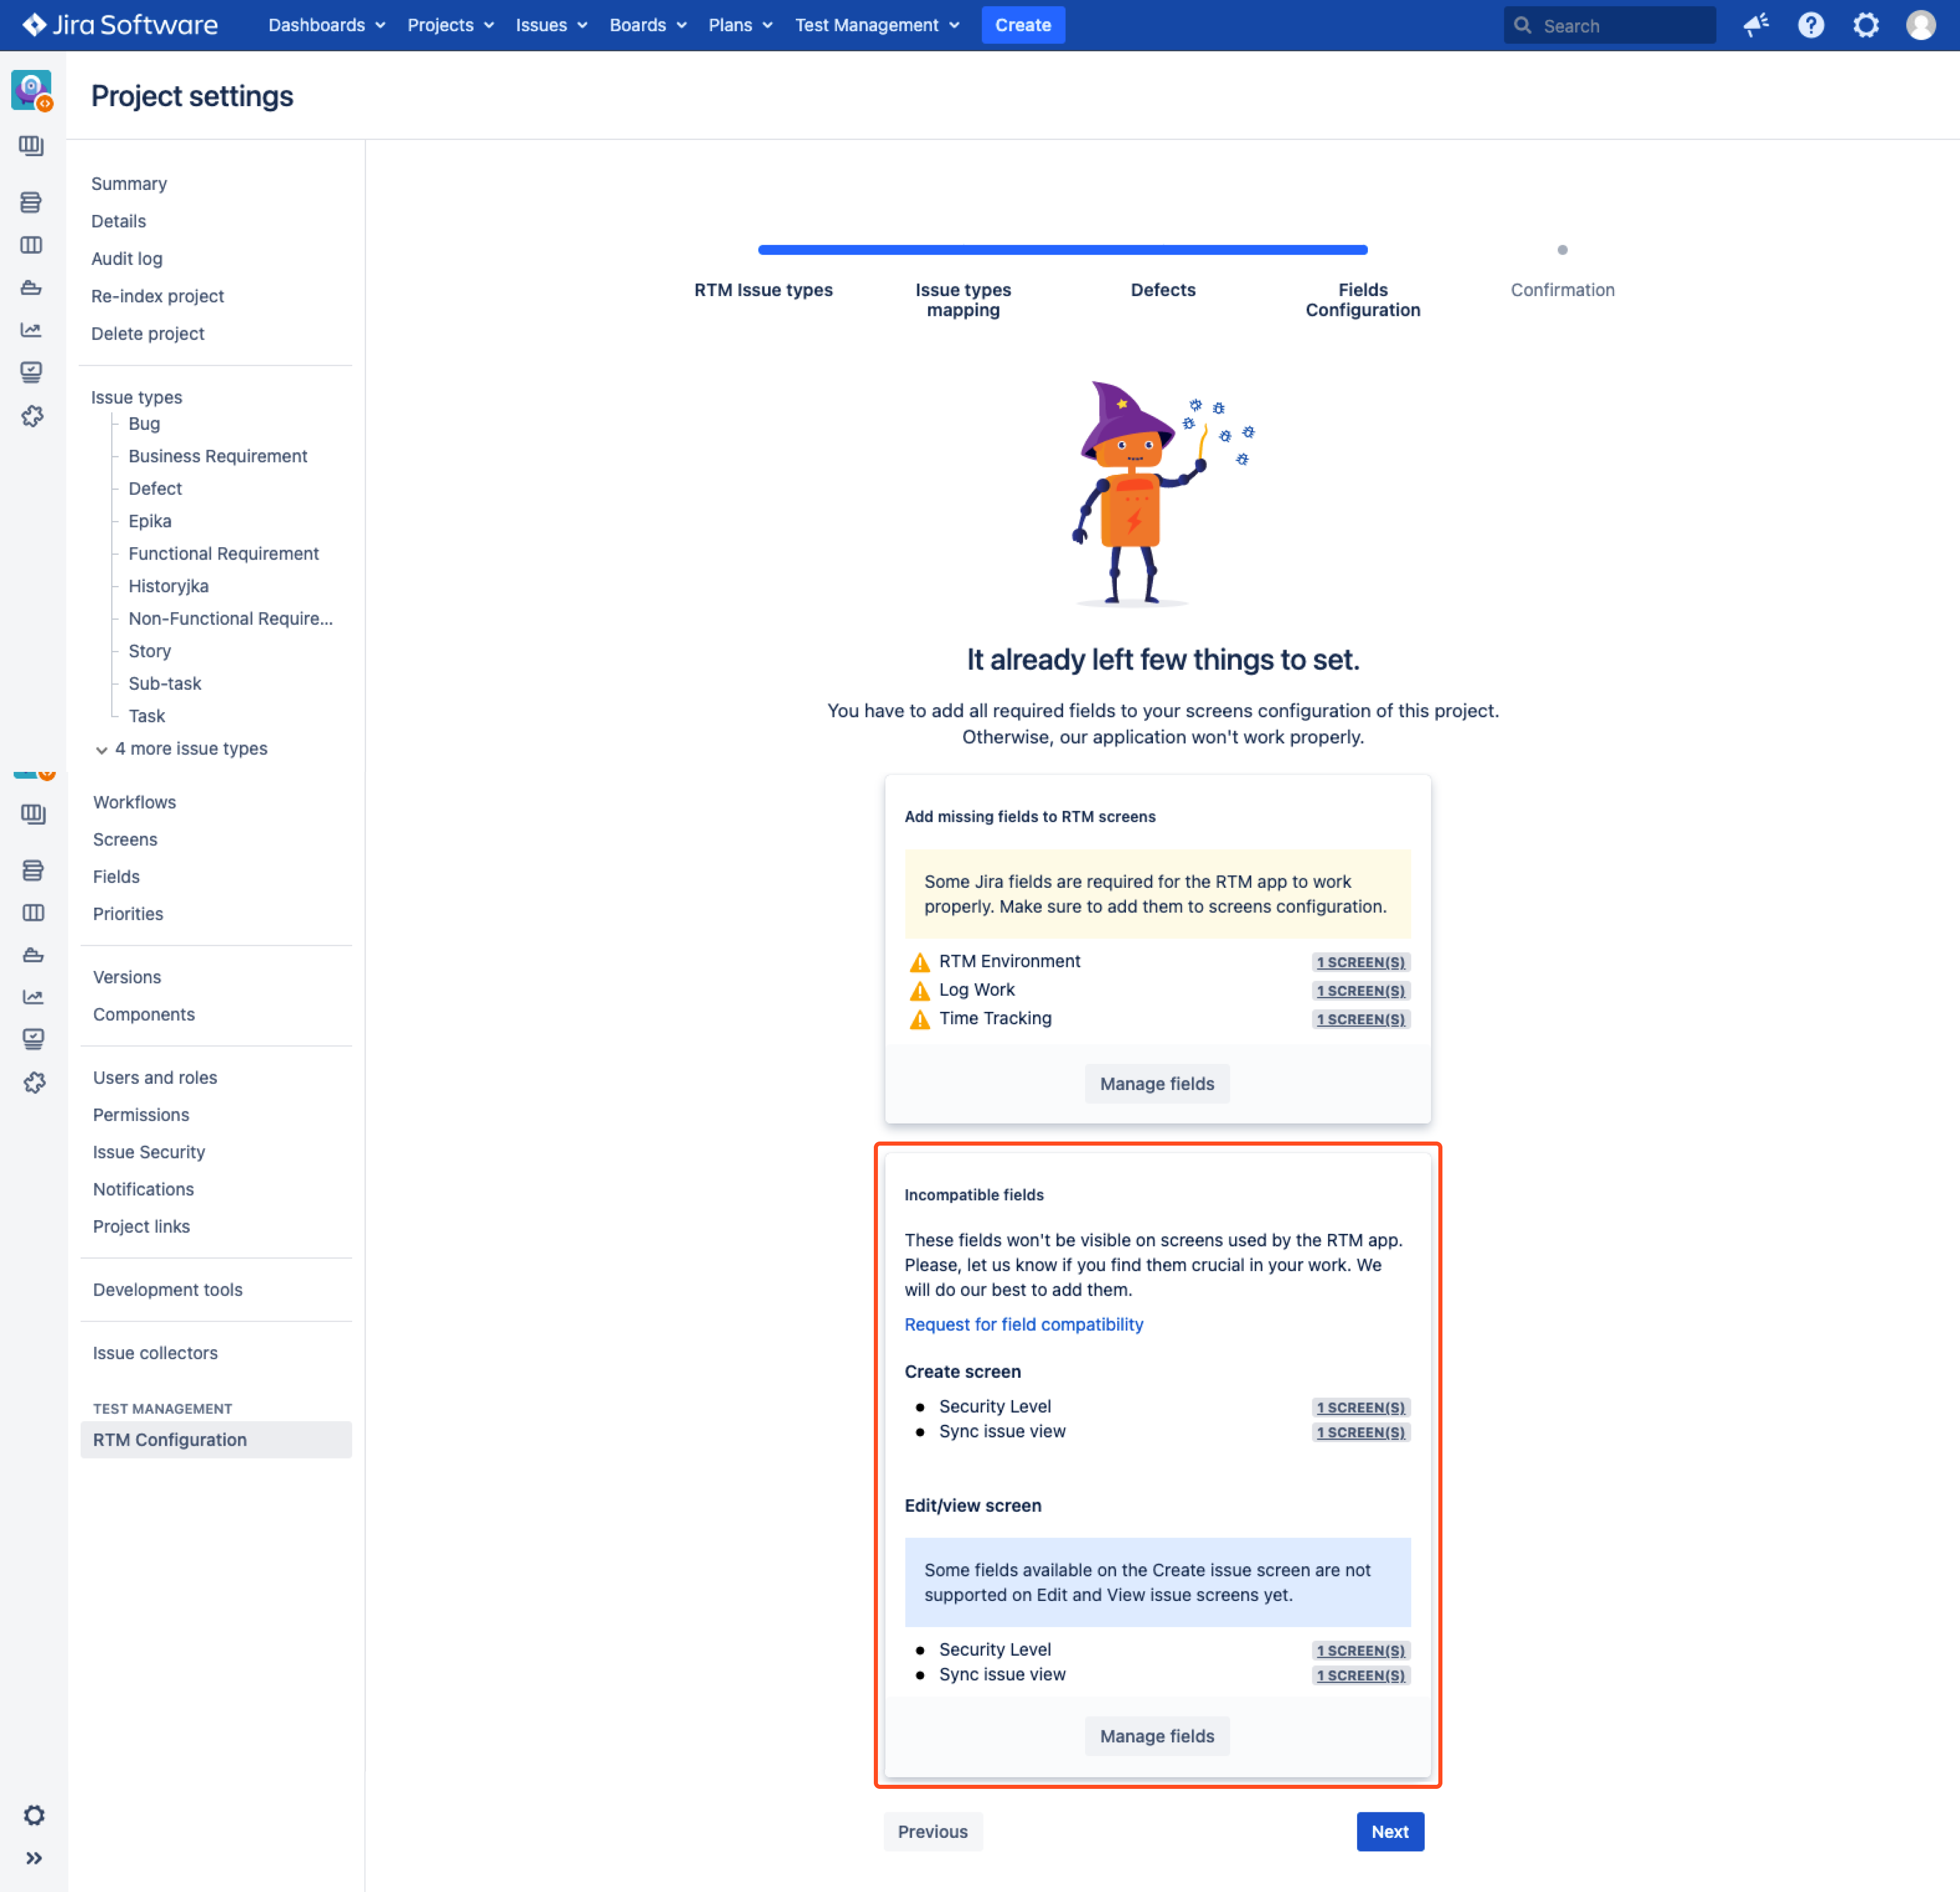
Click Next and navigate to the last step.
Confirmation
Now you can start your adventure with Requirements and Test Management for Jira app.
Steps
To start RTM app:
- Switch Generate sample data for project toggle to on if you need it.
- Click Start Adventure!
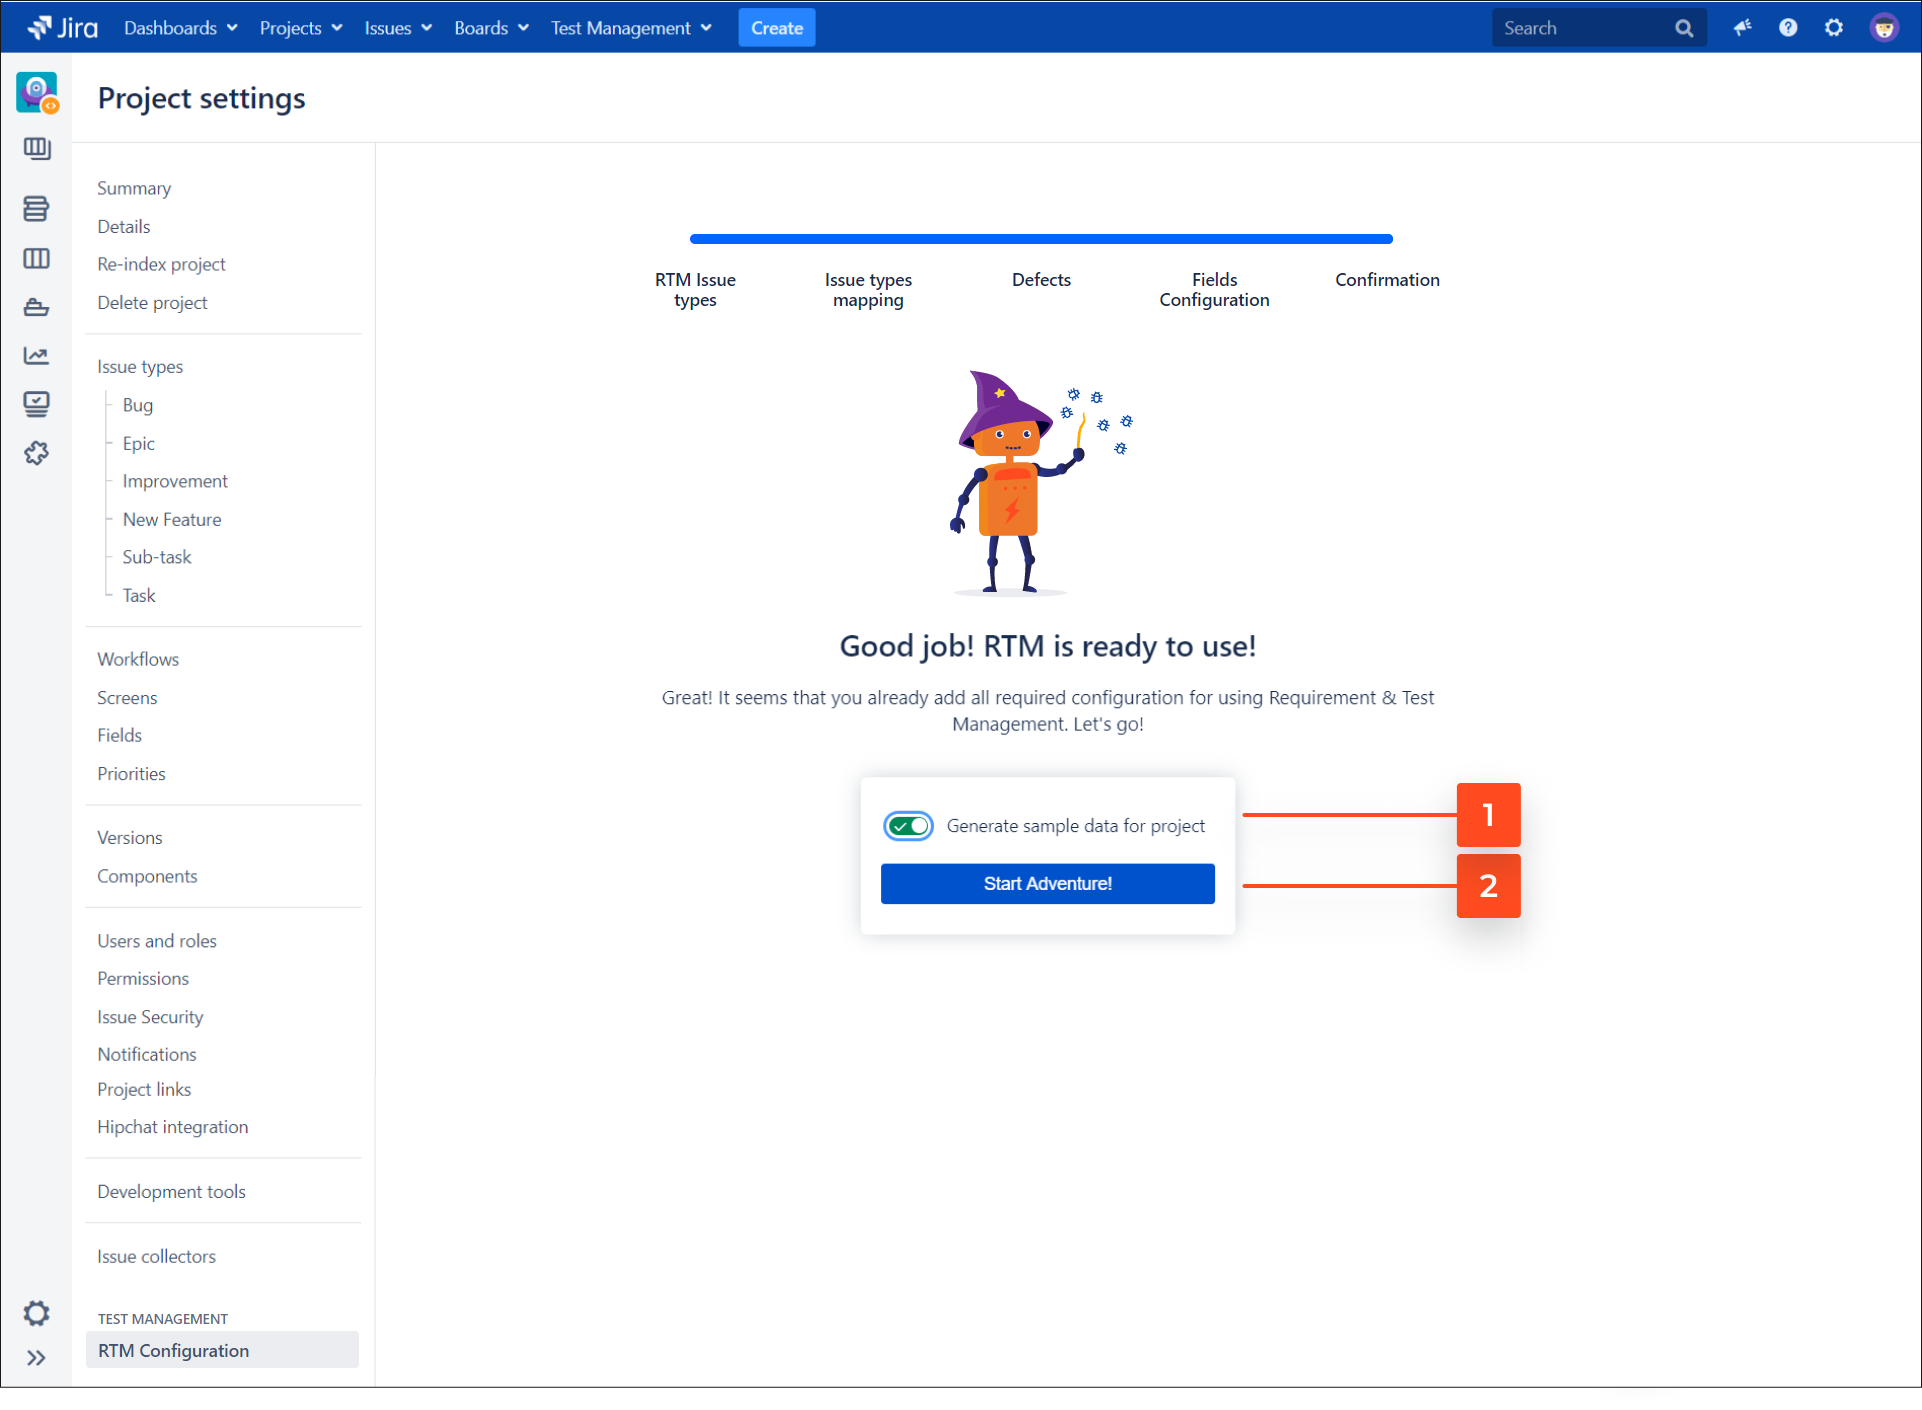
Result
RTM app is ready to use.
The RTM app provides the SAMPLE_RTM label. Thanks to this, users can easily clear their projects from unnecessary data. Filtering issues in project by using SAMPLE_RTM label will expose all issues generated in Onboarding.
Test Management
You can start using Requirements and Test Management app by navigating to the relevant Project.
Expand the left sidebar and select RTM from the project navigation.

List of projects with enabled RTM
As soon as you enable the RTM app, your project will appear on the Projects list in Test Management > Projects.
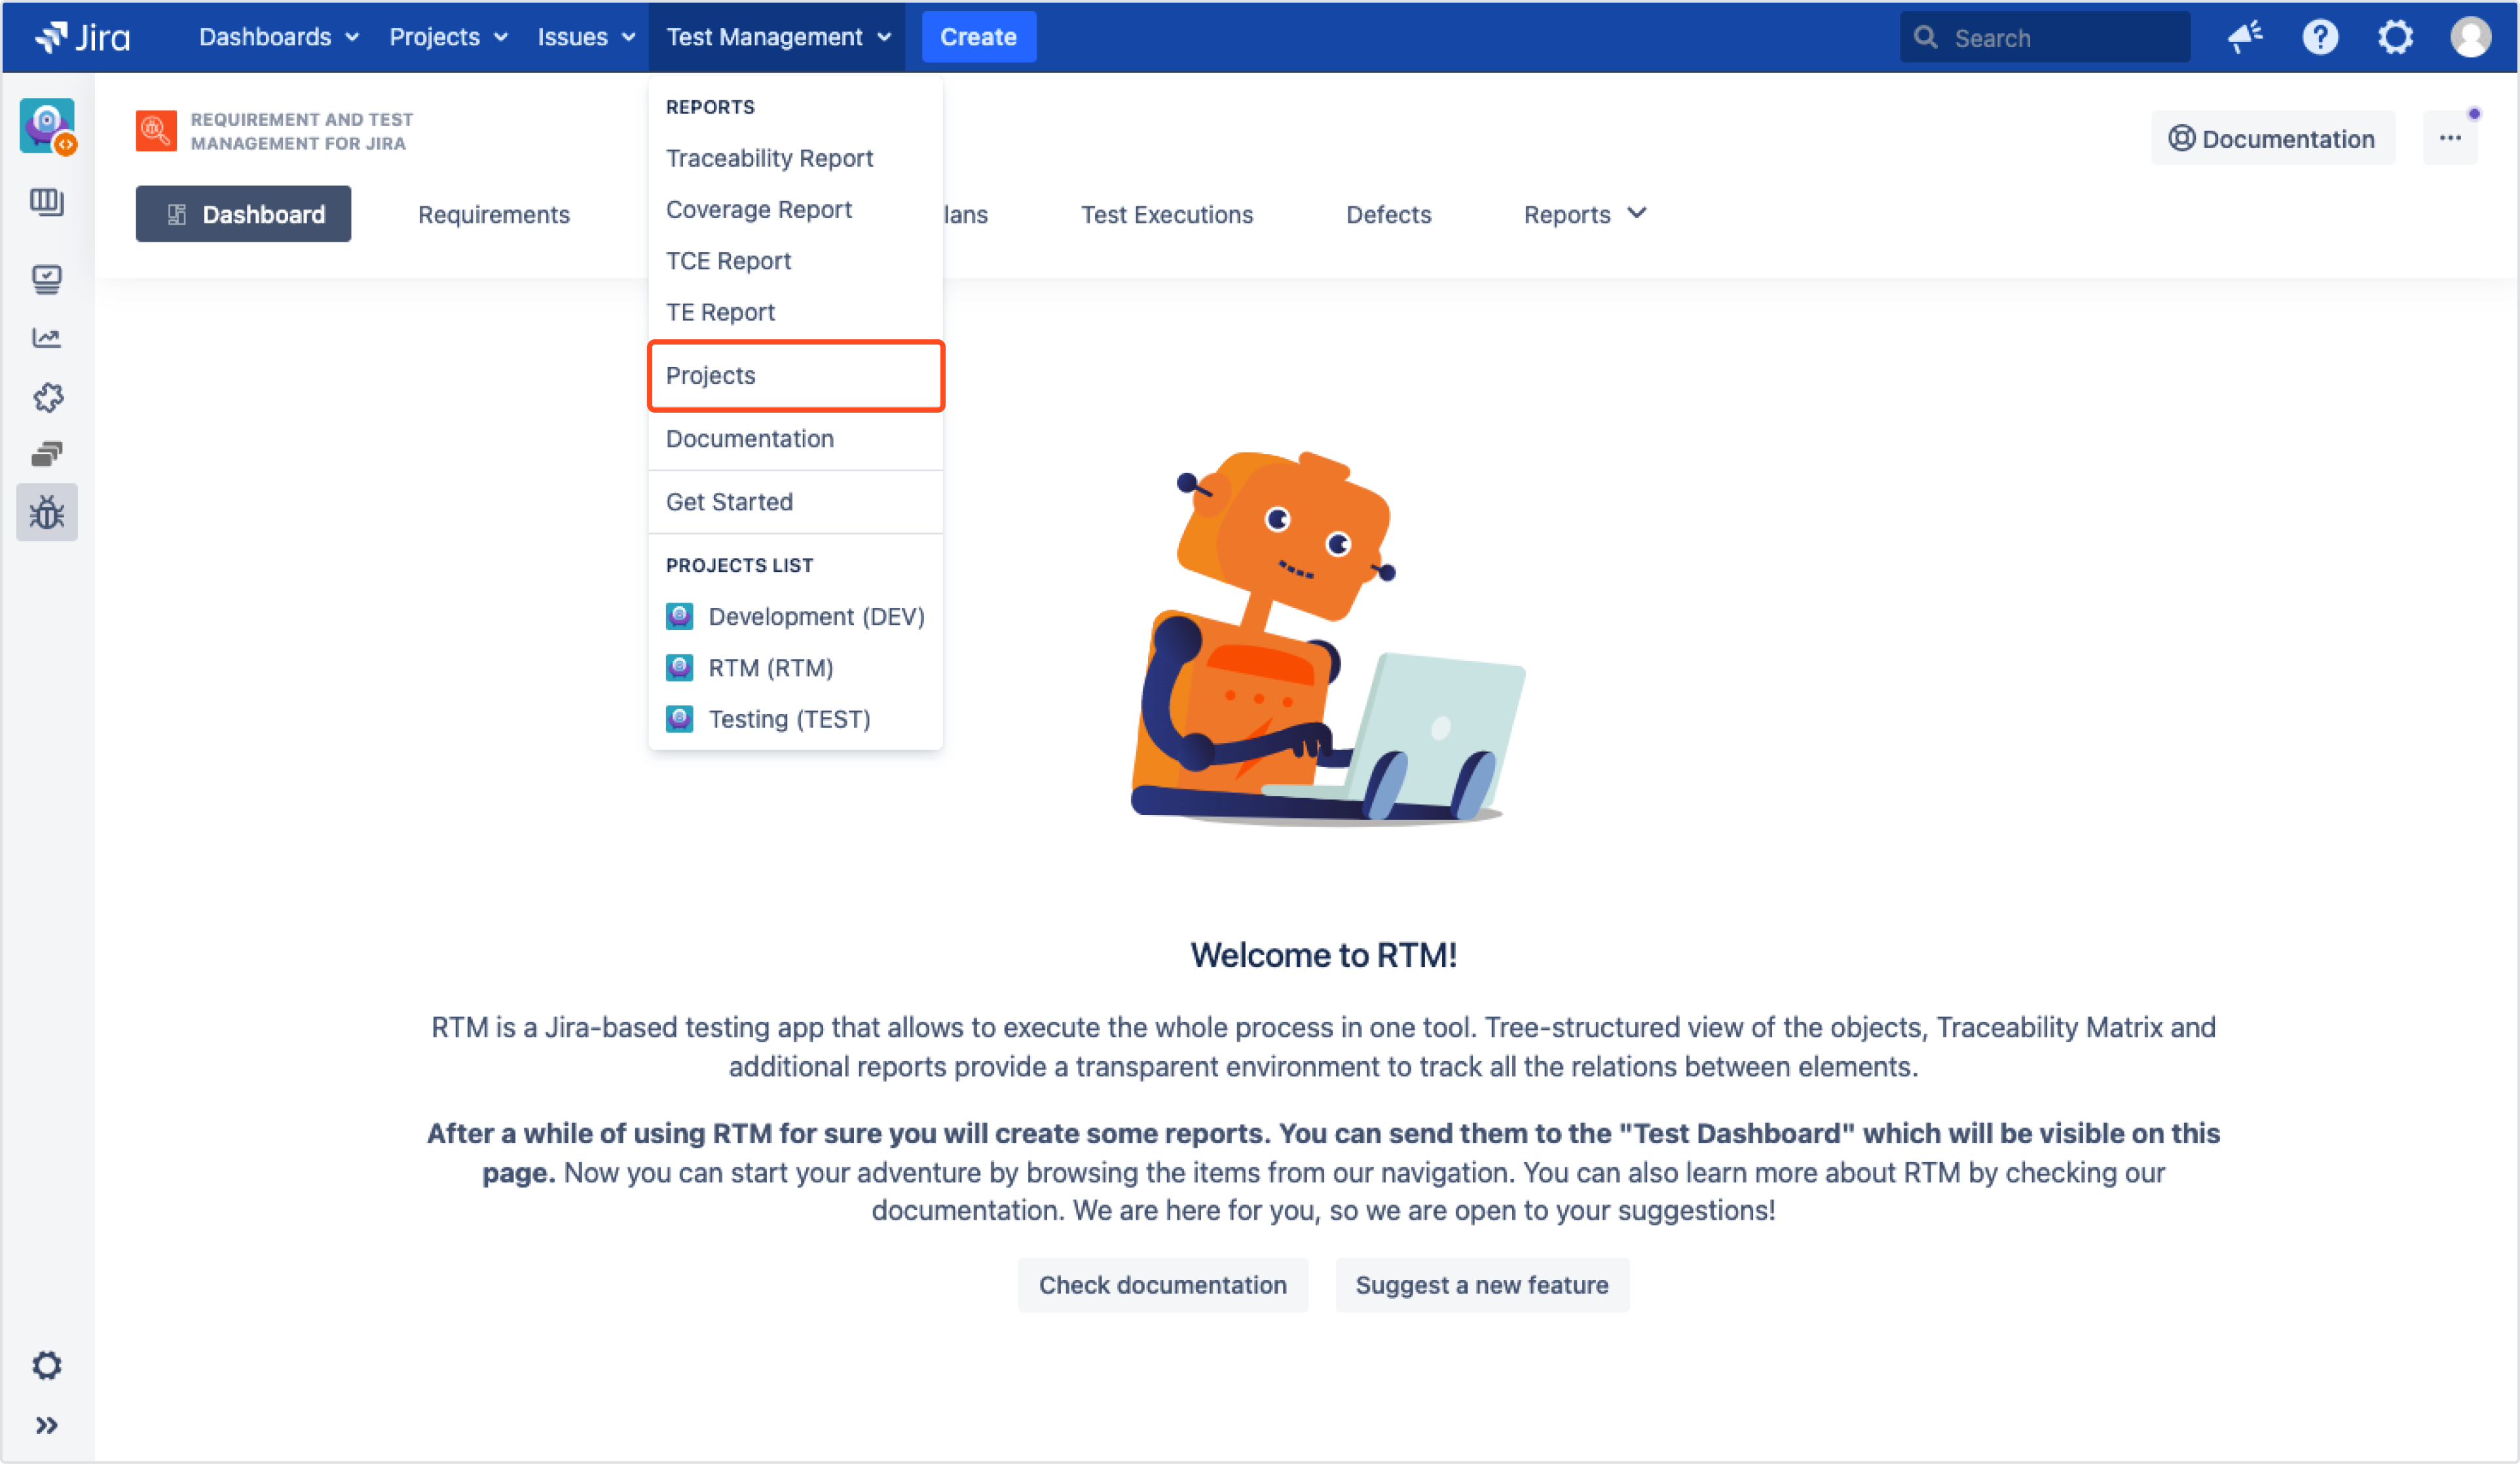
Here, you can enable Requirements and Test Management for Jira in other projects. Simply click Enable app in project, and select one from the list.
Need help?
If you can’t find the answer you need in our documentation, raise a support request*.
*Include as much information as possible to help our support team resolve your issue faster.
