- About TestFLO
- Overview
- For whom
- Key benefits
- Roadmap
- Onboarding
- Basic concepts
- Glossary
- Quick guide for Jira Administrator
- Quick guide for QA manager
- Quick guide for testers
- Demo environment
- Requirements
- Requirements
- Requirement operations
- Designing tests
- Test Case Template
- Organizing tests
- Reporting & tracking
- Reporting and tracking overview
- Requirement Test Coverage Report
- Requirement Traceability Report
- Requirement Test Execution Report
- Test Plan Execution Report
- Test Plan Iterations Report
- Test Execution Report
- Test information panel
- Issue panels
- Export test issues
- Dashboard Gadgets
- Miscellaneous
- TestFLO menu
- Issue Search Dialog
- JQL functions
- Administration & Configuration
- Projects' organization
- Create project
- Project configuration
- TestFLO settings
- TestFLO Permissions
- Custom fields
- Advanced workflow configuration
- Panel Filter Result
- Import/Export TCT
- Test Automation configuration
- Upgrade reports
- Upgrade guide
- Integrations
- Confluence
- REST API
- Configuration Manager for Jira
- Xporter
Quick guide for testers
On this page, the tester will learn how to cover requirements with tests, how to organize and execute them with TestFLO.
You can try out almost everything described below yourself on our Live Demo Environment (login/pass: testflo).
Cover requirements with tests
After the QA manager sets up one or more TestFLO projects, it is time to cover requirements with tests. This means you will be creating Test Case Templates and filling them with steps.
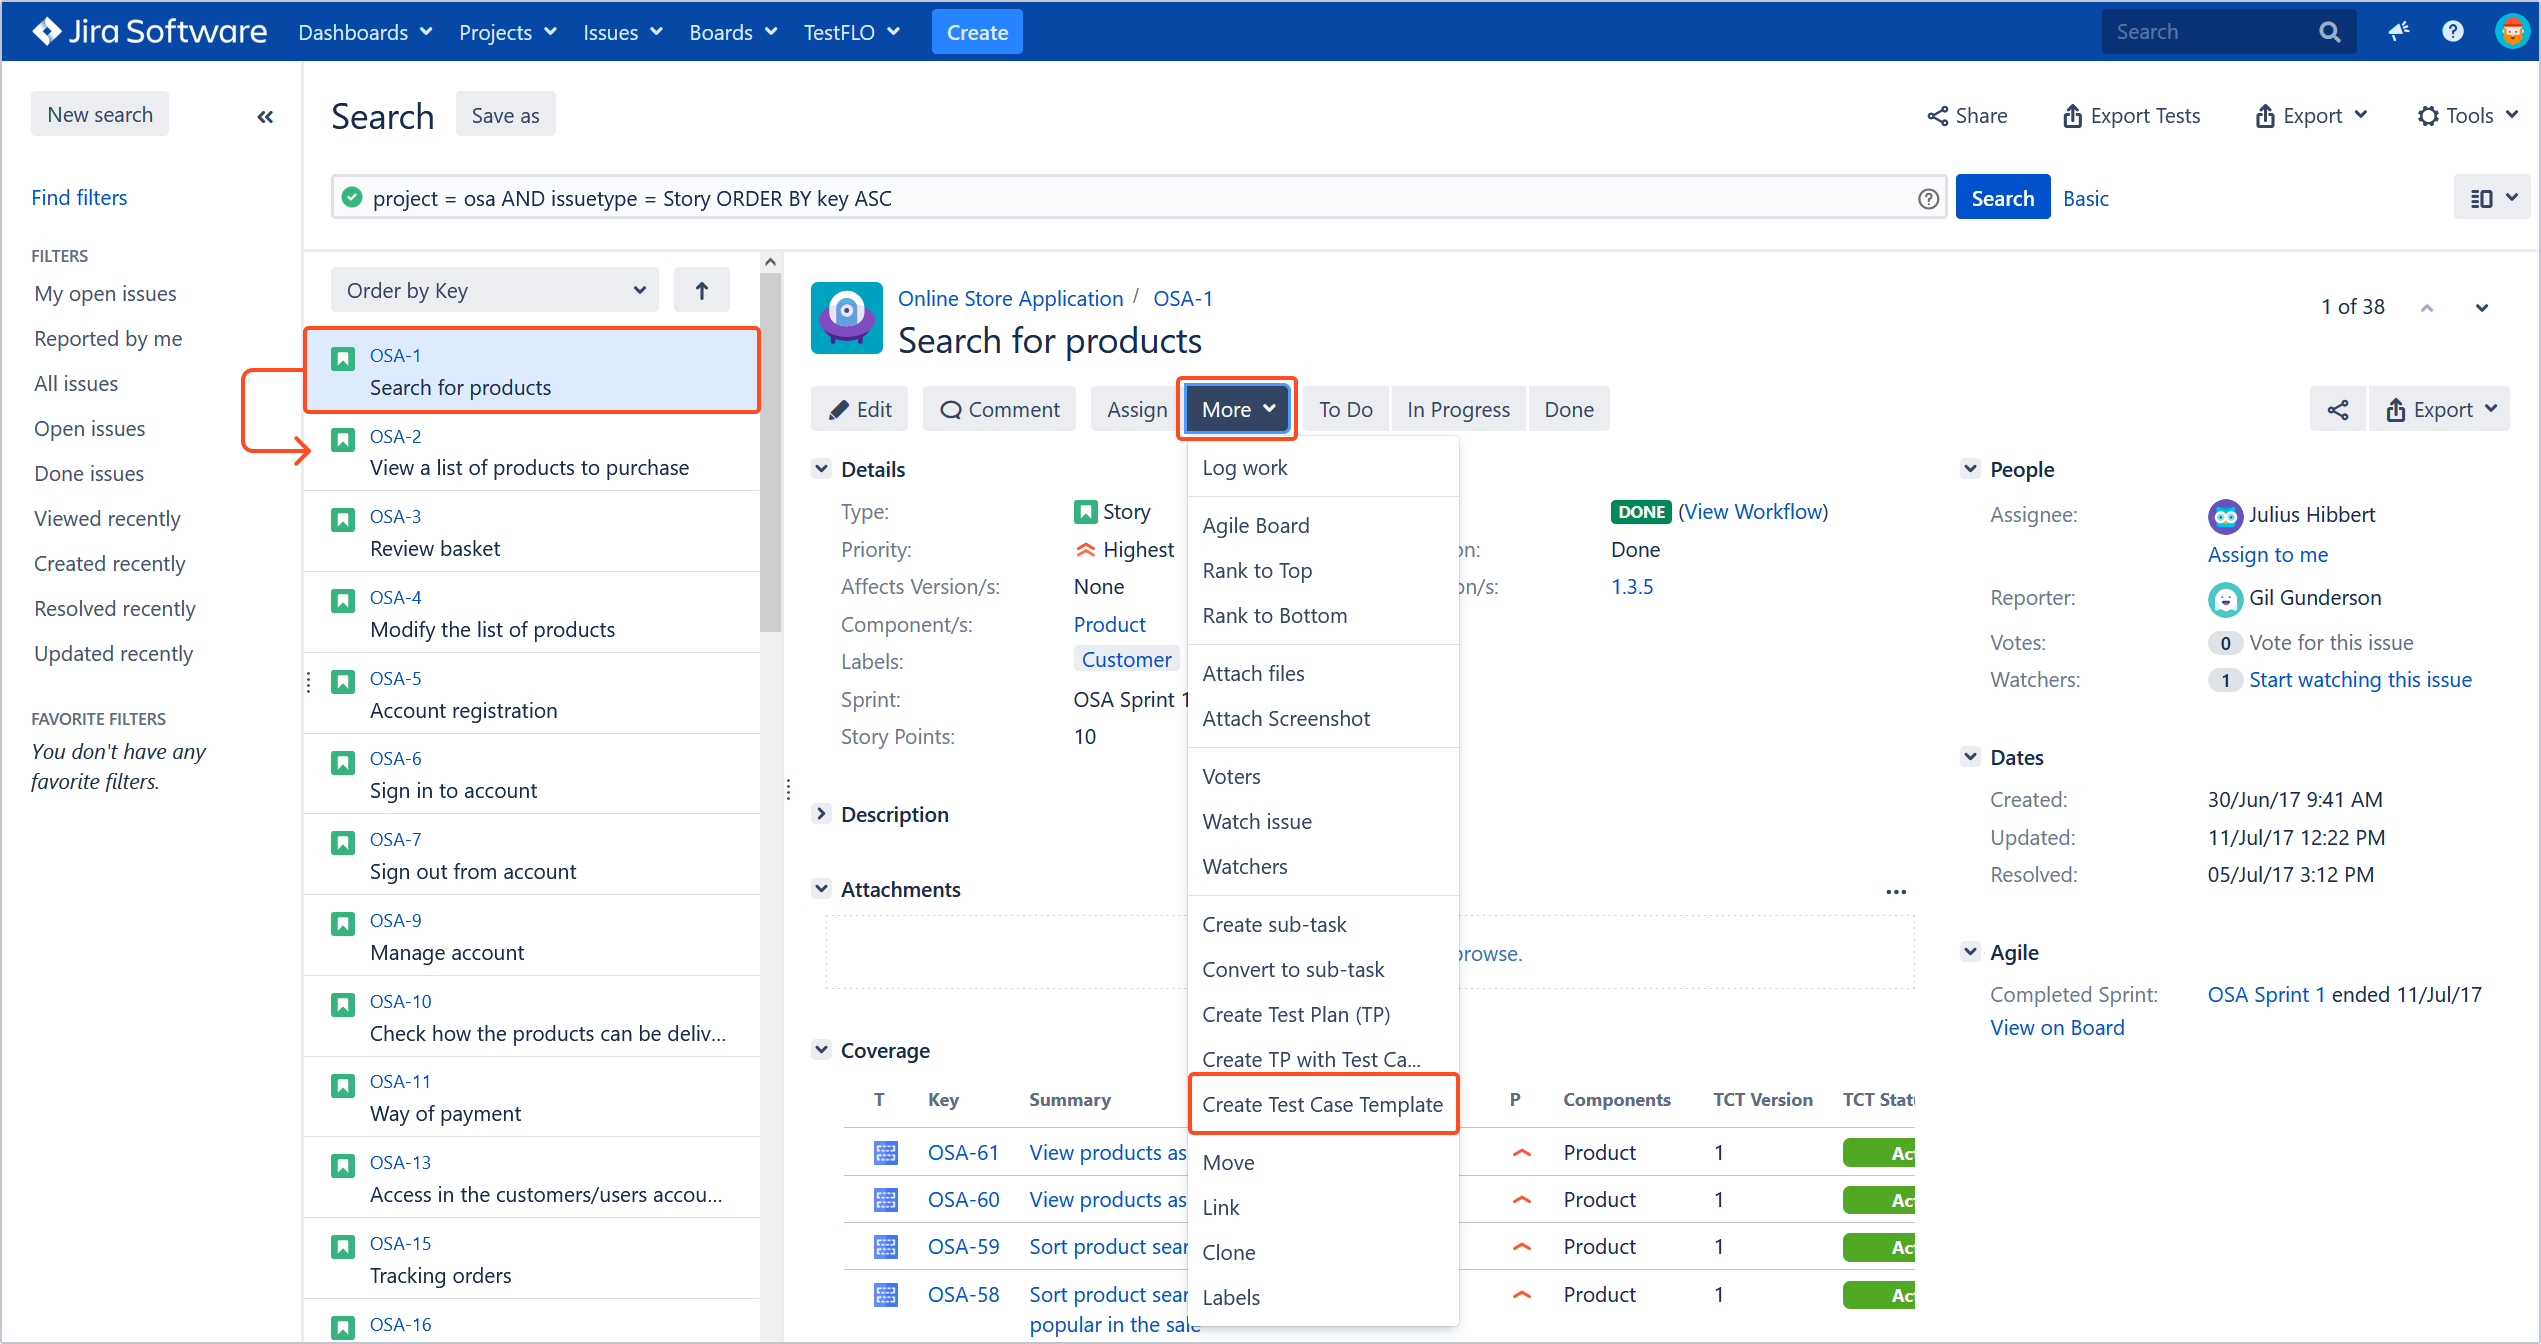
Creating Test Case Templates linked to a requirement can be done in many ways, for example:
- from the menu More on the Requirement, as long as the QA manager has configured the requirement types in Project Settings > Test Management > Requirements tab
- by creating the Test Case Template using the Create button and using the Link with Requirement operation later on it
- by creating the Test Case Template in the Test Repository view
- by using the Create TCTs in bulk operation in the TestFLO menu in the top bar, and executing bulk edit of the Requirements field of the TCT’s afterward
- by importing them from a CSV file
- by creating them using REST API
The first method, starting from requirements, is illustrated below:
- Find your requirements, for example using the TestFLO menu in the top bar and selecting Requirements.

- Further, narrow down the requirements list using basic search or JQL.
- Switch to the Detail View.

- Go requirement by requirement and create as many Test Case Templates for them as you need. In the Test Case Templates create dialog complete all necessary fields that will help you execute the test, including the Steps field.
 Note
NoteIf the Test Case Template create dialog contains too many fields you do not need, then contact your Jira Administrator to configure this screen to suit your needs.
Organize tests
After creating Test Case Templates, you may want to organize them in the Test Repository by creating folders and using drag and drop to place Test Case Templates in the folders. This will make creating Test Plans from the folders much easier.
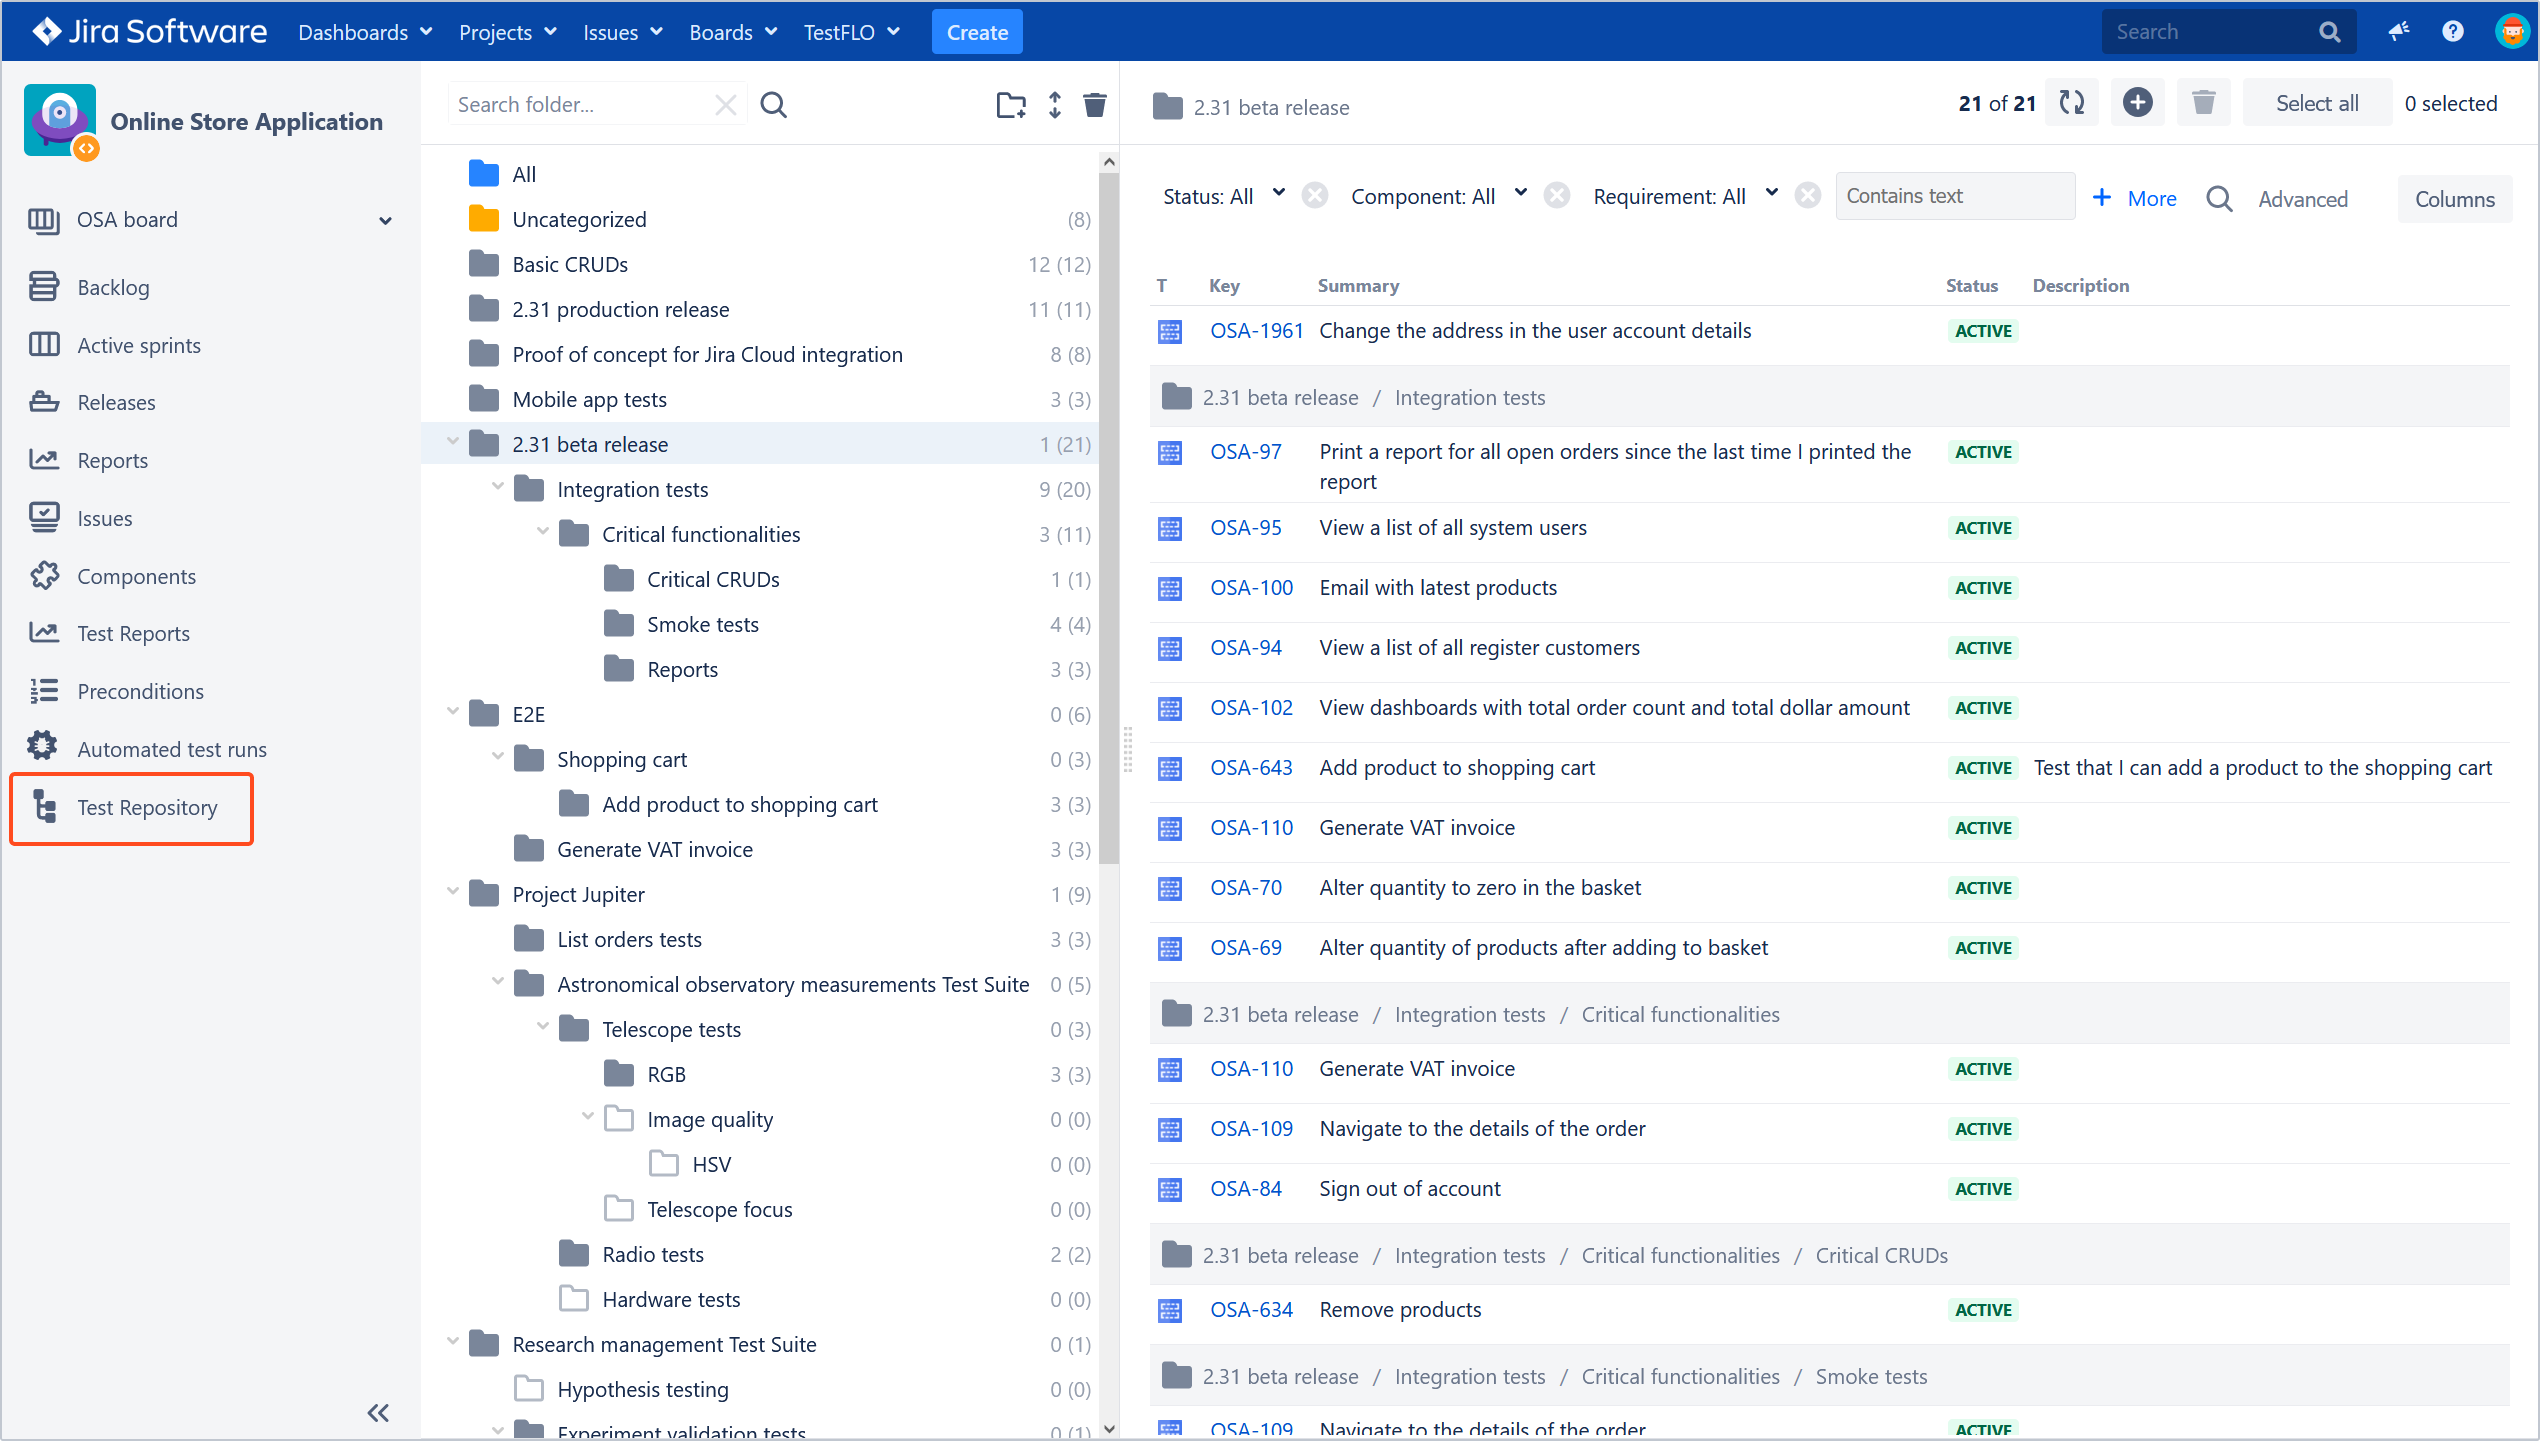
One Test Case Tempalte can belong to many folders, and TestFLO provides JQL functions to enable searching for Test Case Templates that belong to specified folders. It’s up to you to decide what the folders mean. Some choose to use them to represent versions of the application that they are working on. Others organize their Test Repository by test categories, f.e. integration tests, smoke tests, etc. Some use them to represent test sets. Others use a mixed approach or one customized to their specific case. Use whatever makes sense to your team and workflow.
Execute tests
At this point, the person responsible for creating the Test Plan should do their part. This step is covered in the Quick guide for the QA manager.
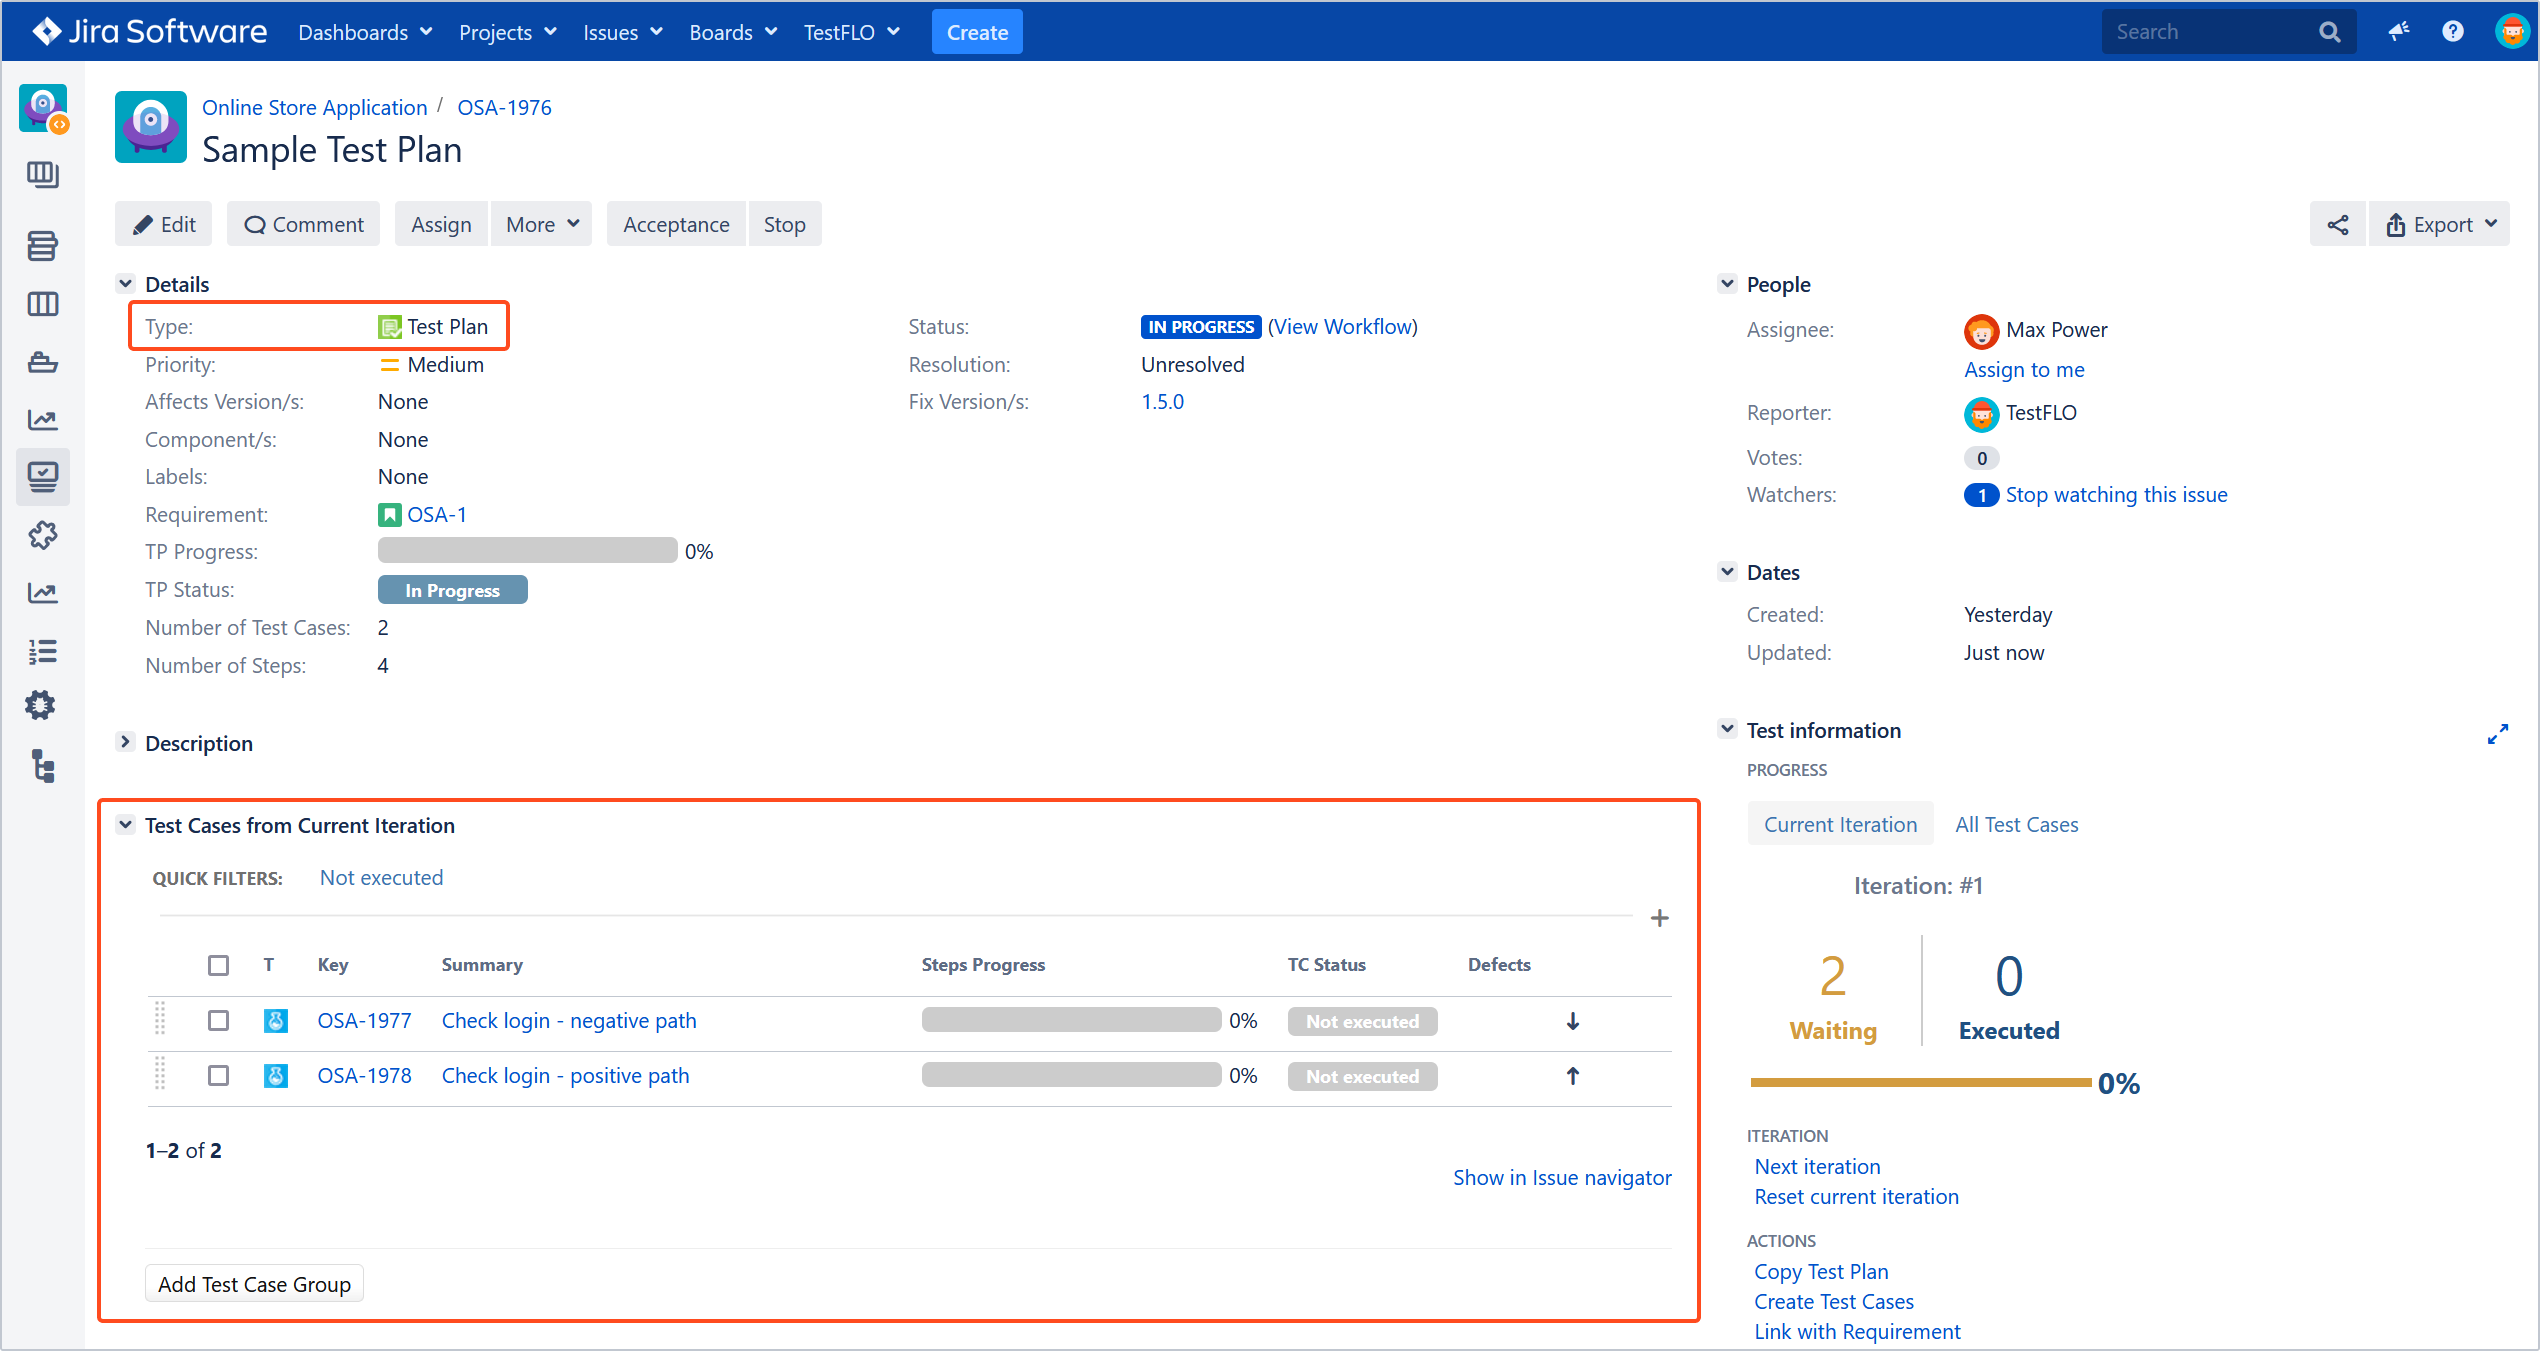
- After the Test Plan is created, you will either be assigned to a particular Test Case to be executed, or you will be asked to assign yourself to them on your own - this depends on how testing is organized in your organization.
- You will find the Test Cases to be executed on the Test Plan.
 Note
NoteThe columns in the Test Cases panel can be modified in TestFLO global settings accessible by your Jira administrator. In the future, TestFLO will enable testers to personalize the columns themselves.
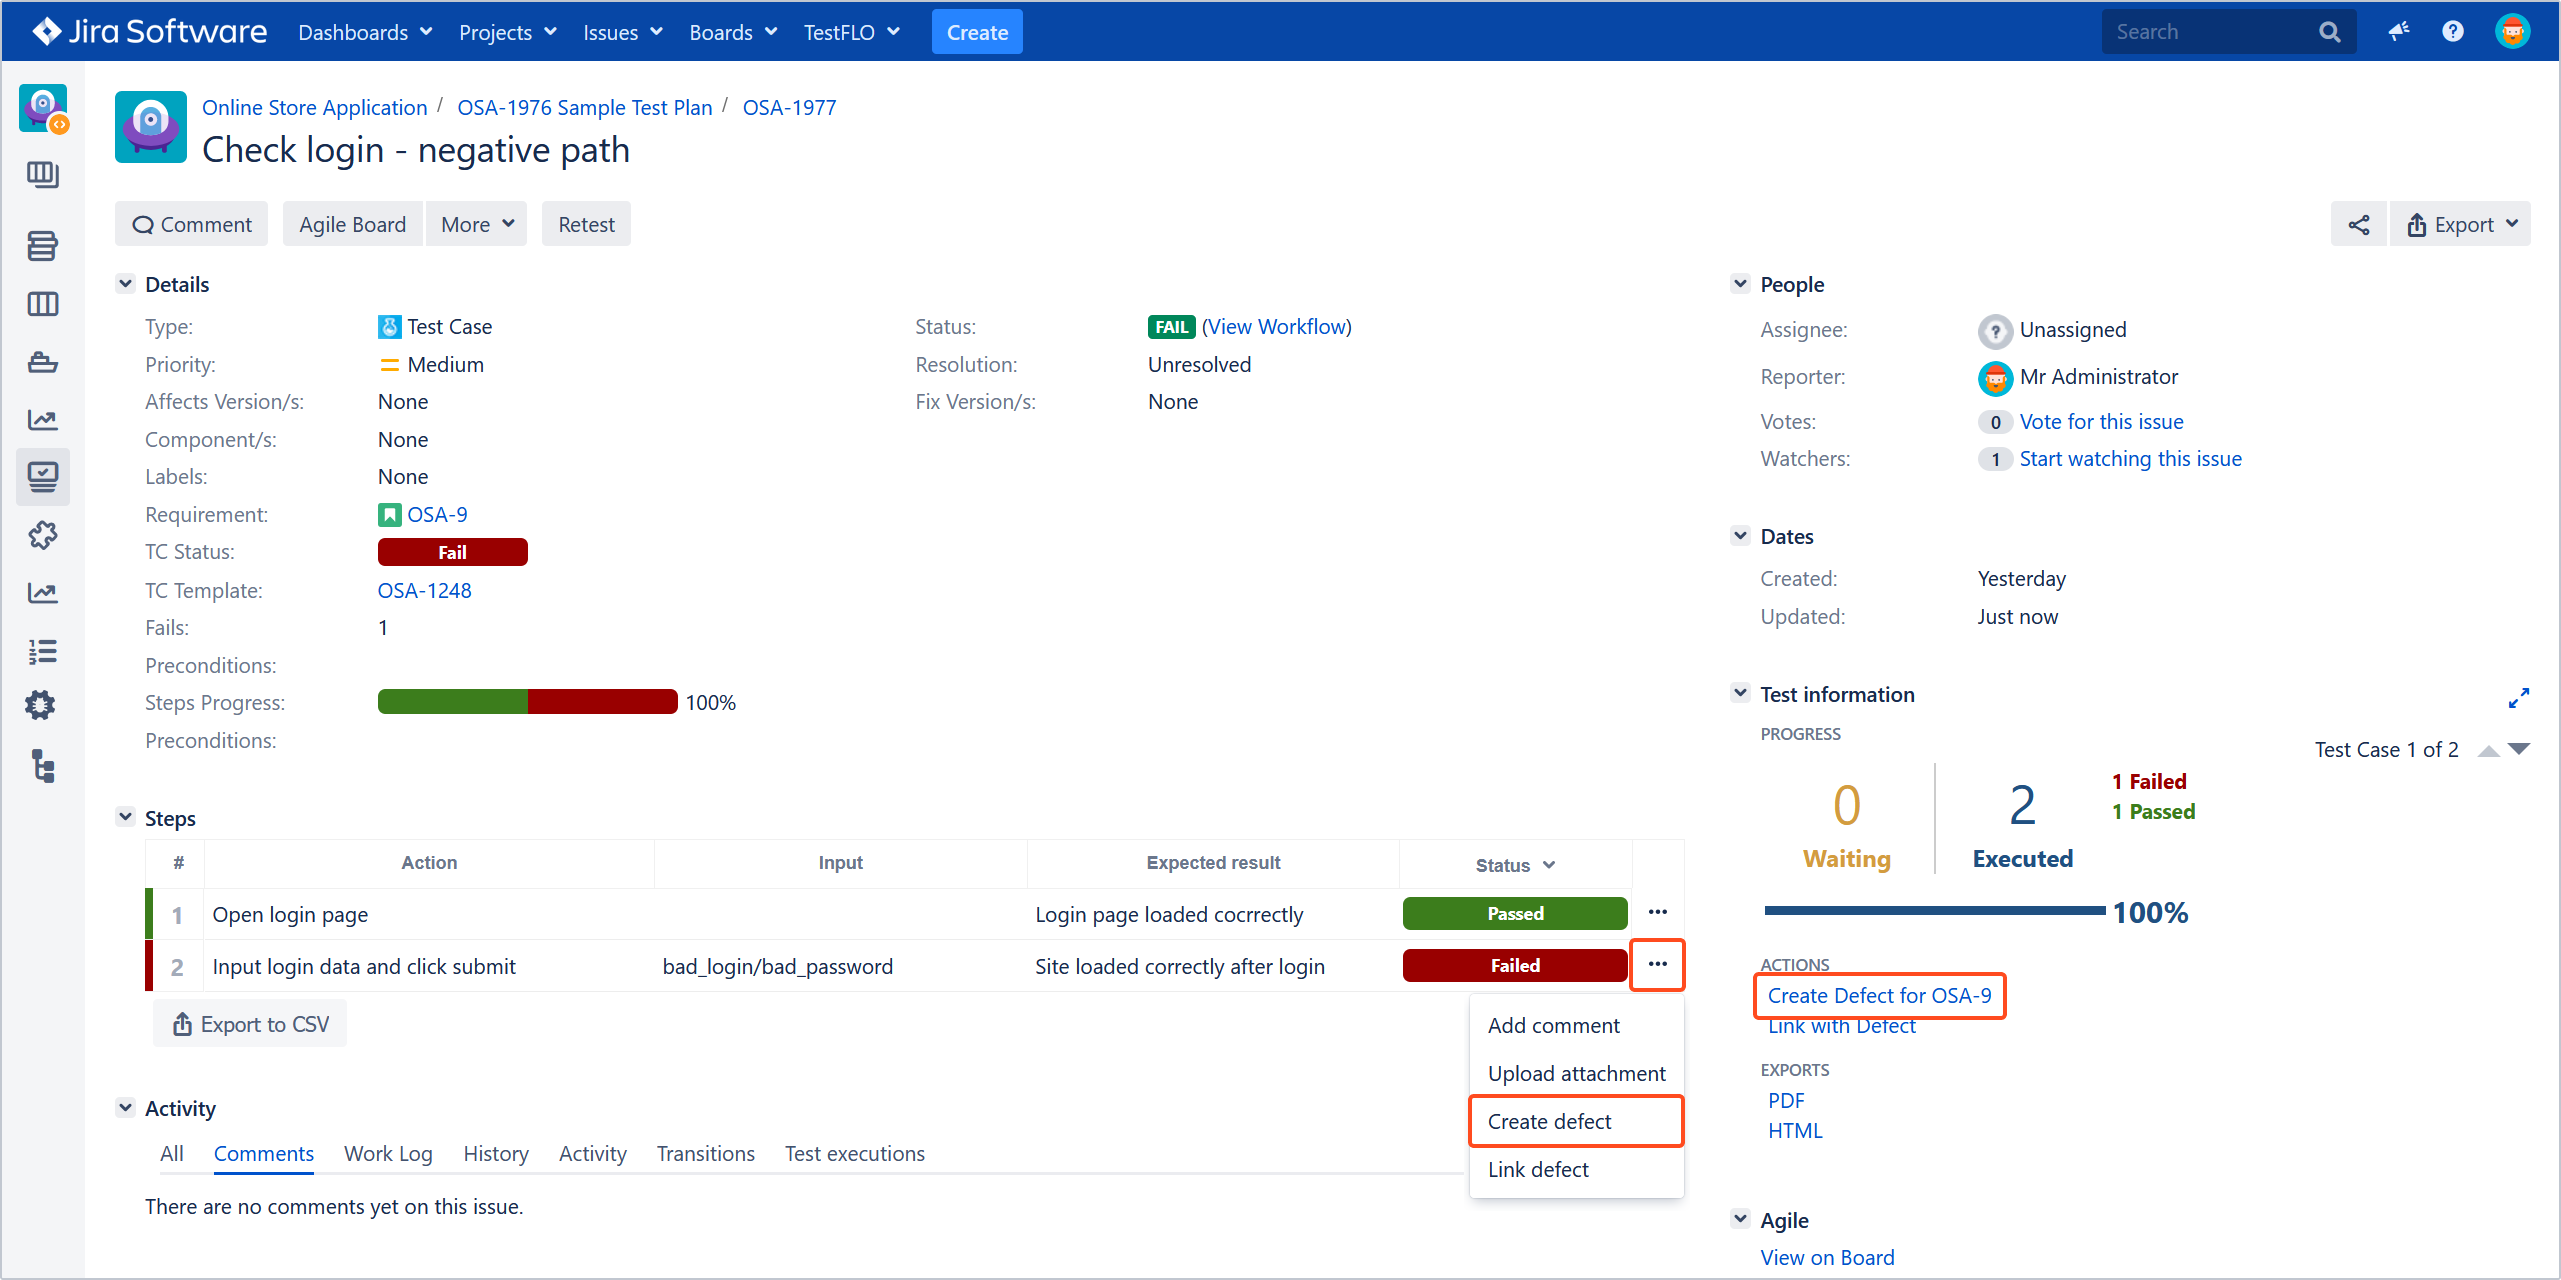
- After clicking on the Test Case’s issue key or Summary, you will see the Test Case with its steps. Use the buttons at the top to change the status of the Test Case, and use the statuses of steps to mark them properly as you go.
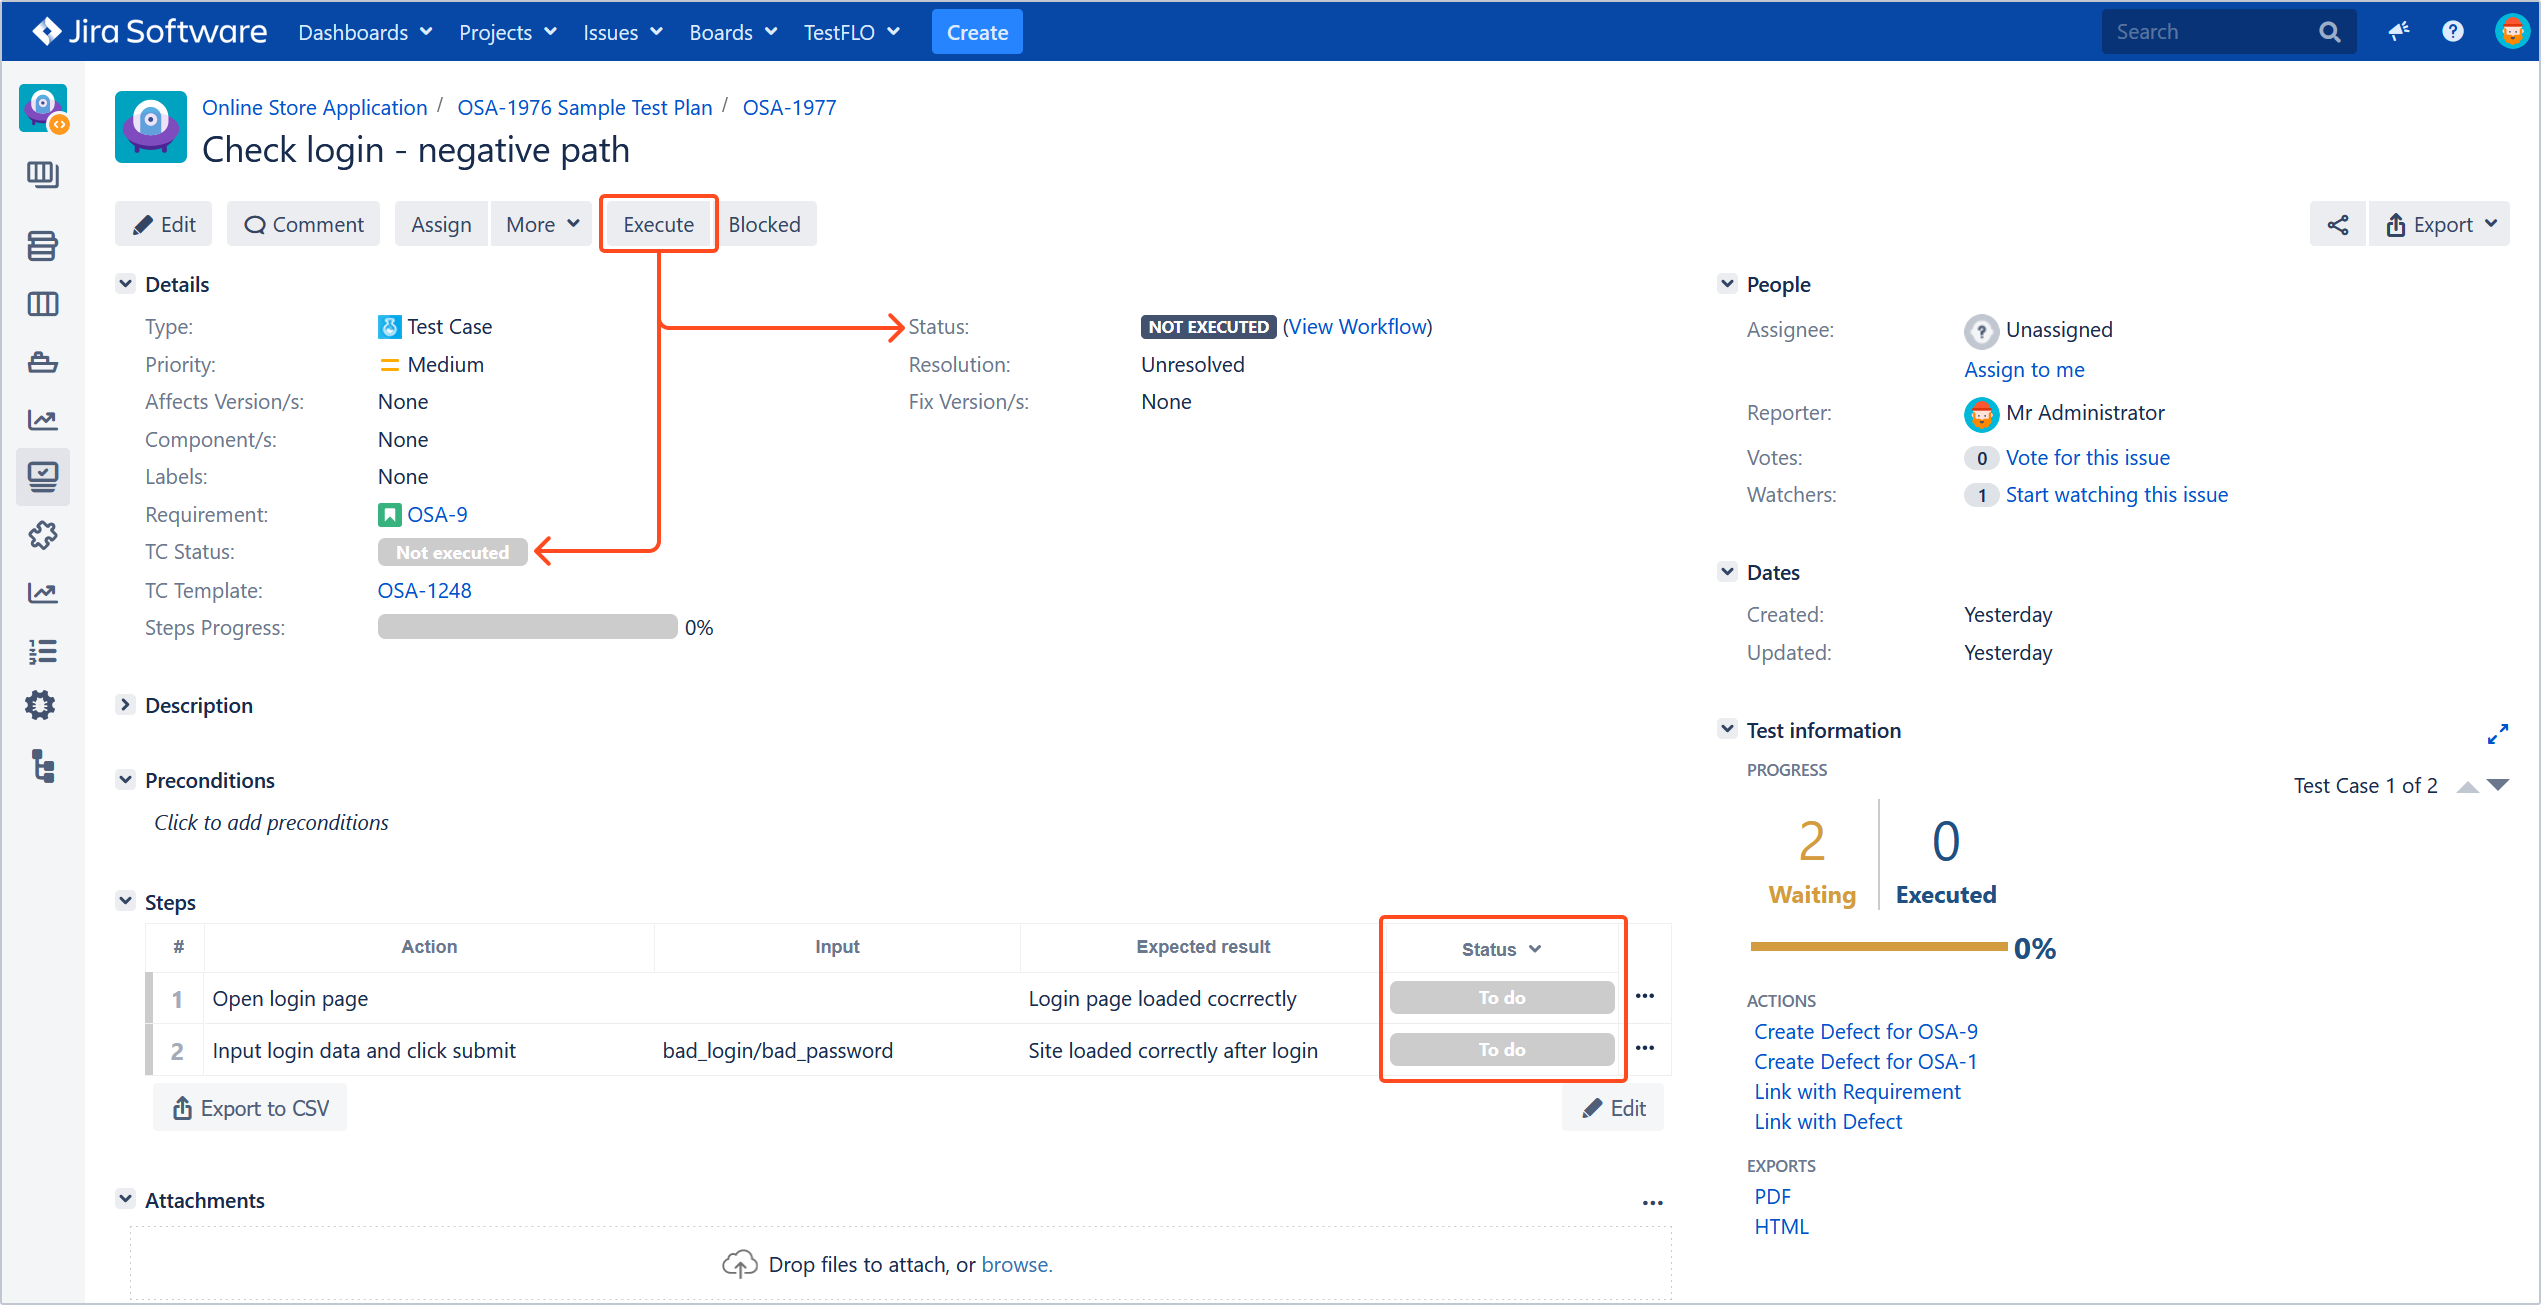
- Use the Create defect operation on the right to create a defect linked to the whole Test Case, or the operation under the three dots menu to create a defect linked to a specific test step.
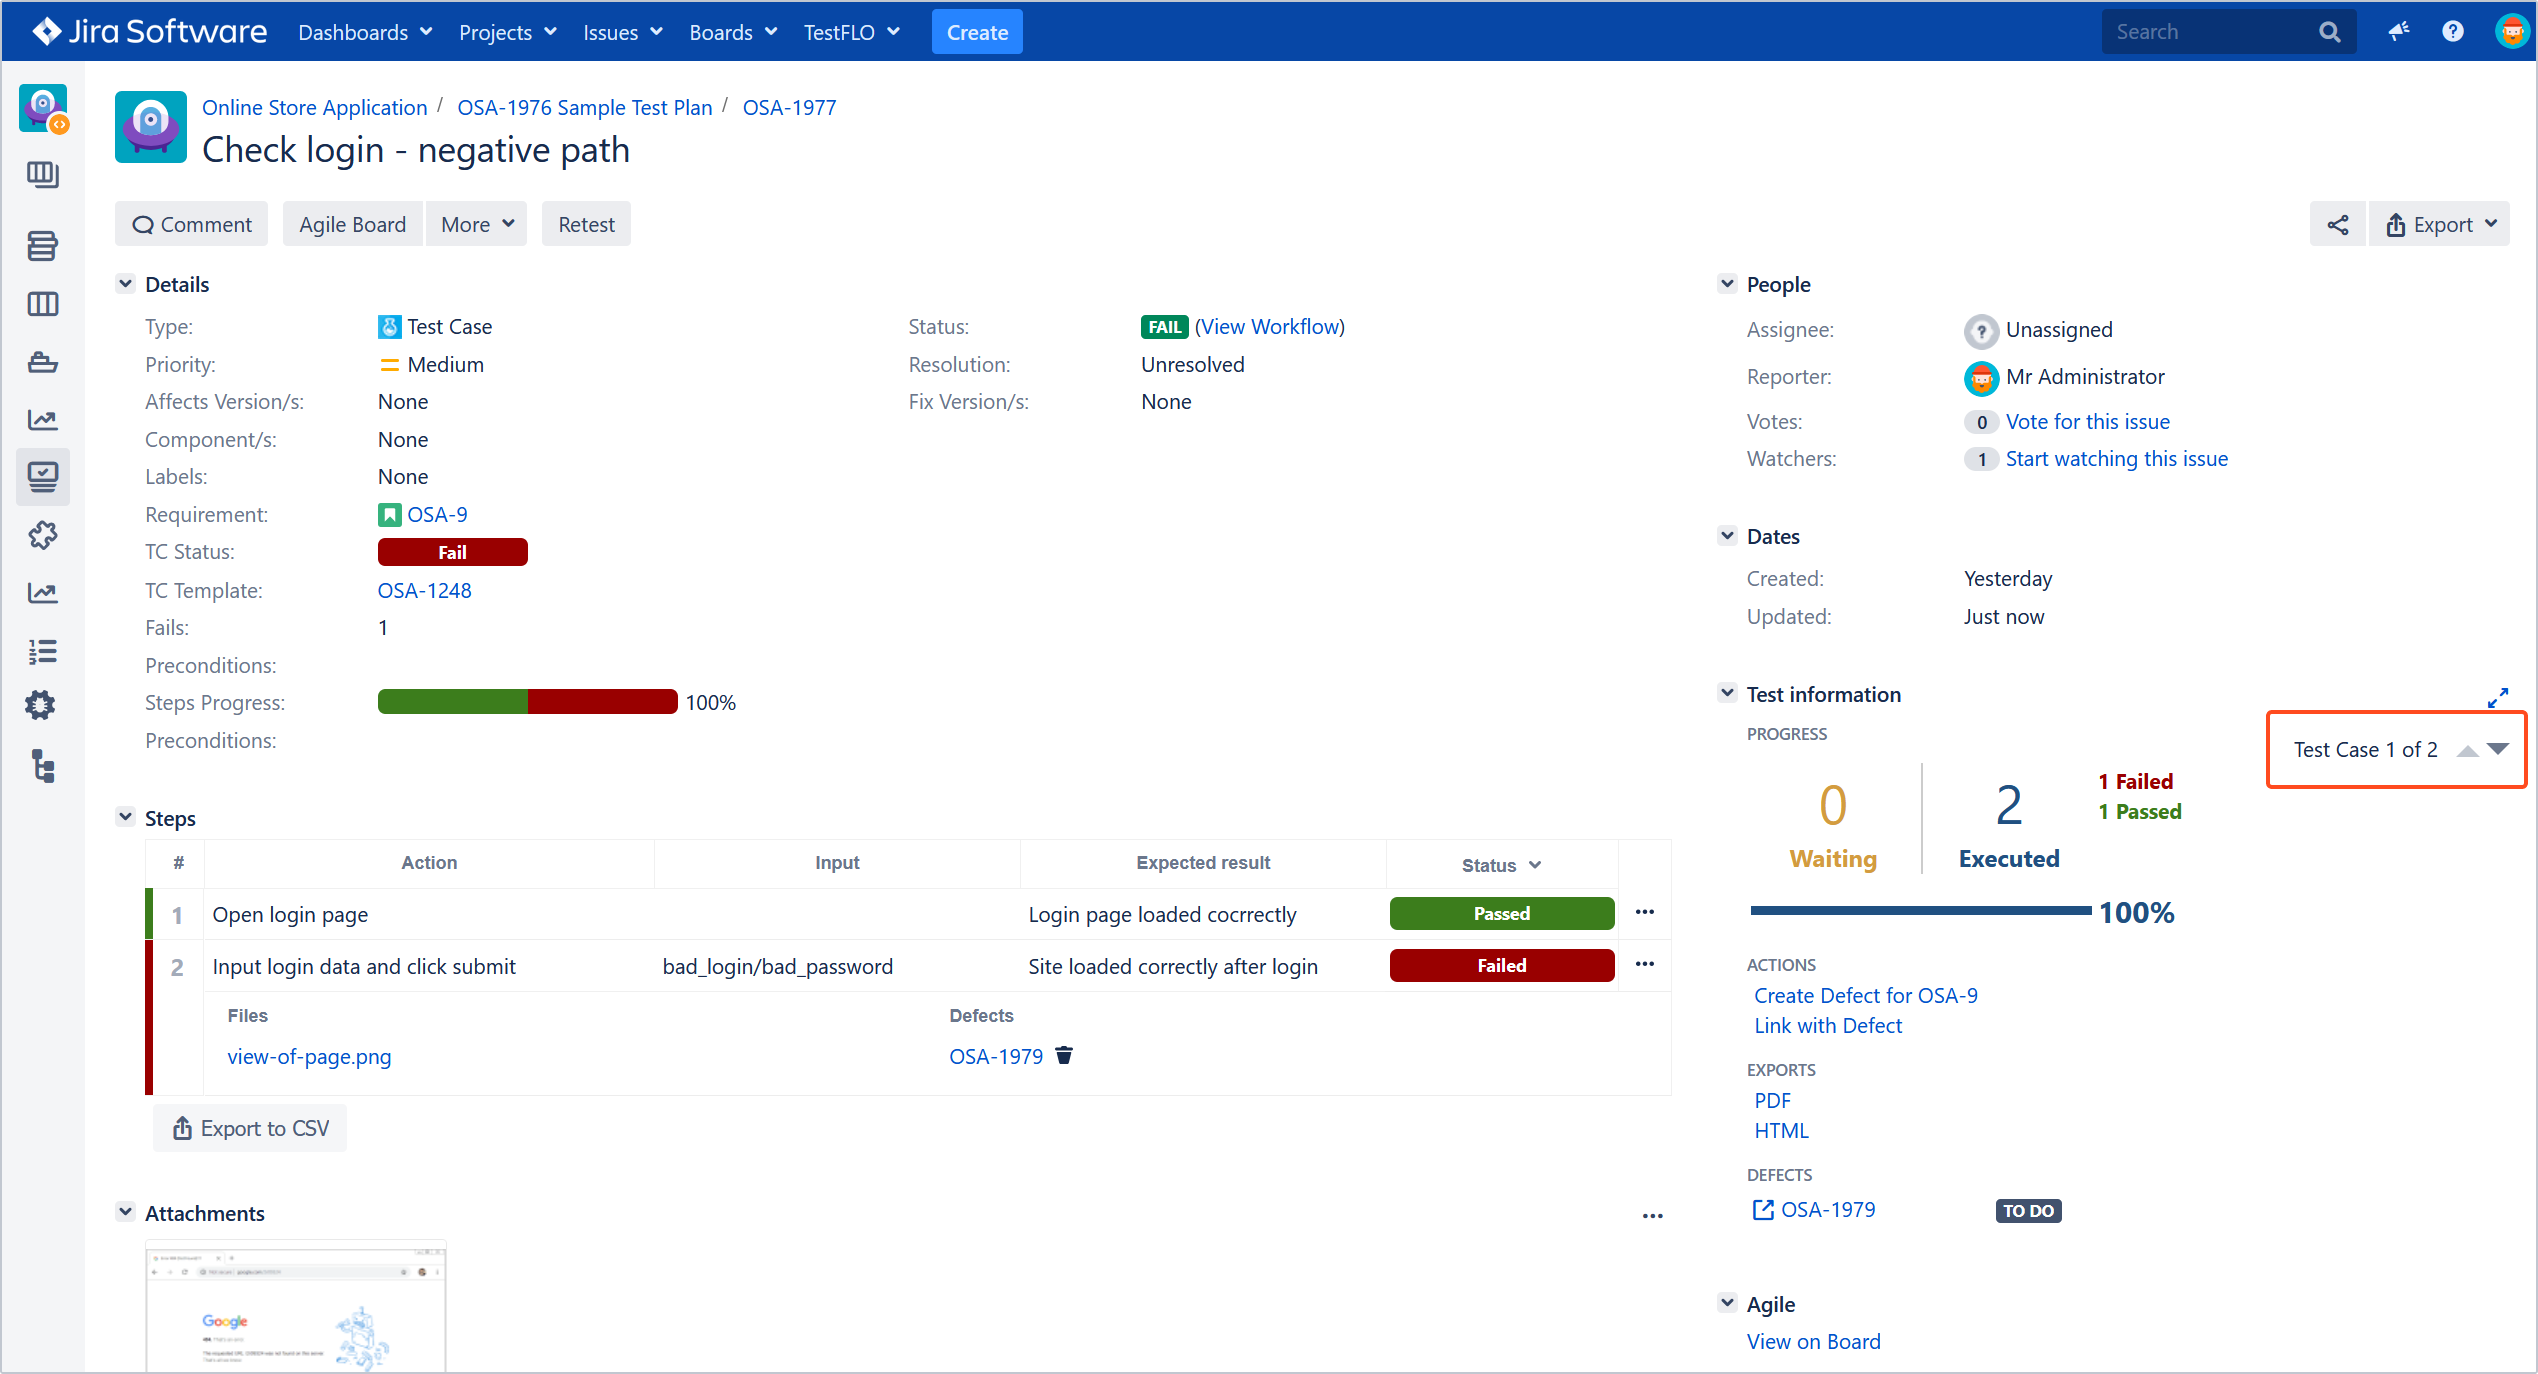
 5.After you are done working with a Test Case, you can easily move to the next one using the arrows on the right.Note
You can add comments to the steps, add screenshots or upload error logs attached to particular steps or the whole Test Case.
 Note
NoteThe expanded arrows just a little above enlarge the Steps table for your convenience. If you would like the Steps table to contain a different set of columns, contact your Jira administrator.
- If you would like to get back to the Test Plan, then it’s always available at the top.

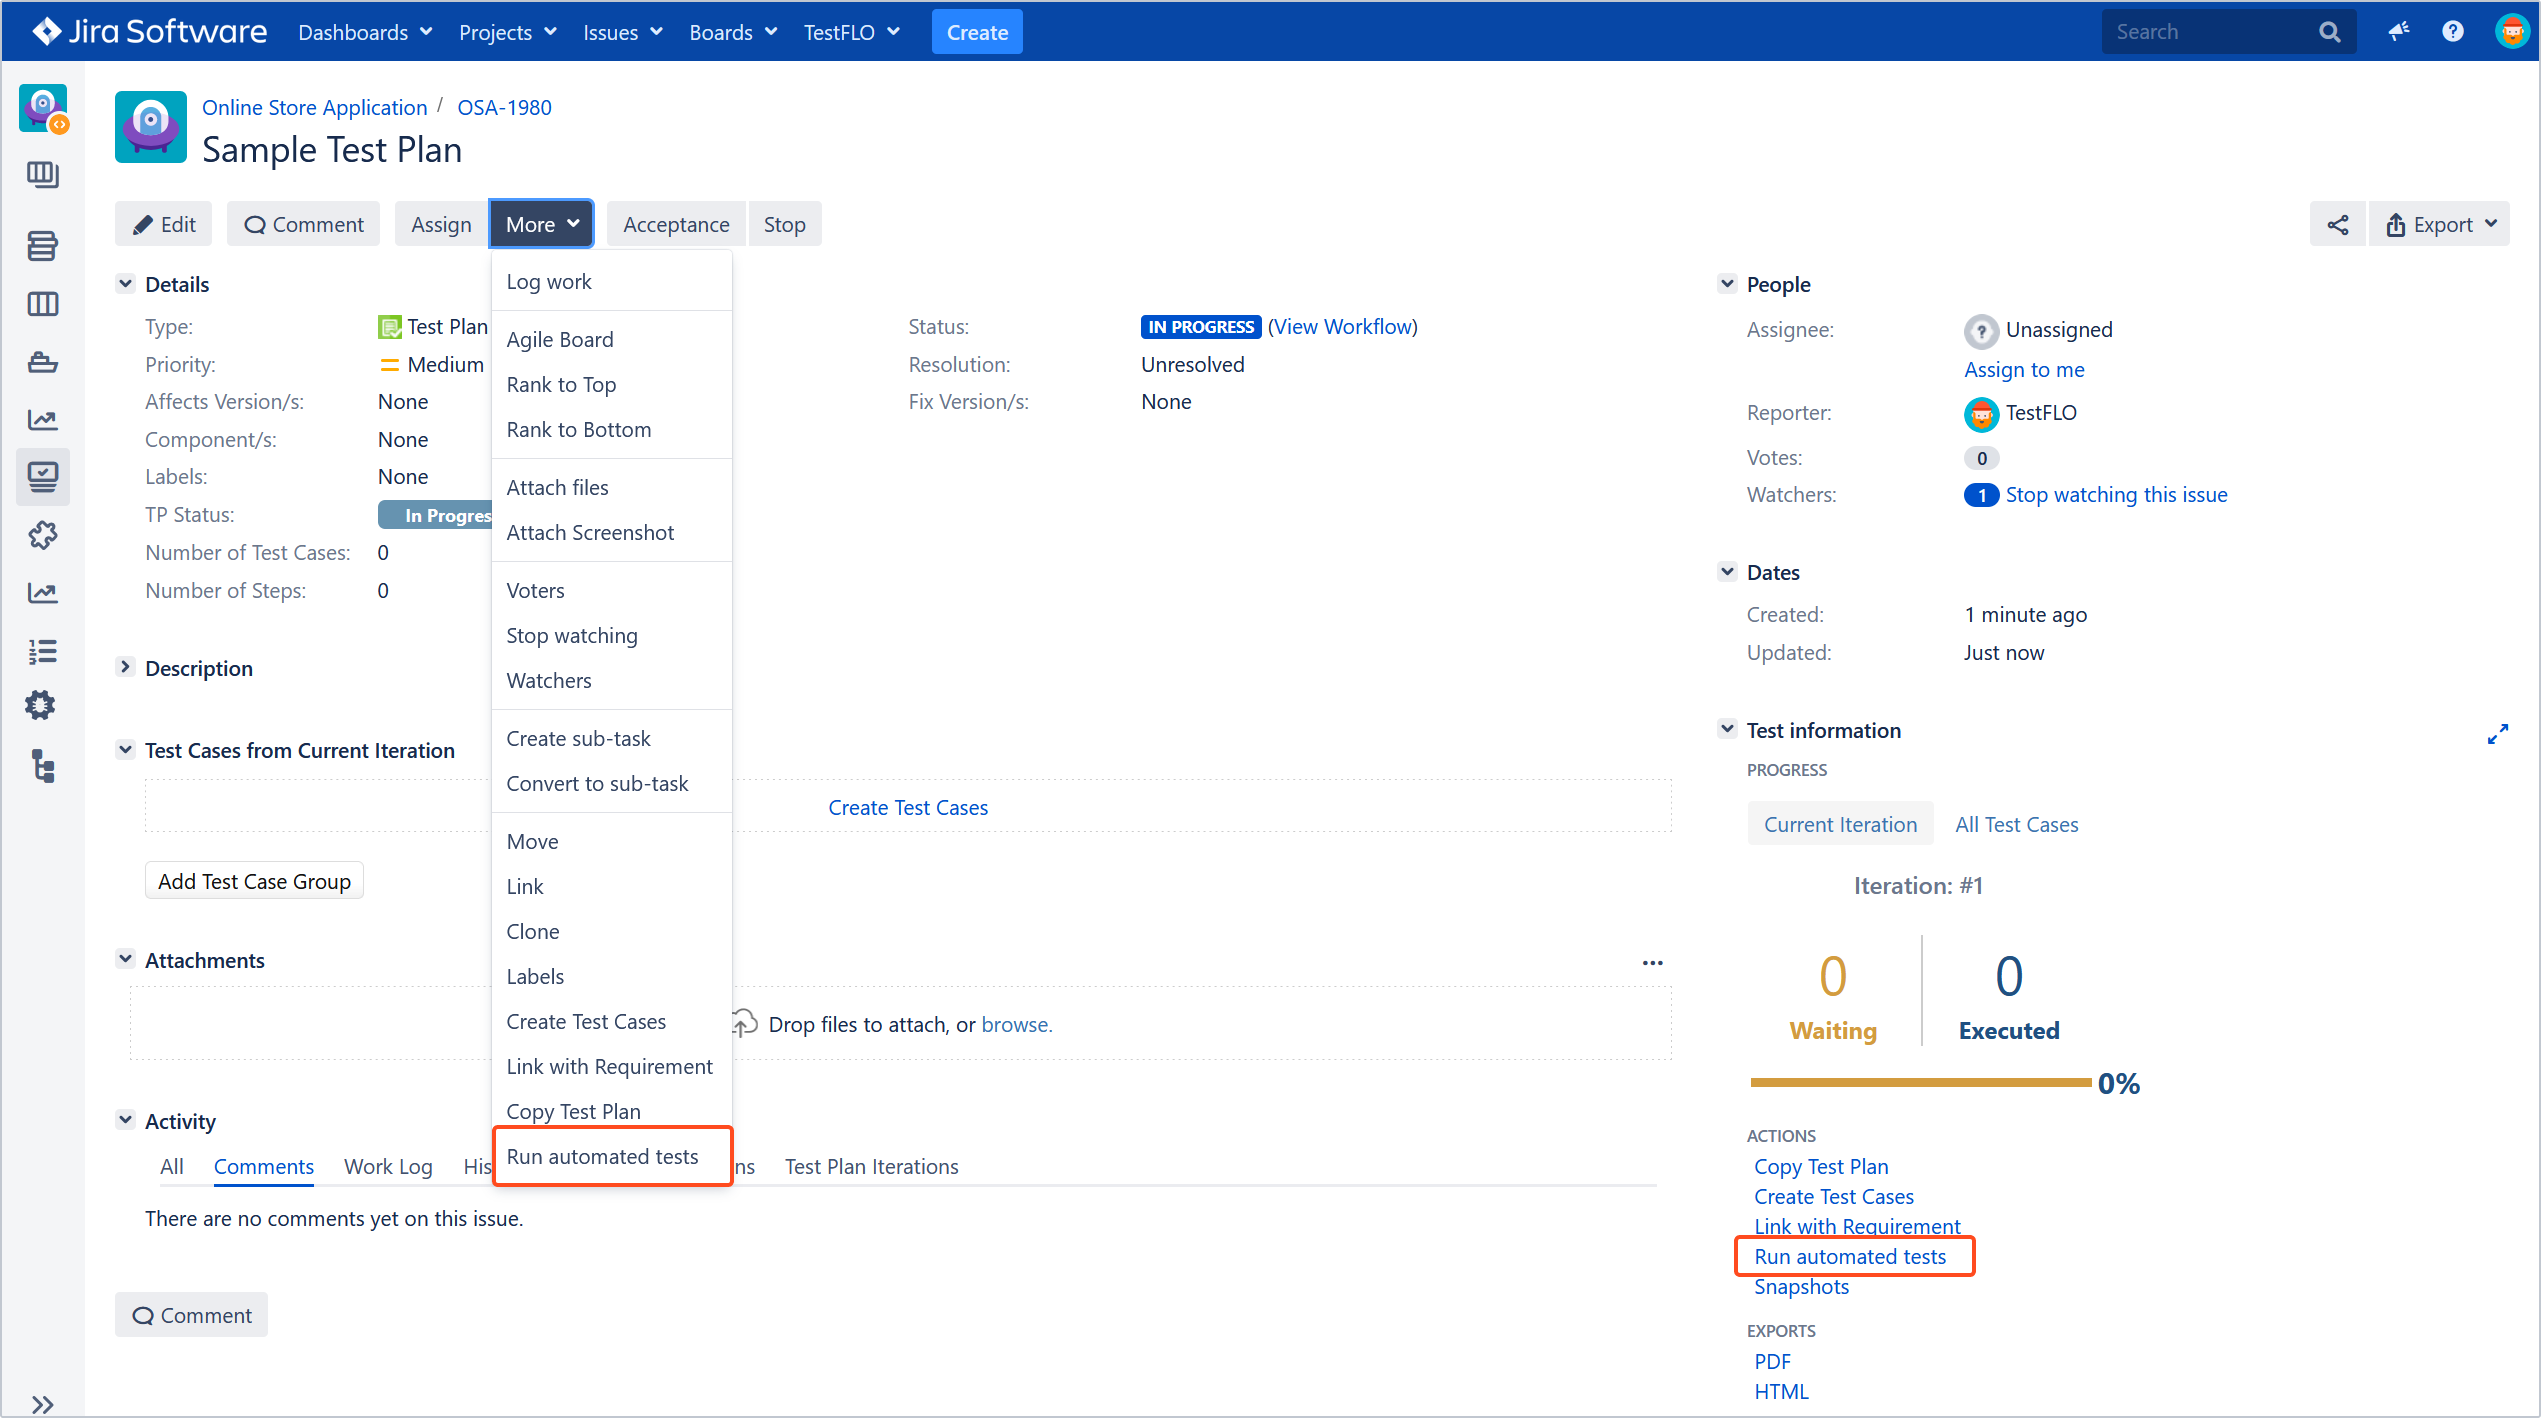
- When you want to run automated tests, you need to invoke the Run automated tests on the Test Plan. This operation is only available if your Jira Administrator connected TestFLO to a Continuous Integration Server.
All elements described above cover the basics, but TestFLO has many more interesting functionalities and configuration possibilities. For more information about the day-to-day use of TestFLO, read the full User’s Guide section of this documentation. To learn about all configuration possibilities that TestFLO offers, go through the Admin’s Guide section of TestFLO’s documentation.
Contact your QA manager or Jira administrator if you’d like to:
- configure screens related to test management by adding or removing fields
- customize test management workflows
- restrict Test Case edition based on its status or user’s permissions
- configure TestFLO’s global permissions
- customize the panels shown on your issues
- change the way test steps are displayed by adding, removing, or renaming columns
- move TestFLO’s configuration and data between two Jira instances or between projects within the same instance thanks to its integration with Configuration Manager
If you can’t find the answer you need in our documentation, raise a support request.