- About TestFLO
- Overview
- For whom
- Key benefits
- Roadmap
- Onboarding
- Basic concepts
- Glossary
- Quick guide for Jira Administrator
- Quick guide for QA manager
- Quick guide for testers
- Demo environment
- Requirements
- Requirements
- Requirement operations
- Designing tests
- Test Case Template
- Organizing tests
- Reporting & tracking
- Reporting and tracking overview
- Requirement Test Coverage Report
- Requirement Traceability Report
- Requirement Test Execution Report
- Test Plan Execution Report
- Test Plan Iterations Report
- Test Execution Report
- Test information panel
- Issue panels
- Export test issues
- Dashboard Gadgets
- Miscellaneous
- TestFLO menu
- Issue Search Dialog
- JQL functions
- Administration & Configuration
- Projects' organization
- Create project
- Project configuration
- TestFLO settings
- TestFLO Permissions
- Custom fields
- Advanced workflow configuration
- Panel Filter Result
- Import/Export TCT
- Test Automation configuration
- Upgrade reports
- Upgrade guide
- Integrations
- Confluence
- REST API
- Configuration Manager for Jira
- Xporter
TestFLO settings
This page provides information about settings for TestFLO’s elements.
After TestFLO installation, it becomes possible to configure settings that affect the entire application. It is divided into five sections and each of them is responsible for individual TestFLO elements.
The configuration in TestFLO Settings page is available to users with permissions:
- Jira System Administrators
- Jira Administrators
Steps
To get to the Settings page:
- Go to the Jira Administration > Manage Apps (Add-ons).
- Click the Settings page in TestFLO section.

or
- Click on TestFLO menu in top navigation bar in Jira.
- Select Settings from list.
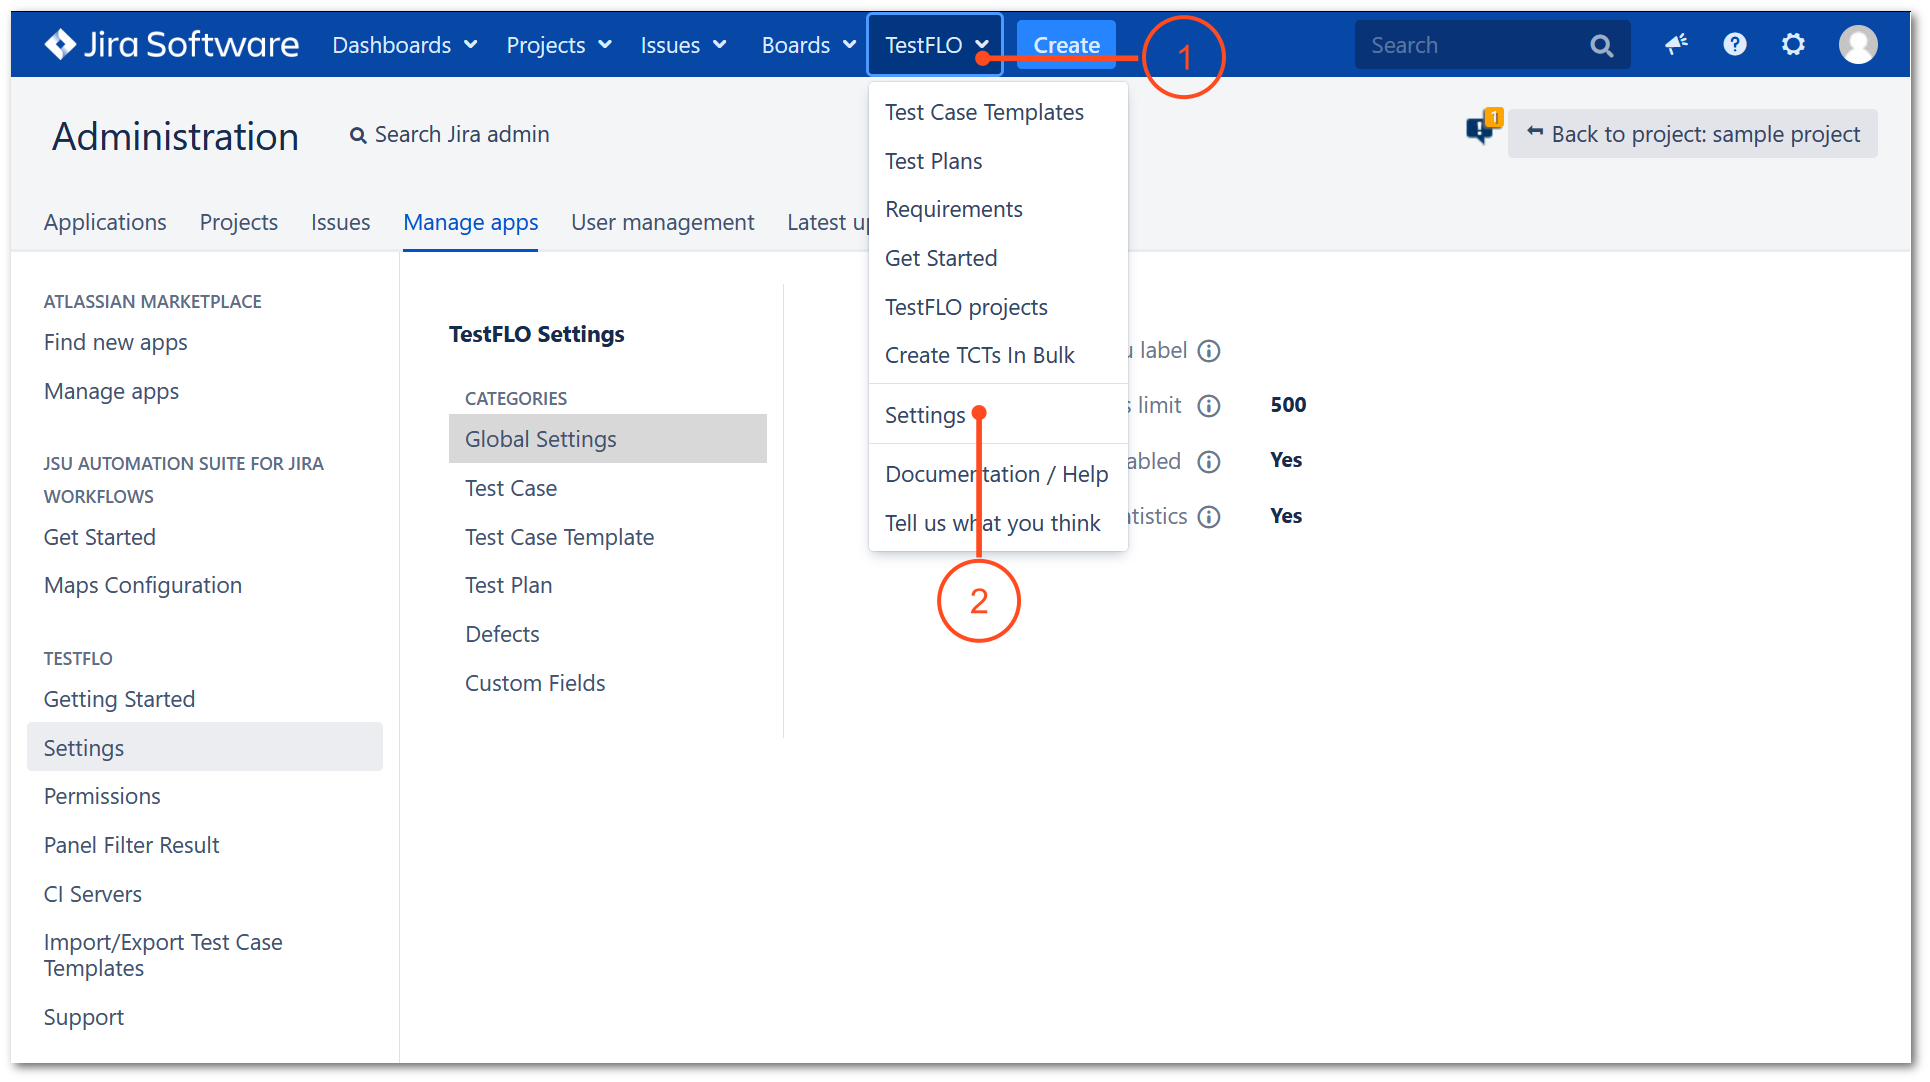
Result
View of TestFLO Settings page.
Global Settings
In this section you can manage the TestFLO menu header name, choose the limit of exported test issues to PDF file and other options.
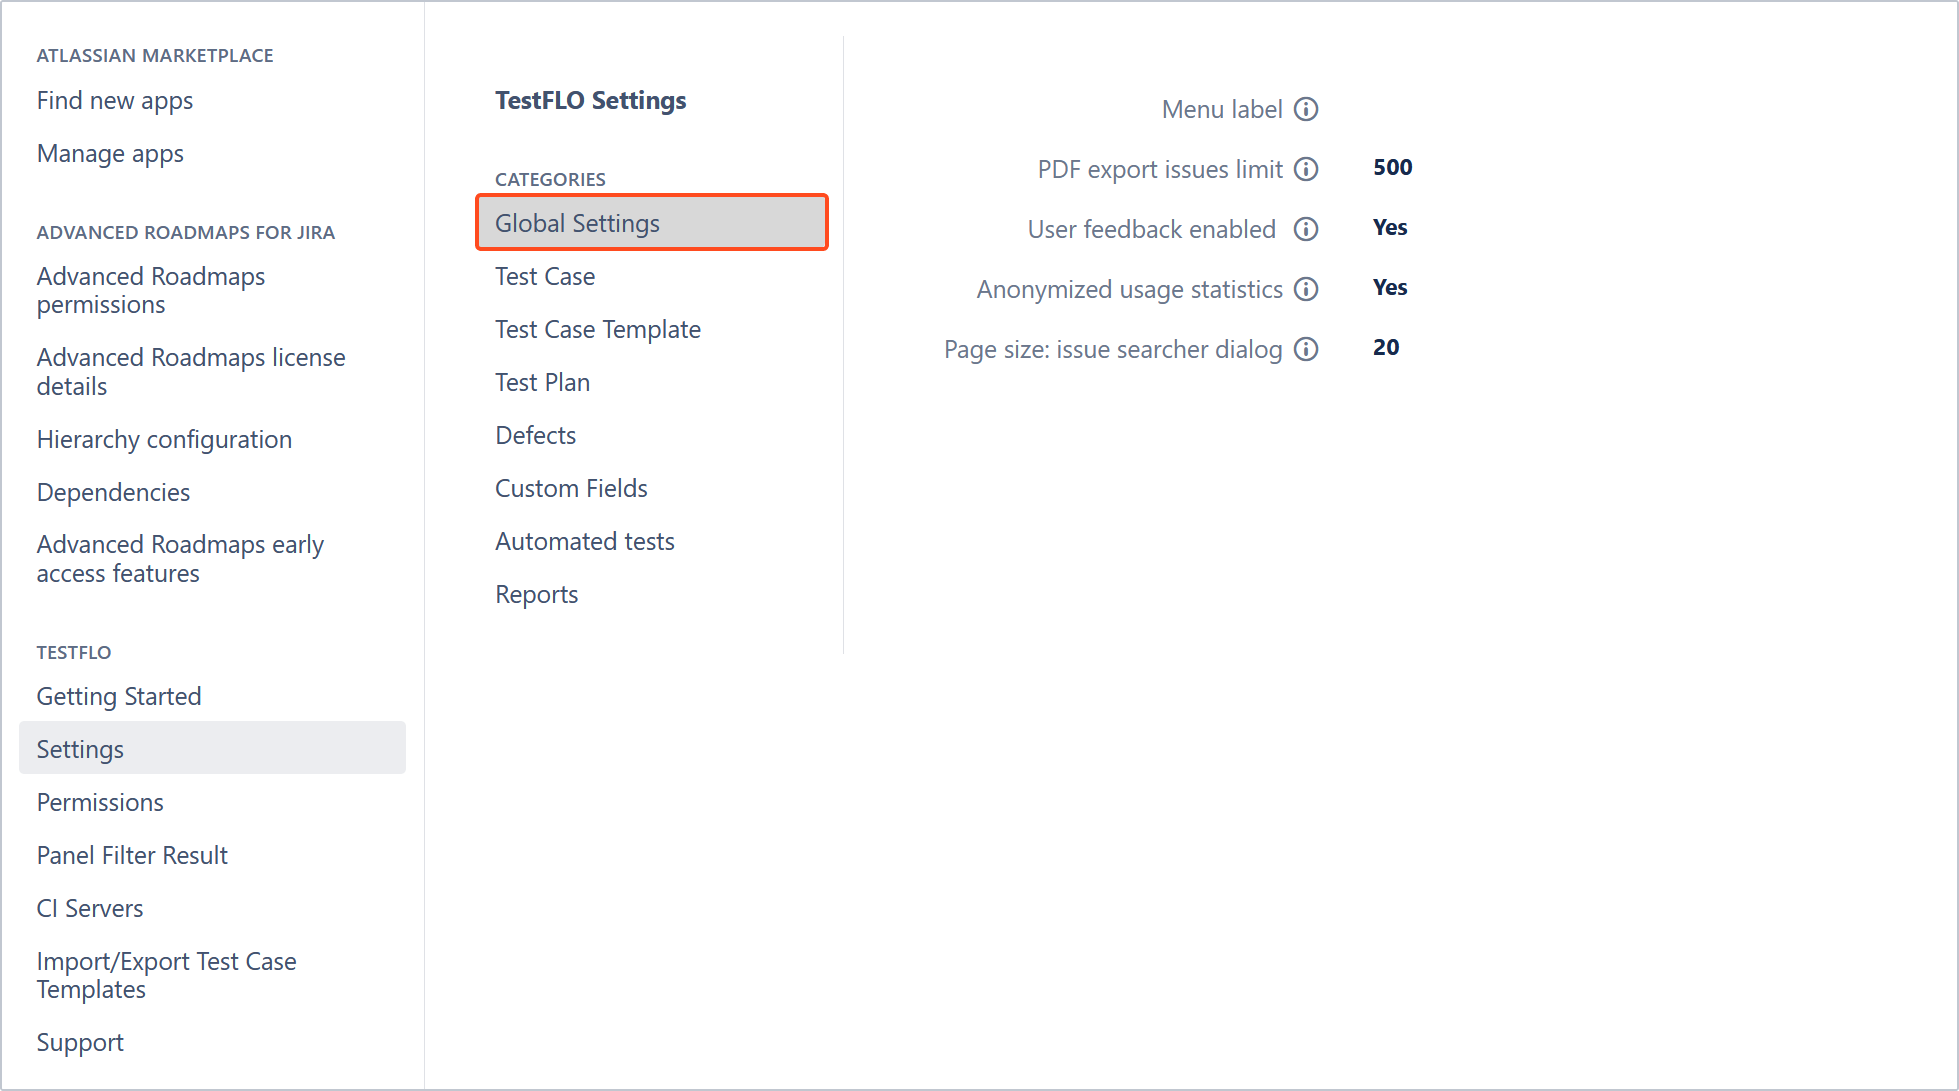
Menu label
With this option, you can set a different title for TestFLO menu. By default, title is set as TestFLO.
PDF export issues limit
Concerns the PDF export functionality present in the Issue Navigator, and Test Information panel on a Test Plan. TestFLO will not export more issues than specified here. Setting over 1000 is not allowed since a higher number might affect your Jira performance.
User feedback enabled
This option allows the users to send us feedback about the product, suggest improvements, etc. It opens a window where users can share their thoughts and send back to Deviniti. By default, the option is set to Yes.
The feedback form is available in:
- Test information panel in test issues (Test Case Template, Test Case, Test Plan)
- Test Repository tree folder
- Test Reports
- TestFLO top menu
Anonymized usage statistics
This option helps us understand where in TestFLO we should focus our development efforts. Your agreement allows us to collect numerical, anonymized data explaining how your users interact with TestFLO, so we can let them enjoy their work even more by improving the product’s features and your testers’ productivity and comfort.
We only collect general statistics such as the average number of test cases per test plan, the maximum number of test plans in a project, the number of projects with TestFLO enabled, which TestFLO-related buttons your users click, etc.
We do not and will never collect any information entered in issue fields, comments, summaries,
attachments, etc. We are only interested in how users interact with TestFLO, and on what scale, to
consider this while building new features and improving the existing ones.
By default, the option is set to Yes.
Please see our EULA and Privacy Policy for details.
Page size: issue searcher dialog
Issue searcher dialog is a special dialog that shows results separated into pages of issues. It displays when you use operation, for example, Create Test Cases and Link with Requirement. With this option, you can decide how many issues will be shown per page. Changing the number of issues affects operations:
- Add to existing Test Plan
- Create Test Cases
- Link with Requirement
- Link with Defect
To change the page size, hover over the pencil icon next to the number and click on it. Enter the appropriate value and click outside the edit box to save.
Test Case
This section is responsible for elements related to Test Cases.
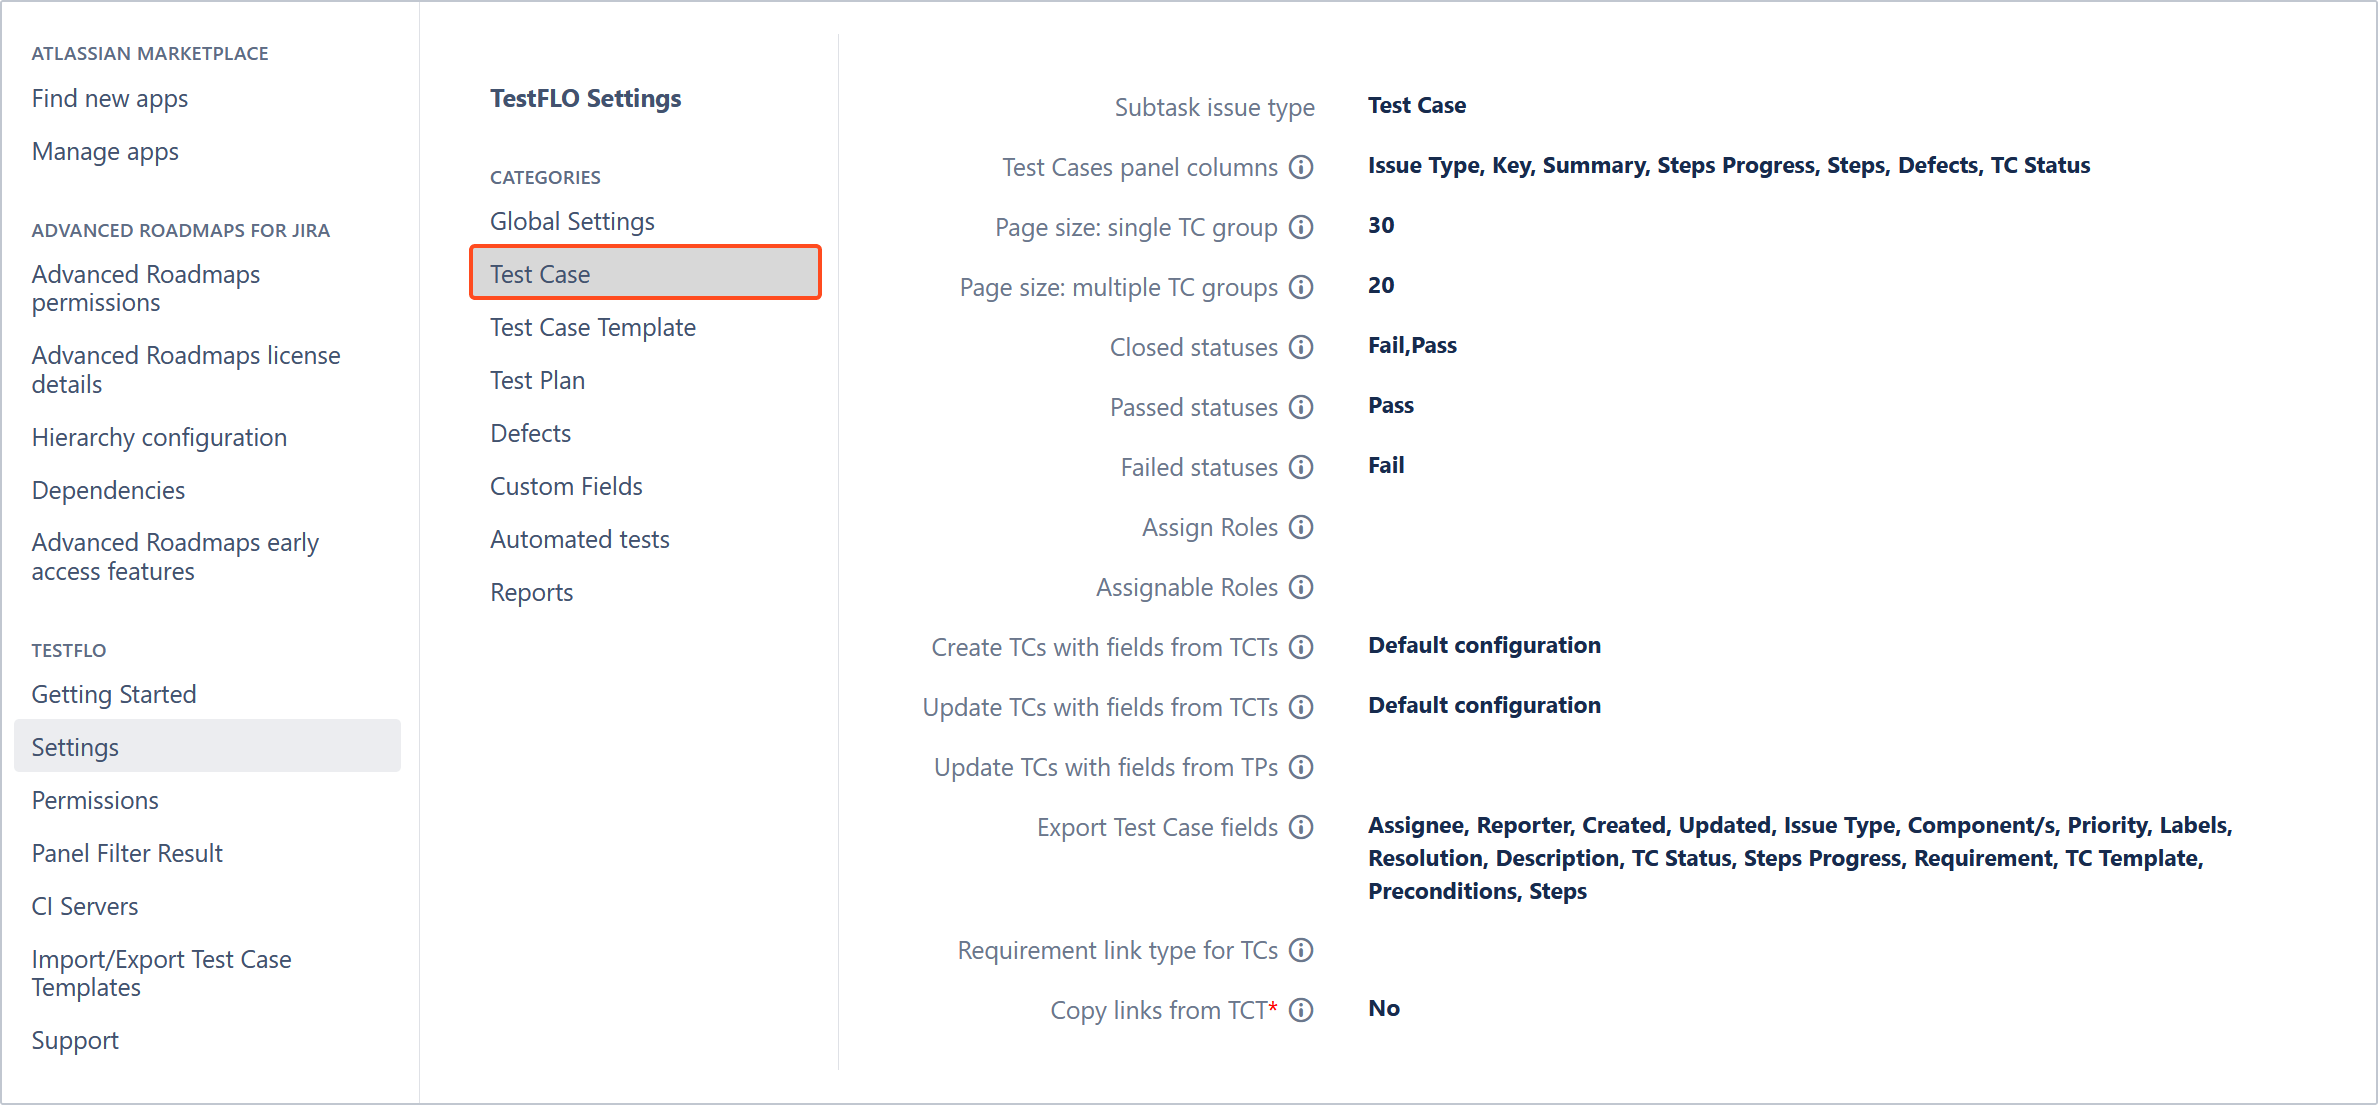
Subtask issue type
The Subtask issue type option is responsible for the Test Case issue type. The Test Case issue type is set after installation. This option is locked and you cannot change the type of issue. You can only change the Name and Issue Type Avatar in the Administration > Issues > Issue types > Test Case > Edit.
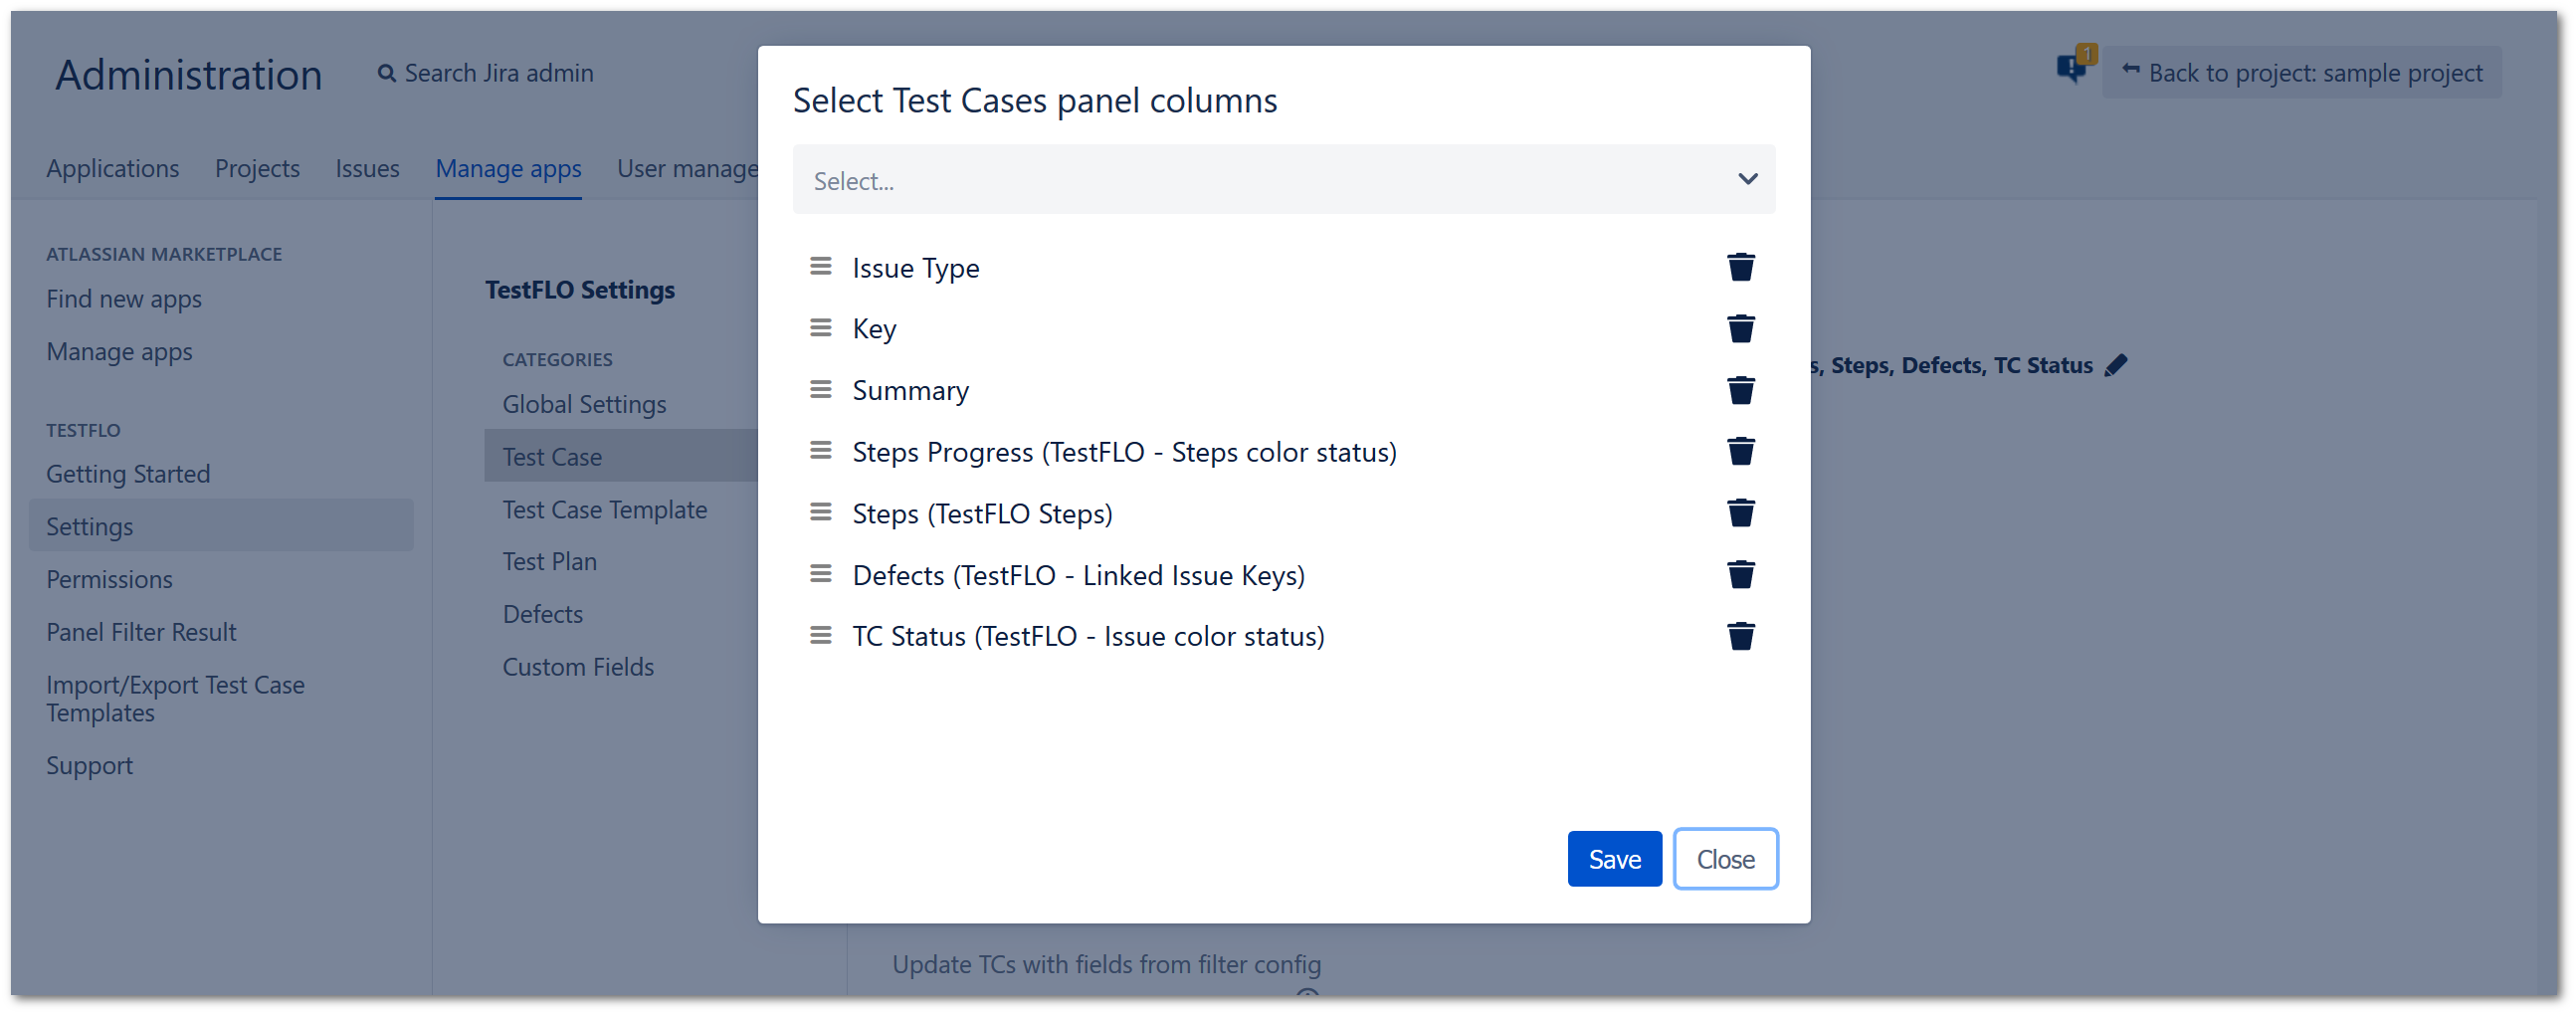
Test Cases panel columns
This option is responsible for displaying columns in the Test Cases panel on the Test Plan.
To add or change columns, hover over on listed fields and click pencil. The dialog with Select Test Cases panel columns will be displayed. Select appropriate fields and click Save.
If you want to change the order of displayed columns use drag&drop option. Use the trash icon to delete the field.
Page size: single TC group
This value is used to determine how many Test Cases are shown per page when the Test Cases panel doesn’t have any created groups.
Page size: multiple TC groups
This value is used to determine how many Test Cases are shown per page when the Test Cases panel has at least one group created.
Closed statuses
Select Test Case statuses that will be considered as closed/executed. This feature is used for:
- Showing the ratio of not executed to executed Test Cases in Test information panel on the Test Plan.
- Updating all linked Test Case from Test Case Template with Update Test Cases operation (case when Test Case Template has change and you want to propagate this change to not executed Test Cases).
Passed statuses
This is a category of statuses that indicates all the statuses that you consider as passed for the Test Case. This feature is used in reporting and iterations.
Failed statuses
This is a category of statuses taht indicates all the statuses that you consider as failed for Test Case. This feature is used in reporting and iterations.
Assign Roles
Select Jira roles that have permission to assign Test Cases. This functionality overrides assign permission and is used when you need more sophisticated permission. For example, users who have the Test Managers role should be able to assign Test Cases to perform, but users who belong to the Junior Tester role should not have such permissions.
Assignable Roles
This option is connected with Assign Roles. It decides to which roles Test Cases can be assigned despite assign permission. For example, tests can be assigned to users from the Junior Tester role but not from the Analyst or Developer roles.
Create TCs with fields from TCTs
Here you can specify the fields that you will use during the Create Test Cases operation. This is useful when you only want to use a specific set of fields, not all of them.
By default, the option value is set to Default configuration. This means that the fields which have the same context for Test Case Template and Test Case are created on the Test Case during the Create Test Cases operation. These fields are created according to the rules described on the Create Test Cases operation page.
Steps
To select specific fields:
- Hover over on the value next to the Create TCs with fields from TCTs option.
- Click the pencil icon to enter the edit mode.
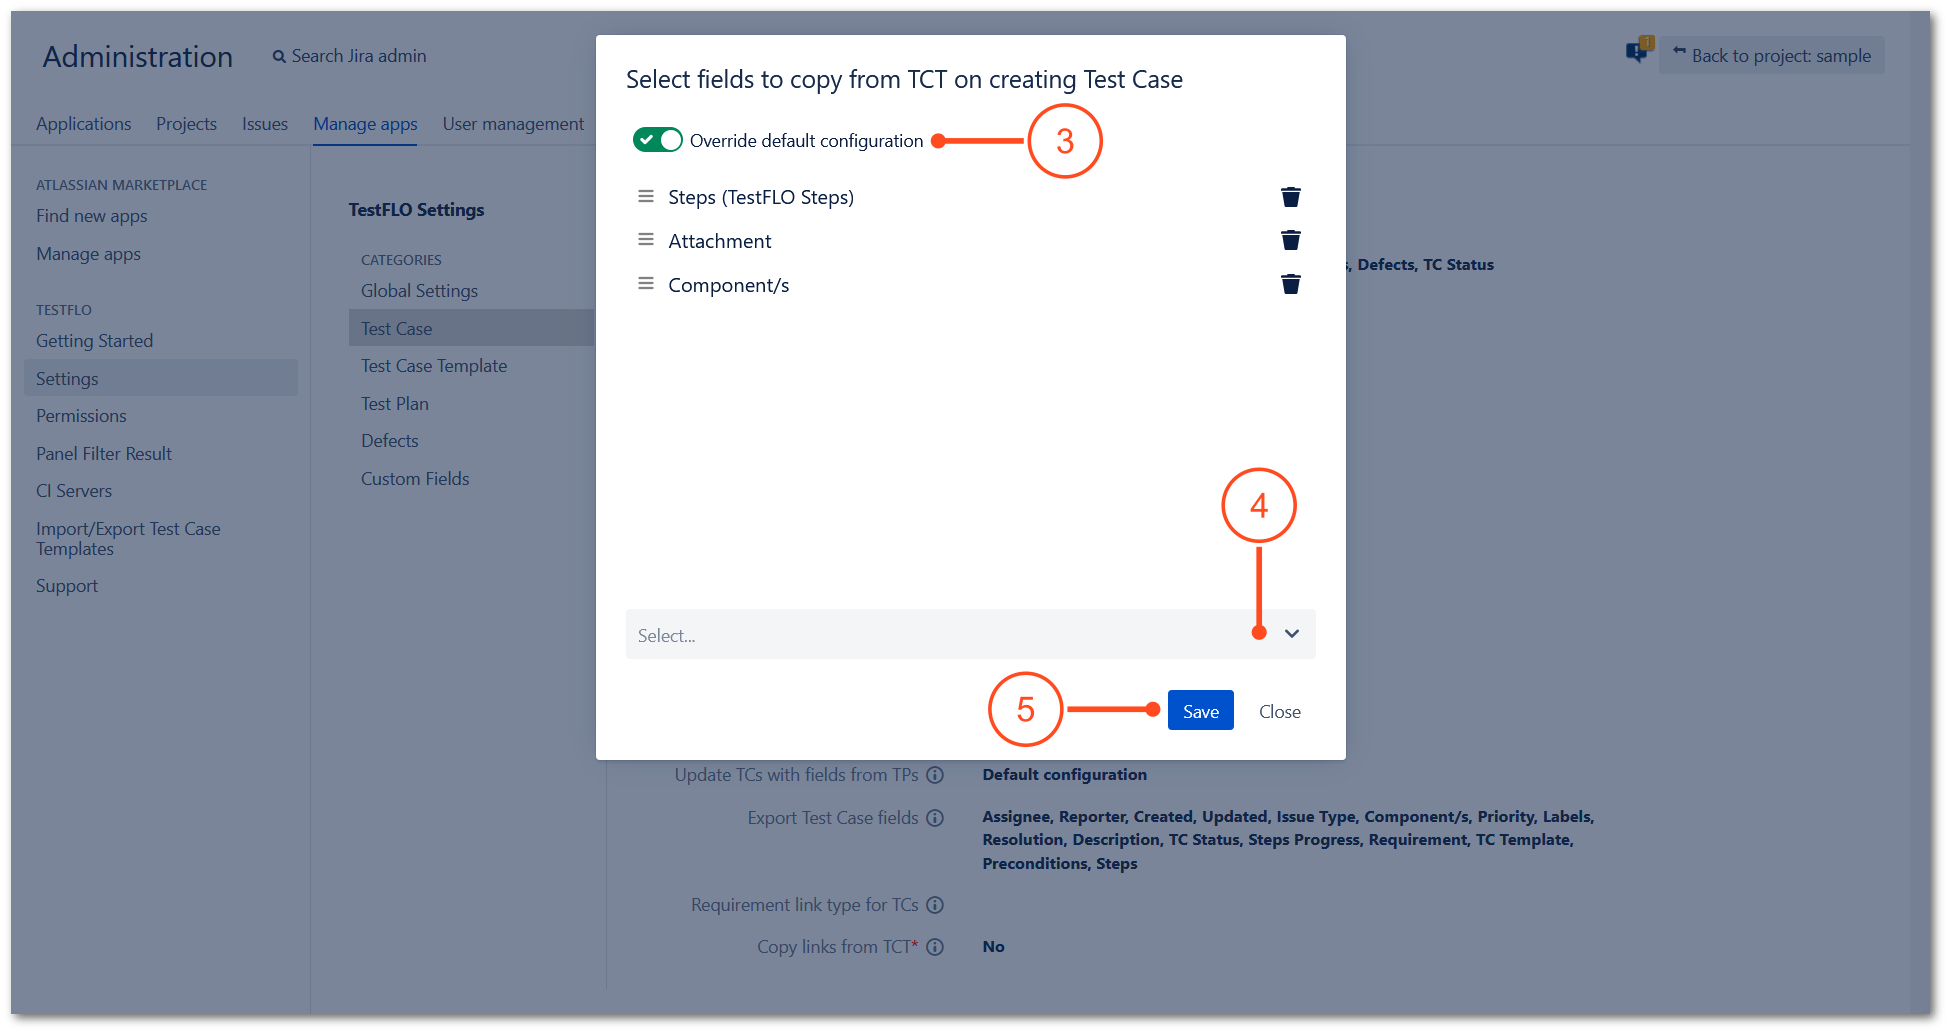
- Click the Override default configuration slider.
- Select fields that you want to use during the Create Test Cases operation.
- Click Save.
Result
You have selected a field or set of fields to be used when creating Test Cases.
Update TCs with fields from TCTs
Here you can select the fields configuration based on which you can update the Test Cases from Test Case Templates during the Update Test Cases operation.
The selected fields configuration in this option is used as a set of default fields for the user when using the Update Test Cases operation. This configuration is reflected in the Update Test Cases dialog in a separate field (field list). You can allow the users to change these fields while using the operation by giving them Set fields on Update Test Cases operation permission. You can find the permission on the TestFLO Global Permissions page.
This configuration applies to the Update Test Case operation on the Test Case Template and the Test Plan.
By default, the option value is set to the Default configuration. This means that the fields which have the same context for Test Case Template and Test Case are updated on the Test Case during the Update Test Cases operation. These fields are updated according to the rules described on the Update Test Cases operation page. If you want to use only selected fields, you need to define them and overwrite the Default configuration.
Steps
To select specific fields:
- Hover over on the value next to the Update TCs with fields from TCTs option.
- Click the pencil icon to enter the edit mode.
- Click the Override default configuration slider.
- Select fields that you want to update from the Test Case Template during the Update Test Cases operation.
- Click Save.
Result
You have selected a field or set of fields to be used when updating Test Cases from Test Case Templates.
Update TCs with fields from TPs
Here you can select the fields configuration based on which you can update the Test Cases from Test Plan during the Update Test Cases operation.
The selected fields configuration in this option is used as a set of default fields for the user when using the Update Test Cases operation. This configuration is reflected in the Update Test Cases dialog in a separate field (field list). You can allow the users to change these fields while using the operation by giving them Set fields on Update Test Cases operation permission. You can find the permission on the TestFLO Global Permissions page.
By default, the option value is empty. This means that the field list on the Update Test Cases dialog is empty and the users can decide which field or set of fields to update (assuming they have permission to change fields).
If users do not have permission to change the fields and the option value is empty they will not be able to update Test Cases from a Test Plan.
In case you want to use only selected fields, you need to define them in the configuration.
Steps
To select specific fields:
- Hover over the pencil icon next to the Update TCs with fields from TPs option.
- Click pencil to enter the edit mode.
- Select fields that you want to update from the Test Plan during the Update Test Cases operation.
- Click Save.
Result
You have selected a field or set of fields to be used when updating Test Cases from Test Plan.
Export Test Case fields
Specify which fields you want to export using PDF and HTML exports. This is useful when you want to display specific fields in a file. For example fix version, steps, issue type, etc. Click the pencil, select the appropriate fields and save your selection.
Requirement link type for TCs
In this option you can specify the type of link, that will be created between Test Case and Requirement issue, if the Test Case Template you are using has any requirements bind to it. This linking uses the Link with Requirement operation.
Copy links from TCT
You can decide, whether issue links from the Test Case Template should be copied to the Test Case upon its creation or not.
Test Case Template
This section is responsible for elements related to Test Case Template.

Issue type
The Issue type option is responsible for the Test Case Template issue type. The Test Case Template issue type is set after installation. This option is locked and you cannot change the type of issue. You can only change the Name and Issue Type Avatar in the Administration > Issues > Issue types > Test Case Template > Edit.
Active statuses
In this option, you can decide which statuses are valid for creating Test Cases from Test Case Template. If Test Case Templates are not in Active statuses, they will not be shown when choosing the Test Case Template in the Test Plan.
Export Test Case Template fields
Specify which fields you want to export using PDF and HTML exports. This is useful when you want to display specific fields in a file. For example fix version, steps, issue type, etc. Click the pencil, select the appropriate fields and save your selection.
Test Plan
This section is responsible for elements related to Test Plan.

Test Plan issue type
The Test Plan issue type option is responsible for the Test Plan issue type. The Test Plan issue type is set after installation. This option is locked and you cannot change the type of issue. You can only change the Name and Issue Type Avatar in the Administration > Issues > Issue types > Test Plan > Edit.
Export Test Plan fields
Specify which fields you want to export using PDF and HTML exports. This is useful when you want to display specific fields in a file. For example fix version, steps, issue type, etc. Click the pencil, select the appropriate fields and save your selection.
Page size: Number of TC groups
This value is used to determine how many Test Case groups are shown per page in the Test Cases panel on the Test Plan issue view. If set too high, then for large Test Plans having thousands of Test Cases and over a hundred groups, this can cause the Test Plan issue view to load slowly.
Defects
This section is responsible for elements related to Defects.

Test Case defect link
When you create or link defects they are automatically linked to a Test Case. With this option, you can select a specific link type for this operation. By default, the link is set as a Defect. If you do not select any type then the Defect link is used by default.
Test Plan defects panel columns
This option is responsible for displaying columns in the Defects from Test Cases panel in the Test Plan. To add or change columns, hover over on listed fields and click the pencil. Select appropriate fields and click Save. If you want to change the order of displayed columns use drag&drop. Use the trash icon to delete the field.
Test Plan defects panel - show only unresolved
This option allows you to display defects based on the Resolution field. If the option is set to YES then the Defects from Test Cases panel shows only defects that are unresolved. If set to NO, all defects are displayed.
Test Plan defects panel - show only from current iteration
This option allows you to display defects from the current iteration or from all iterations performed in the Test Plan. If the option is set to YES then the Defects from Test Cases panel shows defects created during the current iteration. If set to NO, defects from all iterations are displayed.
Custom Fields
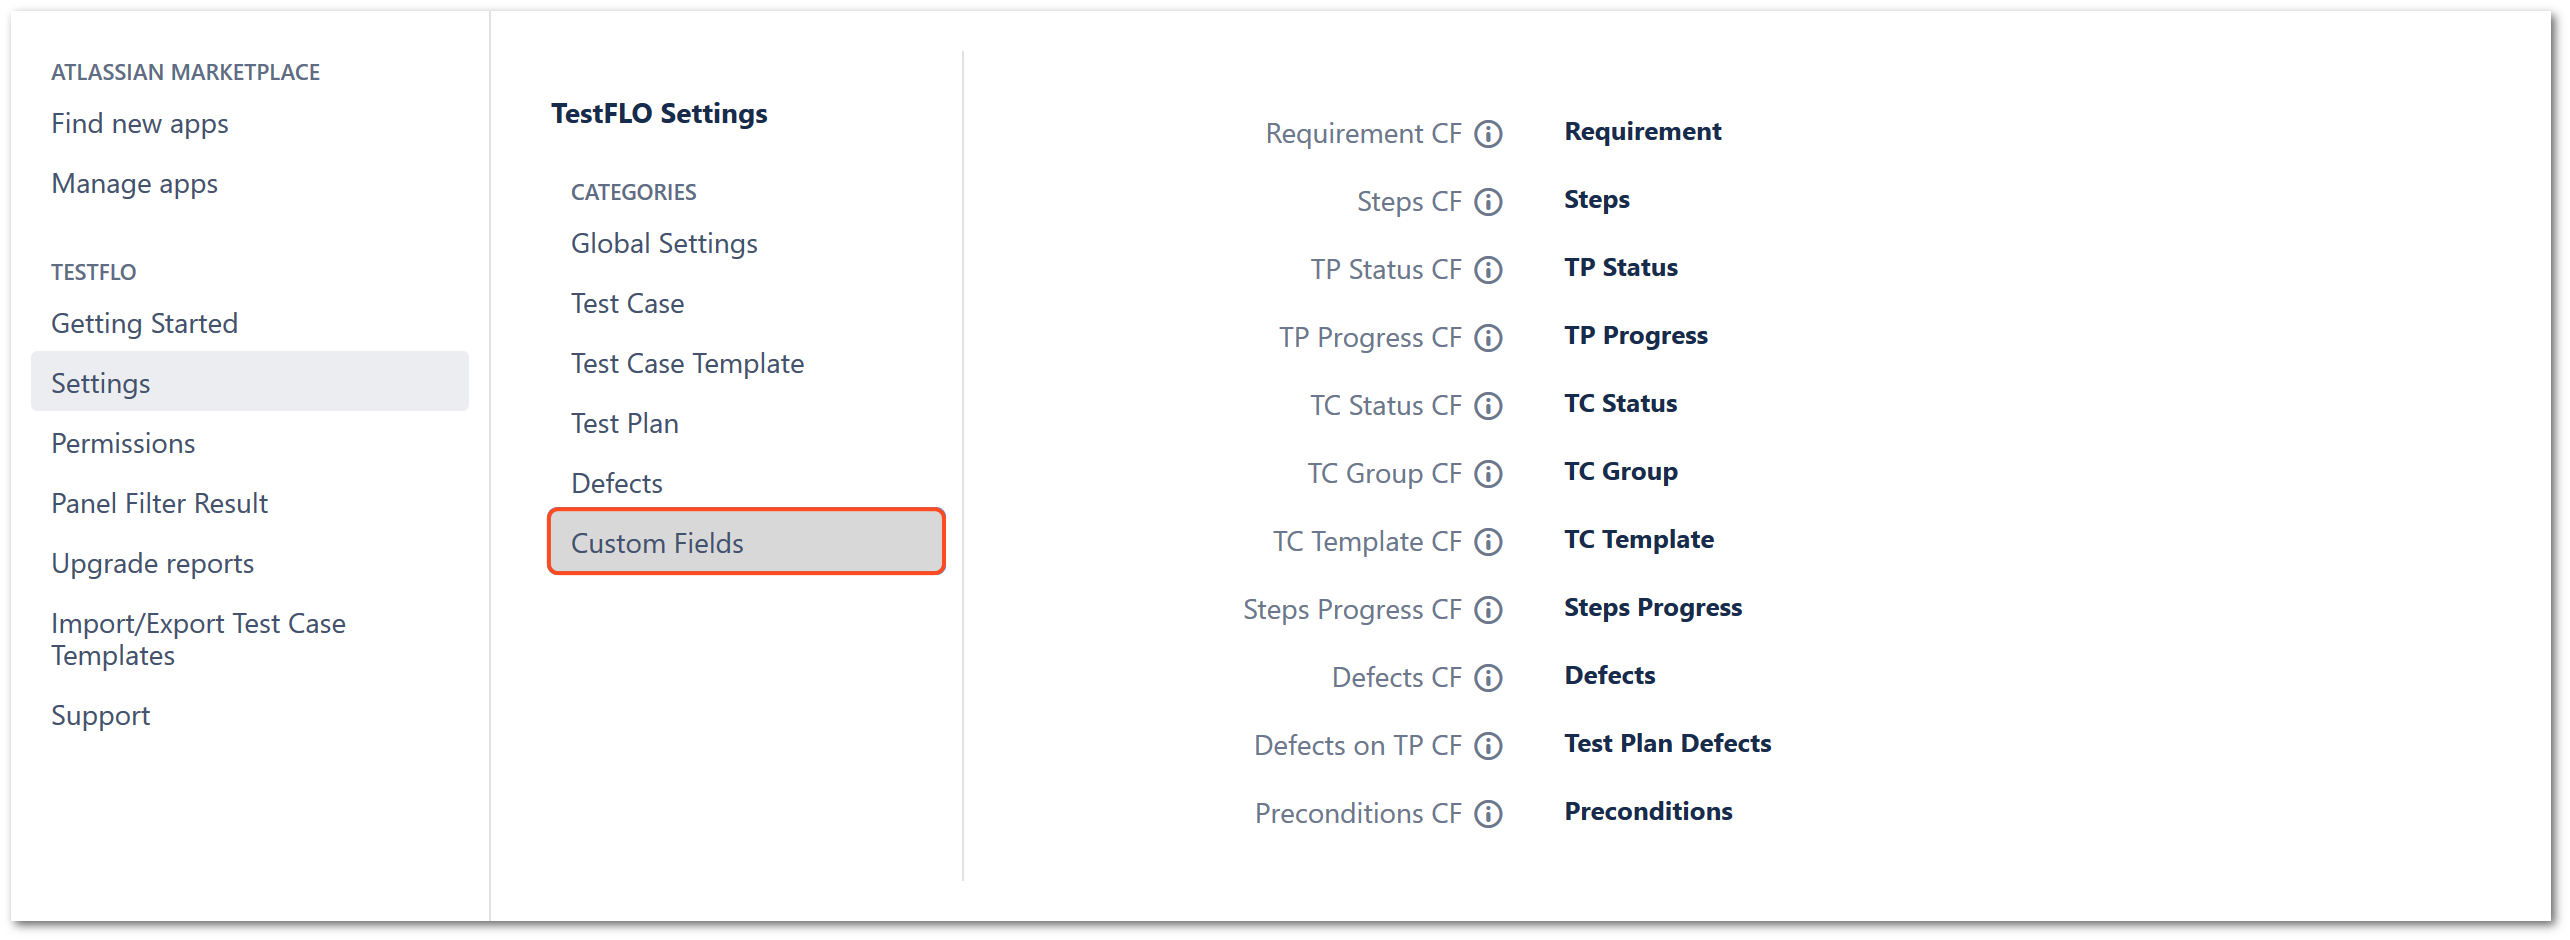
This section is responsible for elements related to TestFLO’s custom fields.
Requirement CF
The Test Case Templates, Test Plans, Test Cases and Defects can be linked with Requirements. This is helpful to track defects, Test Plans, Test Case Templates and Test Cases from the Requirement perspective. This option uses the TestFLO - Enhanced Issues Picker CF.
Steps CF
This field allows creating a table with custom columns. It can be used both on TCT and TC for storing steps that need to be taken for Test Case execution. This option uses the TestFLO Steps.
TP Status CF
This field allows representing Test Plan statuses with a colored bar. In this field, you can configure other colors than the default ones from Jira. This option uses the TestFLO - Issue color status.
TP Progress CF
Custom field that shows the progress of subtasks or related issues. This option uses the TestFLO - SubTasks color status.
TC Status CF
Allows representing Test Case statuses with a colored bar. In this field, you can configure other colors than the default ones from Jira. This option uses the TestFLO - Issue color status.
TC Group CF
Allows to defining groups in the Test Cases panel. This field is a Text Field (read-only) type that stores information to which group given Test Case belongs.
TC Template CF
The Test Case is created as a one-to-one copy from the Test Case Template. If you want to keep information about the Test Case origin, define TestFLO - Issue Link Field. It may be used for:
- propagating changes from the Test Case Template to all not executed Test Cases,
- showing all created Test Case on the Test Case Template,
- referring to the Test Case Template directly from the Test Case.
Steps Progress CF
Custom field that shows the progress of Steps in the Test Case. This option uses the TestFLO - Steps color status.
Defects CF
This field aggregates issue keys from a select type of link. You can select the statuses that you are interested in. For example, when aggregating defects in Test Case, select those which are unresolved. This option uses the TestFLO - Linked Issue Keys.
Defects on TP CF
This field aggregates all created defects in Test Cases on the given Test Plan. This option uses TestFLO - TestPlan Defects.
Preconditions
Preconditions allow the tester to write conditions that have to be met before running a Test Case. This option uses TestFLO - Preconditions.
Automated tests
Finished CI job runs retention period (days)
This option concerns the Automated test runs page and prevents your database from bloating. Here you can set the number of days for keeping information about performed automated tests from the table in the Finished tab. The retention period is calculated from the end date of the given test run. After the specified number of days, the information about performed automated tests is deleted from the database. The field can range from 1 to 2147483647. By default, the value is set to 30 days.
Reports
Req Test Coverage Report: PDF export limit
Limits the number of Requirements to be exported in the Requirements Test Coverage Report. Increasing this number can affect your Jira performance or cause an out of memory exception, leading to your Jira instance crash. Before increasing it in production, try it out in a test environment first. Increase at your own risk. By default, the value is set to 1000.
Test Plan Iterations Report: TP limit
Limits the number of Test Plans to be shown in the Test Plan Iterations Report. Increasing this number can affect your Jira performance or cause an out of memory exception, leading to your Jira instance crash. Before increasing it in production, try it out in a test environment first. Increase at your own risk. By default, the value is set to 200.