This page provides information about Test Plans operations.
Each Test Plan has dedicated operations:
Create Test Cases
This operation allows you to create Test Cases on a Test Plan. Test Case is an issue type that is an executable copy of the Test Case Template. The Test Case Template becomes Test Case when you use the Create Test Cases operation.
Info
For a better understanding of the Test Case issue type and its features, see the entire Test Case chapter.
Note
To create Test Cases you need to have Create Issues and Edit Issues permissions.
Note
The visibility of Test Case Templates in the list and projects using the Search by folders option depend on the browse project permissions of the user who creates Test Cases.
Steps
To create Test Cases from Test Case Templates:
Click on one of the options to use the operation:
1a from menu More,
1b from the Test Cases panel,
1c from the Test information panel.
Selecting the Create Test Cases operation
In the Create Test Cases dialog you can select Test Case Templates to create Test Cases. The list only displays TCTs with statuses in the Active statuses category, sorted DESC by default. The dialog, in addition to the list, contains:
View of the Create Test Cases dialog
Search by filters - allows using Quick filters and Saved Jira filters to search TCTs.
Search by folders - allows using Test Repository folders to search TCTs.
Search bar - allows searching TCTs using Basic and Advanced (JQL) mode.
Columns - allows the user to add their own columns and change the order in which they appear in the list.
Results range - shows the number of Test Case Templates per page to all and the number of selected Test Case Templates by a user.
Info
The number of displayed TCTs per page can be changed using the Page size: issue searcher dialog option. You must bear in mind that the change also affects other operations. To learn more see Global Settings.
Pagination - shows the number of pages with results.
To search specific Test Case Templates you can use Search by filters, Search by folders or Search bar.
With the Search bar, you can search the list using two modes: Basic and Advanced.
The Basic mode allows you to easily select data in each field. You can add more categories (fields) to your search by clicking More and selecting a field.
Note
The Basic search does not support Sprint, Team and Link type fields.
The Advanced mode allows you to write a query in JQL. If a given query is not too complex you can switch to the Basic mode.
The Search by filters option gives you the possibility to filter TCTs using Quick filters and Saved Jira filters. In the case of Quick filters, you just need to click on a filter to use it. Saved Filters will allow you to select saved filters from the list.
Note
Each selected filter is reflected in the Search bar. Depending on the complexity, it will show up in the basic or advanced mode.
Note
In this searching mode, you can sort the TCT’s list by clicking on the column headers. If up and down arrows display next to the header name you can sort DESC or ASC by this field.
Quick filters:
Viewed recently - TCTs that you last viewed.
Same Requirement/s as [Issue key of Test Plan] - TCTs with the same requirement value as on the Test Plan.
Same Fix Version/s as [Issue key of Test Plan] - TCTs with the same Fix Version/s value as on the Test Plan.
Same Component/s as [Issue key of Test Plan] - TCTs with the same Component/s value as on the Test Plan.
Used in current [Issue key of Test Plan] - TCTs from which Test Cases have been created at least once in this Test Plan.
Not used in current [Issue key of Test Plan] - TCTs that have not been used once to create Test Cases on this Test Plan.
Note
Part of the Quick filters are based on the Requirement, Component/s and Fix Version/s fields. If the fields on the Test Plan have no values, the dedicated filters will not appear.
The Saved Jira filters list contains your favorite filters and those created by you. To find a filter that has been shared with you, enter the name of the filter in the search box.
The Search by folders option allows you to search TCTs by the contents of folders from the Test Repository. You can freely:
Switch between repositories from different projects.
Search for folders by a given word.
Navigate folders the same way as in Test Repository.
Searching Test Cases by folders
Note
Folders contain TCTs only in the statuses from the Active category and their number may differ from the one displayed in Test Repository.
Note
In this searching mode, the option of sorting by headers is unavailable due to the set TCT order and displaying the contents of subfolders and their names from the Test Repository.
After searching for Test Case Templates, which you want to add to Test Plan, the next step is to select the checkbox next to the given TCT. You can select up to 5000 records at one time using a single selection or select all (in this case, the first 5,000 records are counted). Selected Test Case Templates are added to the Summary in order from top to bottom from the currently visible list with TCTs (default sorting). The order of selection by the user within the display of a given list is not taken into account.
Note
You can freely switch between Search by folders and Search by filters without losing already selected TCTs.
Selecting Test Case Templates
Note
The Test Case Template used at least once when creating a Test Case in particular Test Plan is highlighted on the list.
Highlighted Test Case Templates that have been already used once in particular Test Plan
Optional: Click on Selected issues:[number] to view the list with a Summary of selected TCTs. In this list, you can uncheck selected TCTs using the bin icon. You can also back to the previous view and deselect Test Case Templates or select more as needed.
Summary view with selected TCTs
After making sure the selection contains all the needed TCTs, click Confirm to create the Test Cases. You can do this in the Summary dialog or on the main Create Test Cases dialog.
Note
Test Cases are created according to the order on the Summary list of selected Test Case Templates.
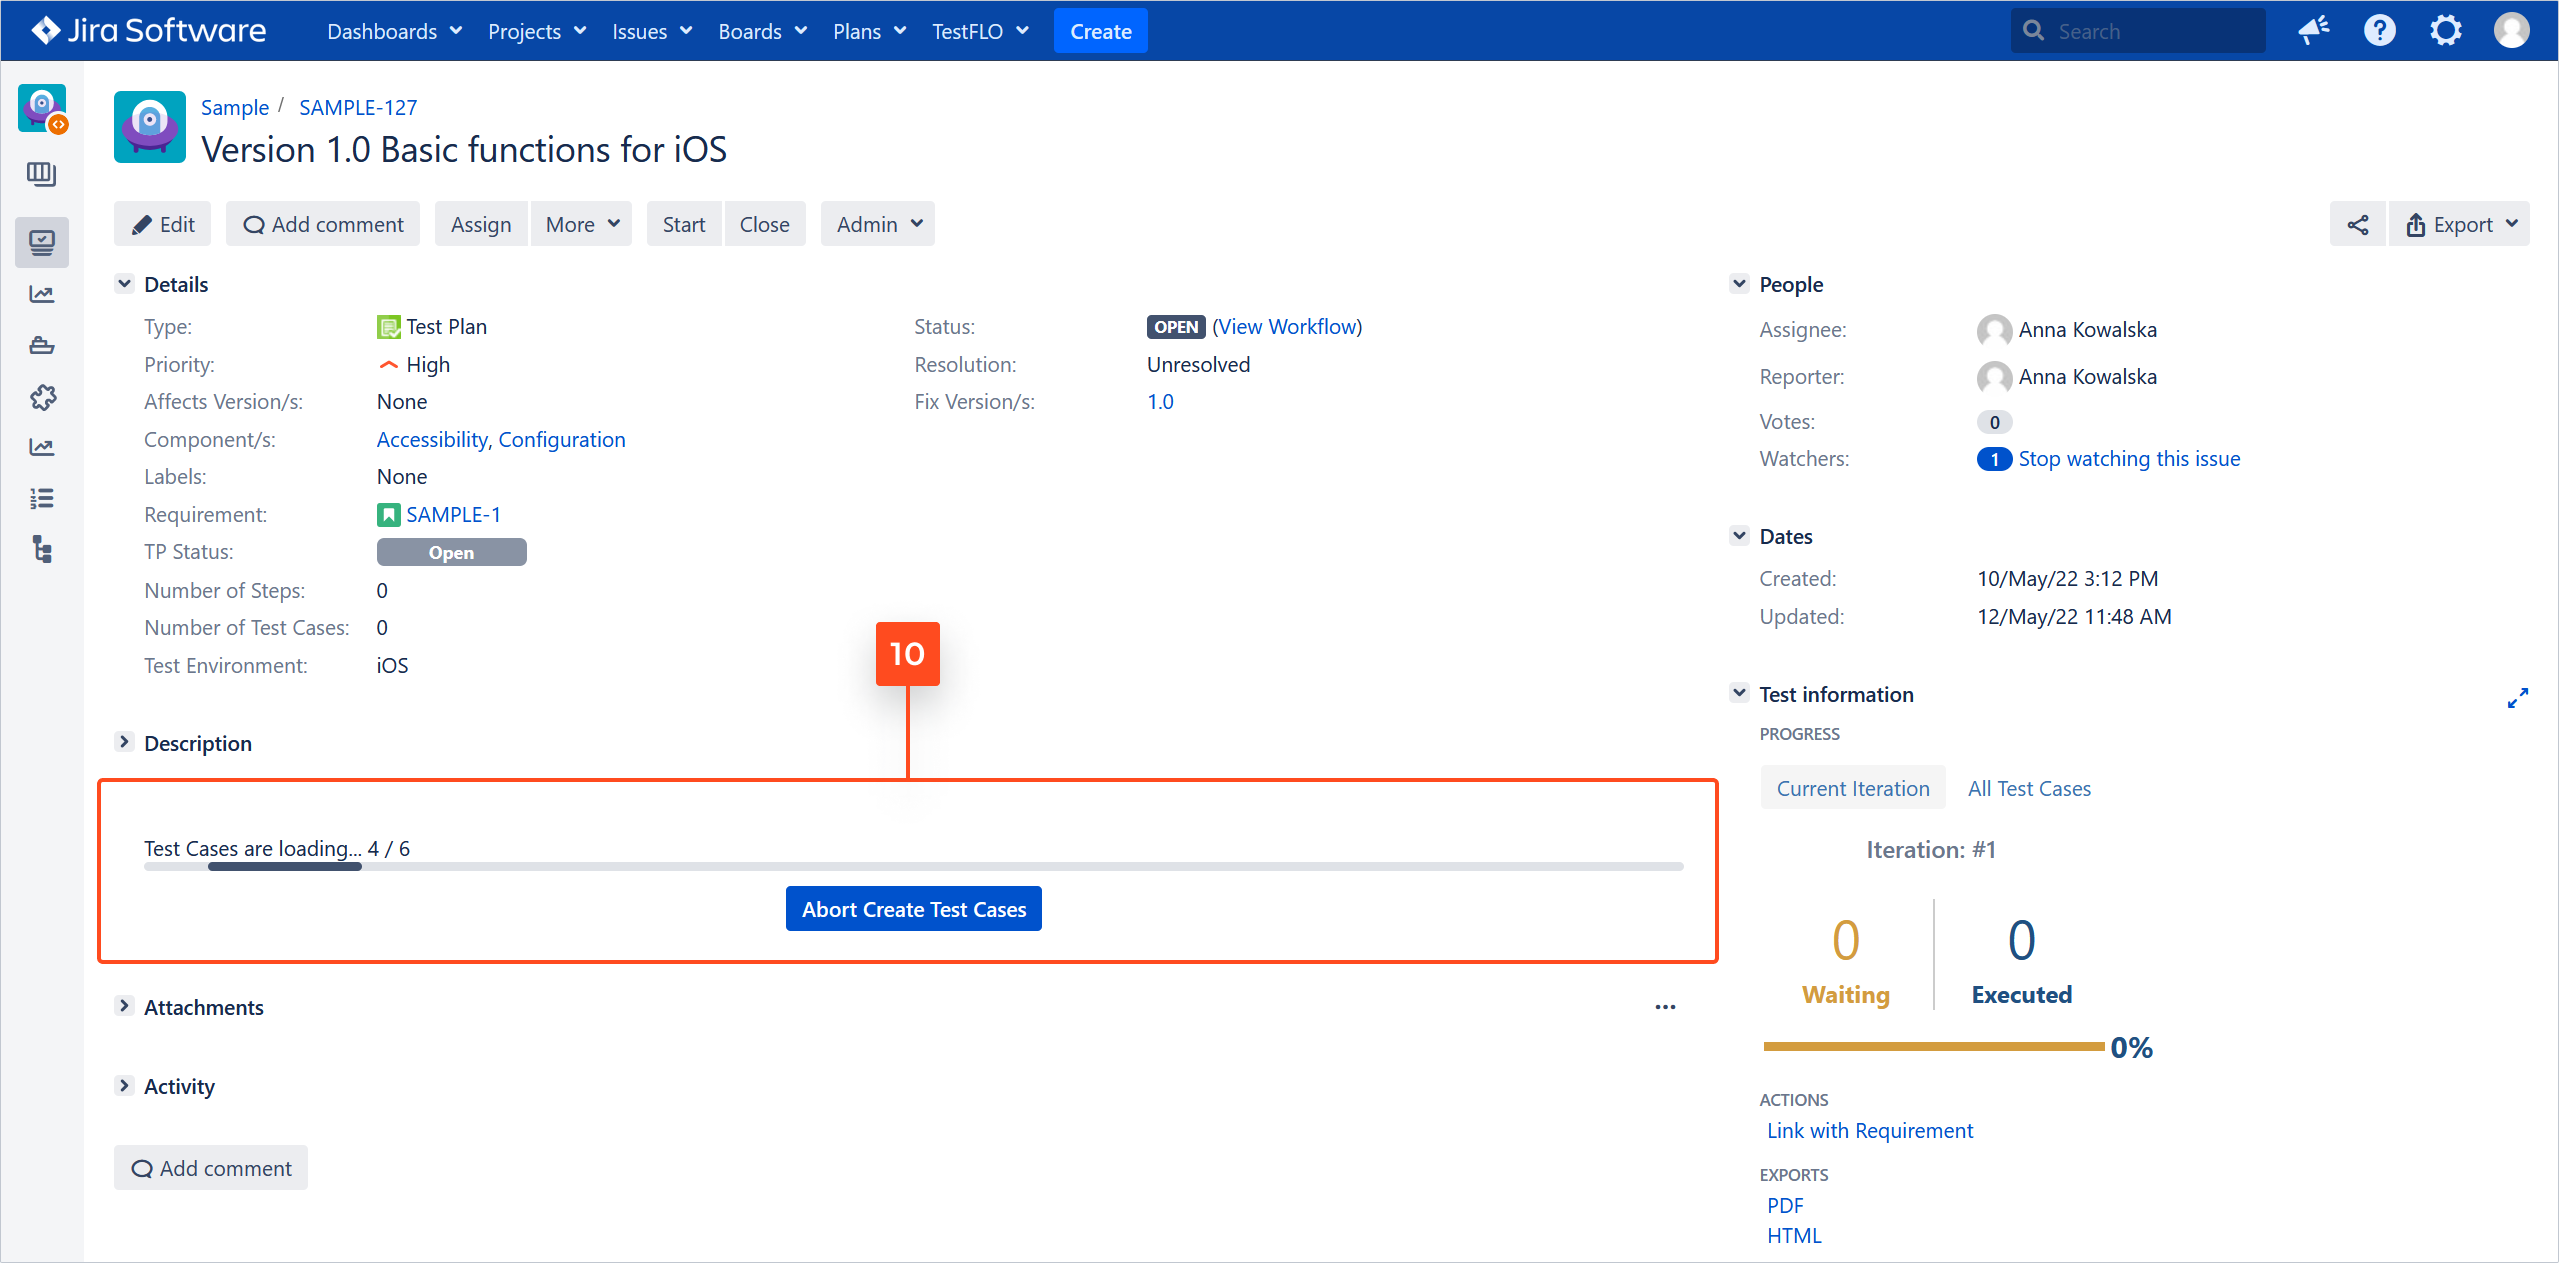
When creating Test Cases, a progress bar is displayed in the Test Plan view. If it is necessary to interrupt operation, you can Abort Create Test Cases using the button below the progress bar.
Note
If you use the Abort Create Test Cases option, then creating Test Cases will end when you press the button.
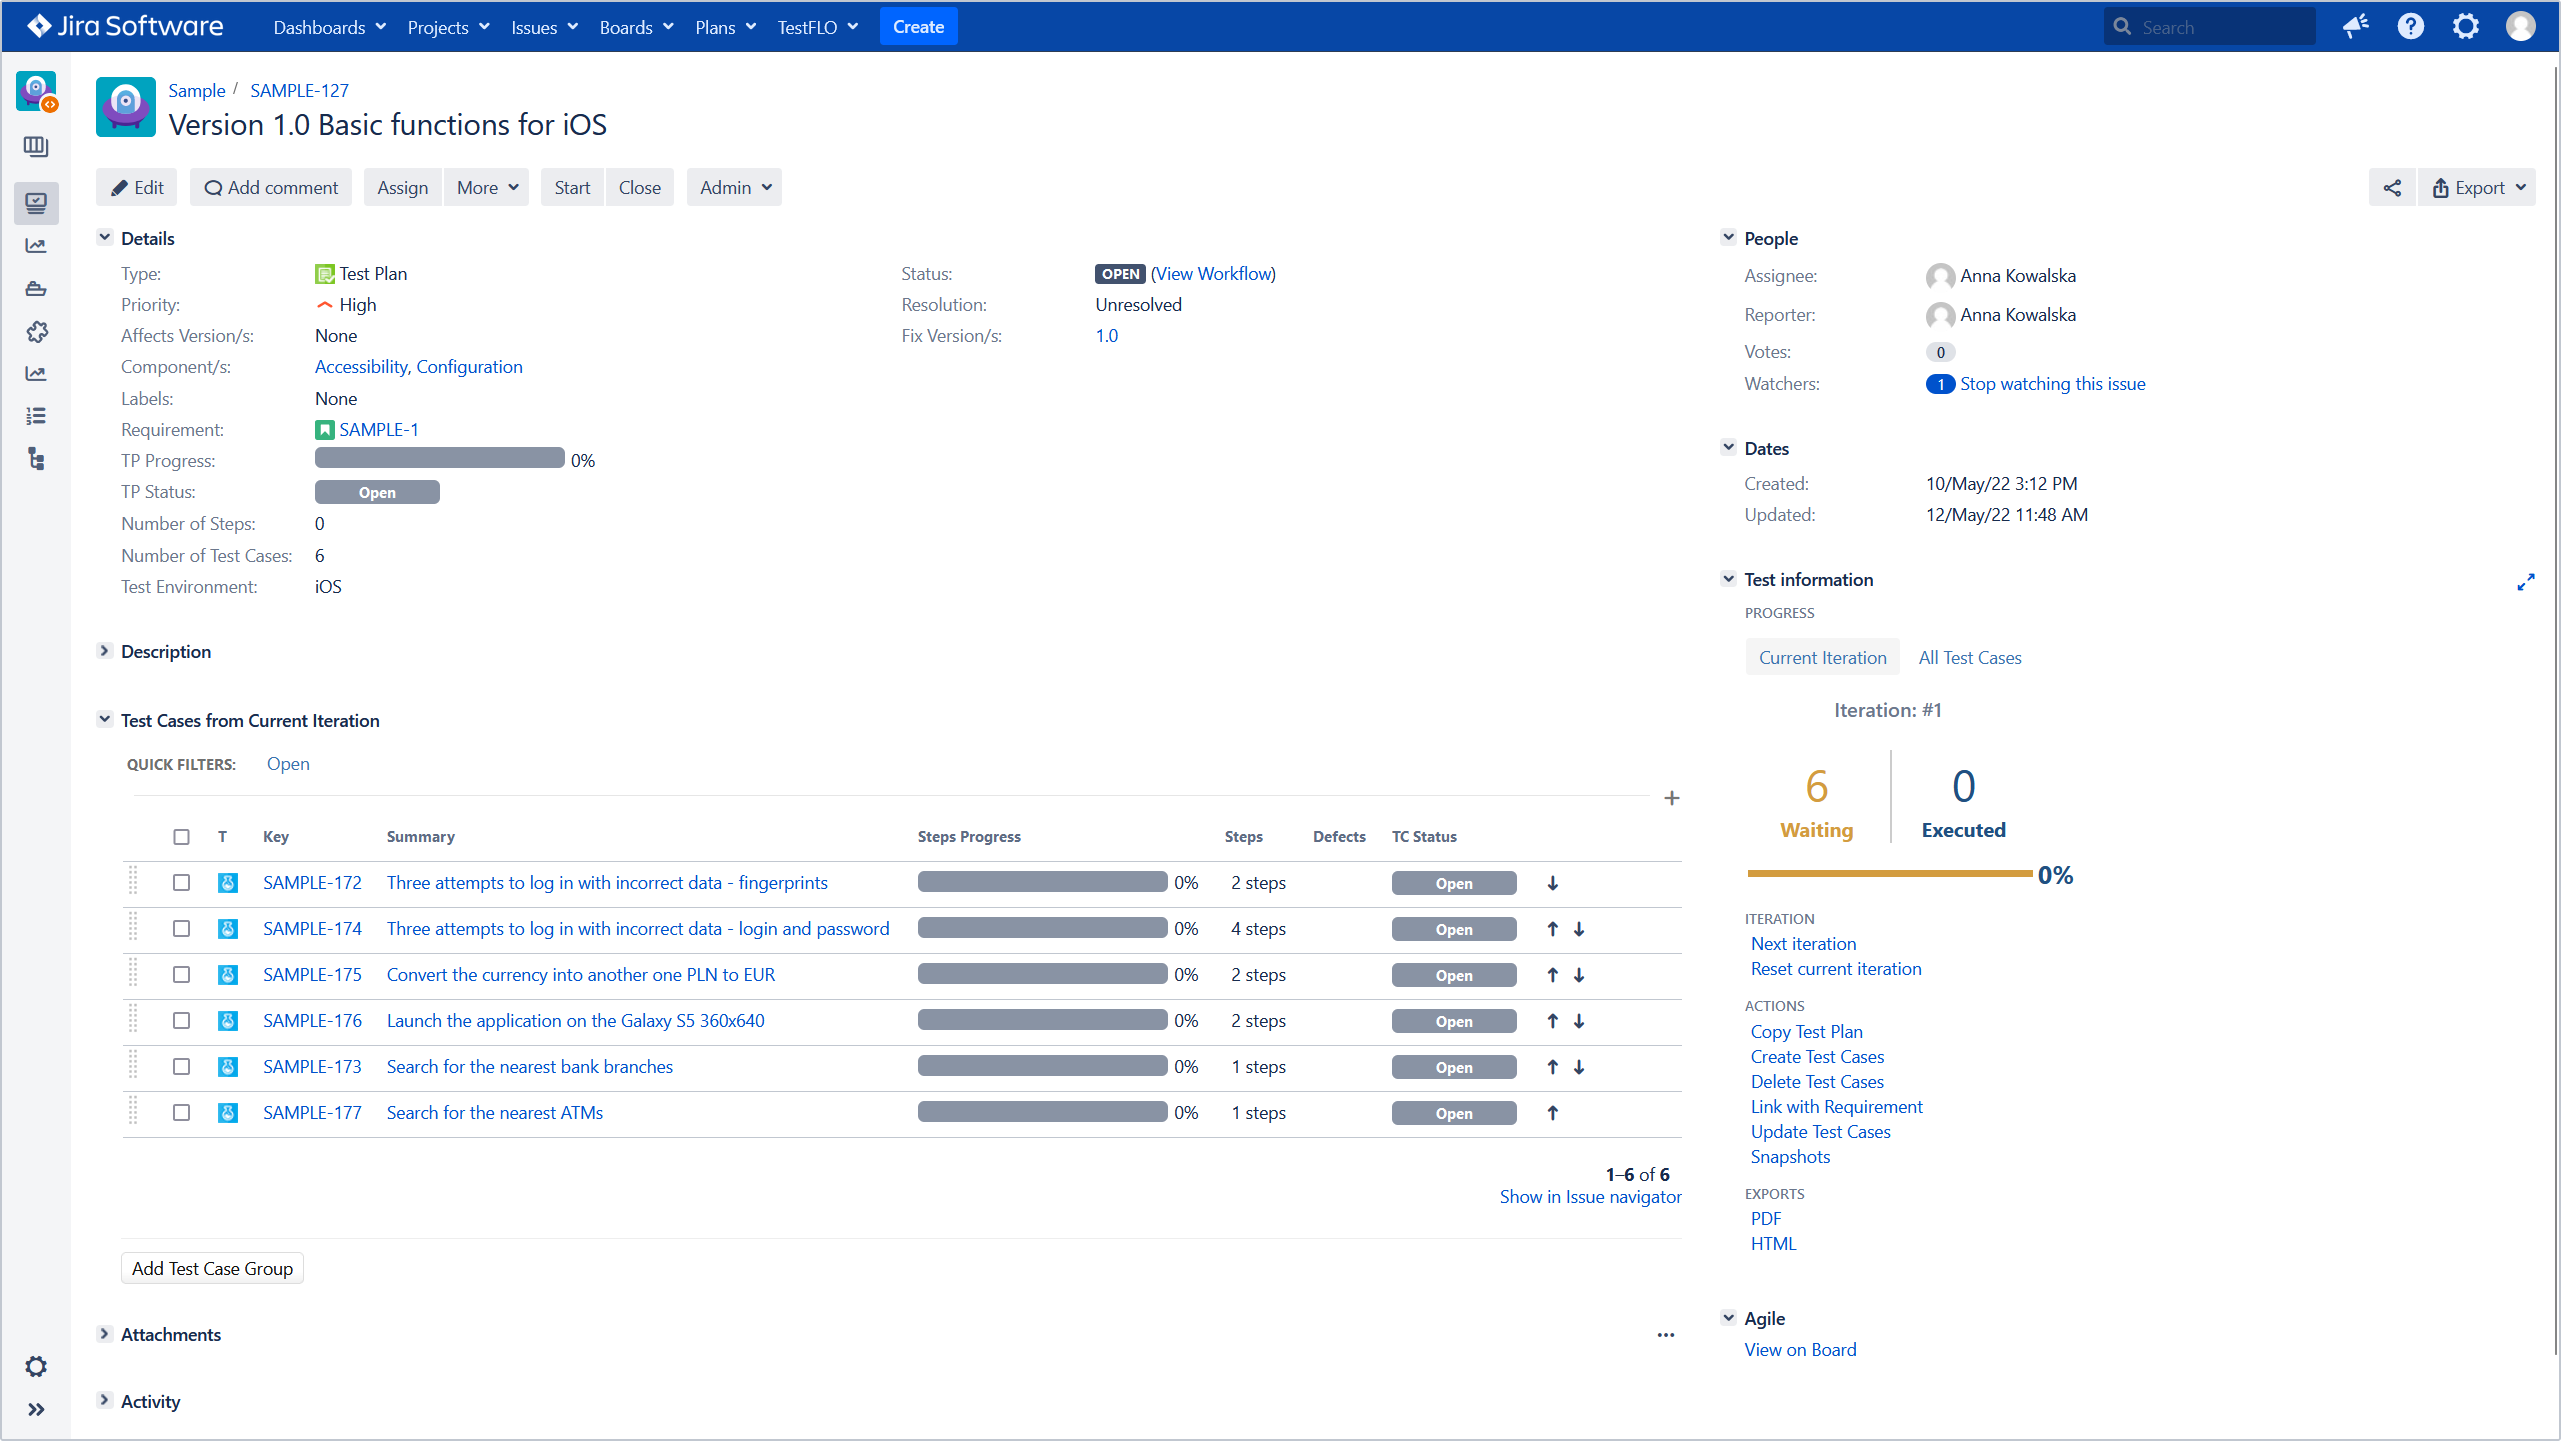
Result
You have created Test Cases from selected Test Case Templates in the Test Plan.
When creating Test Cases from Test Case Templates, the data is taken from the fields existing in the TCT and recreated in the fields in the TC. The data in the fields is created (copied) based on the default configuration, which is presented in the table below. You can also overwrite the default configuration using the dedicated Create TCs with fields from TCTs option in TestFLO settings, where you select only those fields that interest you during creation. The rules for creating using the Create TCs with fields from TCTs option can be found in the appropriate column of the table below.
Note
You must remember that field data will be copied if a given field is configured for both Test Case Template and Test Case.
In the table below you can check the list of fields and their behavior when you are creating Test Cases from the Test Case Template.
Yes - means that data from the field are being created/copied.
No - means that the data from the field is not created/copied.
Parentheses - additional information.
Field type
Default configuration
Fields configuration
Summary
Yes
Yes (always regardless of the configuration)
Description
Yes
Yes
Priority
Yes
Yes (always regardless of the configuration)
Component/s
Yes
Yes (compared by name)
Labels
Yes
Yes
Remaining Estimate
Yes
Yes
Original Estimate
Yes
Yes
Attachments
Yes (compared by name and file size)
Yes (compared by name and file size)
Assignee
Default assignee from project or component
Yes
Reporter
Yes (logged user)
Yes (logged user)
Affects Version/s
No
Yes (compared by name)
Environment
No
Yes
Fix Version/s
No
Yes (compared by name)
Issue links
No (separate configuration Copy links from TCT)
Yes
Custom fields
Yes (same custom fields in both TCT and TC contexts)
Yes (same custom fields in both TCT and TC contexts)
Issue security
No (inherited from Test Plan)
No (inherited from Test Plan)
Delete Test Cases
This operation allows deleting Test Cases from Test Plan. You can select which Test Cases have to removed if you made a mistake, for example during creating Test Cases.
Warning
Delete Test Cases operation is based on Jira Delete Issues permissions. Only users who have been granted this permission will be able to use the Delete Test Cases operation.
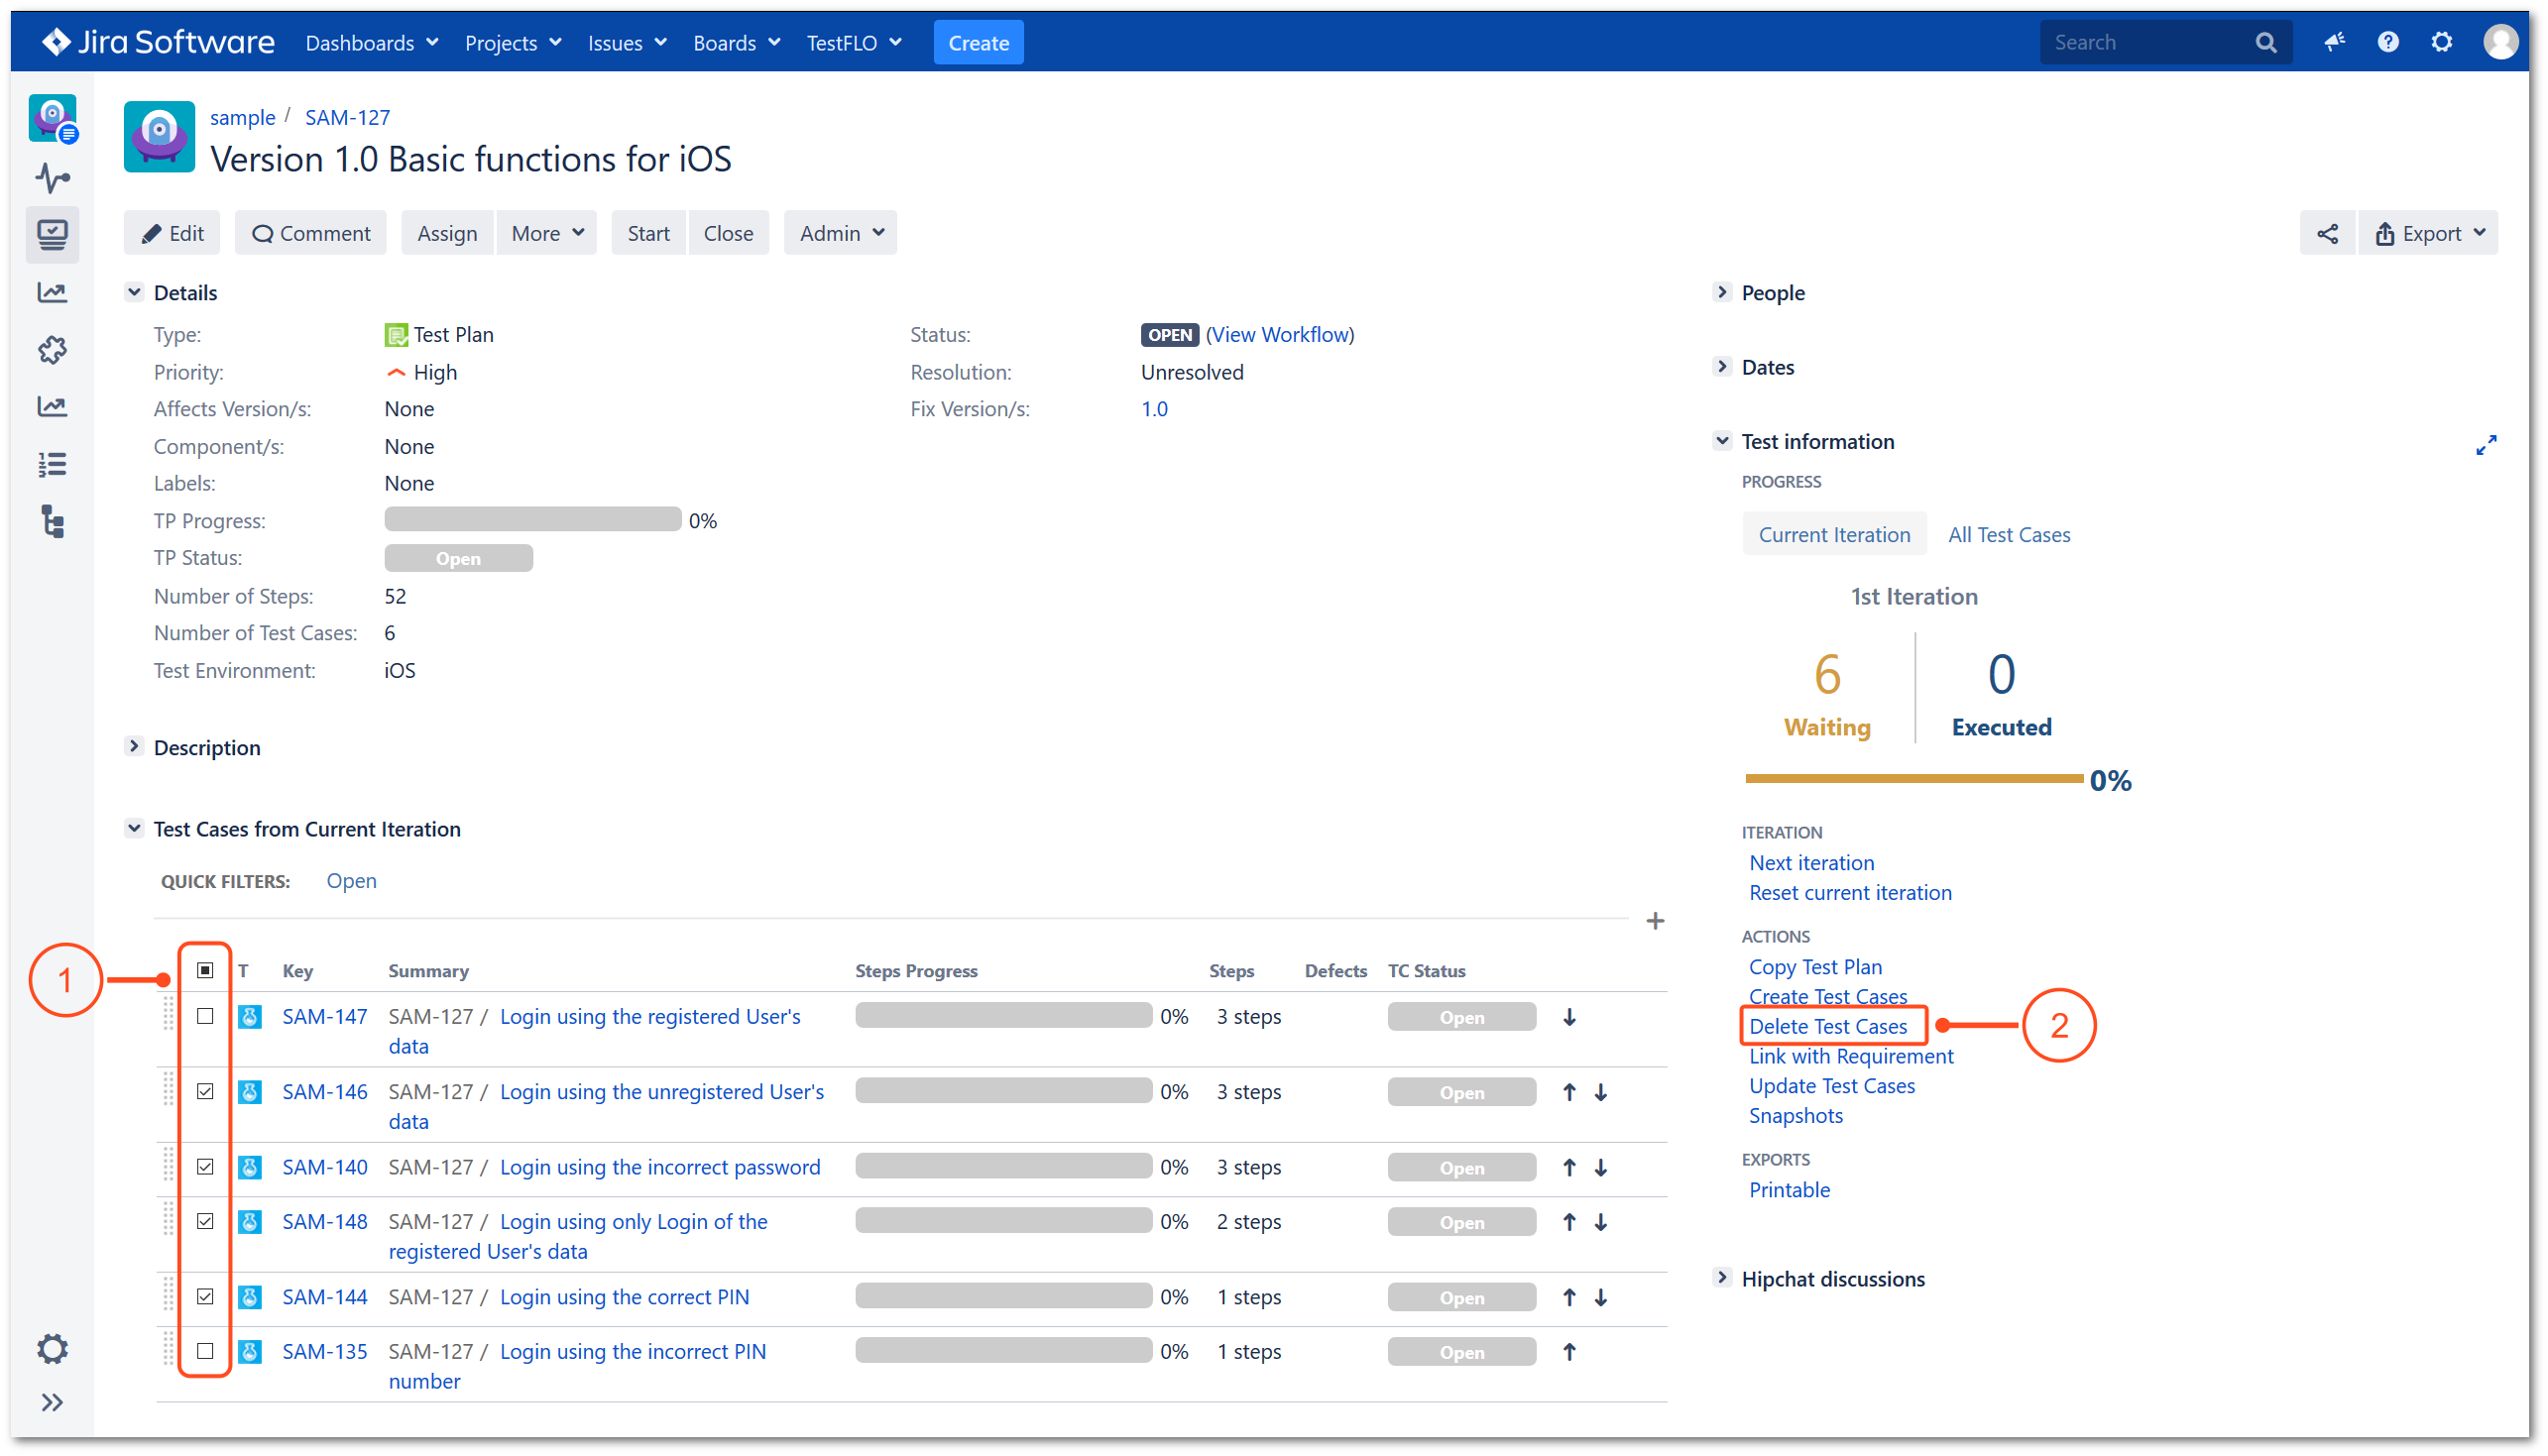
Steps
To delete Test Cases:
Select Test Cases you want to delete.
Click the Delete Test Cases operation from the Test information panel.
Confirm your choice by clicking on the Delete button.
Result
Selected Test Cases and their execution have been removed from the Test Plan.
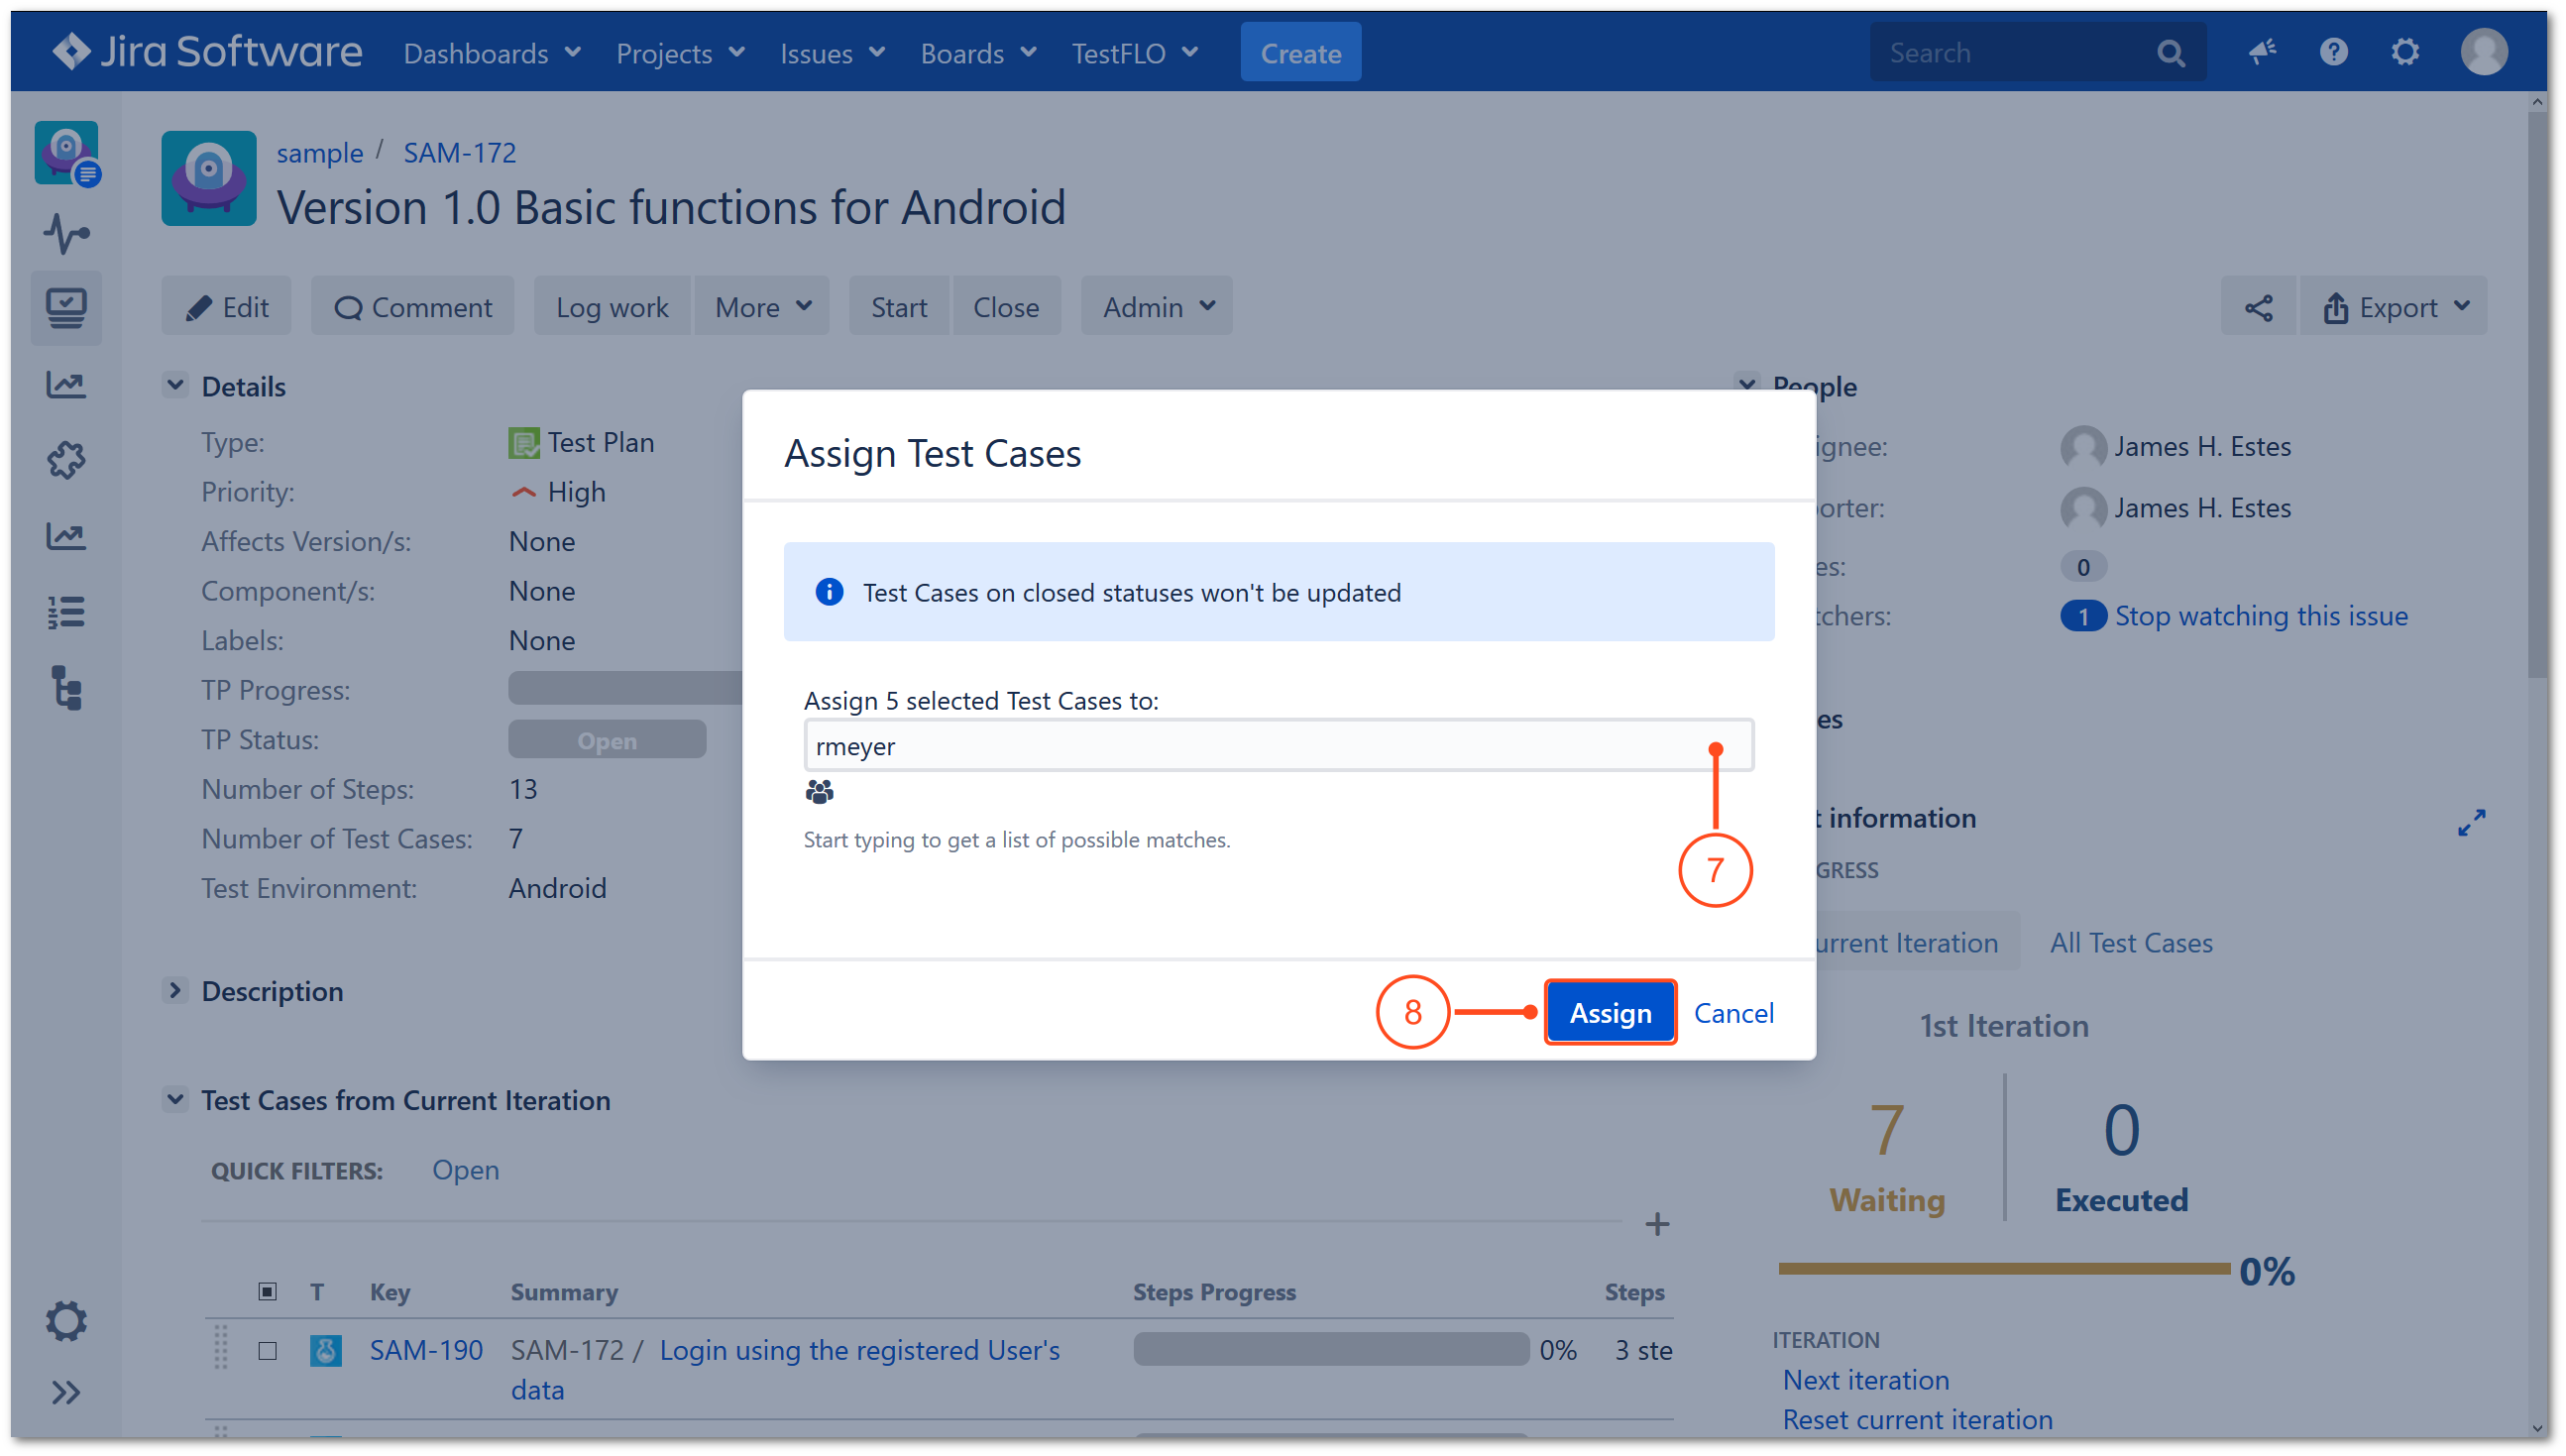
Assign Test Cases
This operation allows changing Assignee of all not executed Test Cases under a Test Plan. Its overrides standard Assign permissions. It is highly useful if your company has sophisticated security regulations and/or for example tester should not be able to change Assignee within the project except Test Cases. Another advantage is the bulk change of the Assignee of all Test Cases under a Test Plan.
Steps
To use Assign Test Cases operation:
Go to the Administration > Add-ons > TestFLO Settings > Test Case.
Select the Assign Roles option and click pencil.
Select appropriate roles and click outside the option. The configuration has been saved.
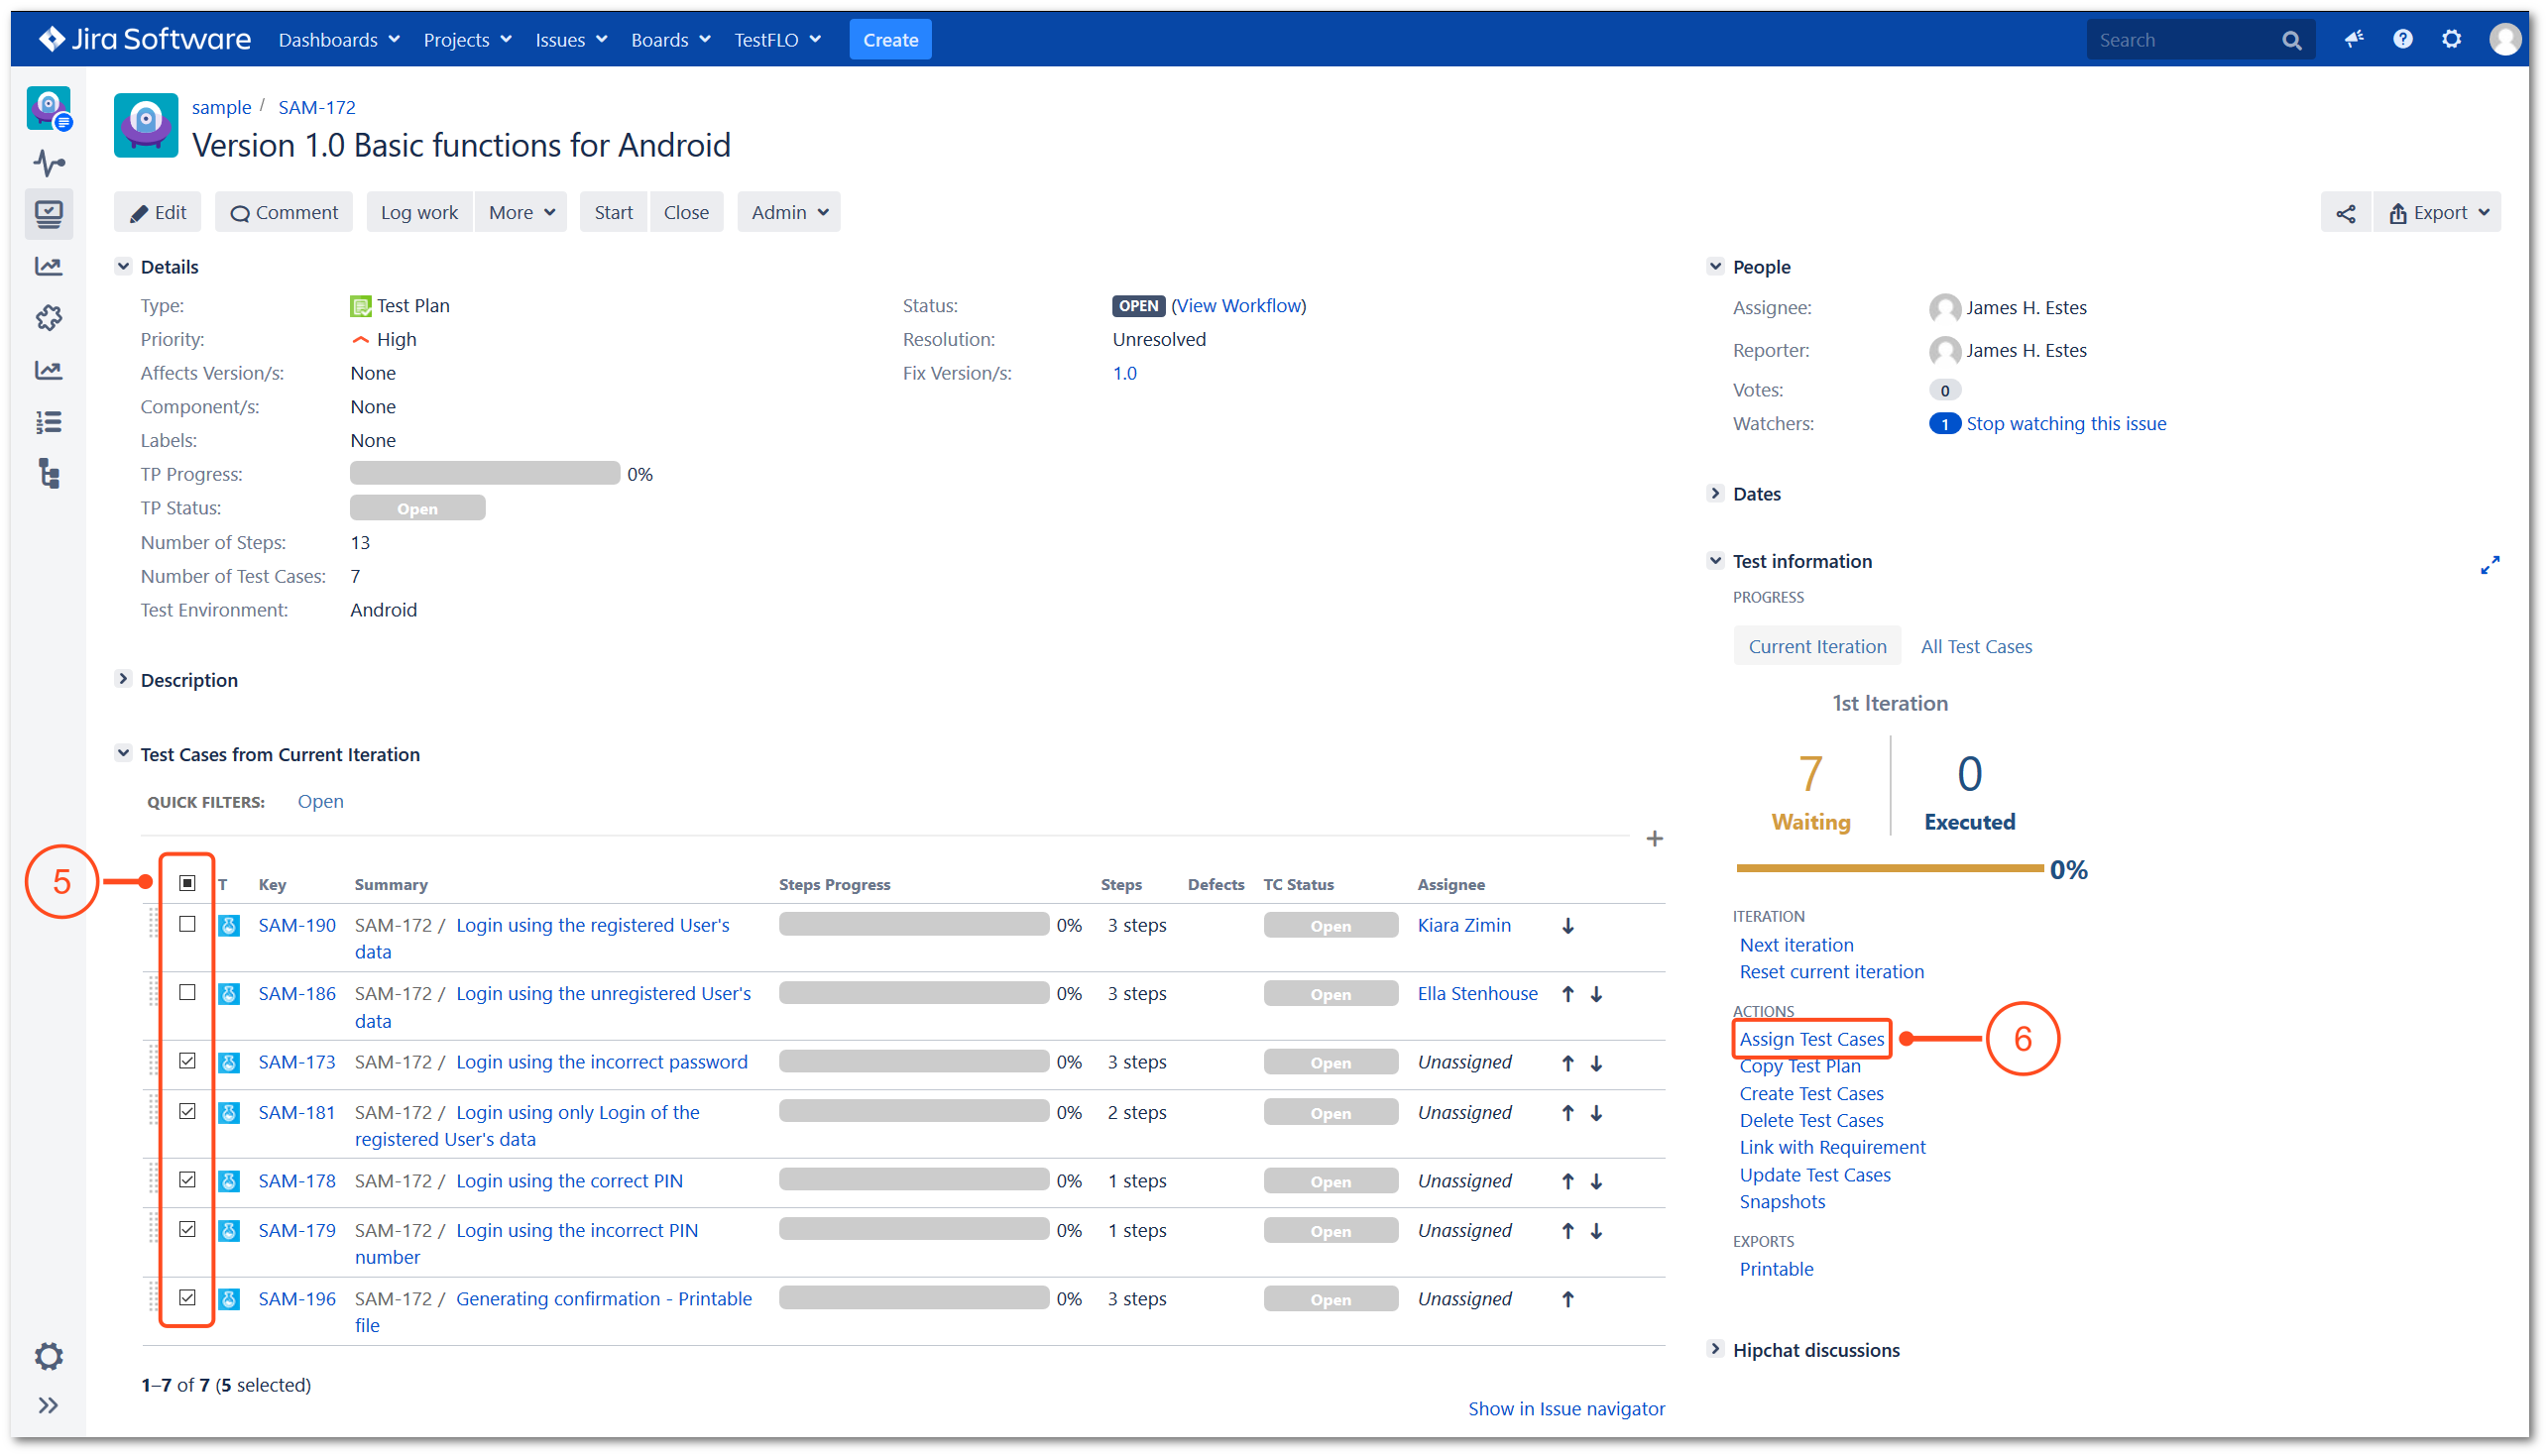
Go to the Test Plan.
Select the Test Cases that you want to assign.
Click the Assign Test Cases operation.
Select the user to whom you want to assign Test Cases.
Click Assign to confirm.
Result
Selected Test Cases have been assigned to the chosen user.
Link with Requirement
The Link with Requirement operation allows linking requirements with the given Test Plan. From the list of available requirements, you can select any issue and after linking its key will appear in the Requirement field.
If you configure issues that will be your requirements then the list of available requirements will be narrowed down only to the issue types you choose. Also linked Test Plans will be displayed in the given requirement in the Test Progress panel.
Info
To learn how to configure your requirement types see the Requirements tab in the Project Settings.
Info
To read more about Test Plans and its connection to requirements, see Link with Test Plans.
Steps
To link Test Plan with a requirement:
Select the Link with Requirement operation from the menu More or click on the Link with Requirement from the Test information panel.
Link with Requirement operation
In the Link with requirements dialog, you can select requirements which you want to link to the Test Plan. The list displays all the requirements available to the user. The dialog, in addition to the list, contains:
View of the Link with Requirement dialog
Search by filters - allows you to search requirements using Quick filters and Saved Jira filters.
Search bar - allows you to search requirements using Basic and Advanced (JQL) mode.
Columns - allows the user to add their own columns and change the order in which they appear in the list.
Columns headers - reflect the names of the fields selected in the Columns. You can sort the requirements list by clicking the column header when up and down arrows are displayed next to the header name. You can sort columns in descending and ascending order.
Requirements settings - this information will be visible if you select issue types in the requirement’s configuration that will represent the requirements in the project. The list shows the project key and issue types that have been configured as requirements. Only these issues will be available in the list of requirements for linking. If you want to see the full name of a project or issue type, hover your cursor over it and a tooltip with the name will appear.
Results range - shows the number of requirements per page to all and the number of requirements selected by the user.
Info
The number of displayed requirements per page can be changed using the Page size: issue searcher dialog option. You must bear in mind that the change also affects other operations. To learn more see Global Settings.
Pagination - shows the number of pages with results.
To search specific requirements you can use Search by filters or Search bar.
With the Search bar, you can search the list using two modes: Basic and Advanced.
The Basic mode allows you to easily select data in each field. You can add more categories (fields) to your search by clicking More and selecting a field.
Note
The Basic search does not support Sprint, Team and Link type fields.
The Advanced mode allows you to write a query in JQL. If a given query is not too complex you can switch to the Basic mode.
The Search by filters option gives you the possibility to filter requirements using Quick filters and Saved Jira filters. In the case of Quick filters, you just need to click on a filter to use it. Saved Filters will allow you to select saved filters from the list.
Note
Each selected filter is reflected in the Search bar. Depending on the complexity, it will show up in the basic or advanced mode.
Quick filters:
Viewed recently - requirements that you last viewed.
Same Fix Version/s as [Issue key of Test Plan] - requirements with the same Fix Version/s value as on the Test Plan.
Same Component/s as [Issue key of Test Plan] - requirements with the same Component/s value as on the Test Plan.
Note
Part of the Quick filters are based on the Component/s and Fix Version/s fields. If the fields on the Test Plan have no values, the dedicated filters will not appear.
The Saved Jira filters list contains your favorite filters and those created by you. To find a filter that has been shared with you, enter the name of the filter in the search box.
After searching for the requirements which you want to link to the Test Plan, the next step is to select the checkbox next to the given requirement. You can select up to 5000 records at one time using a single selection or select all (in this case, the first 5,000 records are counted). Selected requirements are added to the Summary in order from top to bottom from the currently visible list with requirements. The order of selection by the user within the display of a given list is not taken into account.
Selecting requirements
Note
If a given requirement has already been linked to a Test Plan, that requirement will be highlighted in the list.
Highlighted requirements that have been already linked with a particular Test Plan
Optional: Click on Selected issues:[number] to view the list with a summary of selected requirements. In this list, you can uncheck selected requirements using the bin icon. You can also back to the previous view and deselect requirements or select more as needed.
Summary view with selected requirements
Click Confirm to link requirement/s.
Result
You have linked requirement/s with the Test Plan. The keys of the linked requirements are displayed in the Requirements field in the given Test Plan.
Note
You can change the behavior of the Requirement field, including key display type, number of values, and other options in the field settings. For more information, see TestFLO - Enhanced Issue Picker CF.
Test Plan view with linked requirements
Update Test Cases
This operation allows you to update Test Cases based on two sources:
Test Case Template
Test Plan
Depending on the selected source for updating the Test Cases, the operation is based on different configurations.
Note
To use the Update Test Cases operation, the user must have the Edit issue permission. The permission must be granted in the project where the Test Cases are to be updated.
Note
You can decide which users have access to the Update Test Cases operation by granting the Update Test Cases operation permission.
Update Test Cases based on Test Case Templates
This operation updates all not executed Test Cases based on the Test Case Templates fields. In this case, the Update Test Cases operation can be useful if you made a mistake while writing Test Case Templates and you want to change the content of created Test Cases from these Test Case Templates.
In the table below you can check the list of fields that are updated from the Test Case Template to the Test Case. There are two ways to update fields. You can use the Default configuration or select specific fields using the Update TCs with fields from TCTs option in TestFLO settings.
Field type
Default configuration
Fields configuration
Summary
yes
yes
Description
yes
yes
Priority
yes
yes
Component/s
yes (compared by name)
yes (compared by name)
Labels
yes
yes
Remaining Estimate
yes
yes
Original Estimate
yes
yes
Attachments
yes (compared by name and file size)
yes (compared by name and file size)
Assignee
no
yes
Affects Version/s
no
yes (compared by name)
Environment
no
yes
Fix Version/s
no
yes (compared by name)
Issue links
no
yes
Issue security
no (inherited from Test Plan)
no (inherited from Test Plan)
Reporter
no
yes
Custom fields
yes (all in TCT and TC context)
yes (all in TCT and TC context)
The selected option in the Update TCs with fields from TCTs configuration will be the default set of fields for the user. The default fields are available in the Fields to be updated on Test Case field in the Update Test Cases operation dialog. If the user has Set fields on Update Test Cases operation permission, they can edit the field list in the dialog. Changes made in the dialog only affect the results of the operation that the user performs. They do not change the defaults set in Update TCs with fields from TCTs configuration for other users. If the user does not have this permission, the fields will update according to the selected option in the configuration.
During the Test Cases update, you can decide if you want to reset the Steps statuses to default. This option will not reset step statuses if you apply content changes only to existing steps in the Steps panel. If the change concerns deleting or adding a step to the Steps panel, the statuses will be reset because this is a significant content interference.
Steps
To update Test Cases based on Test Case Templates:
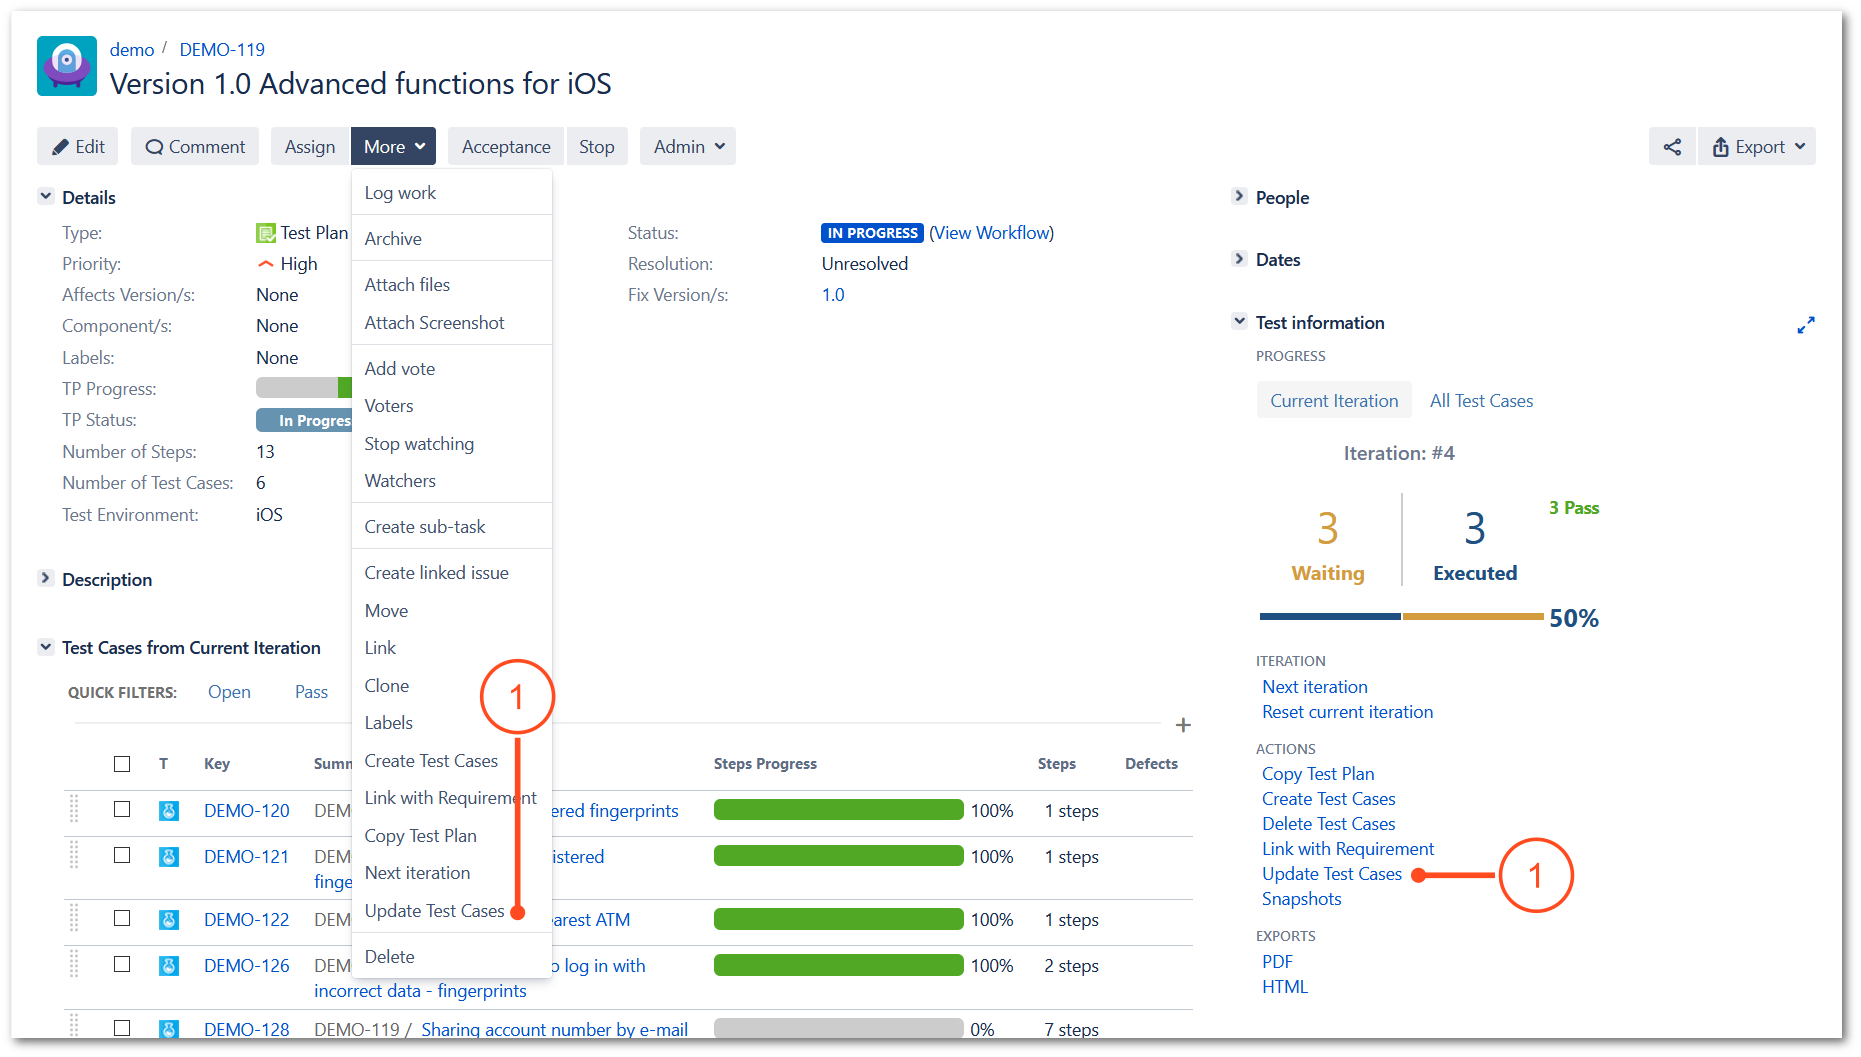
Click the Update Test Cases operation from the Test information panel or select from menu More.
Select the Test Case Templates radio button.
In the Fields to be updated on Test Case field, you can change the set of default fields or leave it unchanged. If you want to restore the default configuration, click Reset to default.
Note
If you do not have the Set fields on Update Test Cases operation permission, you cannot change the fields.
Check the option if you do not want to reset the step statuses to default or leave this option unchecked to reset these statuses. When the number of steps has changed then the status is always reset regardless of this option.
Select Test Cases which you want to update from the Test Case Templates.
Note
The list displays only those Test Cases that have not been executed (their statuses are not set in the Closed statuses option from the TestFLO Settings).
After selection, click Update.
Result
You have updated selected Test Cases from the Test Case Template.
Note
If you have changed the default set of fields in the Fields to be updated on Test Case field when you use the operation again your change will be preserved. Changes are preserved per user.
Update Test Cases based on Test Plan
This operation updates all not executed Test Cases based on the Test Plan fields. In this case, the Update Test Cases operation can be useful if you want to propagate the field value from Test Plan to Test Cases at once, for example, the Fix Version/s field. This will save you time for completing the same fields on the Test Case multiple times.
The user can update fields that have the same context for Test Cases and Test Plan (fields exist on Test Case and Test Plan). Fields that are not on Test Cases and selected during the update will not be propagated.
Note
Attachments are not updated from Test Plan to Test Cases.
The source of the default value for the Fields to be updated on Test Case field in the operation dialog is the Update TCs with fields from TPs option from the TestFLO settings. If there are no fields in the Update TCs with fields from TPs option, then the user has to select the fields to be updated in the dialog (field list is empty). You can also select specific fields in this option then the selected fields will be the default set of fields for the user.
Changing the fields in the operation dialog depends on the Set fields on Update Test Cases operation permission. If the user has this permission granted, they can edit the field list in the dialog. Changes made in the dialog only affect the results of the operation that the user performs. They do not change the defaults set in Update TCs with fields from TPs configuration for other users. If the user does not have the Set fields on Update Test Cases operation permission and the set of fields is selected in the Update TCs with fields from TPs configuration, then the fields will update according to this configuration.
Note
The user will not be able to perform the Update Test Cases operation, if the configuration Update TCs with fields from TPs is empty and they have no permission to change the fields in the dialog.
During the Test Cases update, you can decide if you want to reset the Steps statuses to default. This option will not reset step statuses if you apply content changes only to existing steps in the Steps panel. If the change concerns deleting or adding a step to the Steps panel, the statuses will be reset because this is a significant content interference.
Steps
To update Test Cases based on Test Plan:
Click the Update Test Cases operation from the Test information panel or select from menu More.
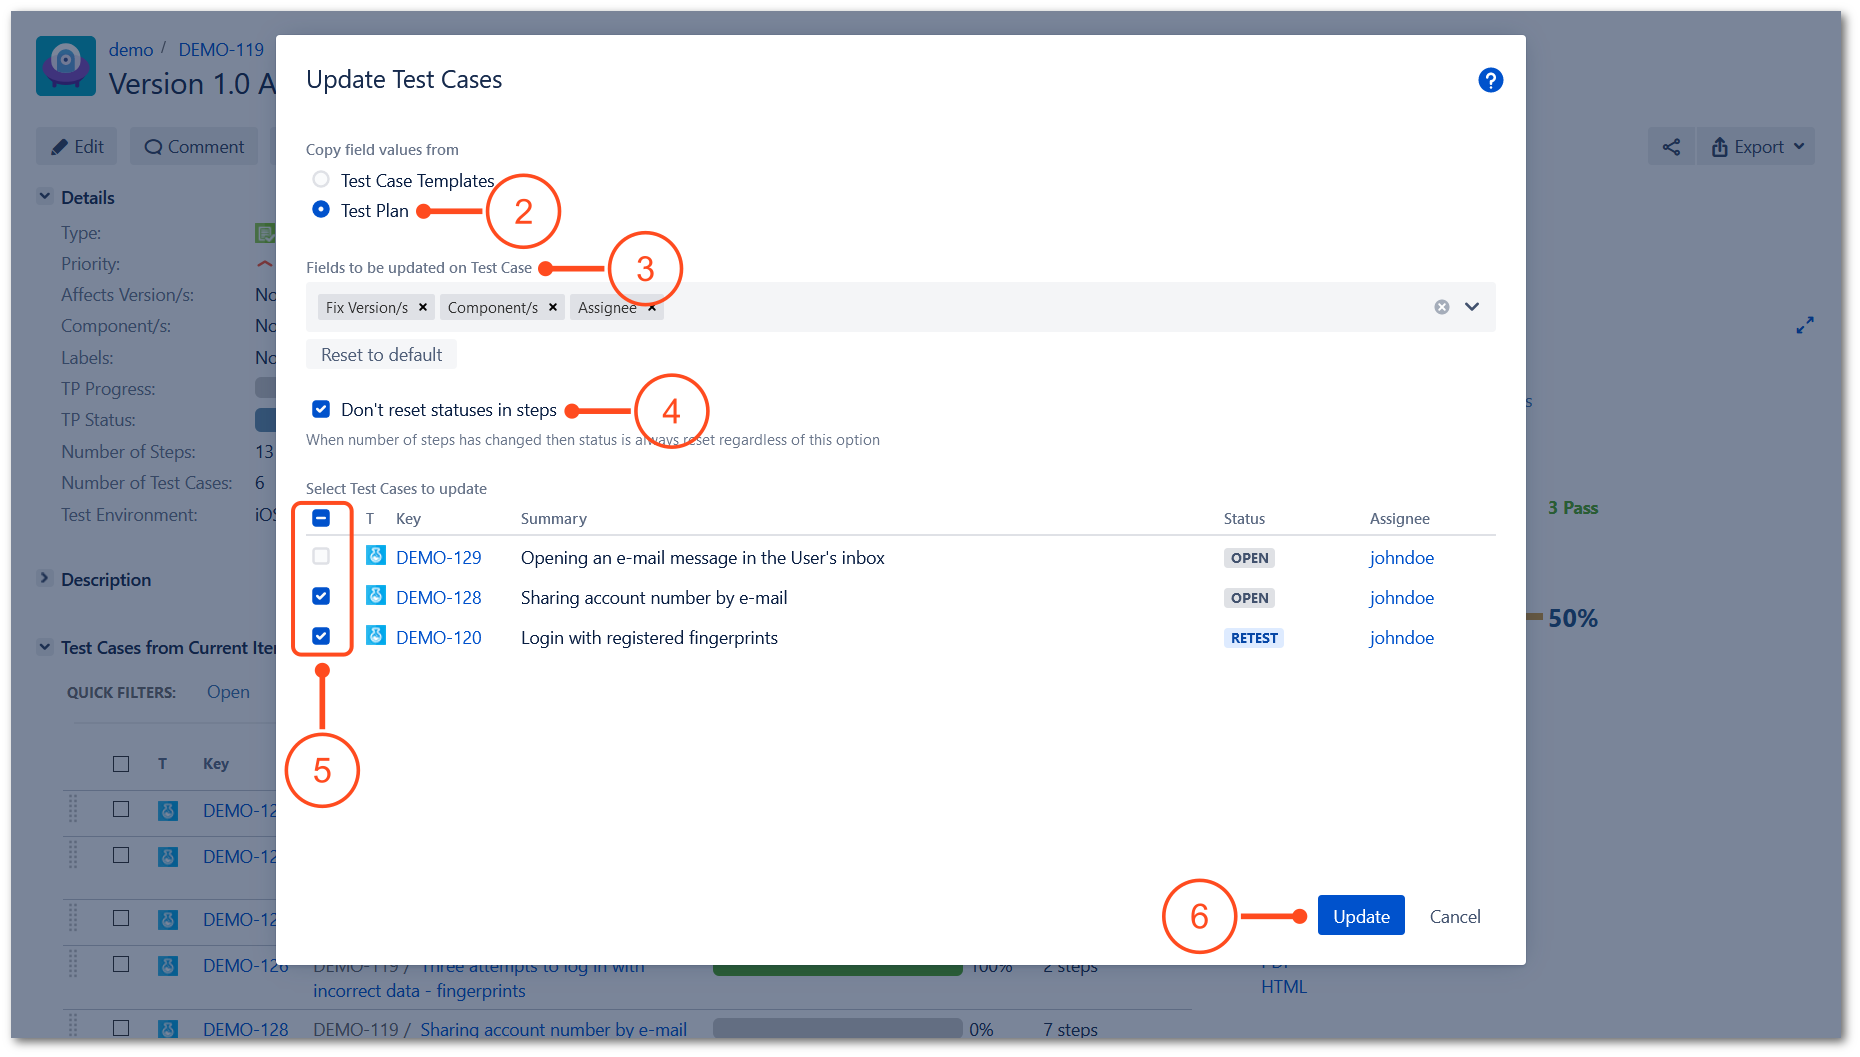
Select the Test Plan radio button.
In the Fields to be updated on Test Case field, you can add fields or change the set of default fields or leave it unchanged. If you want to restore the default configuration, click Reset to default.
Note
If you do not have the Set fields on Update Test Cases operation permission, you cannot change the fields.
Check the option if you do not want to reset the step statuses to default or leave this option unchecked to reset these statuses. When the number of steps has changed then the status is always reset regardless of this option.
Select Test Cases which you want to update from Test Plan.
Note
The list displays only those Test Cases that have not been executed (their statuses are not set in the Closed statuses option from the TestFLO Settings).
After selection, click Update.
Result
You have updated selected Test Cases from the Test Plan.
Note
If you have changed the default set of fields in the Fields to be updated on Test Case field when you use the operation again your change will be preserved. Changes are preserved per user.
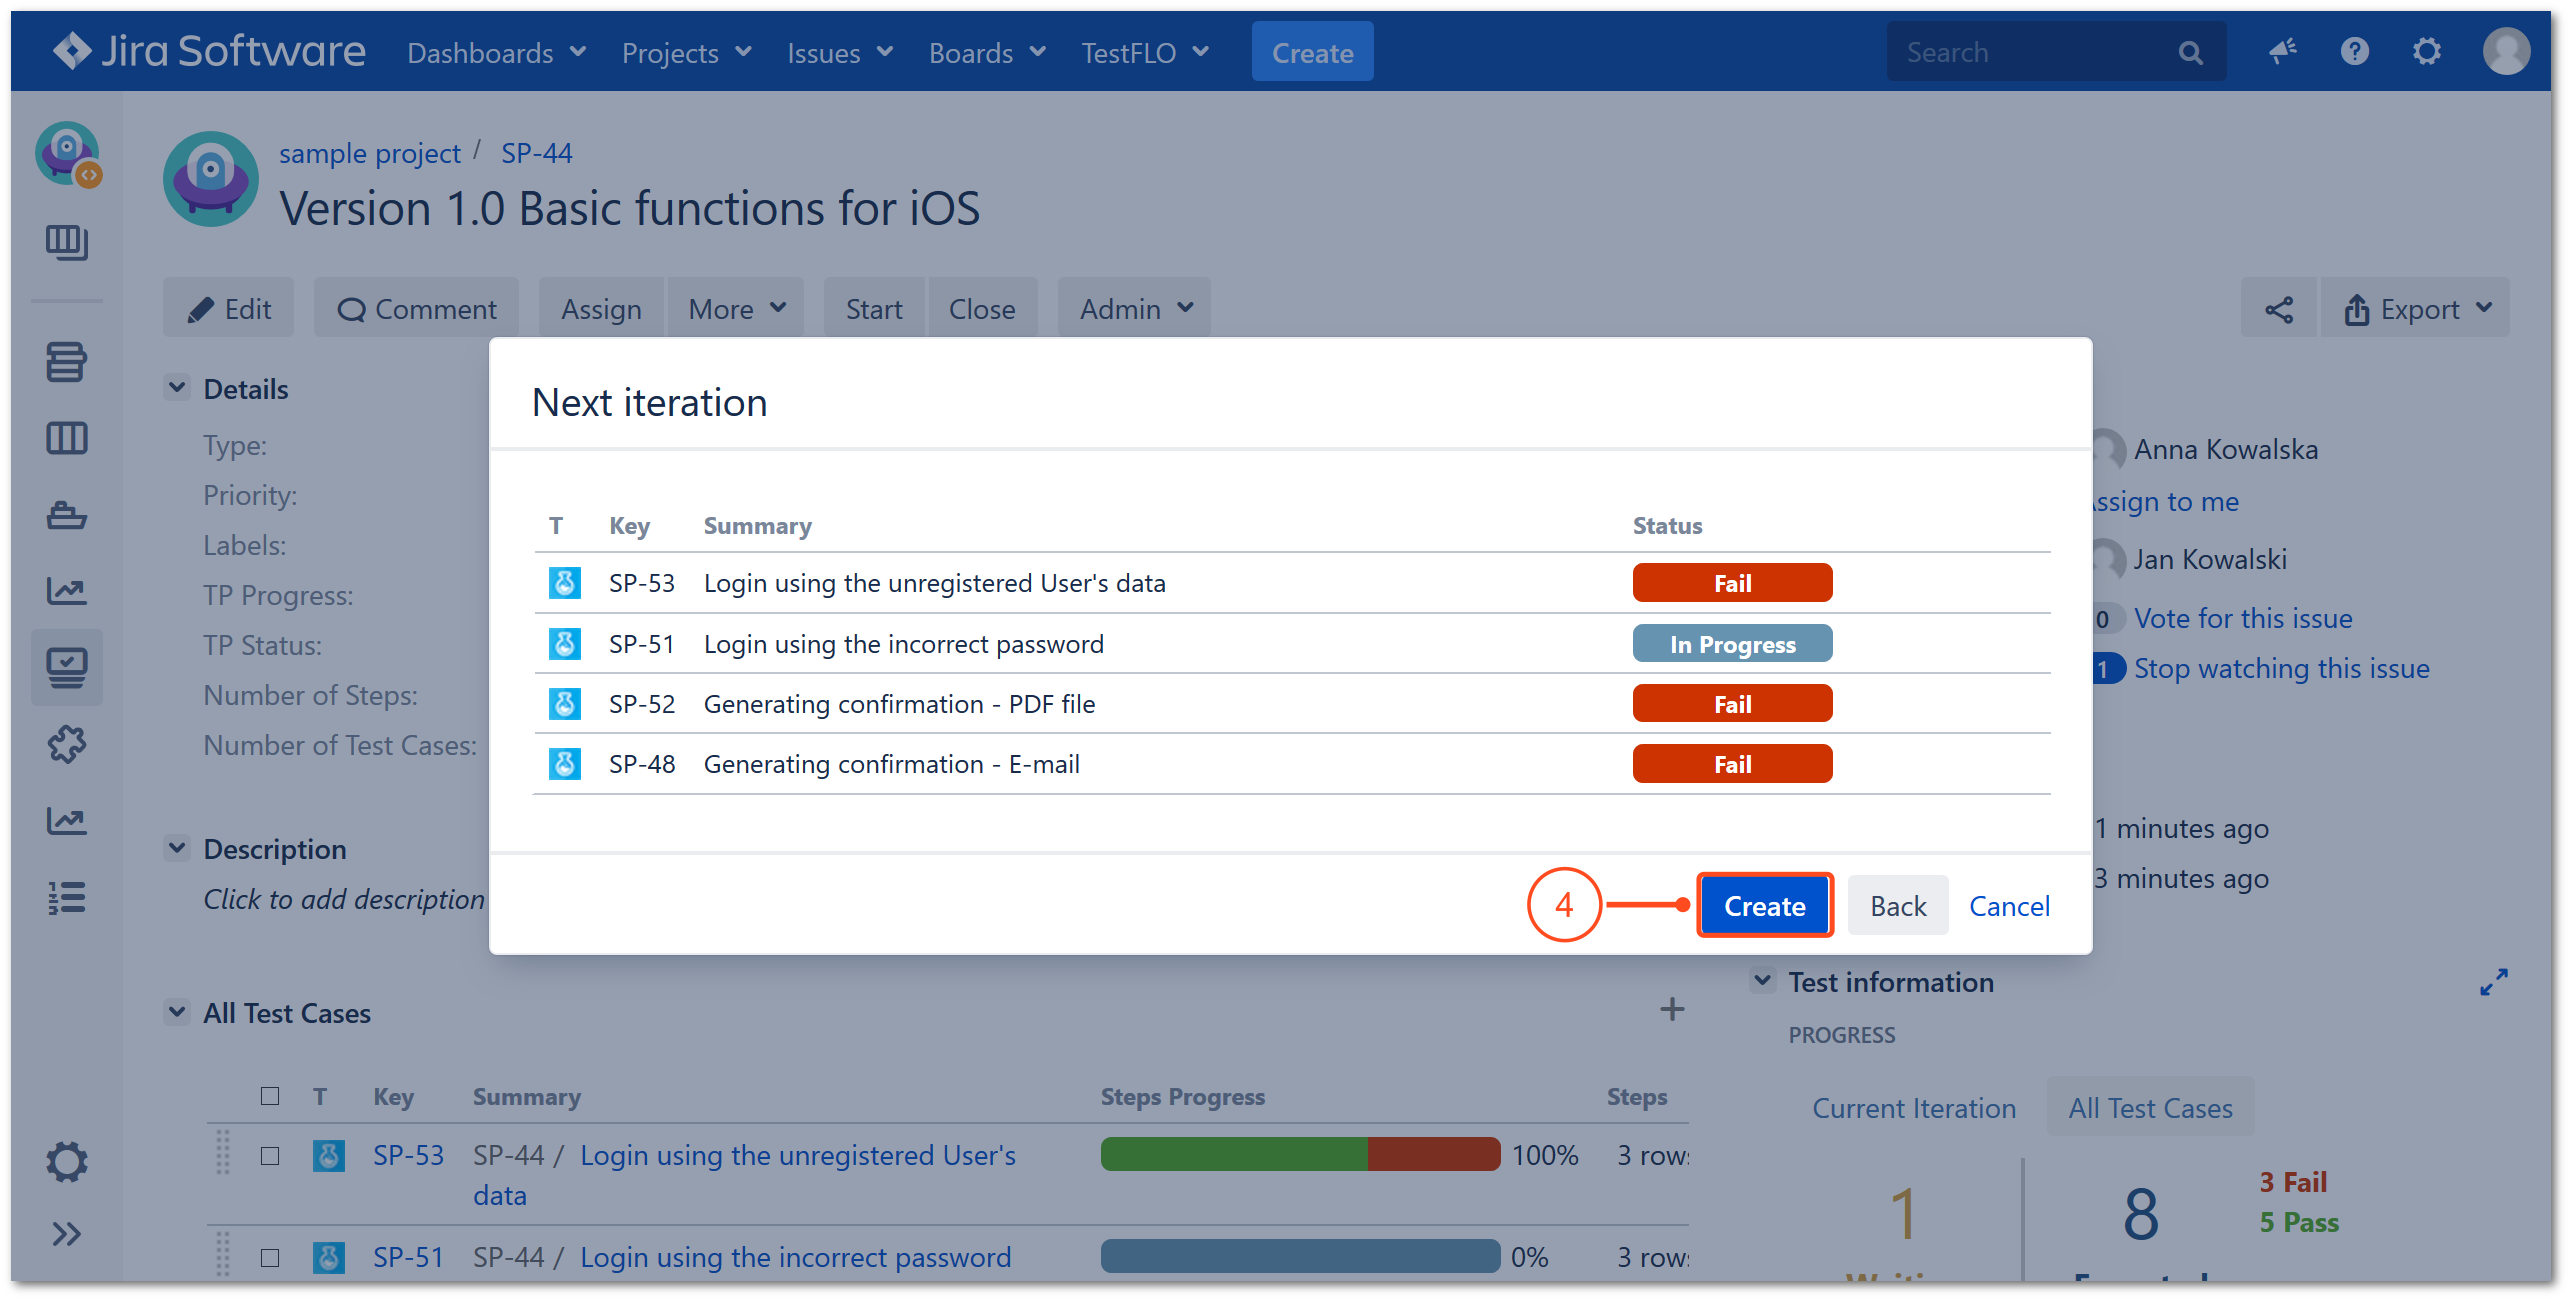
Next iteration
The Next iteration operation allows creating another iteration of the Test Plan with Test Cases based on four strategies. Together with the new iteration, all Test Cases execution statuses, linked defects, and step comments will be reset. This will allow you to test again chosen Test Cases in the new iteration. All previous Test Case executions are available in the Test Executions tab on Test Case and all previous Test Plan iterations are available in the Test Plan Iterations tab on Test Plan.
Info
You can restrict users’ permissions to use this operation with the Next Test Plan Iteration permission. To learn more see TestFLO permissions. Along with the restriction of this operation, a restriction on changing the Iteration name is imposed.
Tip
If your team happens to create iterations by accident, you need to know that they cannot be deleted. Therefore it is best to lower your chances to accidentally create an iteration by restricting the ability to create a new iteration to a small number of people. This can be done by granting the Next Test Plan Iteration permission. You can grant it in a given project in the Permissions tab or globally on the Permissions page.
Depending on the results of a given iteration and what Test Cases you want to execute in the next iteration, you can use strategies:
All Test Cases
This strategy creates a new iteration with all existing Test Cases on Test Plan.
Steps
To use the All Test Cases strategy:
Click the Next iteration operation from the Test information panel or select from the menu More.
Leave the default Iteration name or rename it to one that will help you better identify the iteration.
Select the All Test Cases strategy and click Next.
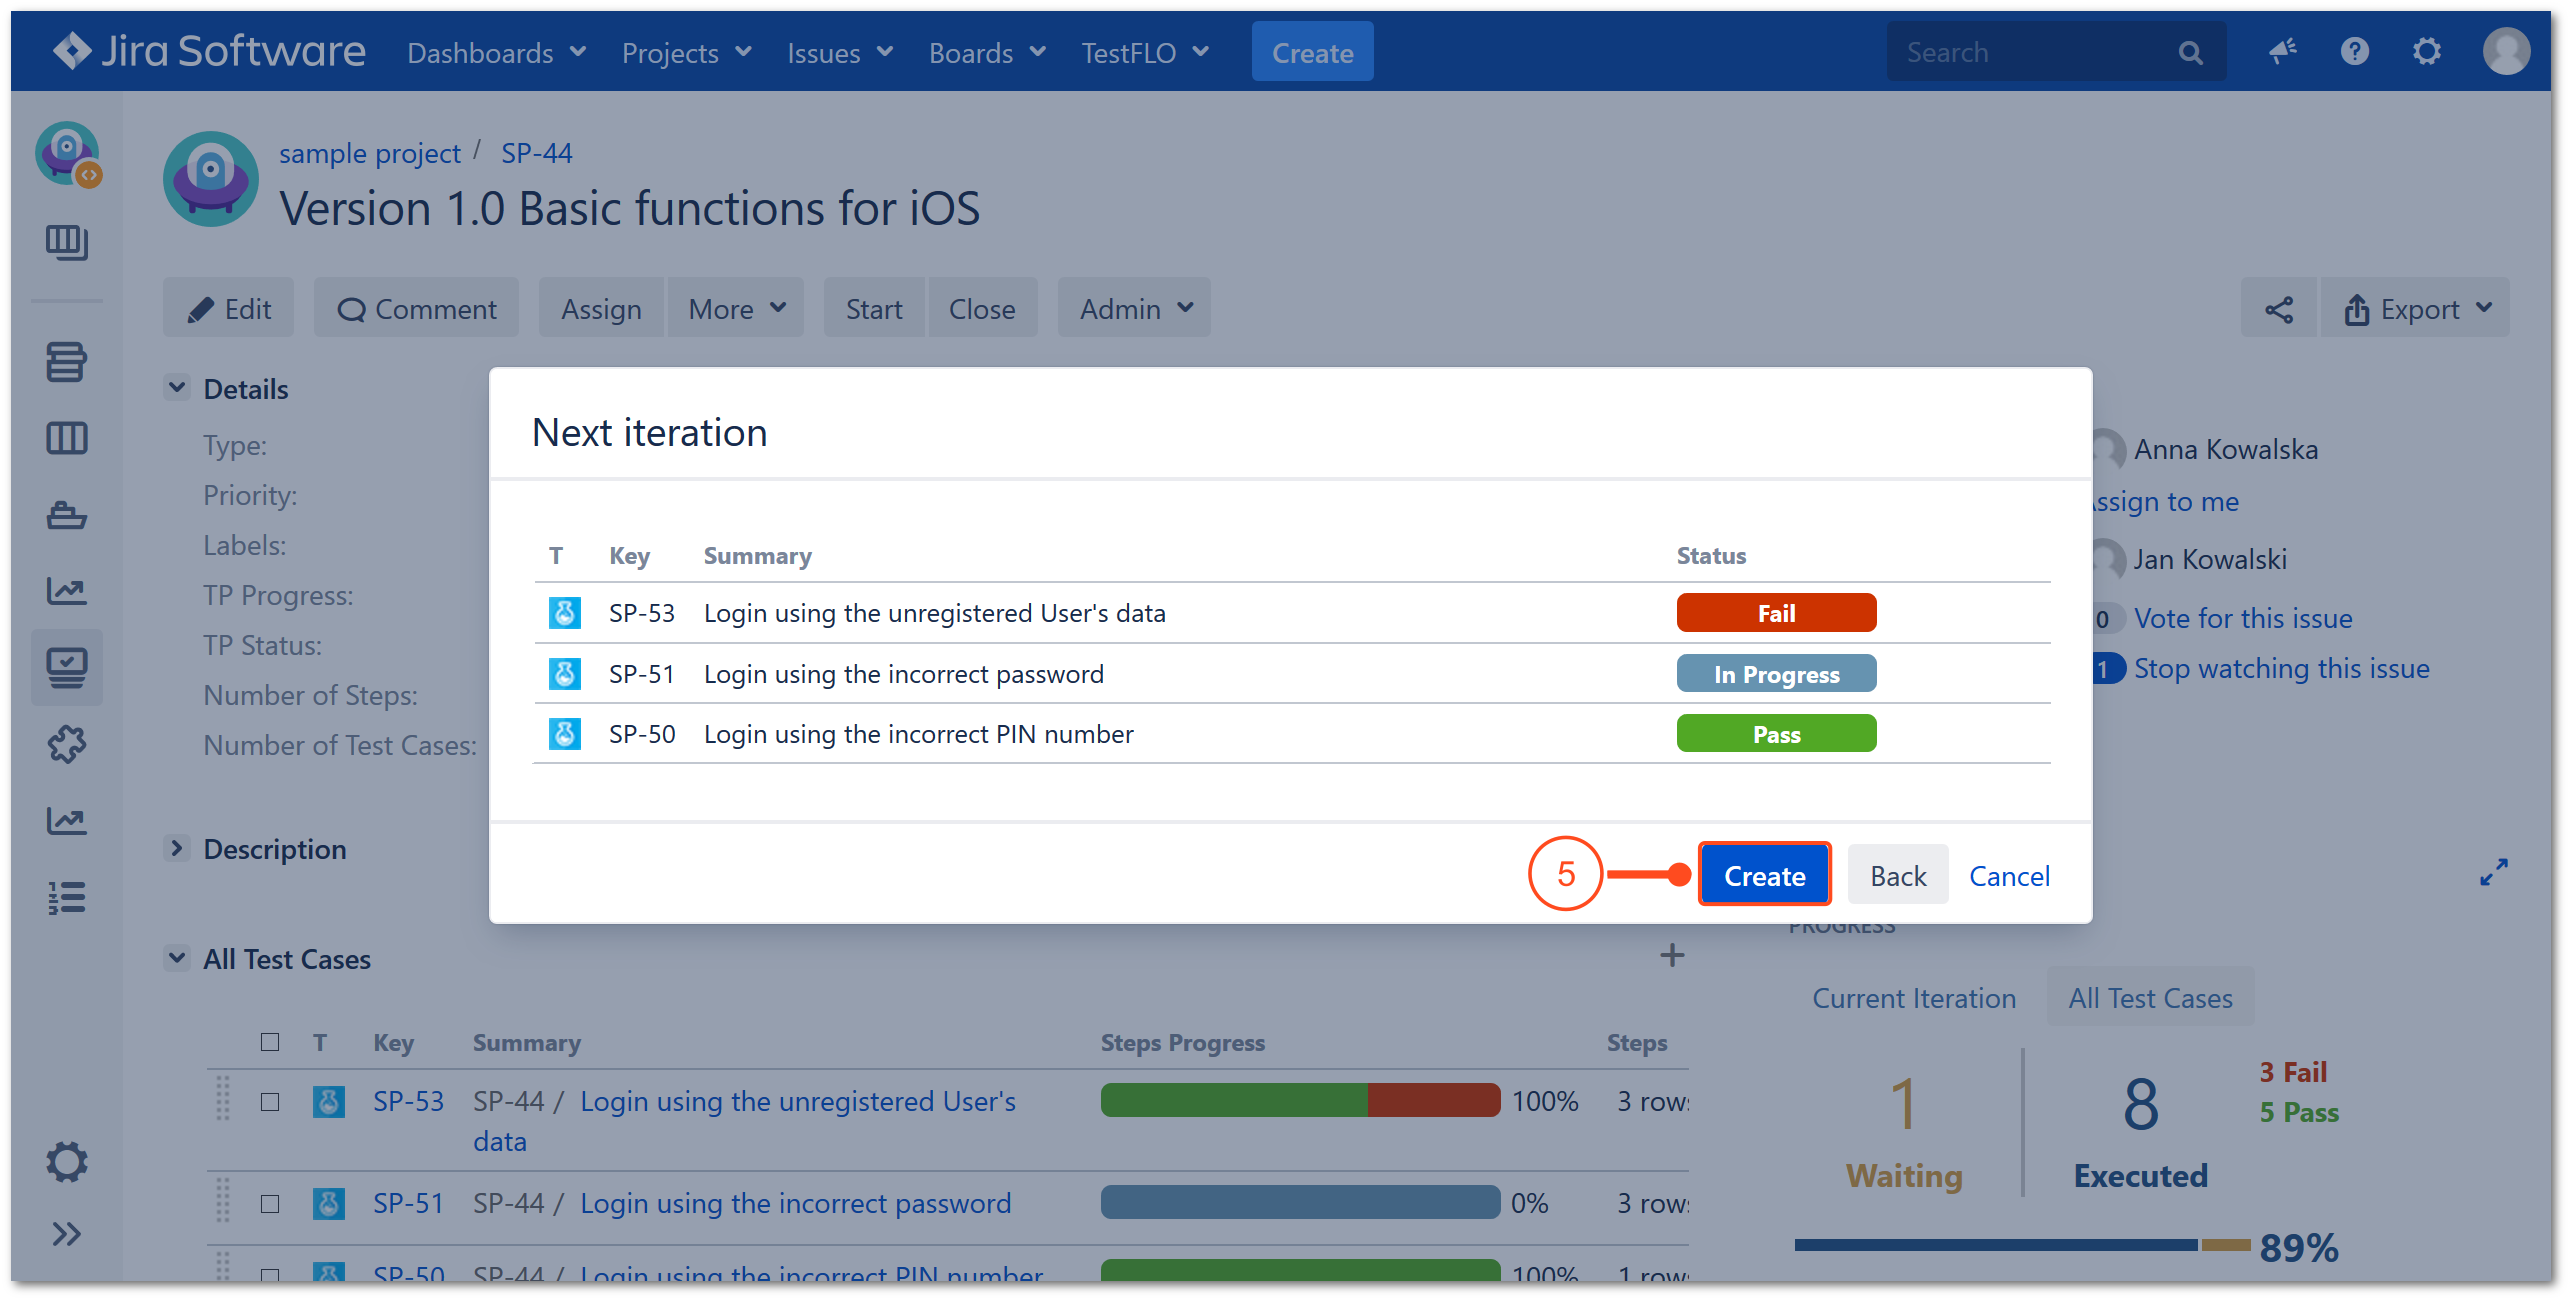
The Next iteration dialog displays a list with all Test Cases from Test Plan. Click Create to create the next iteration.
Result
The next iteration has been created. Historical data from the previous iteration has been saved in the Test Plan Iterations tab.
Not passed Test Cases
This strategy creates a new iteration with Test Cases whose statuses are not configured as Passed statuses in the Test Case section in TestFLO Settings. This means that if the status in the “Passed statuses” category has been set as Pass, then Test Cases which have different statuses than the Pass status will be selected for the next iteration.
Steps
To use the Not passed Test Cases strategy:
Click the Next iteration operation from the Test information panel or select from the menu More.
Leave the default Iteration name or rename it to one that will help you better identify the iteration.
Select the Not passed Test Cases strategy and click Next.
The Next iteration dialog displays the Test Cases list with not passed statuses from the current Test Plan iteration. Click Create to create the next iteration.
Result
The next iteration has been created. Historical data from the previous iteration has been saved in the Test Plan Iterations tab.
Only failed Test Cases
This strategy creates a new iteration with Test Cases whose statuses are configured as Failed statuses in the Test Case section in TestFLO Settings.
Steps
To use the Only failed Test Cases strategy:
Click the Next iteration operation from the Test information panel or select from the menu More.
Leave the default Iteration name or rename it to one that will help you better identify the iteration.
Select the Only failed Test Cases strategy and click Next.
The Next iteration dialog displays the Test Cases list with failed statuses from the current Test Plan iteration. Click Create to create the next iteration.
Result
The next iteration has been created. Historical data from the previous iteration has been saved in the Test Plan Iterations tab.
Custom Test Cases
This strategy allows creating a new Test Plan iteration with selected by user Test Cases.
Steps
To use the Custom Test Cases strategy:
Click the Next iteration operation from the Test information panel or select from the menu More.
Leave the default Iteration name or rename it to one that will help you better identify the iteration.
Select the Custom Test Cases strategy and click Next.
The Next iteration dialog displays a list with all Test Cases from Test Plan. Select the Test Cases you want to test in the next iteration and click Next.
Tip
Use Quick filters to filter relevant Test Case statuses or Test Cases that are in the current iteration.
The Next iteration dialog displays all selected Test Cases. Click Create to create the next iteration.
Result
The next iteration has been created. Historical data from the previous iteration has been saved in the Test Plan Iterations tab.
Reset current iteration
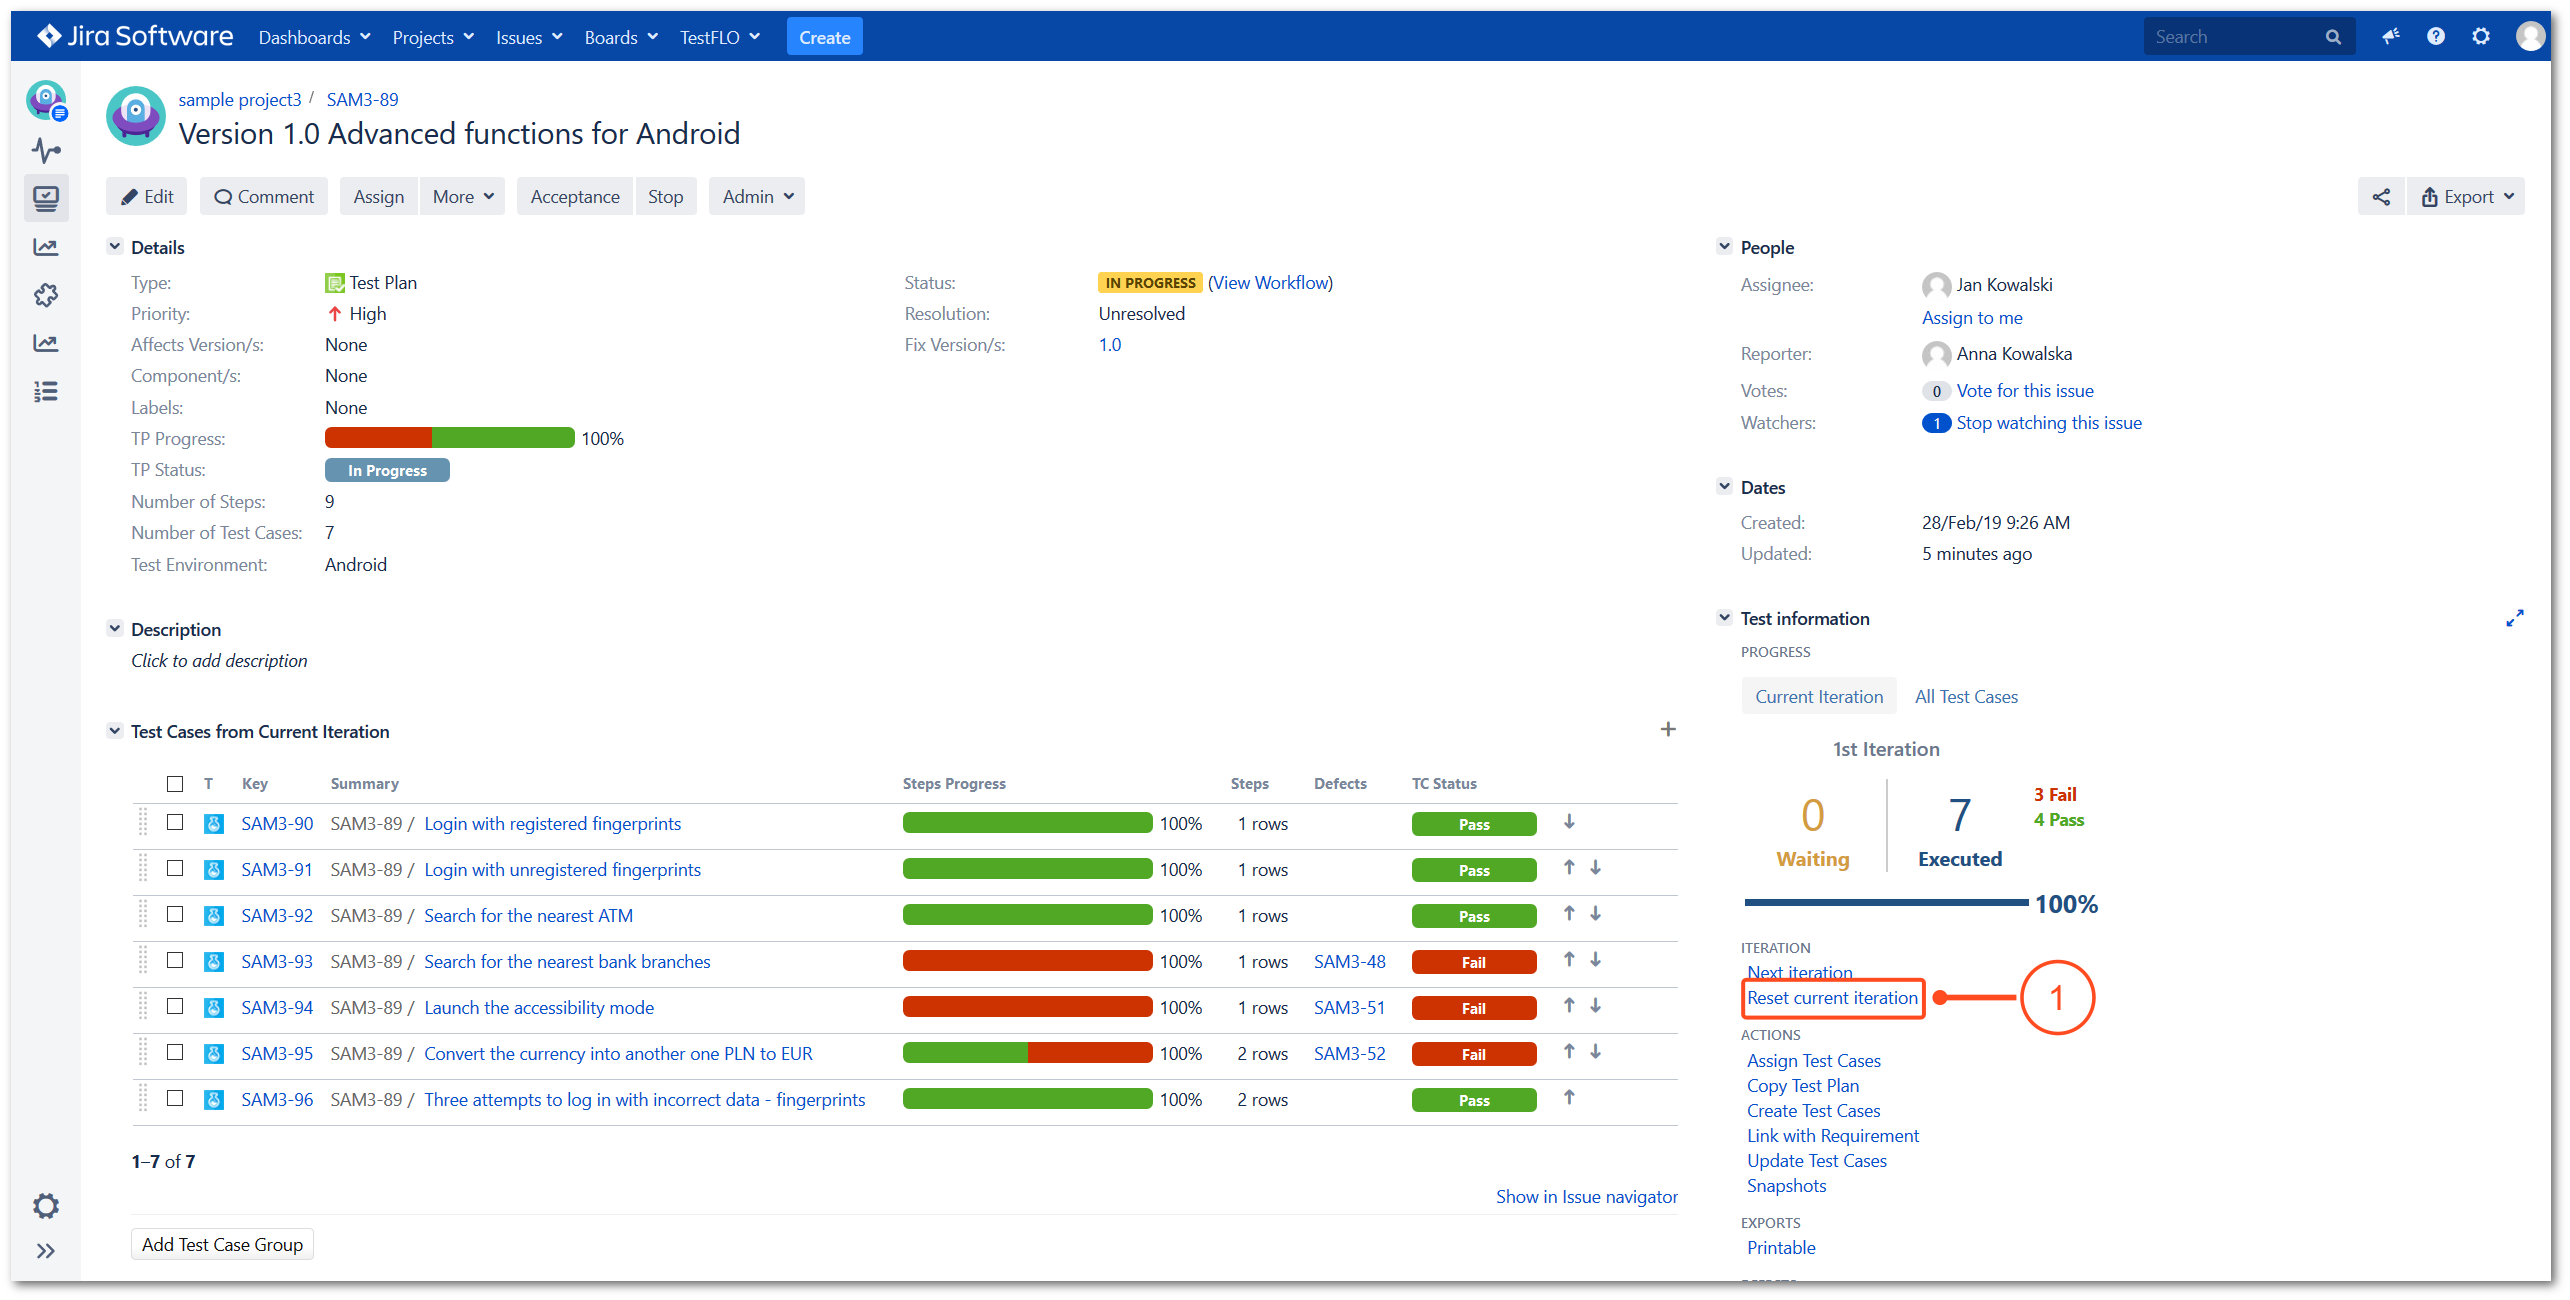
The Reset current iteration operation reset all Test Cases execution in current iteration to initial state. All Test Case statuses, Steps statuses, linked defects, Steps comments, Resolution and Resolution date Test Cases wiil be reset.
Info
You can restrict users permissions to use this operation. To learn more see TestFLO permissions.
Steps
To use Reset current iteration:
Click the Reset current iteration operation from Test information panel.
Click Confirm to reset current iteration.
Result
The current iteration have been reset to initial state.
Copy Test Plan
The Copy Test Plan operation is a dedicated operation for multiplying plans. It is one of the solutions when you need to make for example regression test. The Copy Test Plan operation allows you to select tests that you want to copy to the new Test Plan using two mechanisms.
Steps
To use Copy Test Plan:
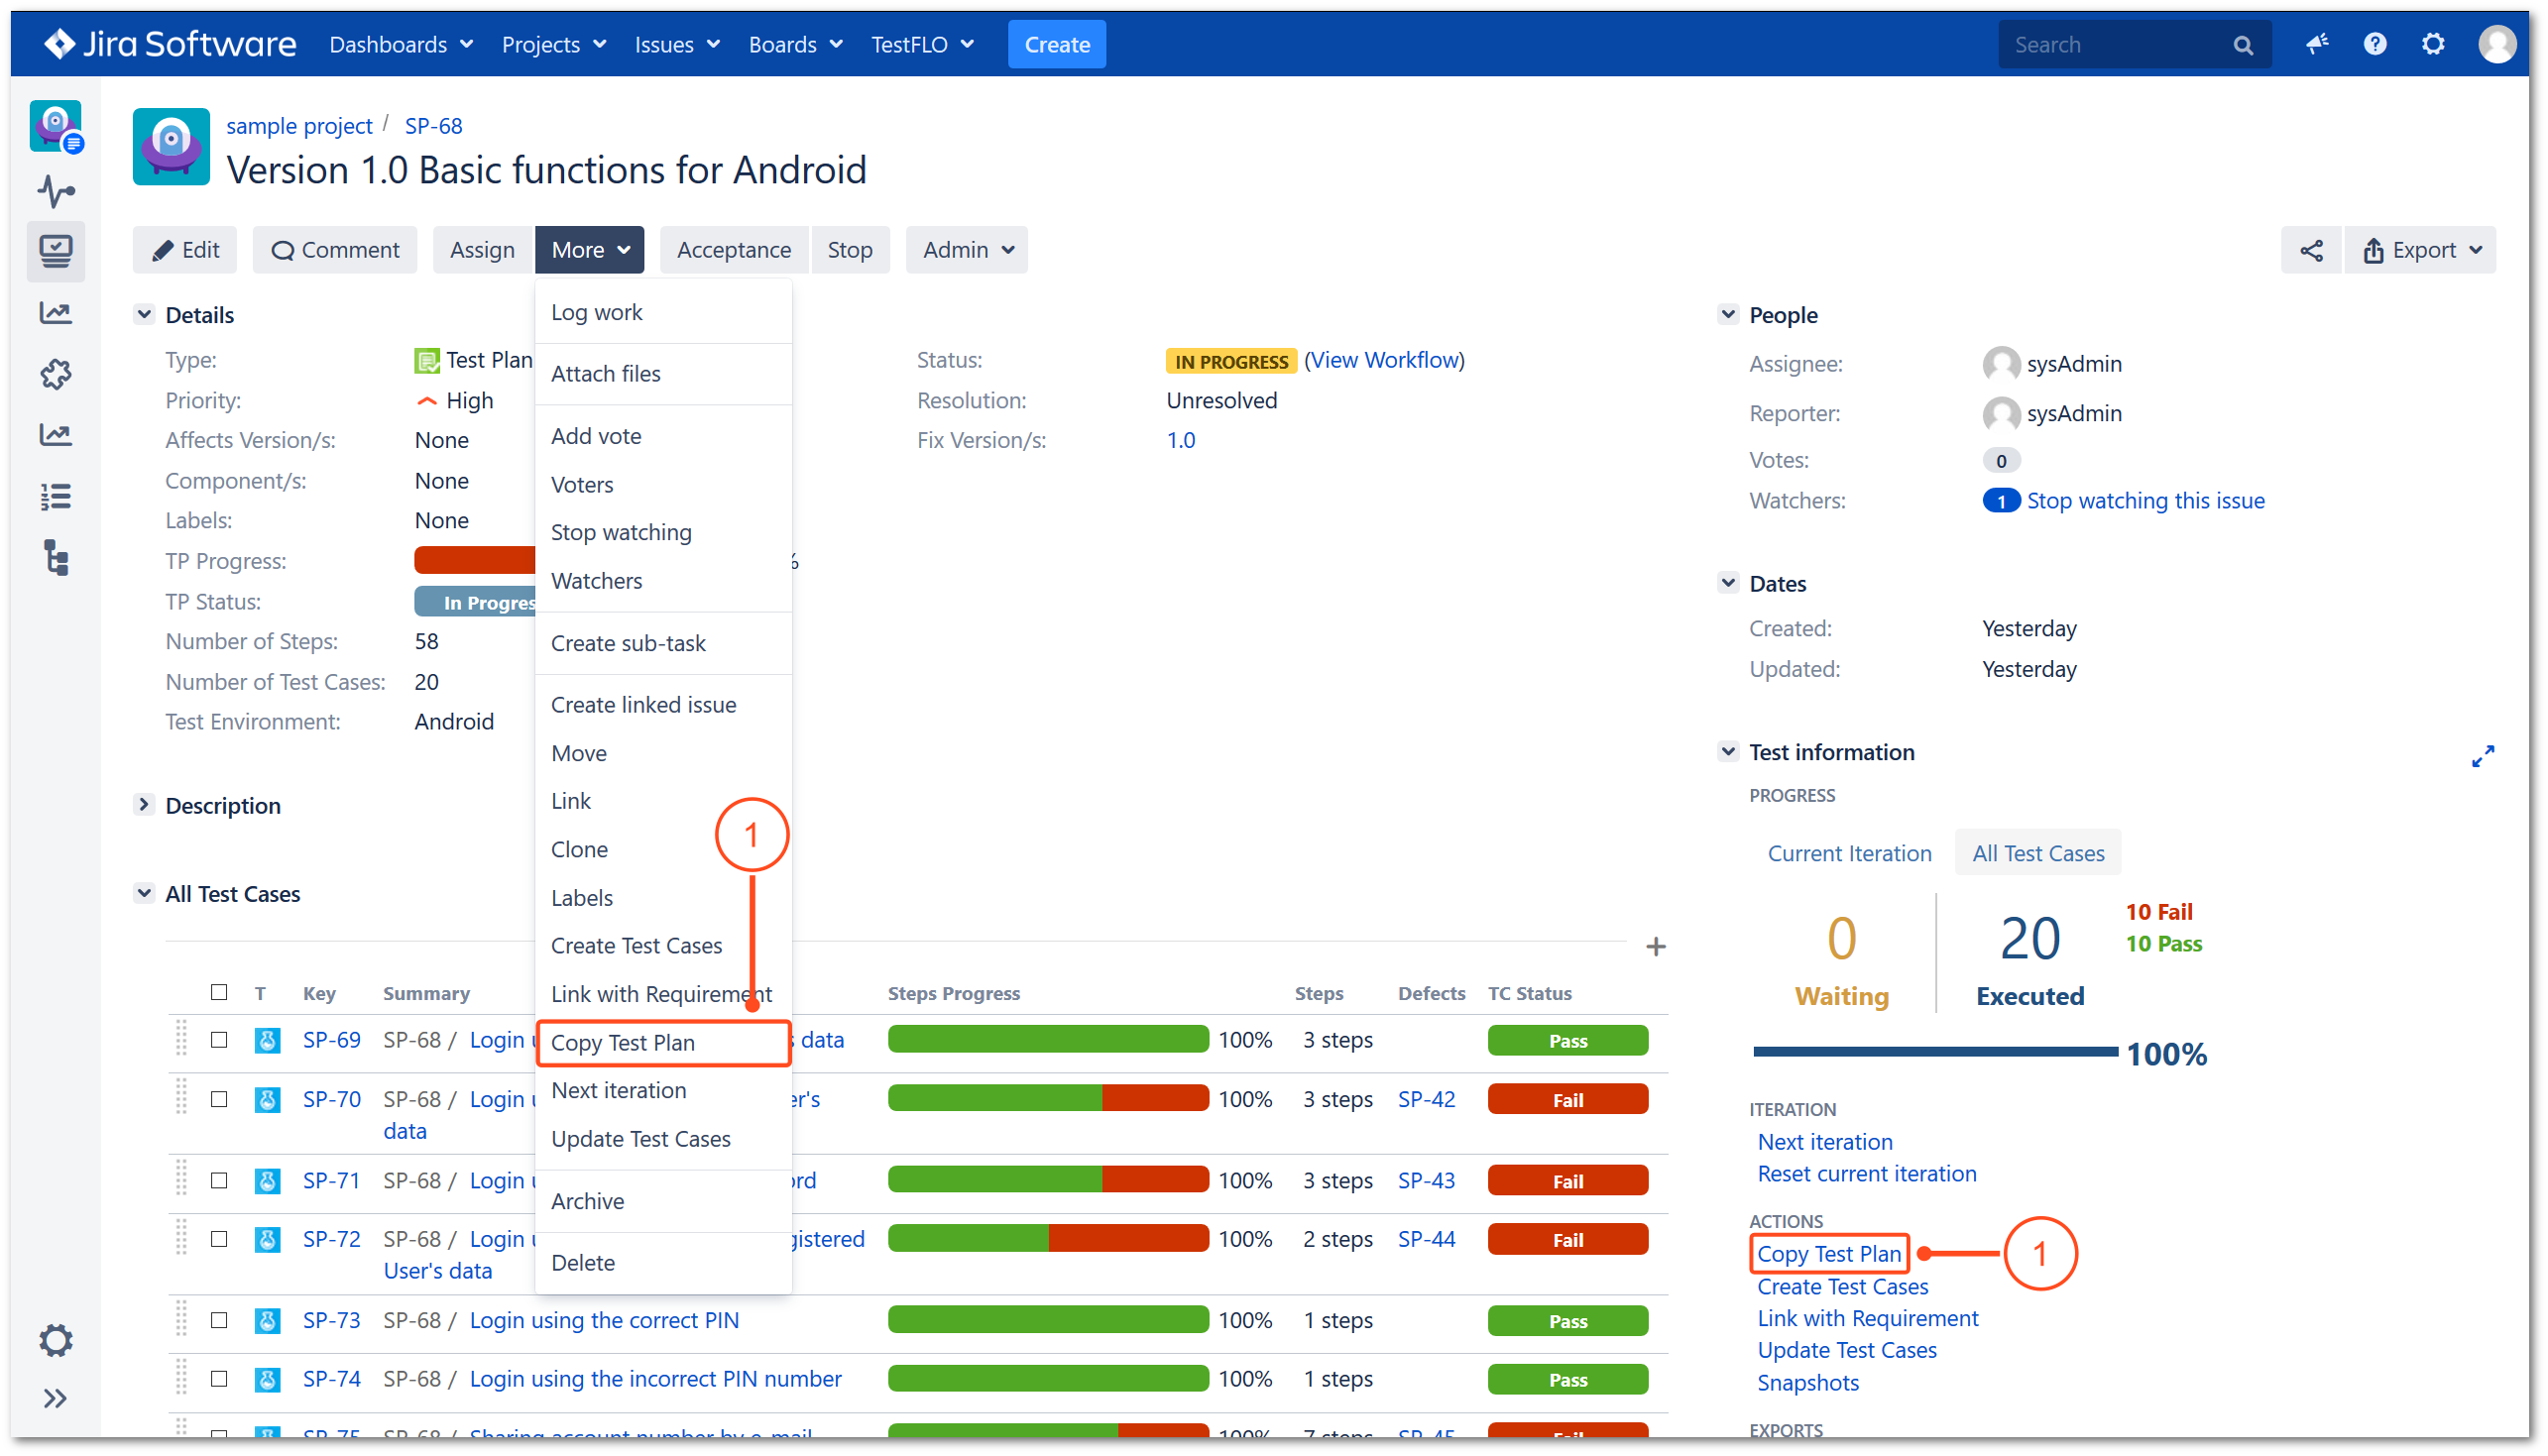
Click the Copy Test Plan operation from Test information panel or select from menu More.
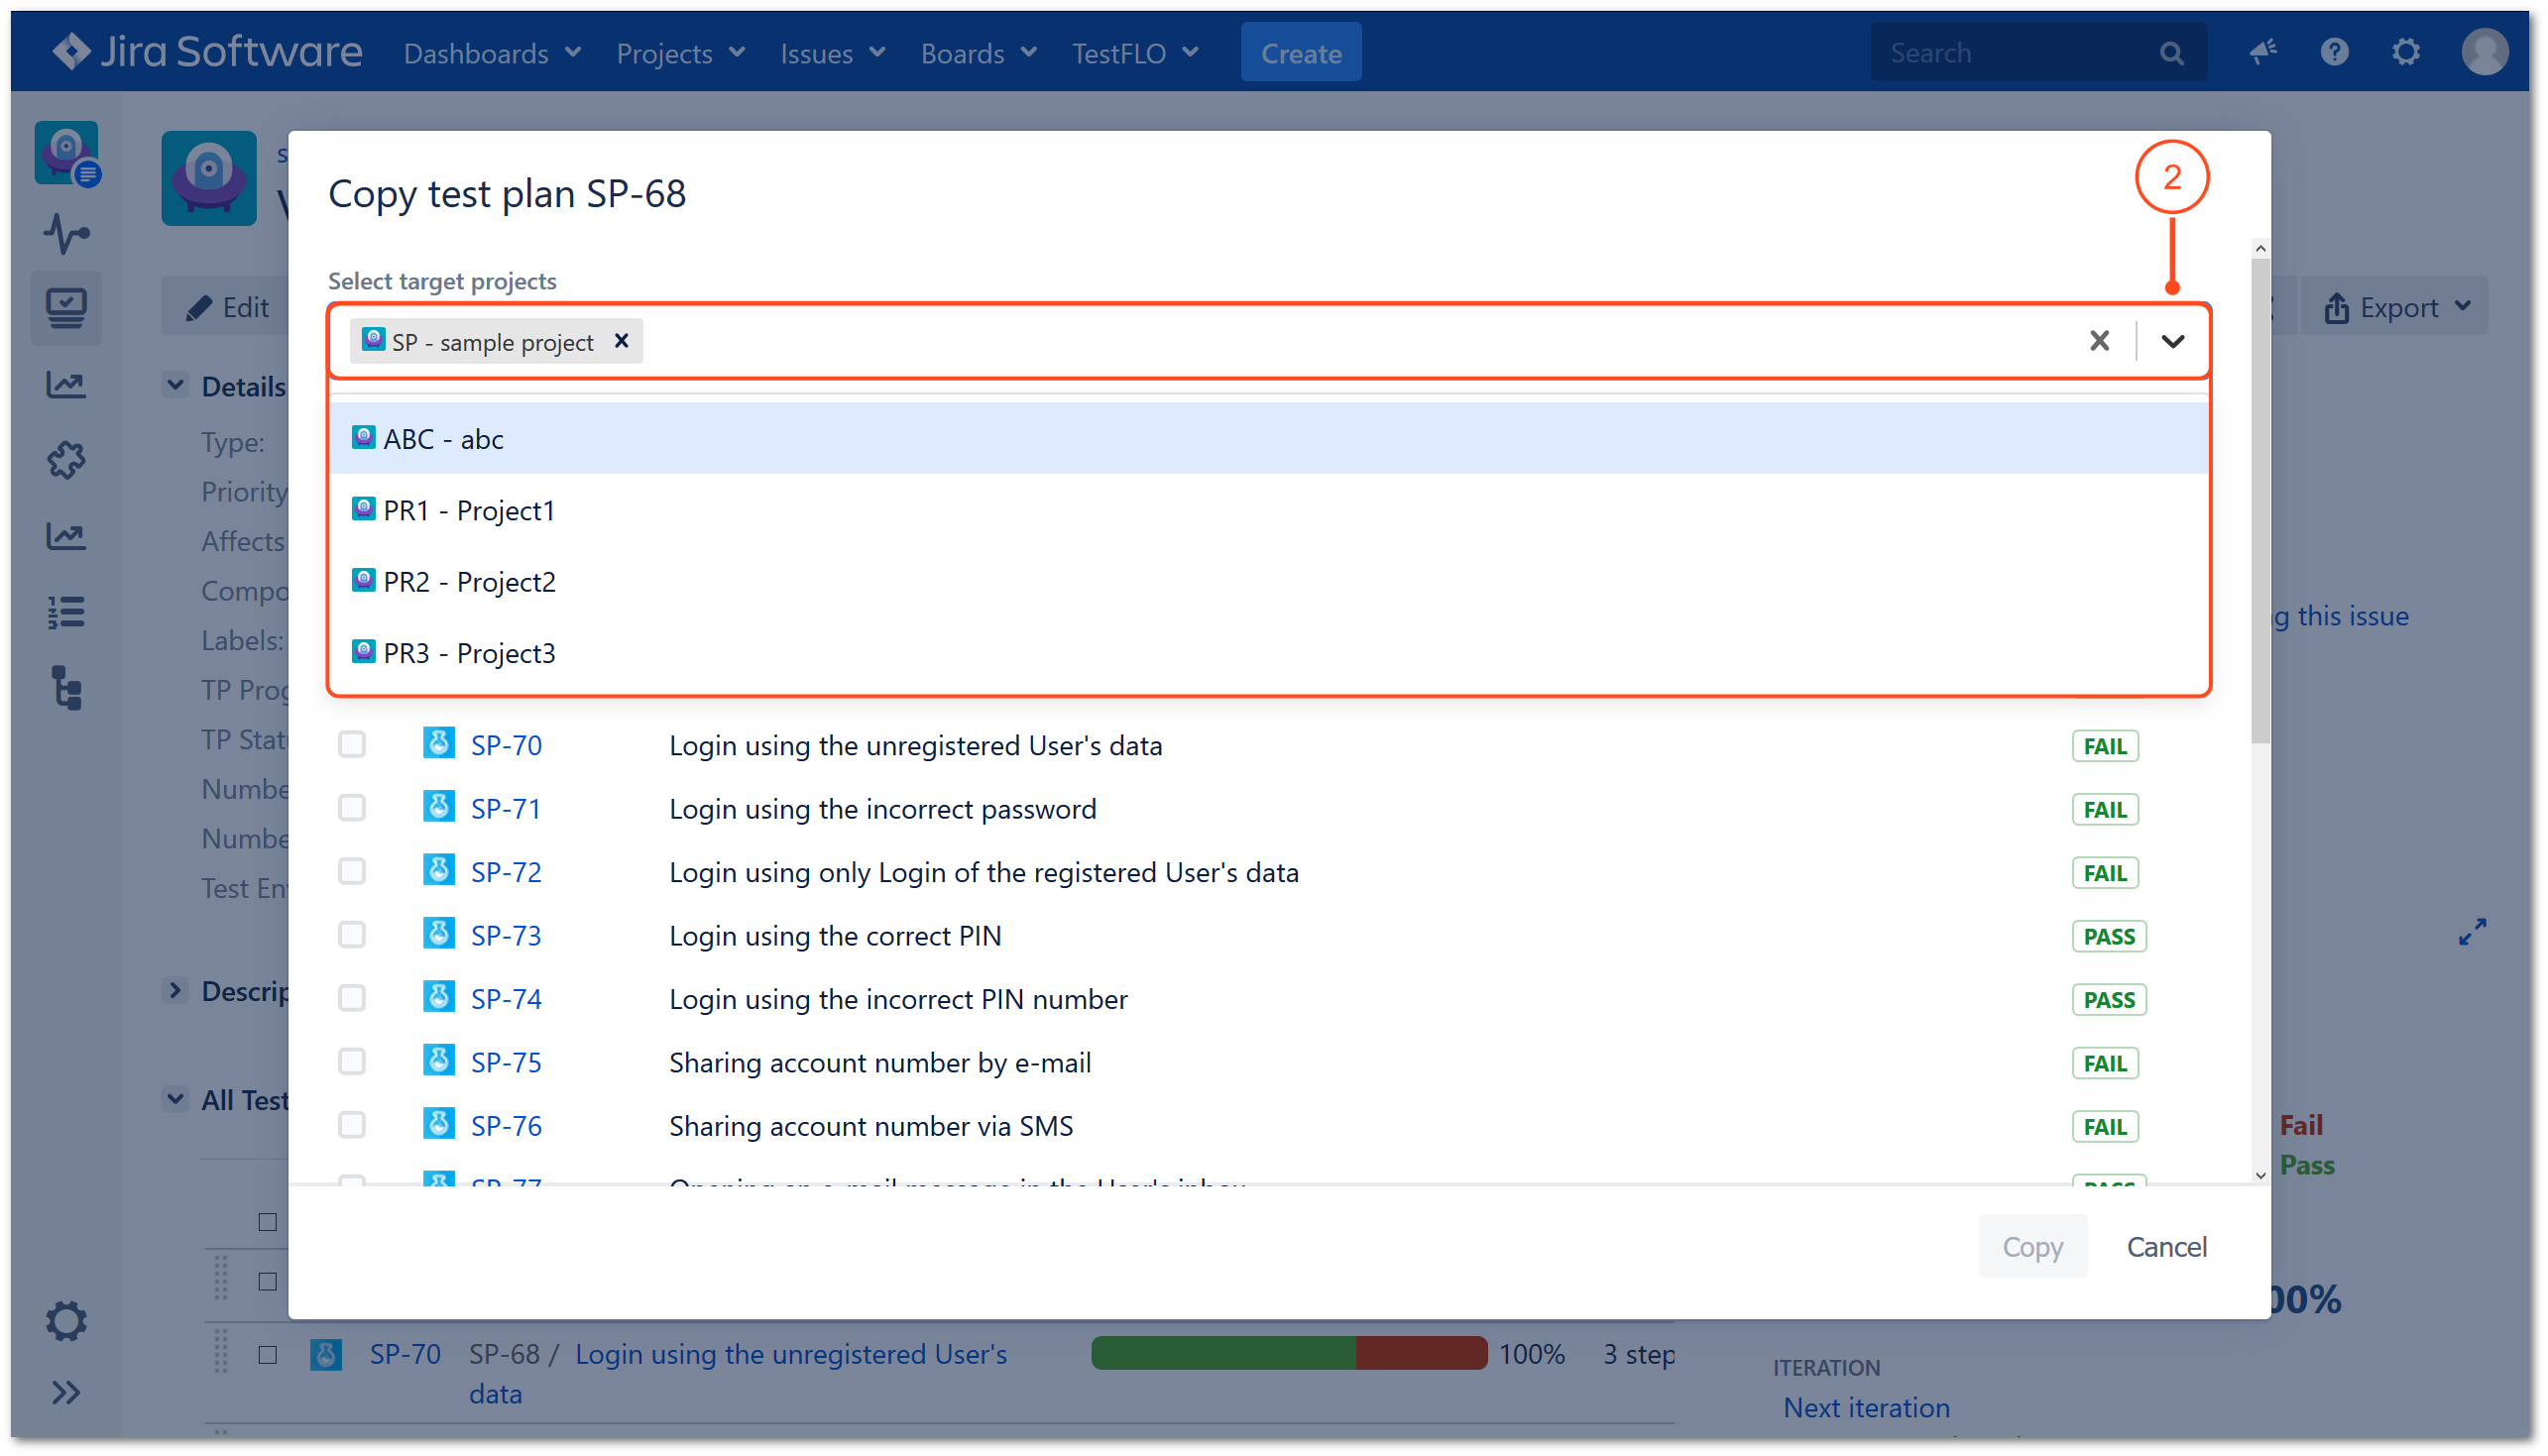
Select target projects from list. By default, the project from which the Test Plan was created is set.
Warning
Available projects are those in which:
Test Execution module has been activated.
Current user has Create Issue and Browse Project permissions.
Select from two copy mechanisms:
3a. current Test Cases creates Test Cases on the copied Test Plan as copy of Test Cases in current Test Plan (one-to-one).
3b. instances of active Test Case Templates creates Test Cases as instance of Test Case Templates originating Test Cases in current Test Plan.
Note
If Test Plan have multiple Test Cases originated from the same Test Case Templates, the target Test Plan will contain all Test Cases for each Test Case Template.
Select Test Cases or Test Case Templates (depending on the chosen mechanism) to copy from list.


 Note
Note Note
Note


 Note
Note


 Note
Note