- Configuration
- First steps
- Project setup
- Sample templates
- Migration to Cloud
- Supported fields
- Permissions
- Jira Service Management
- Template management
- Create a template
- Template configuration
- Variables
- Template Navigator
- Delete a template
- Use as a template
- Set of Fields - advanced features
- Using template
- Autocomplete
- Default Template
- Apply template
- Use Template in Jira Automation
- Automatic create and close
- JQL Searchers
- Direct links
- Create Structure post function
- About Create Structure
- Create Structure configuration
- App integrations
- REST API
- ScriptRunner and Groovy scripts
Autocomplete
Learn about Issue Templates’ most basic feature
Autocomplete allows you to automatically fill in issue fields with values predefined in a template. You decide exactly which fields should be copied from the template, and you can define their contents.
Autocomplete works with regular Jira fields, as well as with custom fields. Learn more in the Supported fields chapter.
Defining a set of fields
Steps
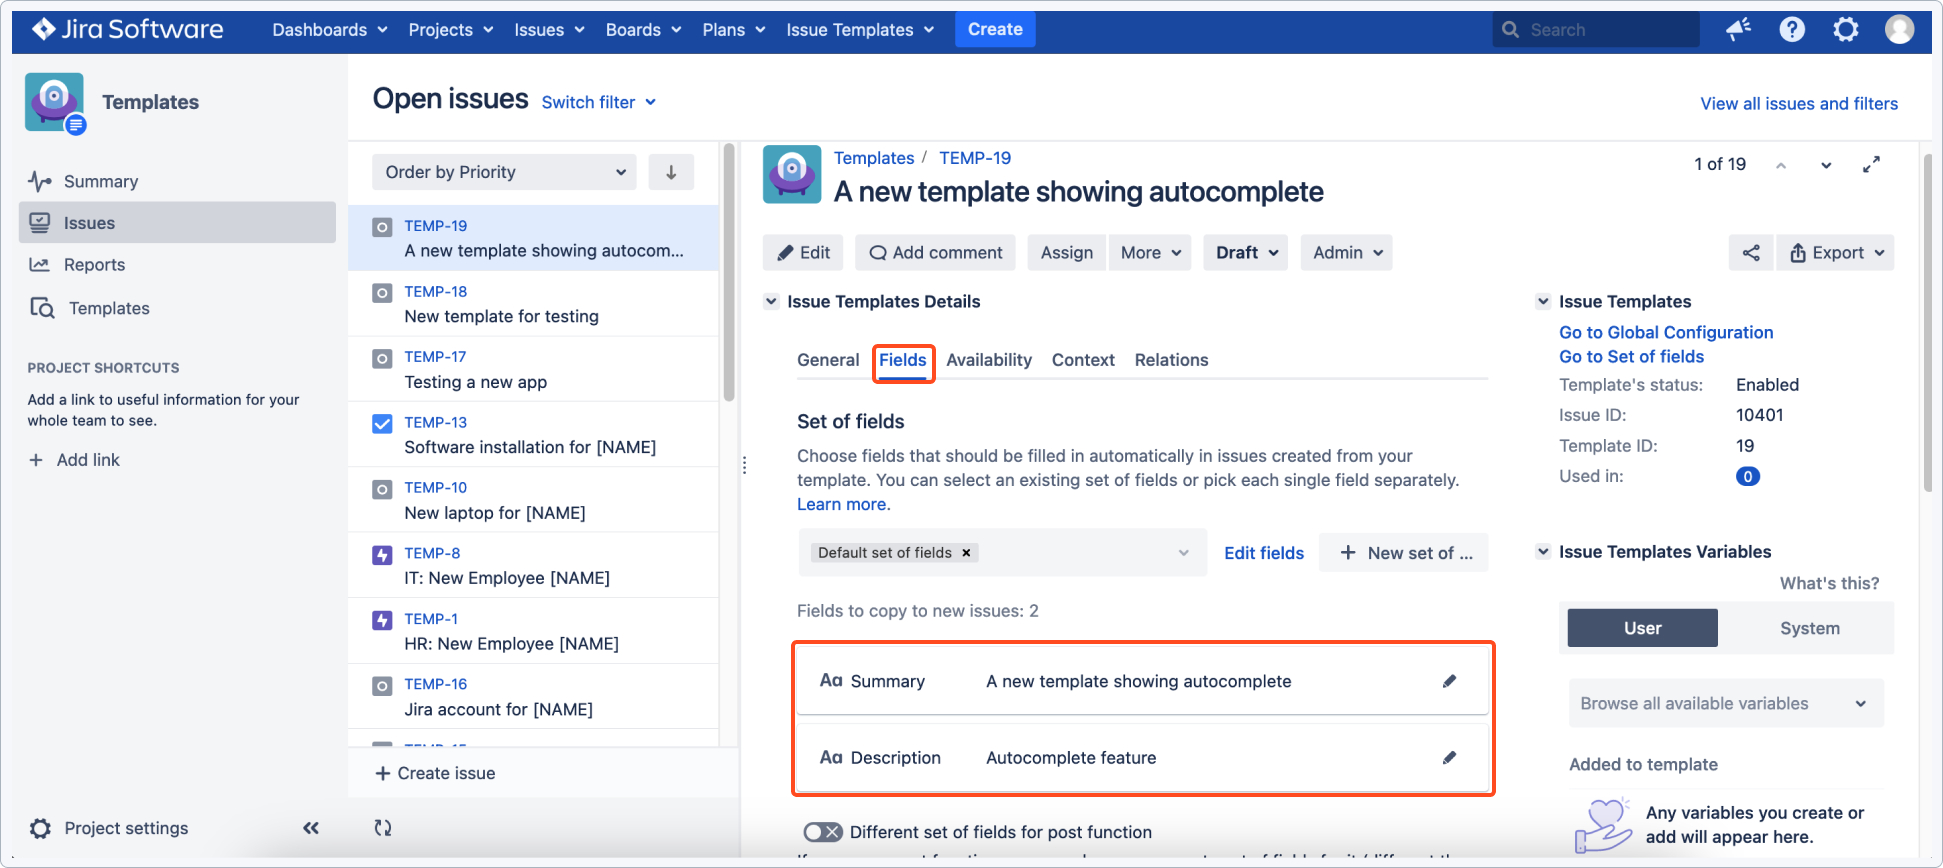
To choose fields that should be autocompleted in a template:
-
Go to your Template Repository project.
-
Create a template (or select an existing one).

-
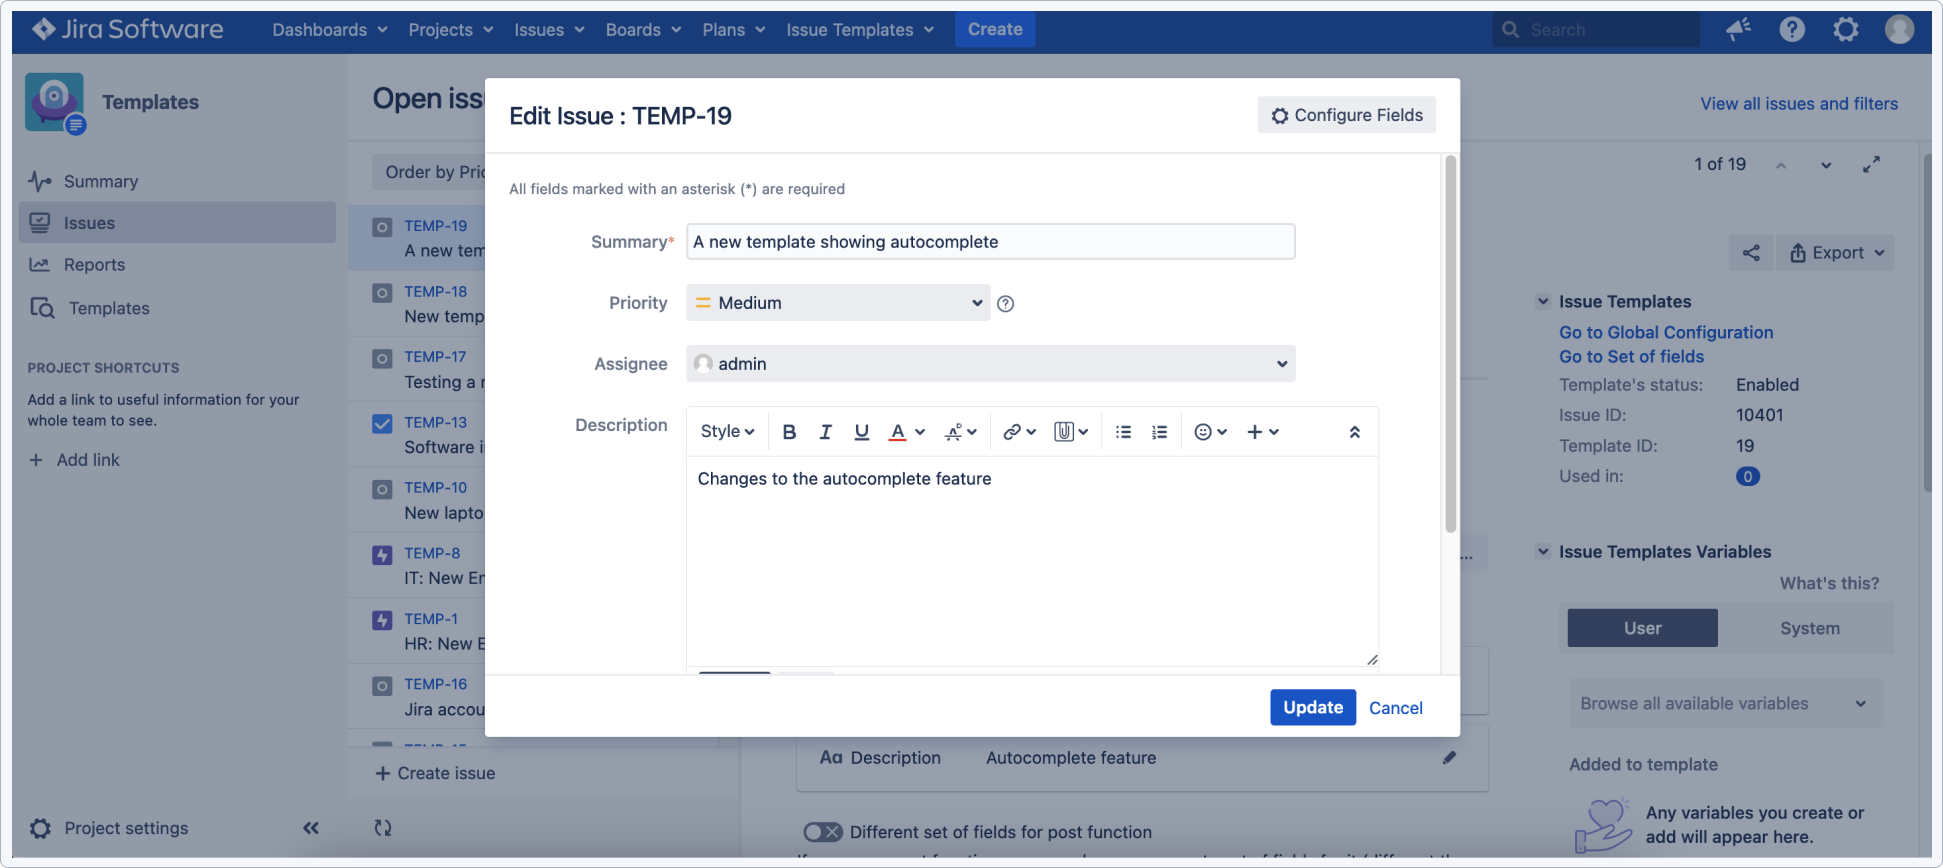
Go to the Fields tab and click on the pencil icon next to the fields.
-
Edit the autocompleted field values if necessary (they will be saved in real-time) and click Update
Result
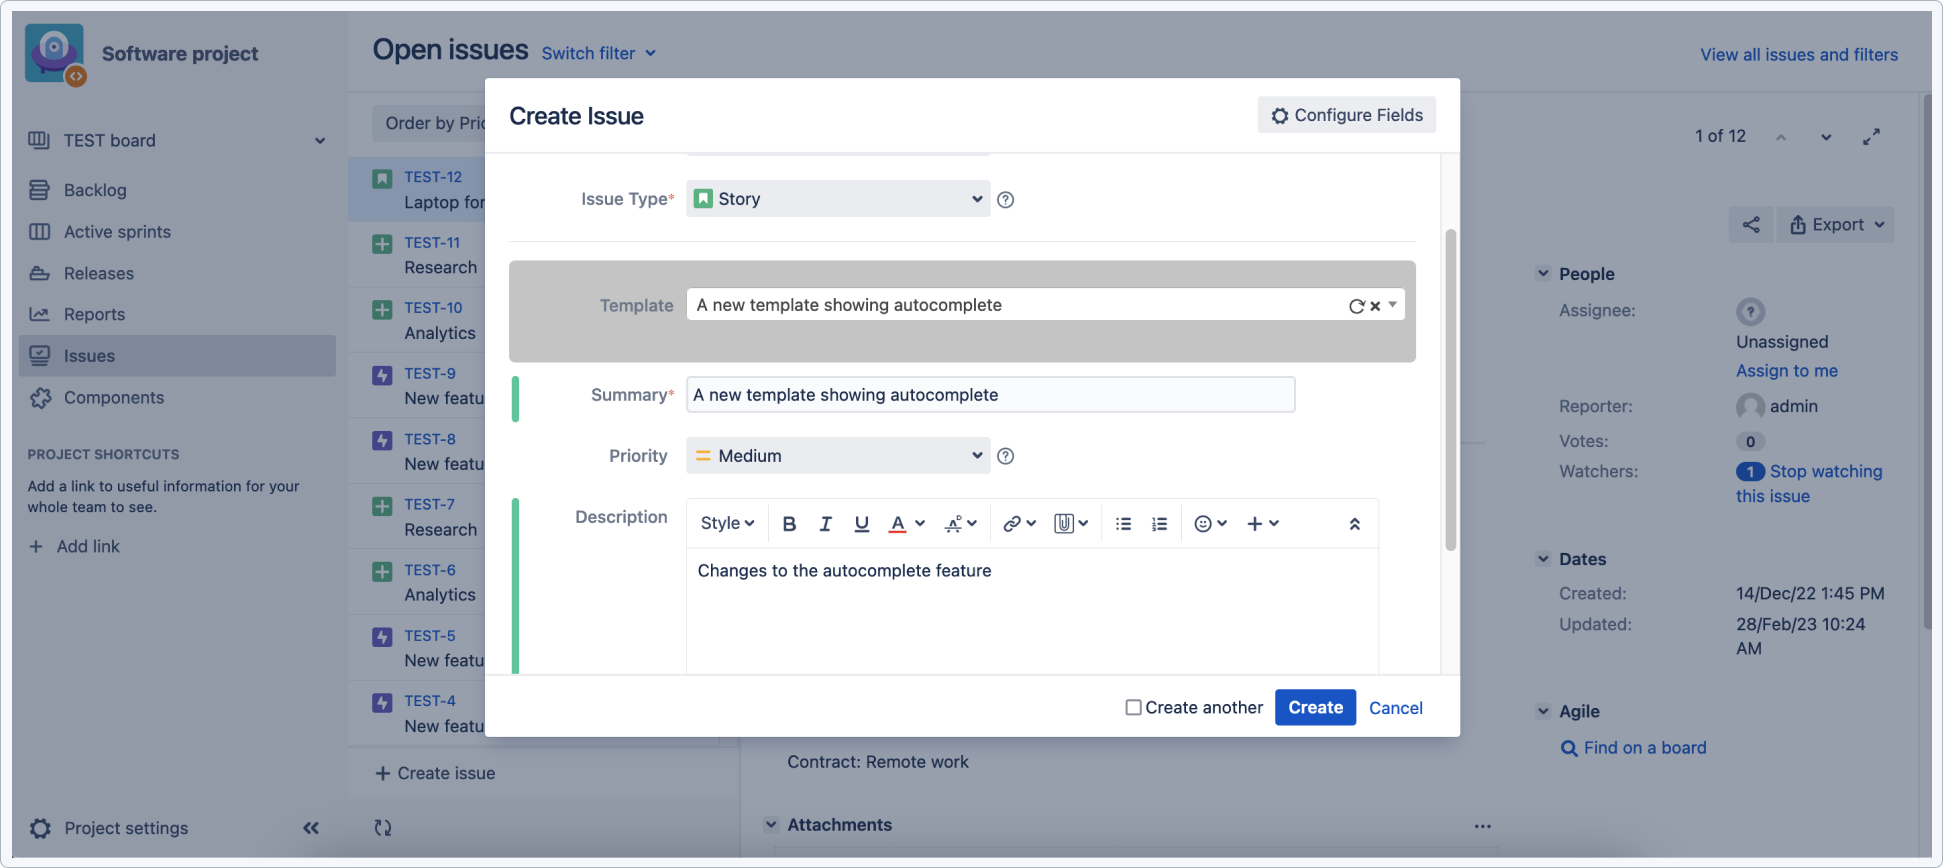
Selected fields are autocompleted on the Jira Create issue screen after selecting the template.
Remember to add fields defined in the Set of fields to the target screen. Learn more about it in the Set of fields chapter.
Fields from a defined set of fields will be completed and marked with a specific color. See Colors for details.
Different set of fields for post function
More complex operations (like copying subtasks or using the Attachment and Issue Link fields in your templates) require adding the Create Structure post function to your target project’s workflow. Read more about it in the next chapter.
Comment field support
Discover how templates can speed up every process with ready-to-use comments
Issue Templates can improve the quality and speed of every support team in many ways. By adding comments from templates, Service Agents can automate the repetitive part of their work and focus on finding solutions.
You can configure every template to add a comment visible to customers. It can be a short confirmation message that their ticket has been received, some SLA information, or a closing message after the resolution of their issue.
Thanks to the Create Structure post function, your configuration may get as advanced as your workflow, with different comments getting generated on different transitions.
Remember to add the Template custom field to all the screens that involve using templates, and then to add those screens to the chosen transitions in your workflow.
Adding comments from templates use case - Canned Responses for Service Management
Templates selectable on the Edit issue screen / Transition screen
You may want to give your support team the possibility to choose different comments from templates when they handle a request. They will be able to choose the best matching canned response right from the issue view. Let’s prepare a special screen where the agents will be able to select a comment best fitting the request’s status.
Create the template
First, we need to create simple templates with the desired comments. Here is how to start:
Steps
- Create a new template, containing only the comment (no summary or description).
- Add the Comment field to the template’s scope.
- Turn on the toggle next to Request form in the Availability tab.
You can prepare as many comments as you need. When they’re ready, we can move on to the project configuration.
Configure the target project
Now, let’s prepare our target project (in this example: IT Support). We’ll add a special screen and add it to a workflow transition.
Steps
- Create a new screen, containing only the Template field (The comment section will be added by Jira default settings).
- Go to your project workflow and start editing the transition, upon which the template should be selectable.
- Add the screen to the chosen transition.
Result
Templates with different comments can be selected on the Issue view:

Templates that add comments in the background
We can choose to add comments in the background, without any additional screens being displayed. This way the comment will be added automatically, right after the issue passes the chosen workflow transition.
Using this method you can add as many comments as you like. Just remember that you can only choose one template for one workflow transition.
Create the template
We’ll create a template containing only one comment and associate it with the proper transition. The steps are almost the same as in the former example, except we won’t add any screens to a transition.
Steps
- Create a new template, containing only the comment (no summary or description).
- Add the Comment field to the template’s scope.
- Turn on the toggle next to Request form in the Availability tab.
Add the Create Structure post function
In order to make adding comments in the background possible, we need to add the Create Structure post function to the target project.
Steps
- Select the proper transition in your target project’s workflow.
- Click Add Post Function and select Deviniti (Issue Templates) - Create Structure in the following mode:
- Operation mode: Modify current issue
- Template: (Select the template you’d like to use)
- Subtask stage: none

Result
When an issue passes the chosen transition, a comment will be automatically be added in the background.
To get a similar result you may also use the Default template feature.
If you can’t find the answer you need in our documentation, raise a support request.