- Configuration
- First steps
- Project setup
- Sample templates
- Migration to Cloud
- Supported fields
- Permissions
- Jira Service Management
- Template management
- Create a template
- Template configuration
- Variables
- Template Navigator
- Delete a template
- Use as a template
- Set of Fields - advanced features
- Using template
- Autocomplete
- Default Template
- Apply template
- Use Template in Jira Automation
- Automatic create and close
- JQL Searchers
- Direct links
- Create Structure post function
- About Create Structure
- Create Structure configuration
- App integrations
- REST API
- ScriptRunner and Groovy scripts
Use cases
Learn Issue Templates for Jira by analyzing real-life examples
We’ve prepared a few examples for you, showing most common use cases of Issue Templates. We start with the simplest case to give you an idea of how the app works. Every next scenario is more complex, so feel free to read the introductory chapters first, before you try to re-create the examples in your Jira instance.
- Single template - Sport Card Benefit
- Template applied automatically on transition - Default template
- Template with variables - Guest WI-FI Access
- Template with subtasks that get created only when their parent issue fulfills custom JQL criteria - Issue creation criteria
- Template with custom availability settings - Availability Use Case
- Structure of issues with variables - Jira Webinar
- Adding comments from templates - Canned Responses for Service Management
Use case - sport card benefit
Learn how to use Issue Templates by following a simple example
Let’s start with the simplest case. Say, you’d like to have a single template for requesting a Sport Card Benefit. The template will generate the same Summary and Description every time someone uses it to create an issue.
Create a template
Templates are like regular Jira issues, so the first thing you need to do is to create a single template issue.
Steps
To create a template:
- Click Create at the top of the screen to open the Create issue dialog box.
- In the Create Issue dialog box, select the Template Repository project - the default repository is called Templates.
- Choose Template as the Issue Type.
- Fill in the Summary and Description fields.
- Click Create.

Configure a template
Your template is already working, but you might want to refine it. In order to manage it further:
-
Go to Template Navigator.
-
Click on the newly created template to open the Template Details panel to the right.
-
Go to the General tab.
-
Add a Template name
The summary you provided while creating the template will automatically become your template’s name. You can change it if you wish, in order to easily find it later. -
Add a Category
Adding a category to your template is also a good idea. It will help you organize greater numbers of template issues thanks to a dedicated display mode for it. It might become very helpful in the future as your template repository grows. -
Add a Description
It is not mandatory but adding a short description could help your colleagues choose the right template for their task. It will appear on the Create Issue screen, right below the Select Template field.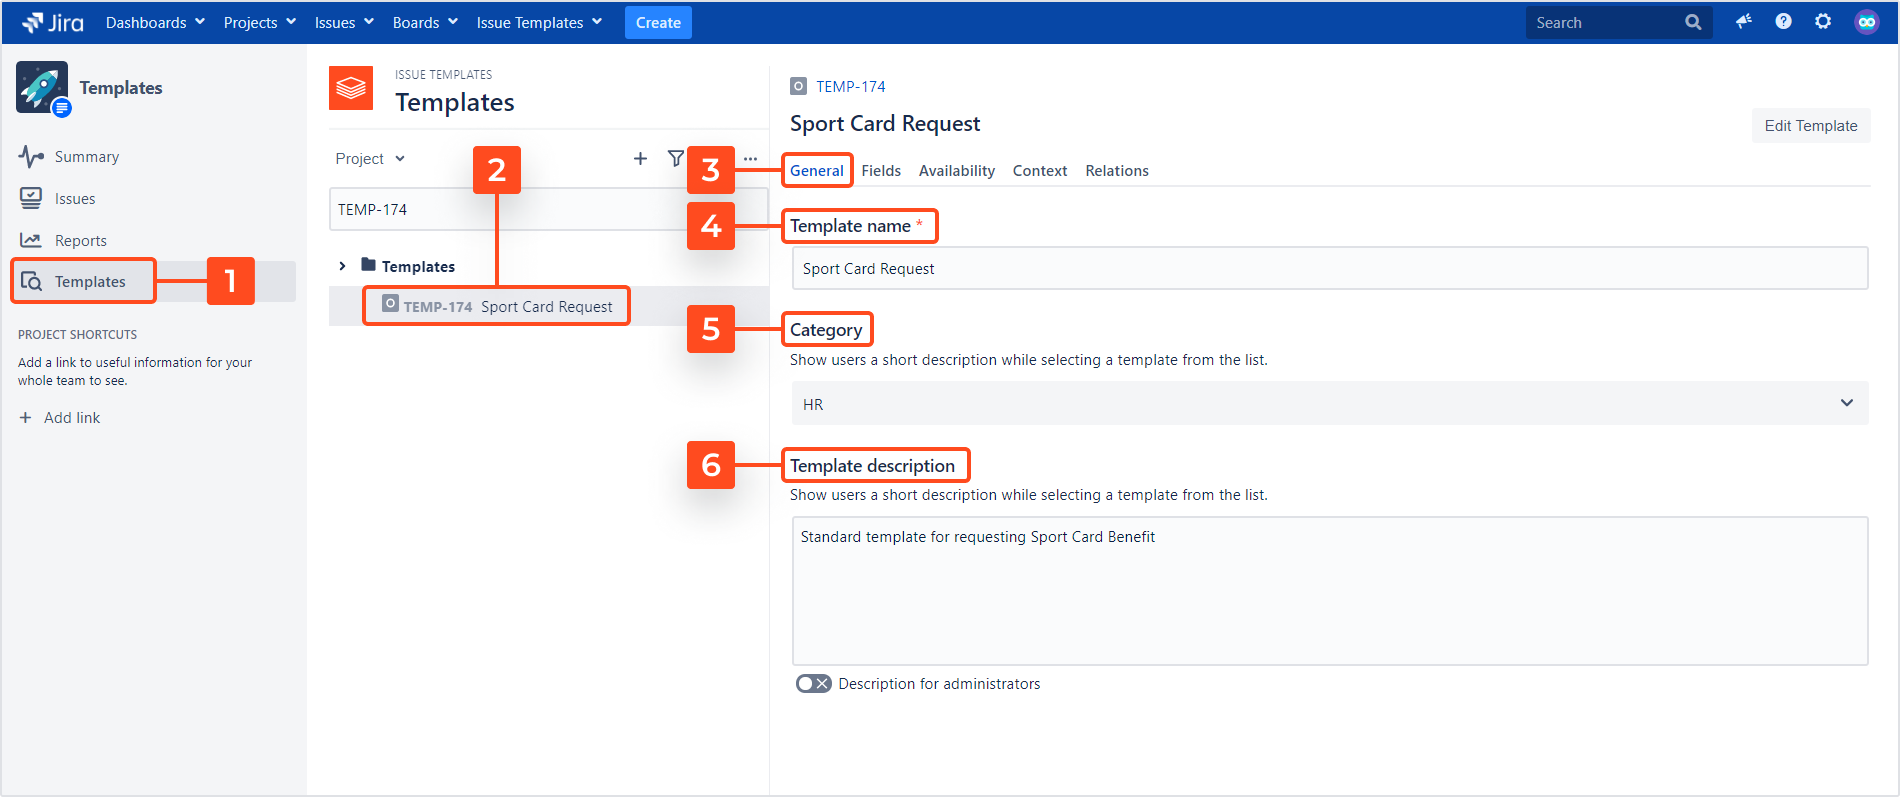
-
Choose a Set of fields
Decide which Jira fields should be automatically filled in on the Create Issue screen in issues generated by this template. There is always a default set that you can use, but you may decide to add fields separately. Summary and Description will be enough for this simple case. Info
InfoRead more about Set of fields here.
-
Manage the Availability
Choose where your template should be available. By default, it will be selectable on the Create Issue screen. If you wish to make it available on the Customer Portal, turn on the switch right next to Request Form.
Configure a project
In order to use your template, you need to add the Template field to the Create Issue screen of your target project. You can either configure all projects at once in the initial project configuration panel, or you can add the Template field to each project separately.
Configure all projects at once
You can access the initial project configuration panel at any time.
Steps
To add the Template field to the Create issue screen in one or more projects:
- Go to Issue Templates in the upper navigation bar.
- Select Get Started.
- Click through the Onboarding steps until you arrive at the Configure project screen.
- Click the plus icon next to the selected projects.
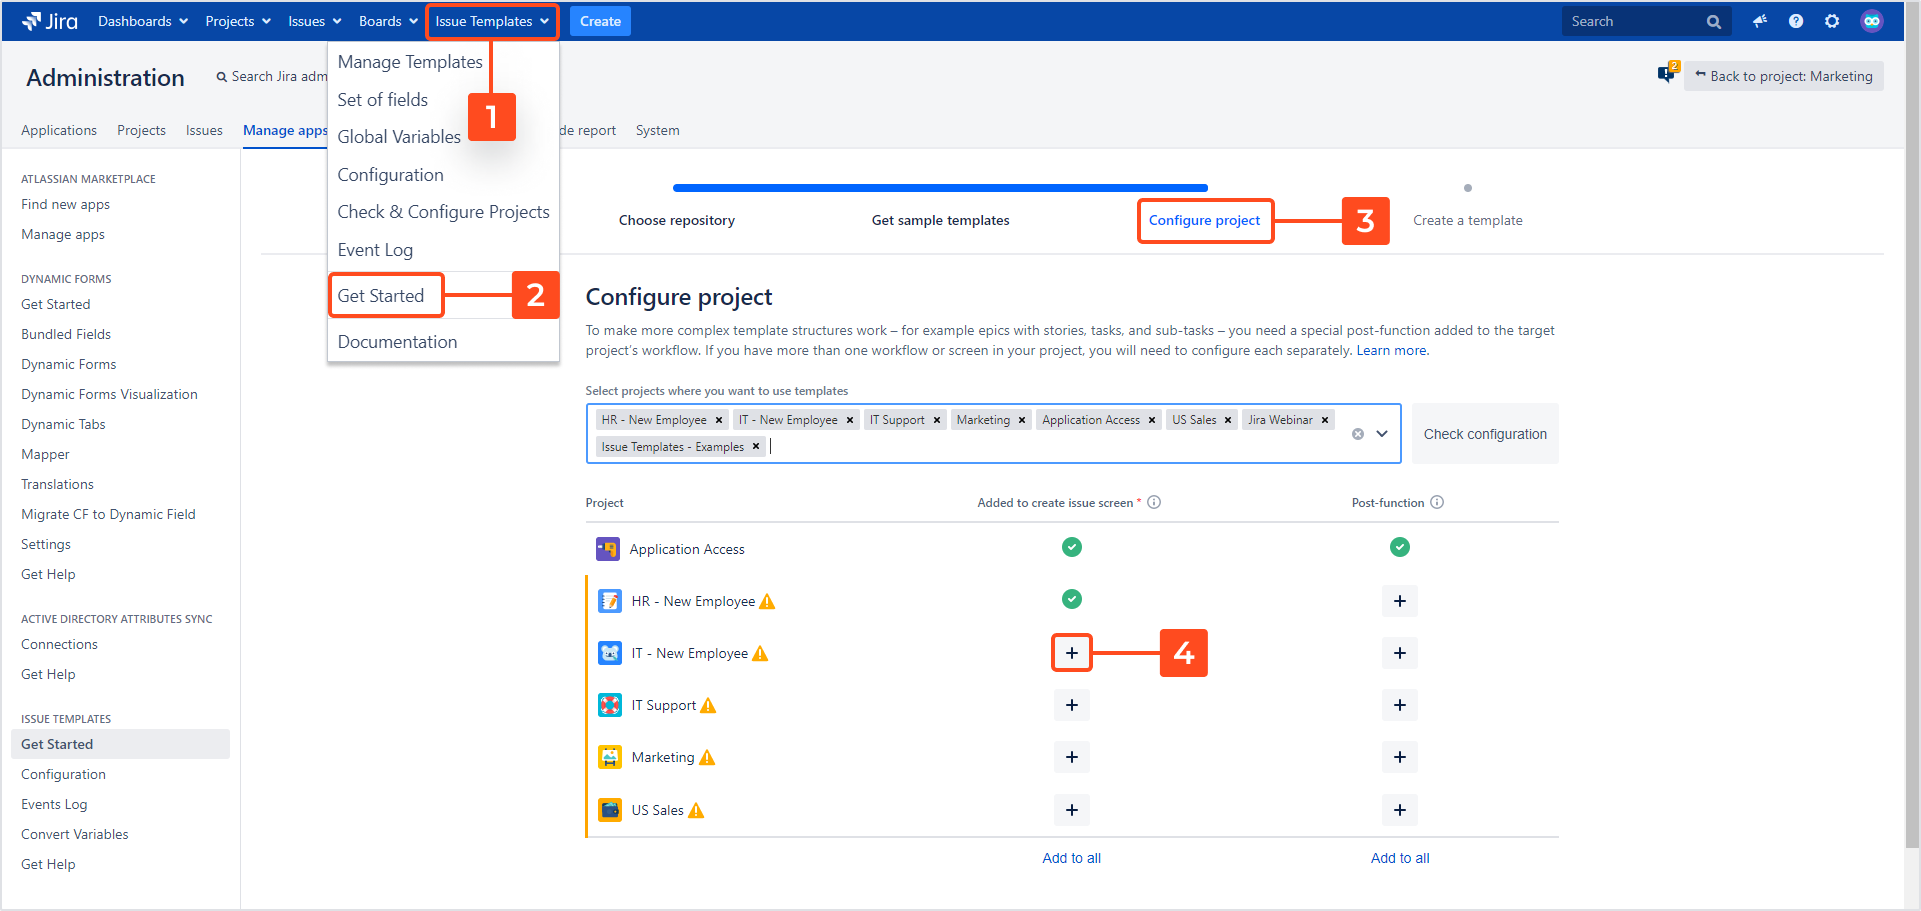
Configure one project at a time
You may want to add the Template field to a screen in one project only. This way is particularly useful when you wish to add the Template field to other screens, like the Edit issue screen.
Steps
To add the Template field to a screen in one project:
- Open the project, where your template should be used and go to the Project settings.
- Go to Screens and select the screen. (In this example we’ll choose the Create Issue screen).
- Select the Template field in the lower search bar and click Add.
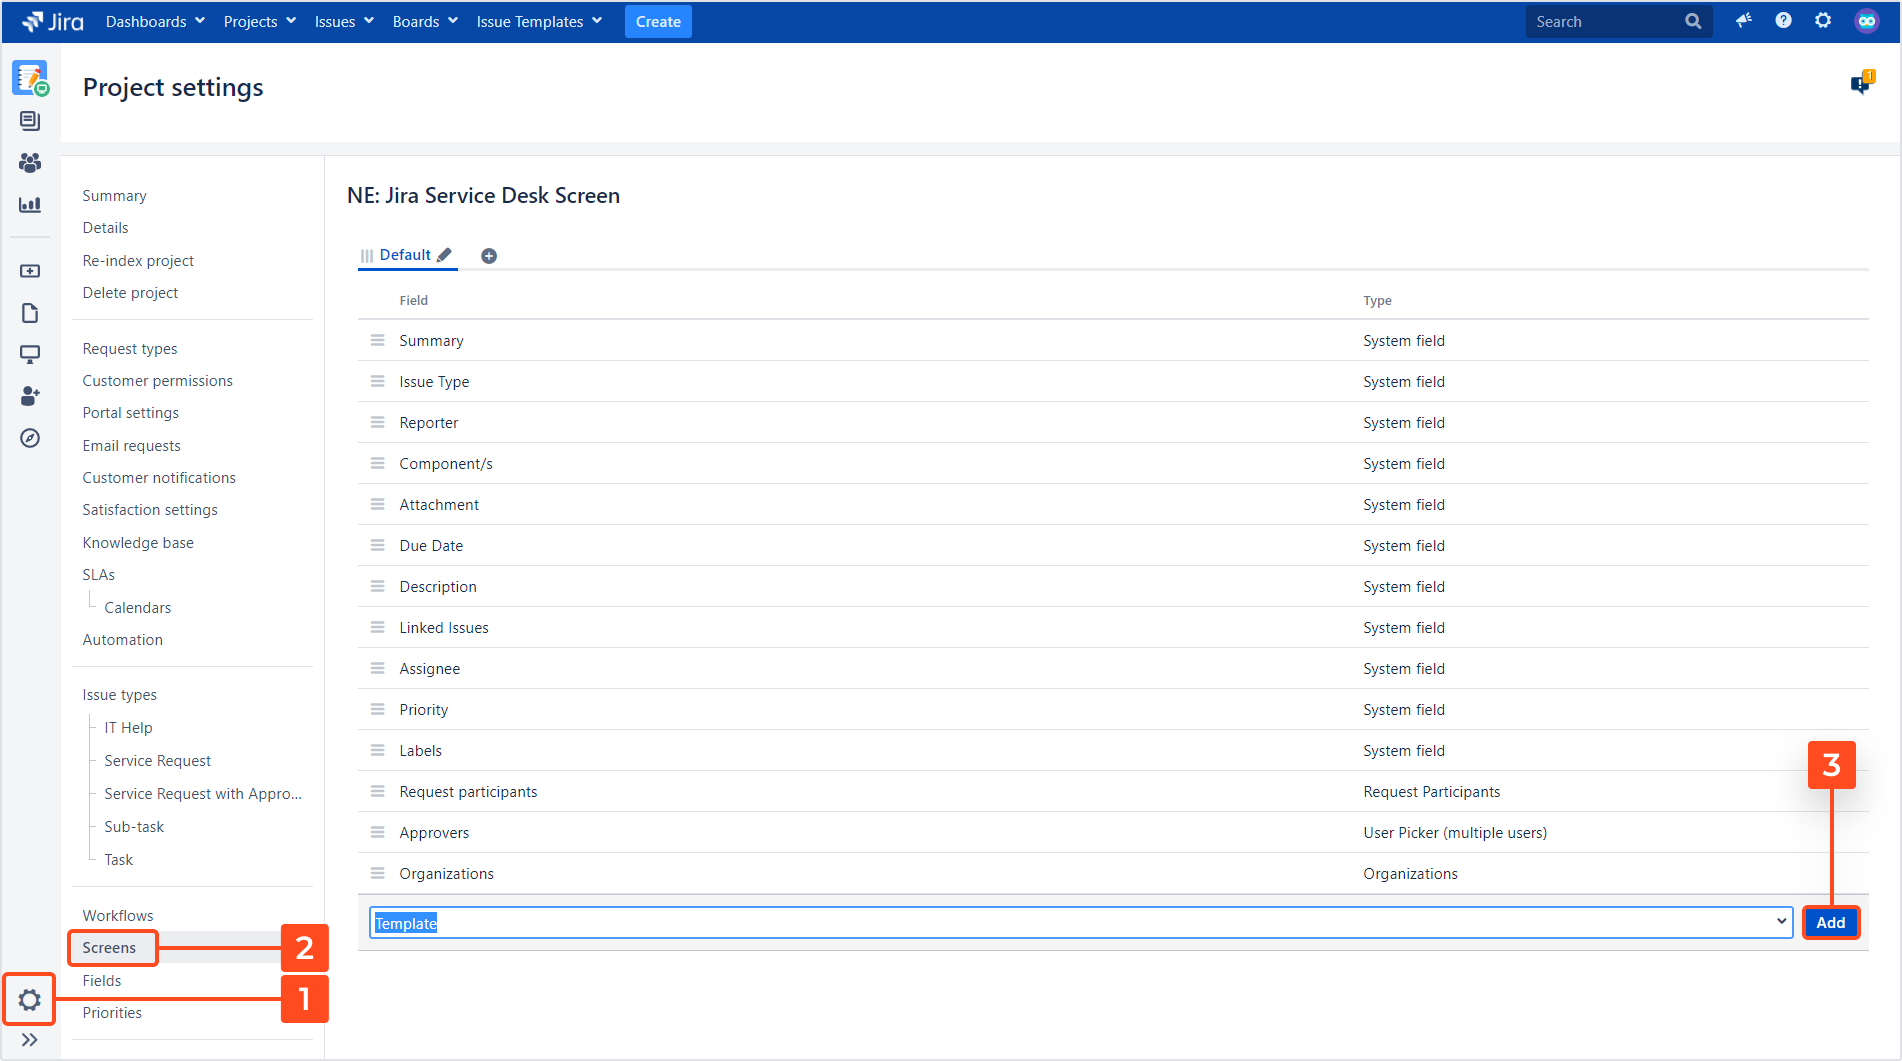
Result
Every time someone creates an issue in this project they will be able to select a template from a drop-down list.
Create an issue using a template
Now you can create the first issue using your template:
Steps
- Go to the project where your template should be applied.
- Click the Create button.
- Navigate to the Template field and expand the drop-down list.
- Select your template from the list.
Result
Summary and Description have been populated by your template in the new issue.
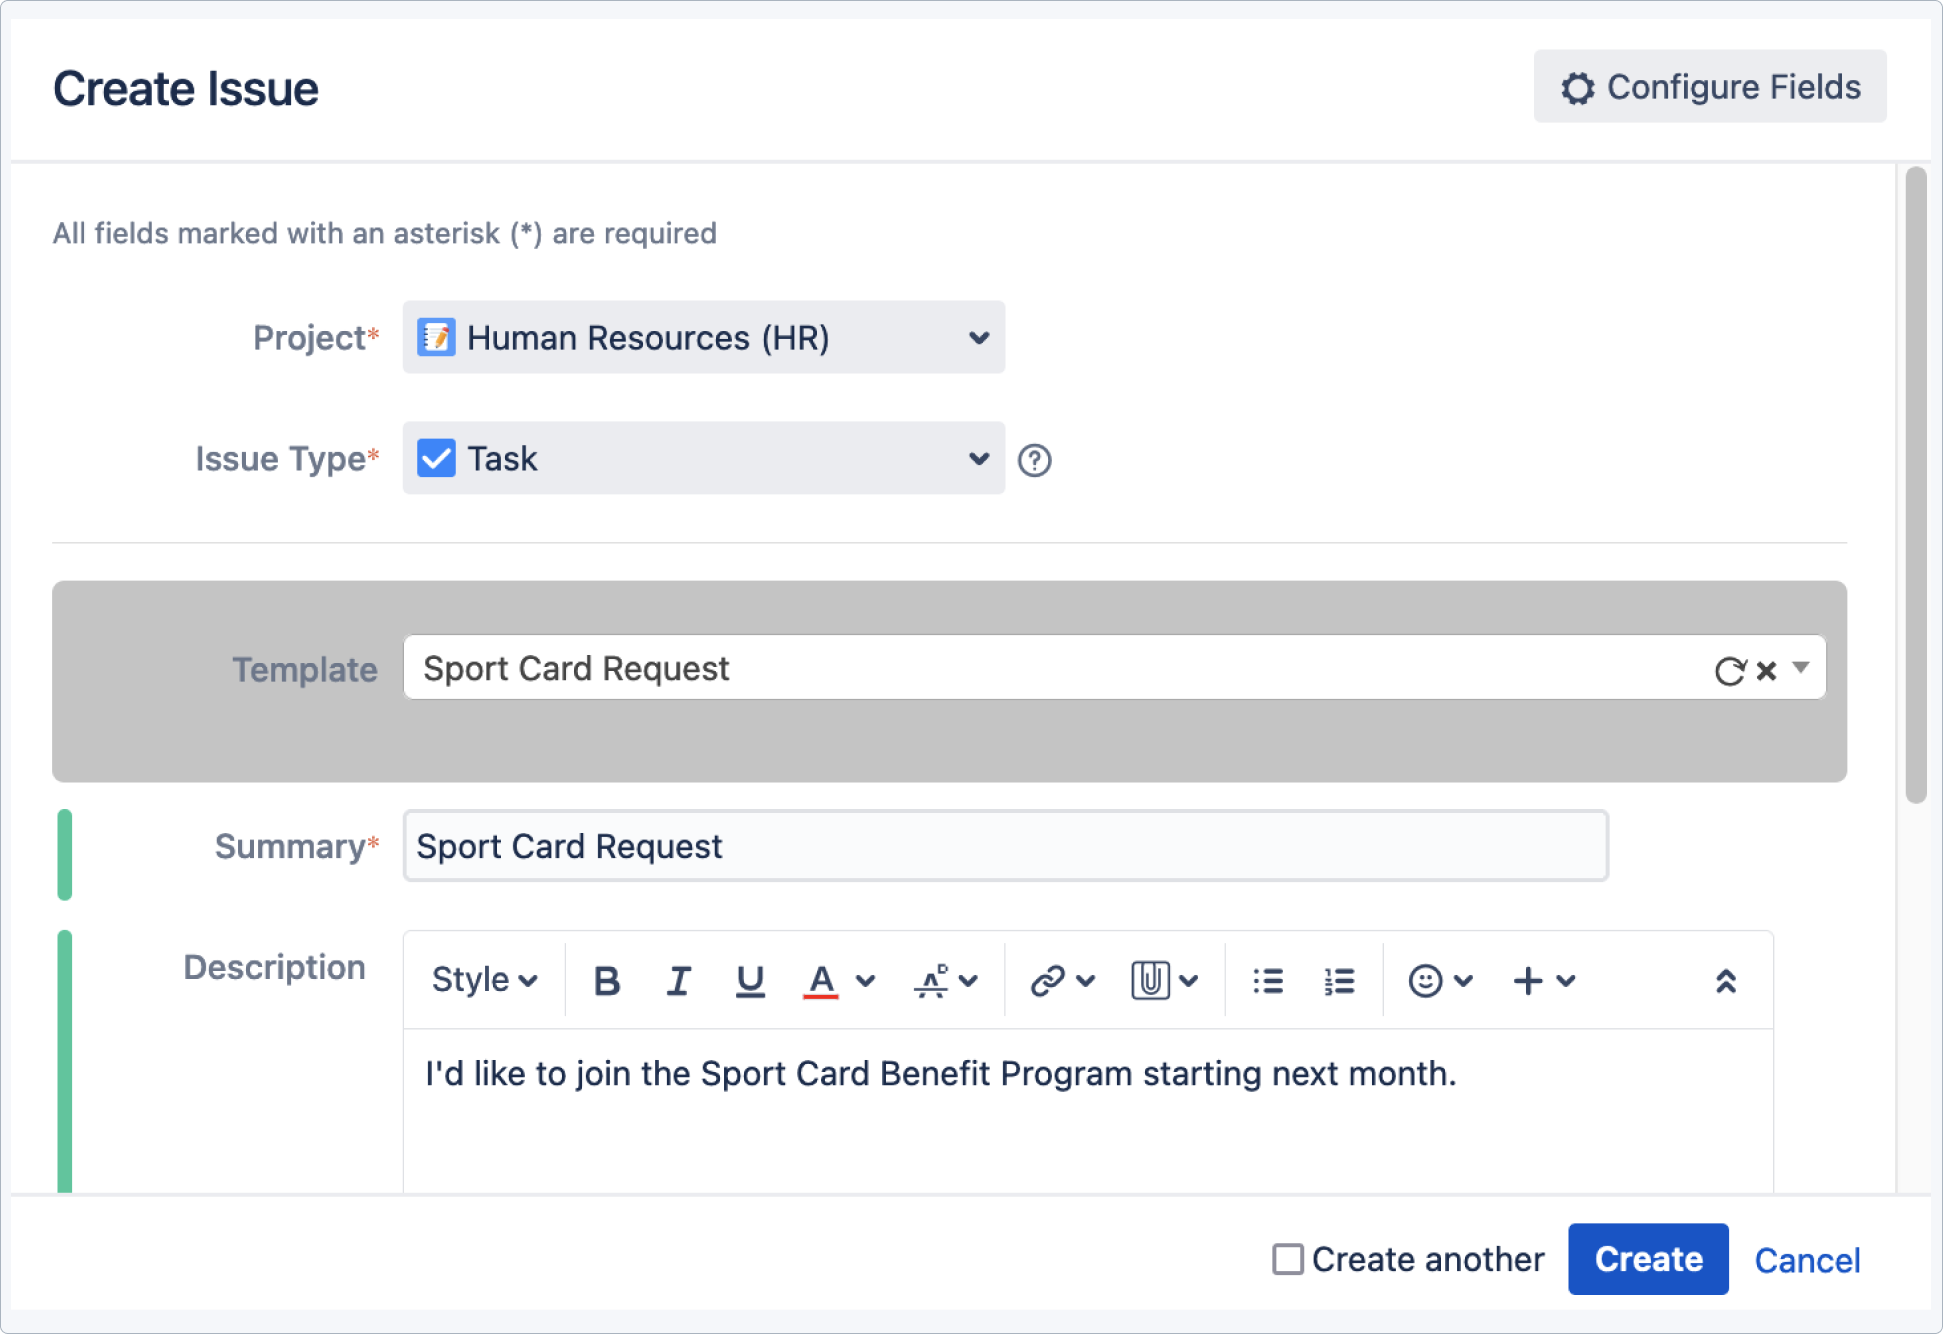
Use case - Adding fields upon a transition
See an example of a Default Template used in a software project
Previous chapter showed us a simple example of a single default template. Now, let’s explore other functionalities of the Default Template feature.
Say, we want to add release notes to an epic right before the release. We’ve got a separate template to create the epic - it’s applied upon the Create transition and generates additional linked issues thanks to the Create Structure postfunction. It doesn’t include any field for release notes, since we don’t want to clutter our tickets with empty fields, until they’re necessary.
With Default Template we can apply a separate template, only to the epic issue, upon the Done transition. The template will add a custom field to the transition screen and auto-complete it with a basic draft of our release notes.
Create the custom field
We’re going to need a special custom field in order to add it to our template, so let’s start with that.
-
Let’s go to the project settings of our New App project and under Fields > Custom fields let’s add the custom field Text Field (multi-line) with a name Release notes:

-
Next, we need to add our Release notes custom field to both the Templates (TEMP) project and the New App (APP) project, and then add it do relevant screens:
TipLet’s not forget to add the Template field to the APP: Released Screen. -
Finally, let’s associate the APP: Released Screen with the final transition in our project, that is, the one leading from Waiting for release to Released.

Create a template
Now, we need prepare a template that we’ll use as the default.
-
Let’s create a Release Notes Template under Issue Templates > Manage Templates (issue type: Template):

-
Then, under the Fields tab, we need to create a separate set of fields add the Release notes custom field to the template:

-
Finally, let’s provide a default value for our Release notes custom field:

Read more on creating templates in the Create a template chapter.
Select the template as default
Our template is ready and we can associate it with the Epic issue type in our project. Let’s go to the New App project settings and select Issue Templates > Default Templates.
There, we’ve got three steps to follow:
-
Select the Release Notes Template from the list.
-
Choose the Epic issue type.
-
Choose when the template should be applied, which in our case means the Released transition.

Configure template’s visibility
Now it’s time to set up the template’s visibility. Since we probably won’t need to change this template to a different one, we may leave this option disabled:

Remember that this setting affects all projects in your Jira instance.
Result
Default Template is applied automatically on our Release transition screen:

You’ll find more detailed instructions in the main Default Template chapter.
Use case - Guest Wi-Fi access
Learn how to use variables using a real-life example
Using variables can help you speed up many repetitive support tasks. Let’s take requesting access to the corporate Wi-Fi as an example. We can use three system variables that will get filled in automatically:
$TODAY - will be replaced by the current date
$USER_NAME - will insert the name of the issue reporter
$CURRENT_USER_MAIL - will insert the email address of the issue reporter
We can also create three other user variables. They will turn into blank fields on the issue create screen, so that users requesting access will need to fill them in:
[NAME] - in this particular configuration: first name of the guest
[SURNAME] - in this particular configuration: last name of the guest
[DEVICE_ID] - in this particular configuration: ID of the laptop or mobile device that will be used to access the company’s network
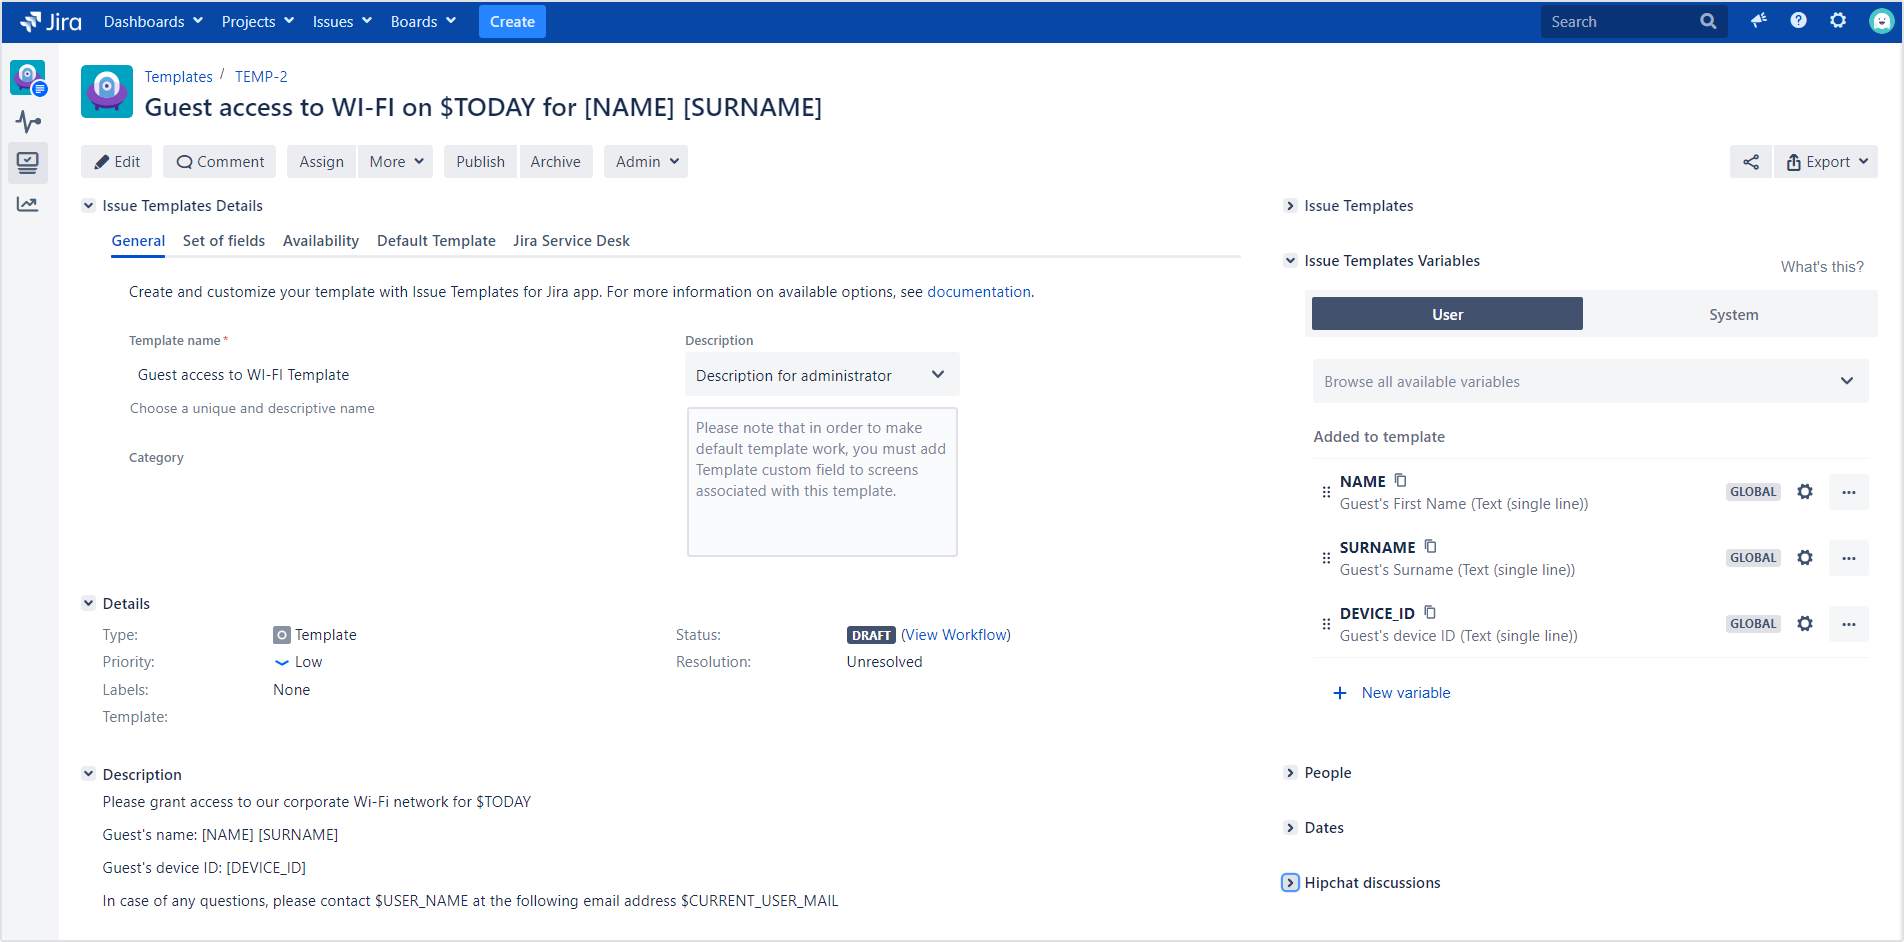
Result
All the user needs to do in order to raise the request is simply to fill in three fields:

- To get more details, read the main Variables chapter.
- To learn how to add variables to a structure of linked issues, check out the Create Structure use case chapter.
Use case - Issue creation criteria
Let’s create a number of subtasks under a story for onboarding new employees. Then, we’ll add a checklist to the Create issue screen. Thanks to this, hiring managers and HR employees will be able to decide which subtasks to create by choosing them from a checklist depending on their needs.
Creating templates
First, we need to prepare templates that will be applied according to JQL conditions.
Steps
- In the Template Repository project, create a story template.
- Under the new story click More > Create subtask.
- On the Create issue screen select the issue type: either subtask or subtemplate.
Read more on creating templates in the Create a template chapter.
Result
A story template with subtasks is created:

Use case - Availability
In this scenario there are several projects and two teams are located in different countries. You’d like to create a template available only for German and Polish speakers.
Steps
-
Open your template.
-
Go to Issue Templates Details > Availability.
-
Click the arrow to expand Create Issue Screen options.
-
Hover your cursor over Language field and click the pencil icon to edit it.

-
Select Polish and German in the Languages tab and apply changes.

If you want your template to be available on the Customer Portal, remember to switch on the toggle next to Request form.
Result
Template’s availability is limited to the specified language groups.
Use case - Jira Webinar
See an example of how to use Create Structure in a project
Let’s use the Create Structure post function to organize a webinar for developers. We’ll create an epic with stories, subtasks and variables, so we’d better start with some initial configuration.
You’ll find more information about the post function parameters and all possible configuration modes in the Create Structure configuration chapter.
Configure fields and screens
First of all, we need to have proper fields available on our Create issue screen.
Steps
- Open Template Repository project settings and select Screens.
- Go to TEMP: Templates Field Screen.

- Add new fields. (In our example: Template and Epic Name).
- Drag and drop to rearrange the fields in the desired order.
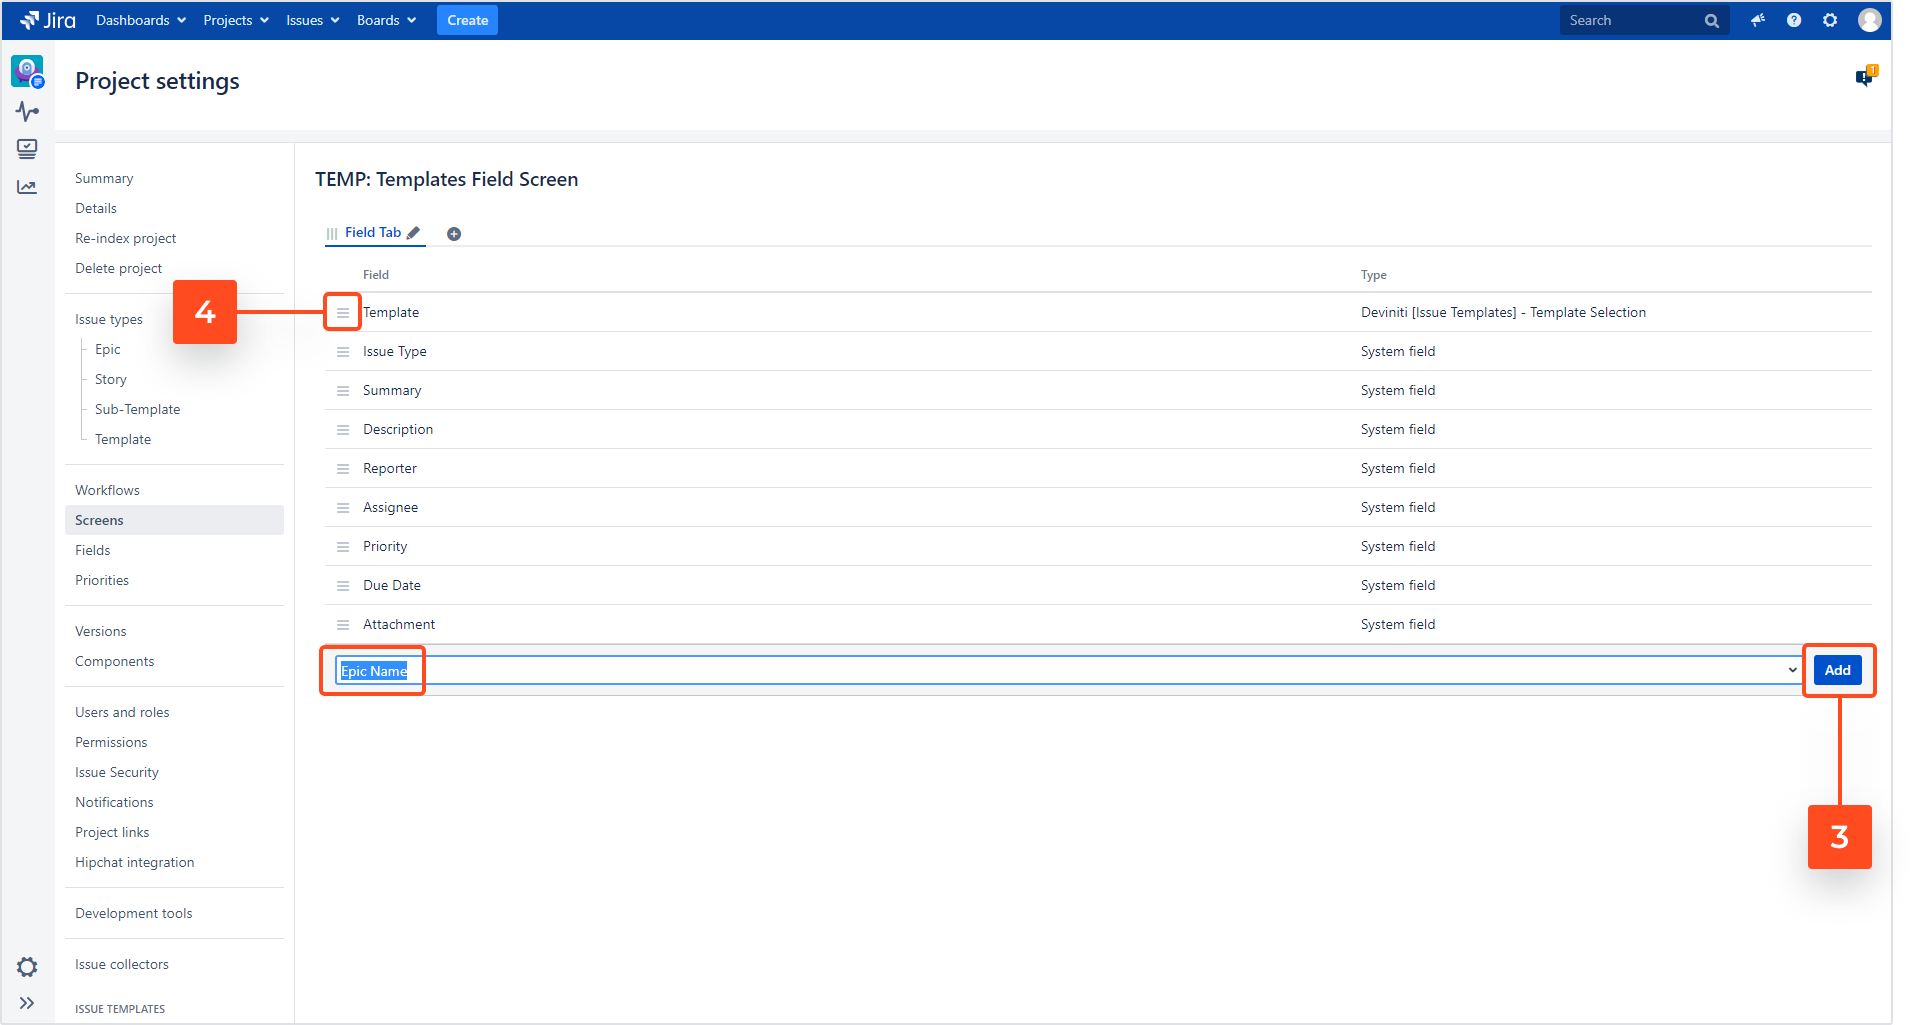
Add issue types
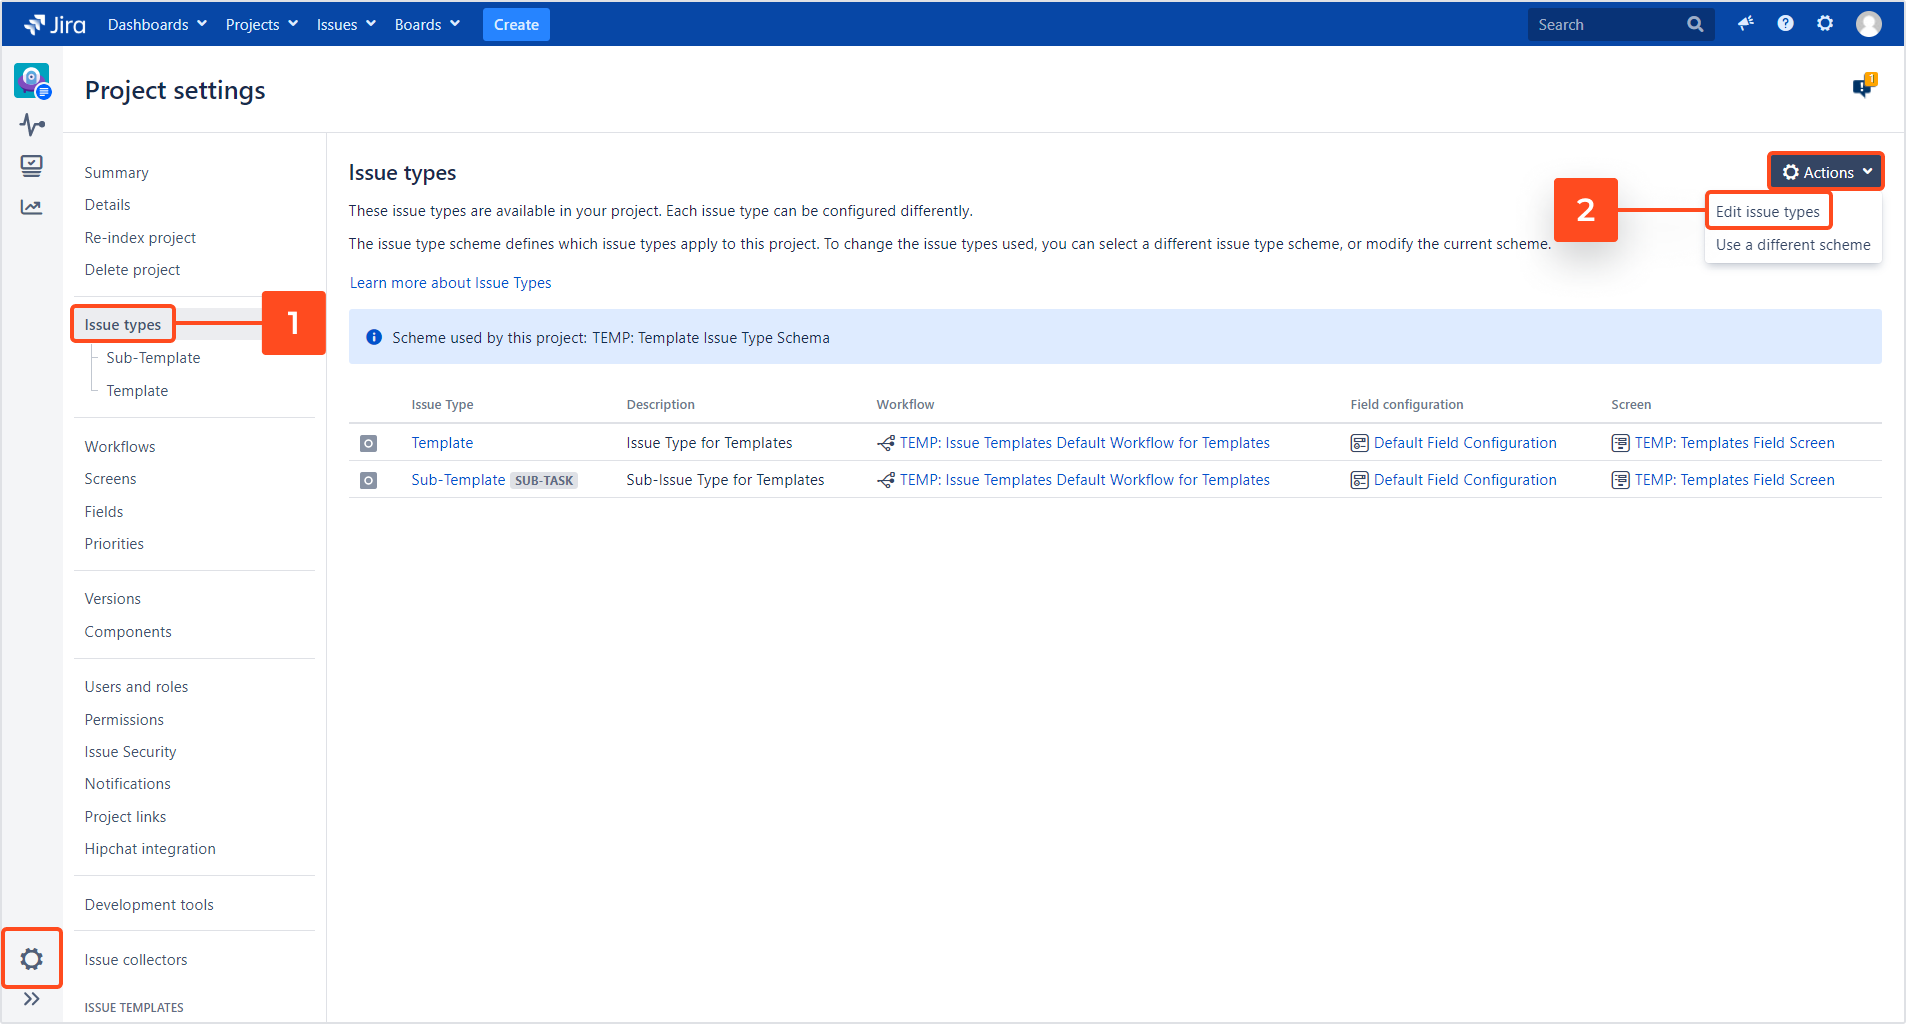
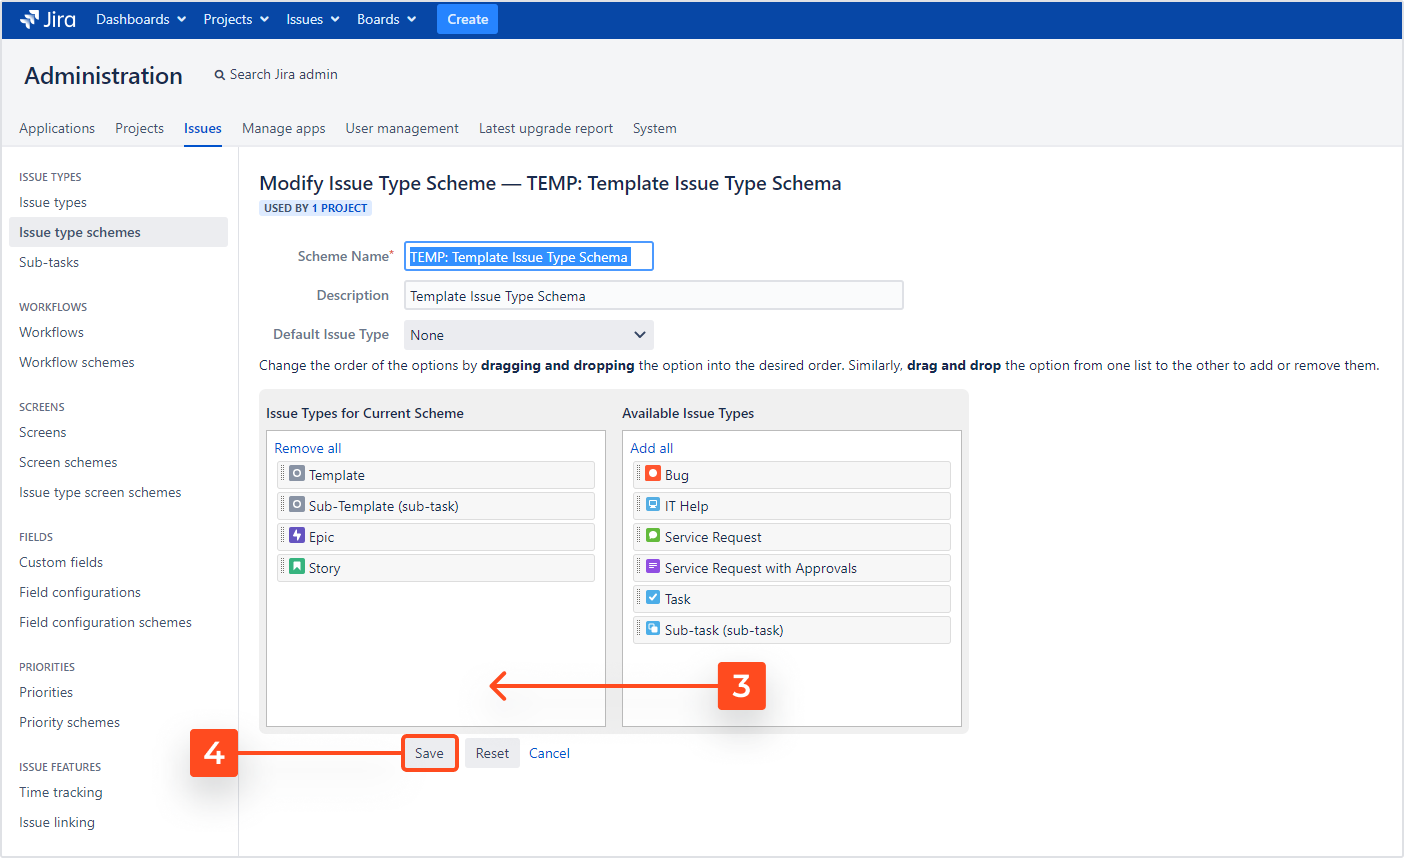
By default, there are only two issue types in the Template Repository (TEMP): Template and Sub-template. If we want to build a more complex structure, we need to add other issue types manually.
Steps
-
In the Template Repository project settings, select Issue Types.
-
Drag and drop desired issue types (in our case: epic and story) from the table on the right to the one on the left.
Create an epic
Now that the initial configuration is ready, we can create our templates. Let’s start with an epic.
Steps
- On the Create issue select Templates (TEMP) as the project and epic as the issue type.
- Fill in the fields you’d like to be autofilled in your future projects.
- Click Create at the bottom of the form.

Define the set of fields
Next step is to decide which fields should be autofilled by the template in the target issue.
Steps
To define the set of fields of the template:
- Select your epic template in the Template Navigator.
- Open the Fields tab.
- Start typing to add fields that should be filled in from the template (in our case: Summary, Description, Priority, Labels).

- The Default set of fields will disappear once you add your first field.
- Learn more about defining the template’s scope in the Fields chapter.
Add variables
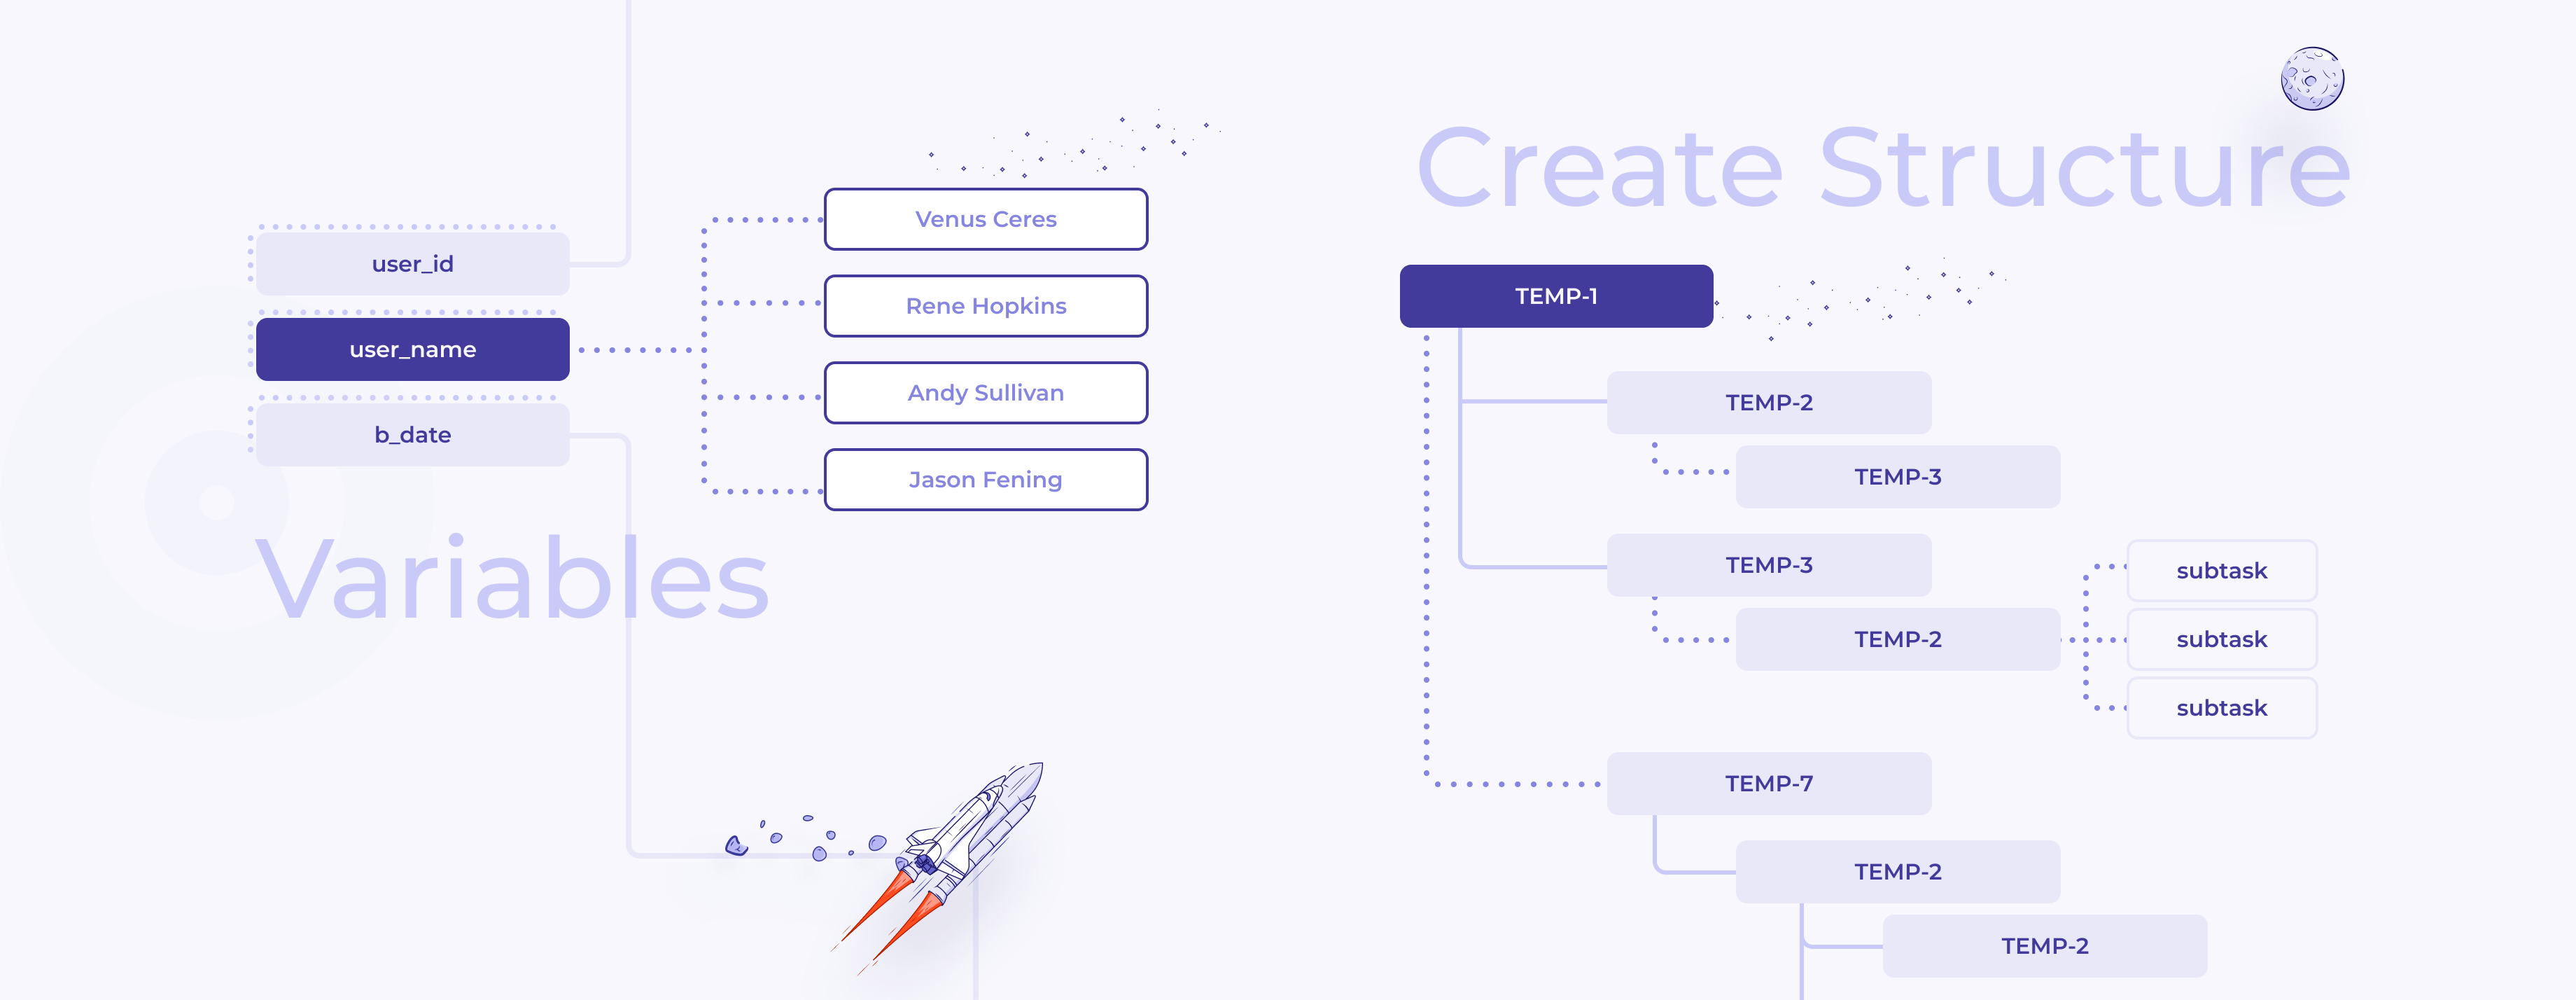
Now you can add variables to your epic and make them global - which means that they will be available in all the templates. Thanks to that, values once provided by the user on the Create issue screen will be replaced in every issue in the structure.
Steps
-
Give your variable a name (in our case it will the topic of the webinar).
-
Check the box next to Available in other template issues to make your variable global.
NoteThis option is available only for administrators of the Template Repository (TEMP) project. If you’re not one of them, you may skip this step as we’ve got a workaround for you in the next section.
-
Copy the variable to clipboard by clicking the copy icon.
-
Paste it into the Summary.
- Read on to learn how to add the same variables to other templates in the structure.
- Learn more in the Variables chapter.
Create a story
Now it’s time for Stories - more specific issues that will bind together related subtasks.
Steps
To create a template story with variables:
-
In the newly created epic, click the plus icon next to Issues in Epic.

-
In the Browse all available variables search field, type in the name of the global variable you’ve defined in the epic (in our case: TOPIC).
-
Click the plus icon to add the variable to the story template.

-
Repeat with your other global variables.
-
Copy the variables and paste them into the Summary (and any other text fields where you need them).

-
Repeat the whole process to create as many stories as you need. In our example we’ve got Presentation, Mailing and Social Media.
 Tip
TipIf you don’t have administrative permissions for the Template Repository (TEMP) project, here’s a workaround:
- Create a new variable with exactly the same placeholder (in our case: TOPIC).
- Add the variable to where you need in the text.
- Repeat in all the templates in this structure where you want to use the same variable.
Result: When you (or your colleagues) will provide a value while creating the target issue, it will be replaced in all the variables having the same placeholder across the entire structure.
Create subtasks
Now let’s create subtasks and see how they can be linked to each other.
Steps
-
Open the newly created story (in our example: Presentation).
-
Create another subtask to be linked with the previous one and select Link from its three dots menu.

-
Choose the relation (in our case the first subtask is related to the presentation’s content and must be completed before other colleagues start working on the visual aspects of our webinar: graphics and presentation slides, so the first task is blocked by the second one).
Result
We’ve created a structure of issues, with an epic, stories, and linked subtasks. You can preview it in the Template Navigator under the Relations tab.

If you’d like only your main template (for example epic) to be visible on the create issue screen, just disable all subordinate issues (it doesn’t apply to subtasks). Read more about it in the Availability chapter.
Add the post function
Now that our template structure is ready, we can use it to create issues in our target project. First, we need to add the Create Structure post function to the workflow.
Steps
To add the post function:
-
Open your target project.
-
Go to Projects Settings > Workflows.
-
Select the default workflow and click on the edit icon under Actions.

-
Click on the first transition (Create) and go to Post Functions.
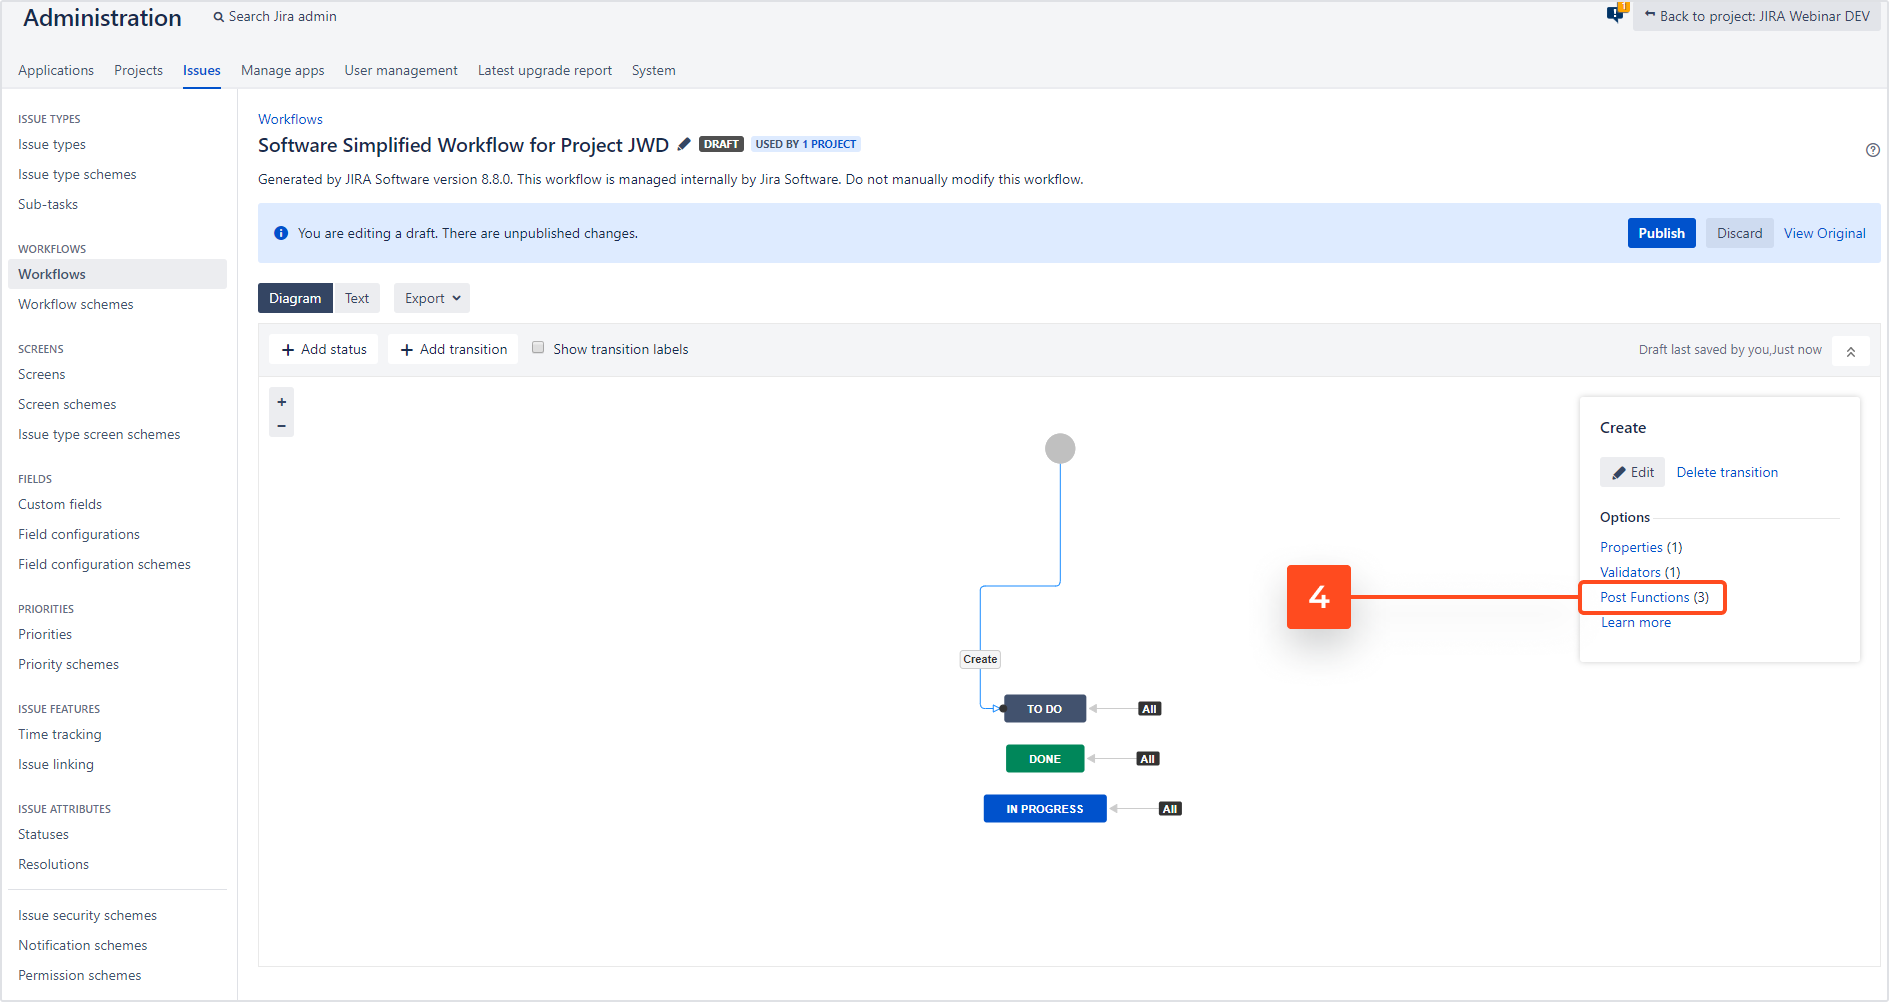
-
Click Add Post Function and select Deviniti (Issue Templates) - Create Structure.

-
Go to Project Settings > Screens and select your projects Default Issue Screen.
-
Add the Template field.
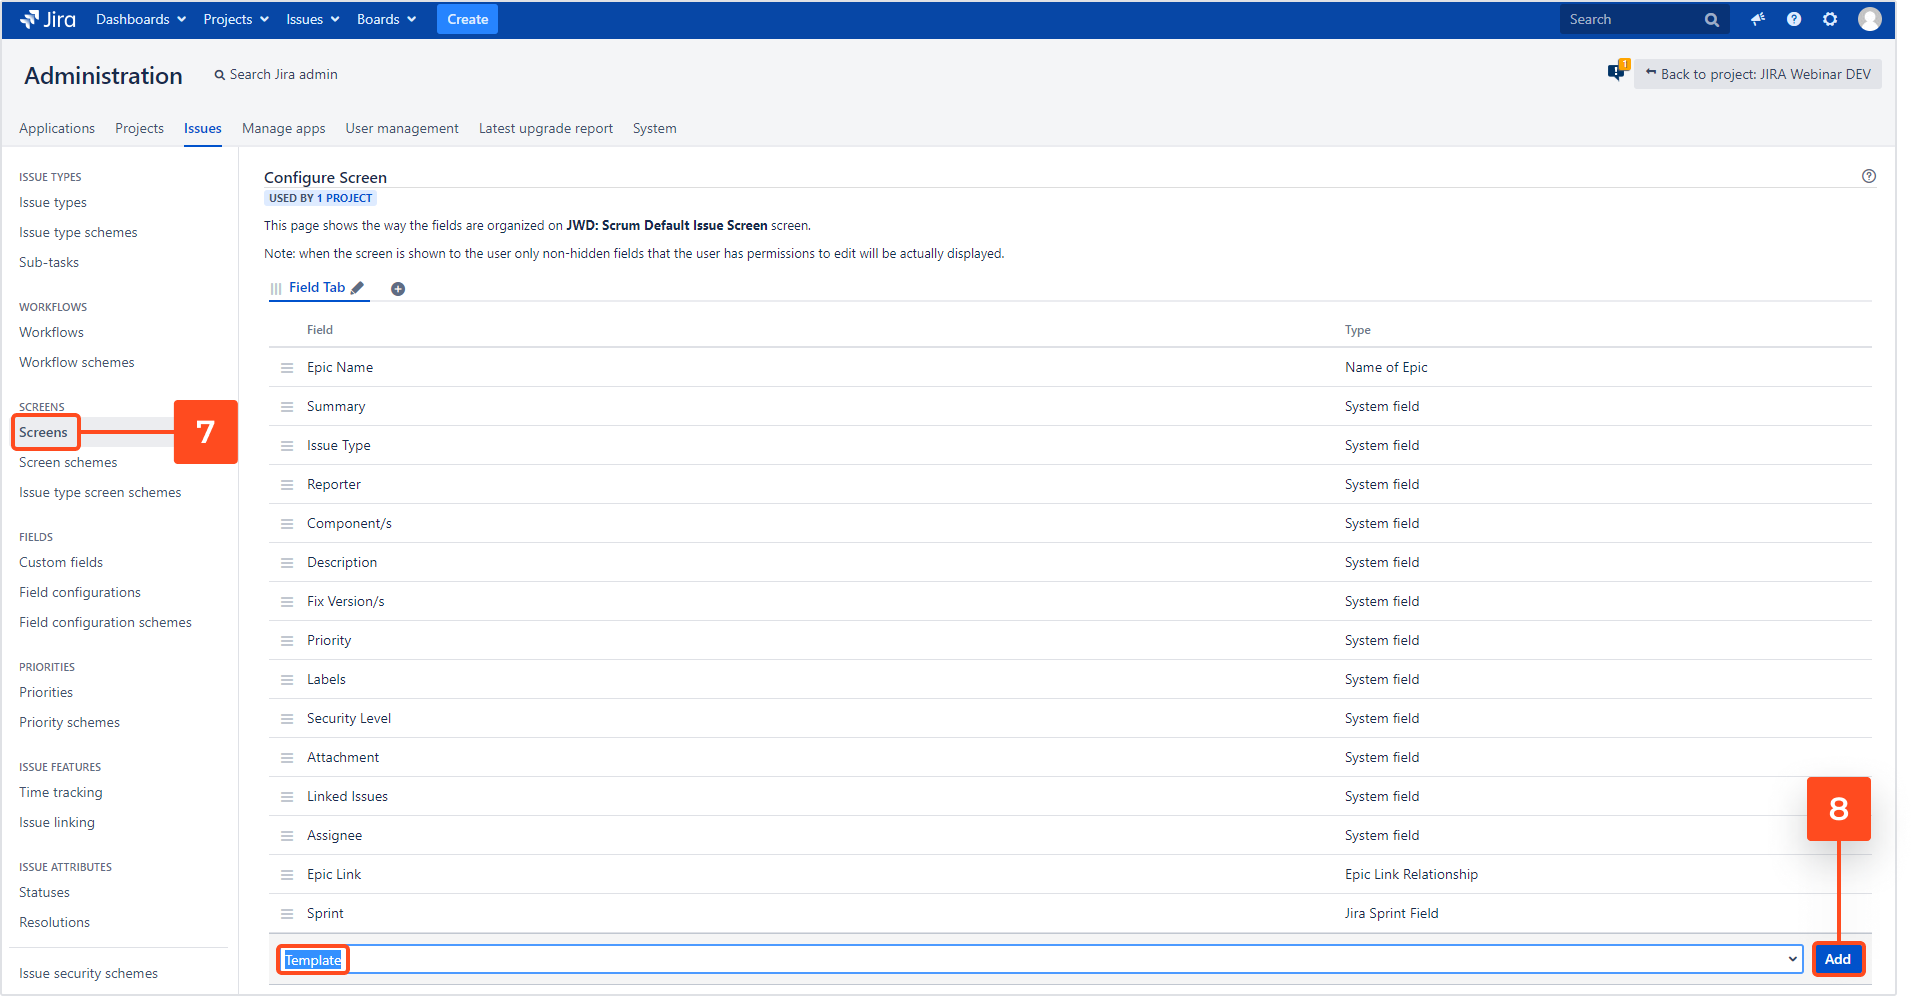
Create issues from the template structure
Now, we are all set to create our structure of issues:
Steps
- Select the project you’ve set up before.
- Select the Issue type (in our case epic).
- Select your template from the drop-down list (in our case Jira Webinar).
- Define the variables and click Replace values in fields.
- Once the variables are replaced, click Create.

Result
We’ve created a template that can be reused anytime to quickly set up a structure of issues:
- Stories are listed under the epic
- Subtasks appear under stories
- Variables got replaced in the entire structure
Follow up
- To get an overview of available options, go to Create Structure configuration.
- To learn how to simply apply templates to new issues, go to Modify current issue.
- To learn how to create linked issues in different projects, go to Create new issue.
- To learn how to schedule additional subtasks to be created during a different transition, see Create subtasks during transition.
- If you need to optimize Jira performance while creating a large structure of linked issues, check out Execute post function asynchronously.
Use Case - Canned Responses for Service Management
Learn how to automate a common workflow with canned responses
Let’s see how a standard application access request can be improved with canned responses added from templates.
We will add comments on different workflow transitions, so that the end user will get the most adequate response, depending on the outcome of their request.
Template with the initial confirmation message
First, we’re going to create a template with the initial message that every customer will receive after submitting their issue. In order to add the comment we need to open the extended view of our template and add our message in the comment section, just as we would do with a regular comment:
Steps
- Create a new template or use an existing one.
- Open the template’s issue view.
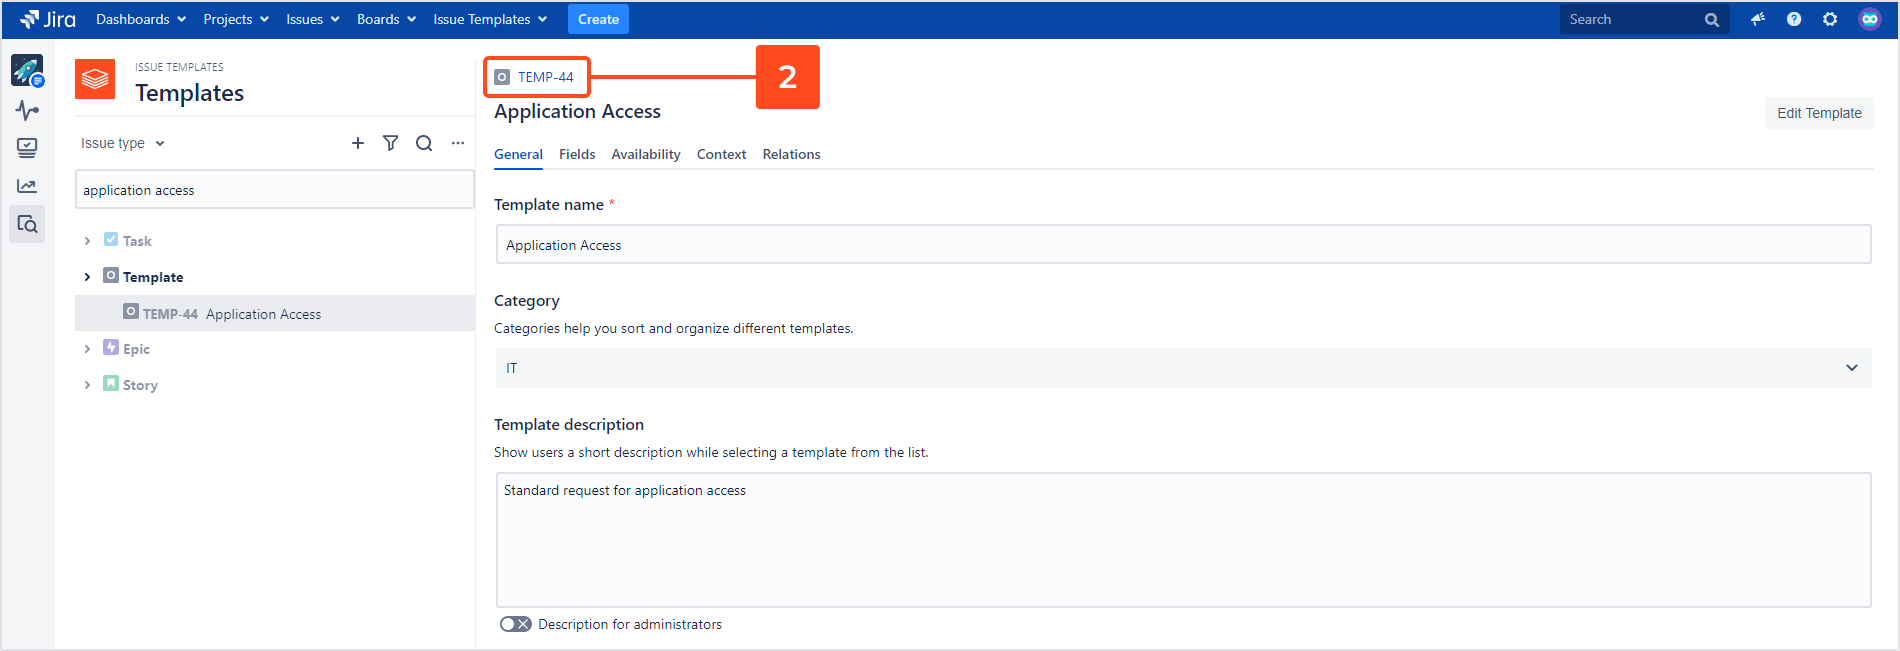
- Go to the Comment section and type in the message you’d like to show to your customers.
- Click Add.

Set of fields
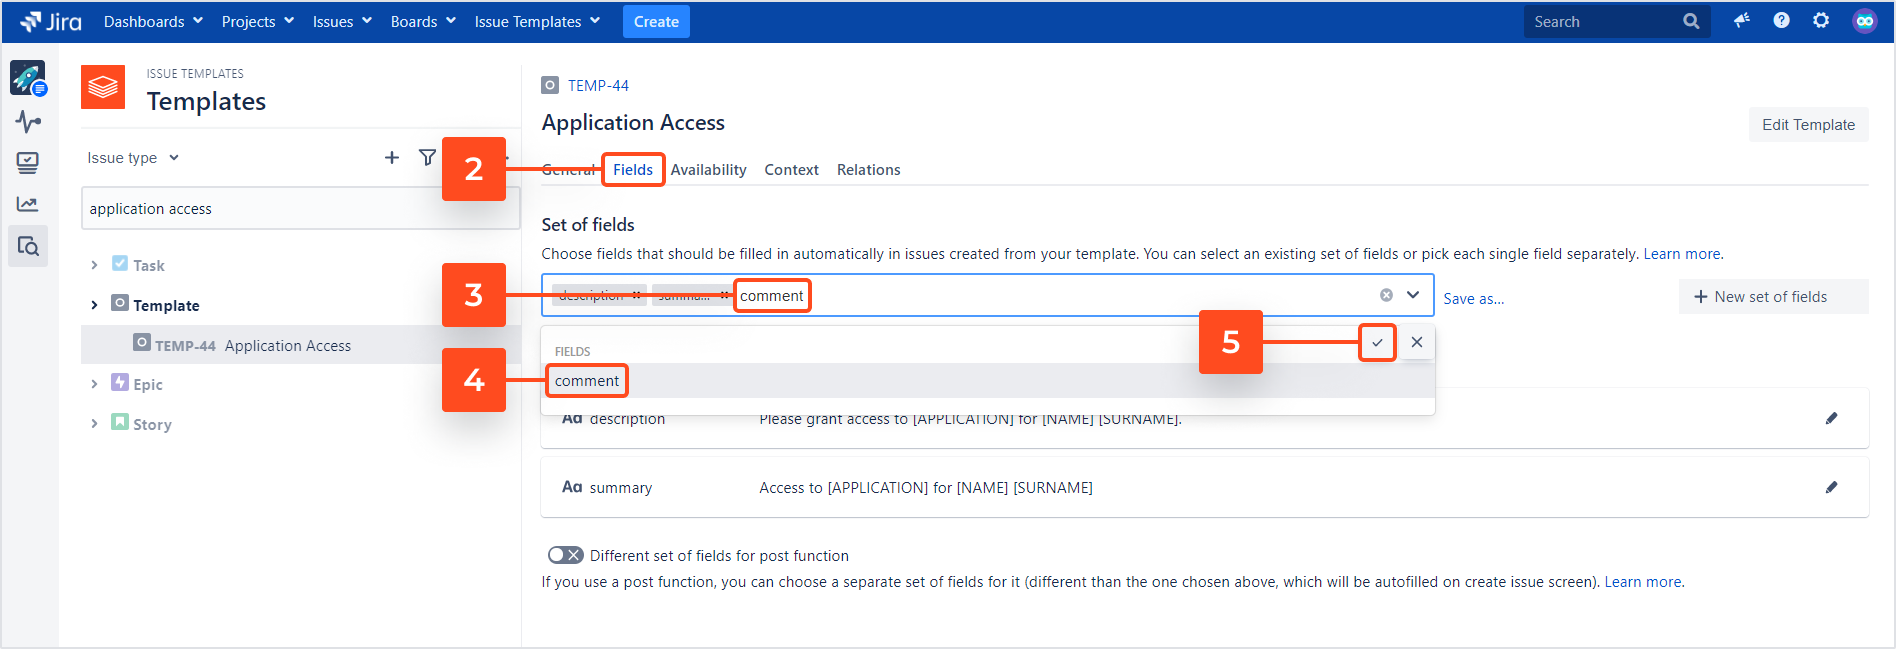
Next, we need to add the Comment field to our Set of fields.
Steps
-
Open the template in the Template Navigator
-
Go to the Fields tab.
-
Start typing to find the Comment field.
-
Select the Comment field from the drop-down list.
-
Confirm your selection by clicking the check mark to the right.
Availability
If we want the comment to be visible to customers, we need to make the template available on the Customer Portal.
Steps
Create Structure post function
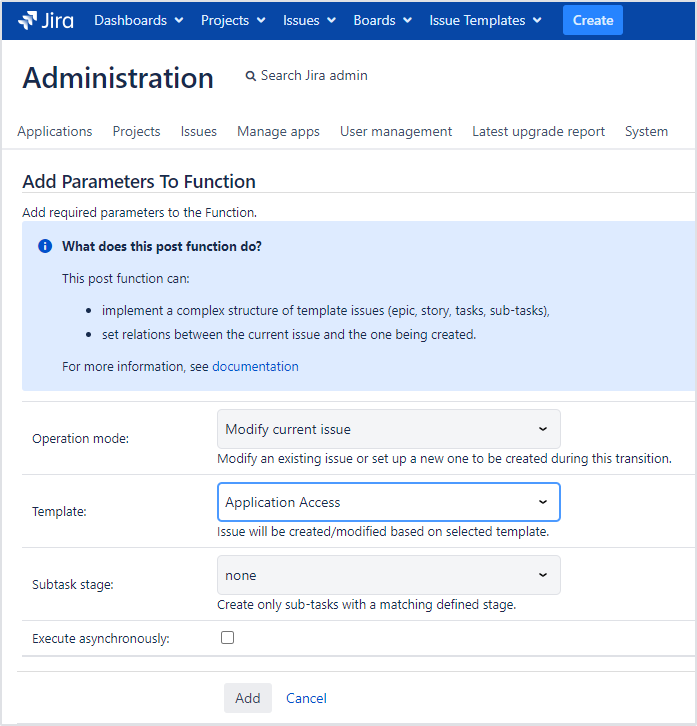
Now we need to configure our target project. The Create Structure post function will make it possible to copy the comment from the template.
Steps
-
Open your target project (in our case: IT Support).
-
Go to Project settings > Workflows.
-
Select the default workflow and click on the pencil icon under Actions.

-
Click Add Post Function

and select Deviniti (Issue Templates) - Create Structure in the following mode:
- Operation mode: Modify current issue
- Template: (Select the template you’d like to use)
- Subtask stage: none
Result
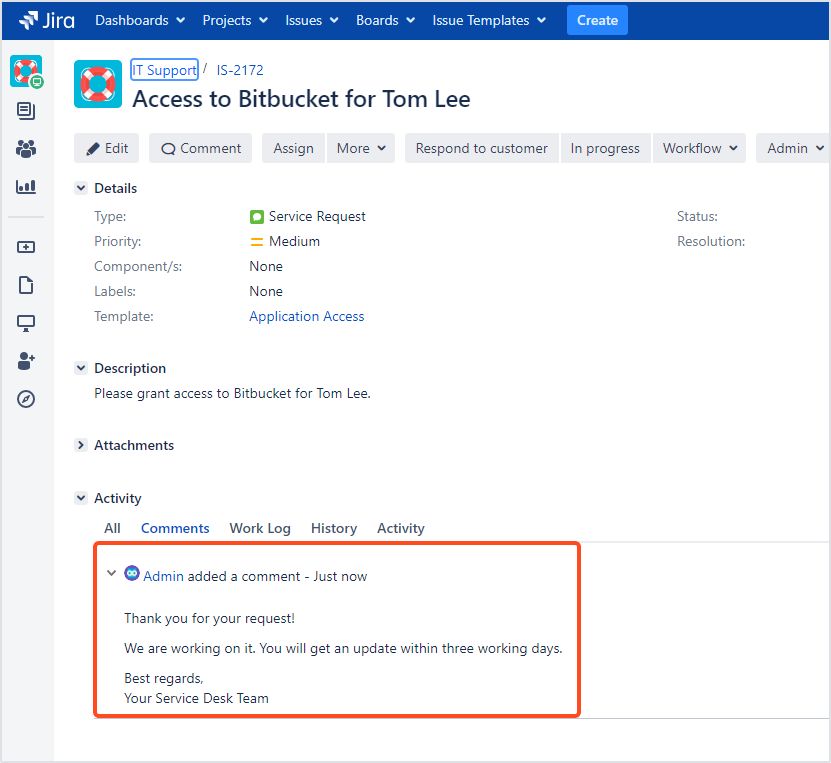
The comment is automatically added to issues created from your template:
If you can’t find the answer you need in our documentation, raise a support request.


