- Get started
- About
- First steps
- Glossary
- Migration
- Configuration
- Global configuration
- Repository
- Template configuration
- Template scope
- Manage templates
- Supported fields
- Permissions
- Using templates
- Create issue from template
- Create issue structures
- Apply template to existing issue
- Recreate issue
- Use template custom field on issue create screen
- Default templates
- Direct link
- JQL searchers
- Variables
- Static variables
- Dynamic variables
- Smart defaults
- Basics
- Smart issues
- Smart users
- Smart dates
- Smart project
- How to use smart defaults
- App Integrations
- Team-managed projects
- Jira Software
- Jira Service Management
- Advanced Roadmaps
- Issue Checklist for Jira
- Advanced
- Automation
- Legacy automation action
- REST API
- Create issue and apply template with Jira REST API
- Security
- Security statement
- App permissions
Migration from Server to Cloud
Learn about migrating templates from Jira Server to Jira Cloud
Background
You’ll find most of the basic functionalities in both Issue Templates for Jira Server/Data Center and Issue Templates for Jira Cloud. They deliver the same business value, which is to save time by using templates for quick issue creation.
Two separate app versions were developed to meet the particular needs of our Clients and to overcome specific limitations of both Jira hostings. That’s why they differ from each other in terms of particular features and the overall application design. The Server version offers more advanced functionalities and customization options, while the Cloud version has been simplified and adjusted to the Jira Cloud experience.
Because of these differences, there is no dedicated migration tool that would allow the migration of settings between the two hosting options. We recommend carrying out the export and import process natively, using standard Jira features.
Migration process
In both versions, templates are stored in a dedicated project called the repository. This project can be migrated, just as any other project, using Jira’s native importing tools.
In Jira Cloud, a template is just an issue with additional issue properties. Unfortunately, at the moment there is no easy way to migrate issue properties. After importing the repository project, all the issues should be visible in issue navigator, however they may not be visible as templates on the Manage templates page yet.
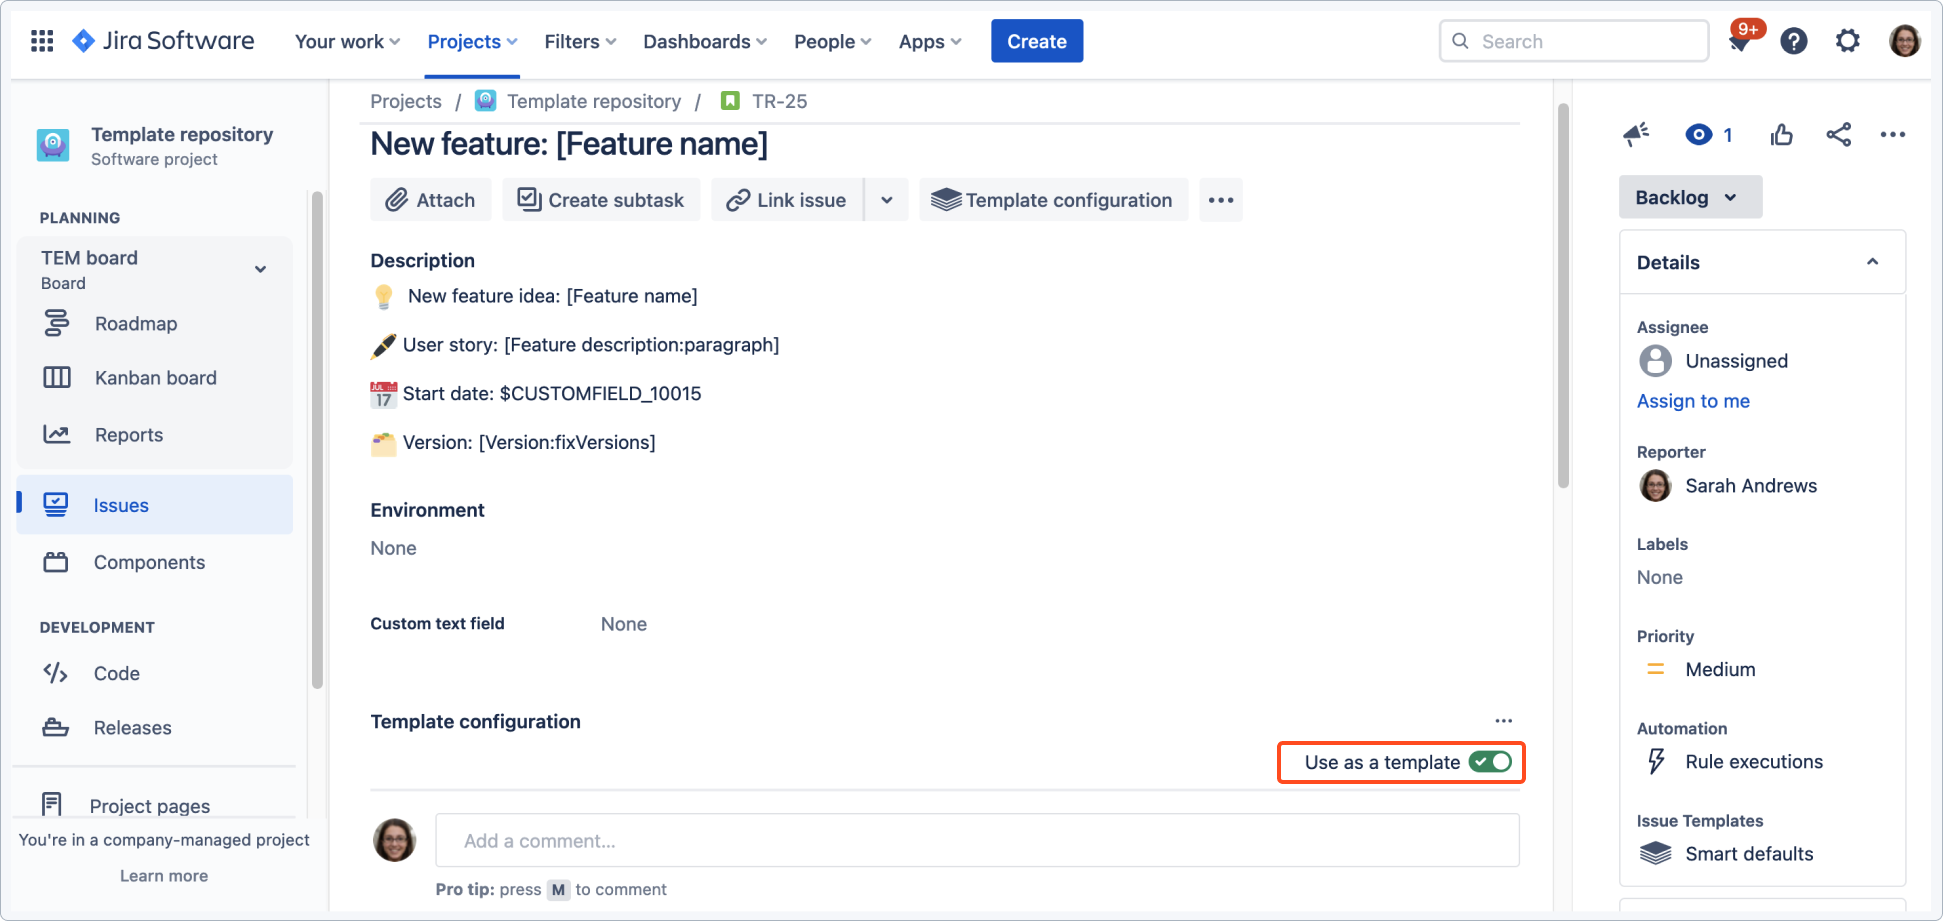
Templates activation
After the migration, the template issues are available in the repository project but they still need to be activated as templates for Jira Cloud. In order to do so, you need to use the Use as a template setting in each template issue.
If you migrate templates to a Jira Cloud instance where Issue Templates is already installed, and you are experiencing problems with app permissions, we recommend to reinstall the app. It should fix the problems with permissions automatically.
After the activation, all the templates will be available on the Manage templates page in Jira Cloud:

Single activation
You can activate the templates one by one manually using the toggle:
Bulk activation
You can activate all templates that have no configuration and have the Use as a template toggle disabled. You should use this option right after migration.
Use bulk activation after:
- migrating templates from Jira Server or Data Center to Jira Cloud.
- importing CSV templates with the native Jira Cloud feature Import data from a CSV file.
Templates will be activated and configured with default values from the template configuration panel:
- Template name set based on the issue summary
- Template selectable ON
- Default scope (inherit)
- Copy sub-task ON
- Template available in all projects
See Template Configuration for details.
Steps
If you have any templates in the repository that you don’t use, these templates will be also activated if you use this option.
- Navigate to Templates Repository > Project settings > Issue Templates and open Manage templates tab.
- Click Activate templates

- Once you click it, the app will scan for all issues in the repository that are not activated as a template and automatically activate these templates.

Result
The manage templates list has been updated and all templates have been activated.

Template details’ configuration
An activated template is practically ready to use on the Cloud. Fields and their contents are preserved in each template. You might want to additionally configure the following:
- Template name. By default, the template’s summary becomes its name. You can change the name at any time if you want it to be different from the summary.
- Scope (set of fields). After the migration, the template’s scope is set to inherit. This means that you only need to set the scope in an epic and it will be applied to the entire issue structure. The default scope is set to All fields except Reporter which means that even if you don’t configure the scope, all the template’s fields (apart from Reporter) will be copied to the target issue.
- Availability. The availability settings are not inherited from the Server version but you can use the Create from template button instead. It suggests matching templates for the chosen issue type and is a good alternative for setting availability per issue type.
Similarities and differences
| Feature | Server/Data Center | Cloud |
|---|---|---|
| Template repository project | The repository project called Templates (TEMP) is created automatically during the app installation. It contains two predefined issue types (Template and Sub-template). It can also contain sample templates if you chose to add the samples during the onboarding. The repository project can be changed in the configuration. | The repository project is not created automatically unless you follow the onboarding. During the first steps you can choose an existing project or create a new one. The repository project can be changed in the configuration. |
| Template details configuration | Available on the template’s issue view, as well as in the Template Navigator. The panel includes the following tabs: General, Fields, Availability, Context, Relations and User variables. | Available on every template’s issue view in the repository project. Contains two tabs: General and Availability. For more details, see Template’s configuration. |
| Set of fields/Scope | Available on every template’s issue view (Fields tab) and under the repository project’s settings. | Available on every template’s issue view and under the repository project’s settings. |
| Template availability settings | Available under the Availability tab in particular templates and in the global Template Repository project’s settings. You can restrict the template’s availability to the following categories: Projects, Project Categories, Issue Type, Screens, Groups, Users, Languages. | Available in the Template’s configuration panel in Availability tab. Allows to restrict the template’s availability to particular projects only. |
| Variables | Provides two types of variables: User variables and System variables. Configured in a dedicated panel on the issue view and globally. | Provides two types of variables: Dynamic (equivalent to User variables in the Server version) and Static (equivalent to System variables in the Server version). The functionality is basically the same, although the server version offers more custom settings. |
| Autocomplete fields on Jira issue screens | Available for all screen types delivered by Jira, including create, edit and transition screens. | Possible with the Create from template screen, however, it is unavailable on Jira issue screens due to API limitations. See more details in a dedicated FAQ section. |
| Applying templates to existing issues | Available under More on the issue view. See Apply template for more details. | Available under the three dots menu on the issue view. See Apply template for more details. |
| JQL Searchers | JQL queries dedicated for searching for templates. See JQL Searchers for more details. | Different JQL queries are available for the Cloud version. See JQL Searchers for more details. |
| Templates with subtasks | Supported with an additional workflow post function (Create Structure). | Supported when the Copy subtasks option is enabled in the template. |
| Templates for epics | Supported with an additional workflow post function (Create Structure). | Supported with no additional settings needed. |
| Templates with issue links | Supported with an additional workflow post function (Create Structure). | Supported with no additional settings needed. |
| Templates on the Customer portal | Supported with all functionalities such as autocomplete and variables. See Jira Service Management for more details. | Supported with limitations. See Jira Service Management for more details. |
| Default templates | Available under every project settings. See Default Template for more details. | Unavailable |
| Use as a template | You can convert any issue into a template. See Use as a template for more details. | Unavailable |
| Templates Navigator | A dedicated view for managing all the templates in the repository project. Offers additional features such as bulk editing, adding templates to categories, and more. See Template navigator for more details. | Unavailable |
| App integrations | The way the app is integrated differs significantly between the Server and Cloud versions. For more details, see REST API | The way the app is integrated differs significantly between the Server and Cloud versions. For more details, see Automation. |
| Post functions | The Create Structure post function is necessary copying subtasks and linked issues, as well as for copying values from templates to target issues. | There is no need to use workflow post functions on the Cloud version. Subtasks, issue links and issues under epics are copied automatically. |
Migration FAQ
Do I need to configure any post functions on the Cloud version?
No, on Cloud you can autofill fields and copy values from templates without any post functions.
How do I copy subtasks on the Cloud?
The Copy subtasks feature is enabled by default. Every template issue that has subtasks will create those subtasks in the target project without any additional configuration.
Will stories be copied under an epic?
Yes. If you have a template that is an epic with stories, the entire structure will be created in the target project without any additional configuration.
Can I use default templates on the Cloud?
Because of the Jira API’s limitations, currently we are not able to offer a Cloud alternative for this feature.
You can reach a similar effect (although without the autocomplete feature) by adding the Apply template post function to the Create transition.
If you can’t find the answer you need in our documentation, raise a support request.