How to set up Jira Service Management? Get started tutorial [for Jira Admins and Support Teams]
As companies grow, it’s time to switch from email support to a good help desk. But how do you make sure it’s managed well? The answer is the right software. Our pick? Jira Service Management tool. In this article, we will tell you how to set up Jira Service Management at your organization to make the most of its possibilities.
Table of contents
- What is Jira Service Management?
- What are the issues and requests in Jira Service Management?
- How do I get started with Jira Service Management?
- How to set up Jira Service Management on the Cloud hosting?
- Getting started with Jira Service Management Cloud for Admins
- Defining roles in Jira Service Management Cloud
- What else can you do in the project’s sidebar?
- Additional materials for Admins: IT Asset Management
- Get started with Jira Service Management Cloud for Agents
- Other features you can use in a service project as an Agent
- How to install Jira Service Management on the Data Center hosting?
- Get started with Jira Service Management Data Center for Admins
- Creating your first project in Jira Service Management Data Center
- Setting up request types in Jira Service Management
- Adding agents to the service project
- Match your Customer Portal to your project’s needs
- Theme Extension for Jira Service Management
- SLAs, Reports, and a Knowledge Base
- Get started with Jira Service Management Data Center Agents
- Commenting on issues
- Sharing issues
- Create the Knowledge Base and provide self-service
- How to set up Jira Service Management on the Cloud hosting?
- How to configure a Jira Service Management Portal your customers will love? A 5 step-by-step guide.
What is Jira Service Management?
Let’s start with the basics. Jira Service Management is a tool by Atlassian for efficient service management. It’s dedicated to IT service and customer support teams. With flexible service desks and automation, it helps agents handle issues smoothly. With Jira Service Management, teams can keep an eye on how they’re doing with meeting SLAs. This helps make sure services are delivered on time.
What are the issues and requests in Jira Service Management?
When it comes to Jira Service Management, we often talk about ‘issues’ and ‘requests.’ But what’s the difference between them?
- Issues in Jira Service Management are problems that need to be solved. They can be anything from a software bug to a customer question. This means issues are just tasks for admin and agents.
- Requests are when someone asks for something, like help or a new feature. Put differently, a request is a type of issue represented on the Customer Portal to your customers or end-users.
How do I get started with Jira Service Management?
Setting up Jira Service Management to match your project needs may seem overwhelming. No wonder, the tool has several integration options, features, and possible use cases. Not to mention the extensions available on the Atlassian Marketplace! But, let’s start from scratch. What should be your very first steps whilst configuring the tool?
How to set up Jira Service Management on the Cloud hosting?
Getting started with Jira Service Management Cloud for Admins
Here’s how to sign up for a Jira Service Management Cloud site:
- First, visit the Atlassian products page and pick the product you want to try. By signing up for Jira Service Management, you get a free 7-day trial with full access to all features.
- Fill in your details and click Agree and Sign up.
Once your site is ready, follow these steps to set it up and create your first service project:
- From the onboarding screen, choose whether you’ve used Jira Software or Jira Service Management before.
- Click Let’s go!
The next step is picking a project template for your first service project. Remember that you can change it later, so no worries if you’re unsure what to pick at this point.
After selecting a template, as a Jira Admin, in the Project Settings, you can edit your projects:
- Name
- URL
- Avatar
- Description
- Project lead
- Default assignee
The updated name of the project will automatically change in any filters of your Jira.
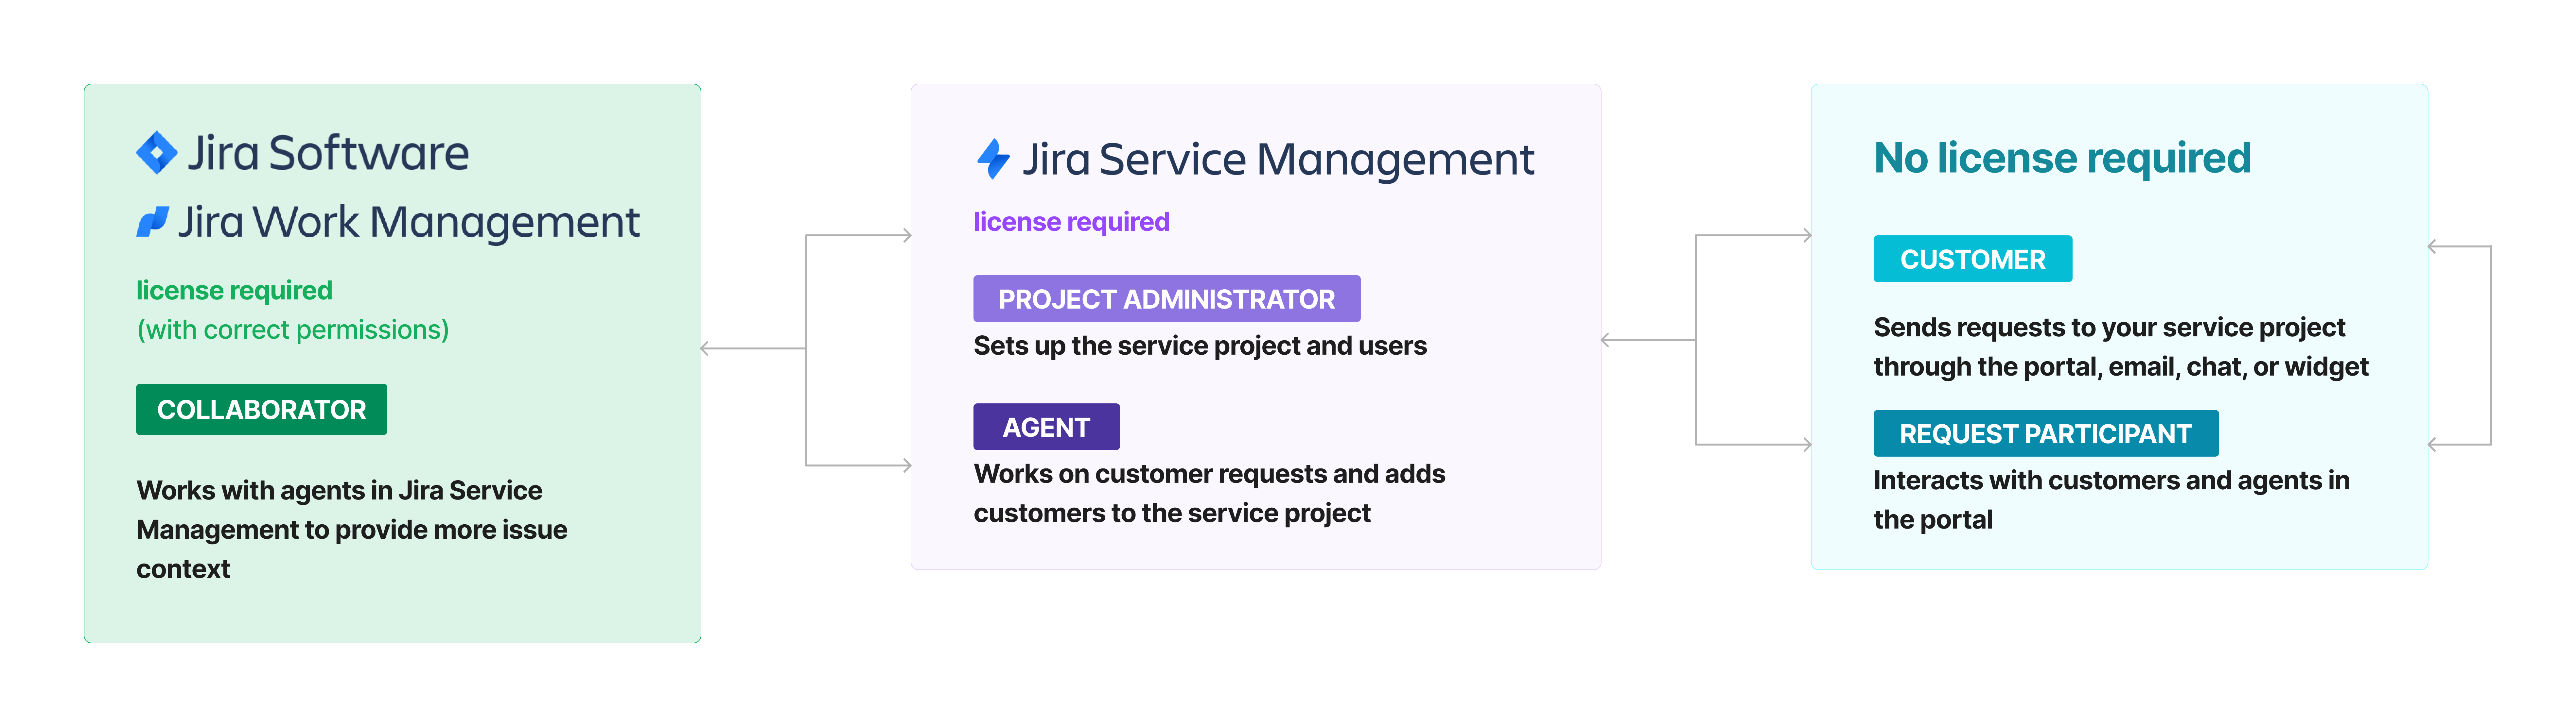
Defining roles in Jira Service Management Cloud
Project roles enable Admins to give users specific permissions or restrictions. It’s an important step in the configuration process. Properly assigned permissions assure safety and data security. You can choose from Administrator, Agent, Collaborator, Customer, and Stakeholder. The infographic below illustrates the dependencies between these specific roles.
What else can you do in the project’s sidebar?
Besides adjusting details and giving permissions, you have more ways to personalize things. You can set up each aspect in the Project Settings sidebar. This includes creating specific request types and SLAs. You can also customize forms and channels for customer communication.
Jira Service Management lets you automate repetitive tasks in customer service. You can set up notifications and offer language support. Additionally, with JSM, you can build a Knowledge Base for your team and assess Customer Satisfaction. The last option allows you to send brief surveys and get customers’ feedback. Then, you can monitor their ratings and comments in a dedicated report.
Additional materials for Admins: IT Asset Management
If you need more customization, you should use Assets. It’s a Premium and Enterprise-only feature in Jira Service Management. For this reason, in the beginner’s guide you’re reading right now, we won’t deliberate on it. If you’re interested in the topic, please go straight to the Atlassian documentation.
Get started with Jira Service Management Cloud for Agents
The first thing you need to do is accept the invitation to the project from your Jira Administrator. To do it, go to your email, and click Join them now. Then, configure your account on the Atlassian site, if you don’t have one.
Congratulations, now you’re part of the team and you can receive requests from customers!
If you only participate in one project, you’ll be taken directly to it. If you manage many projects, just go to the Projects section and pick whichever project you would like to work on.
Other features you can use in a service project as an Agent
The third step is getting to know the Project Settings sidebar from your point of view. Here are some features that you might find useful:
- Queues – work on your customers’ issues
- Customers – manage clients that send requests to your Help Center
- Reports – visualize trends across your project
- Raise a request – send requests as a customer
- Knowledge base – store articles, FAQs, and how-to’s and share them with your teammates
- Channels – see your email and help desk details
Perfect! From now on, you can check the portal, queues, reports, and SLA metrics in a service project. Agents can also add, edit, and delete comments on issues for both customers and internally.
How to install Jira Service Management on the Data Center hosting?
Get started with Jira Service Management Data Center for Admins
To use Jira Service Management on Data Center hosting you need to install it first. For Windows, download it from the Atlassian’s website. Then, the system will ask you to provide your Destination Directory, Home Directory, TCP Ports, and Install as a service function (if you’re an administrator). After determining it, the installation is complete.
Then, you need to set up your Jira Service Management. Here are step-by-step instructions on how to approach this:
- Connect to your database.
- Set application properties: give your site a name, and URL address. Choose whether the site is public or private.
- Enter your license key. You can find it on my.atlassian.com.
- Complete details for your Administrator’s account.
- Set up email notifications according to your needs.
- Congratulations! You can now start using your Jira.
Creating your first project in Jira Service Management Data Center
To start, just click on the Create new project option from the top navigation bar.
Just as in the case of Cloud, Jira Service Management for Data Center comes with customizable project templates. You can choose from: the Basic Service Desk, IT Service Desk, and Customer Service Desk templates. After you select one, all you need to do is name your project. The project key will be created automatically.
Setting up request types in Jira Service Management
Whilst setting up request types, consider what your customers will need in the future. Use simple language, don’t make things too complex. Here are some examples of possible requests:
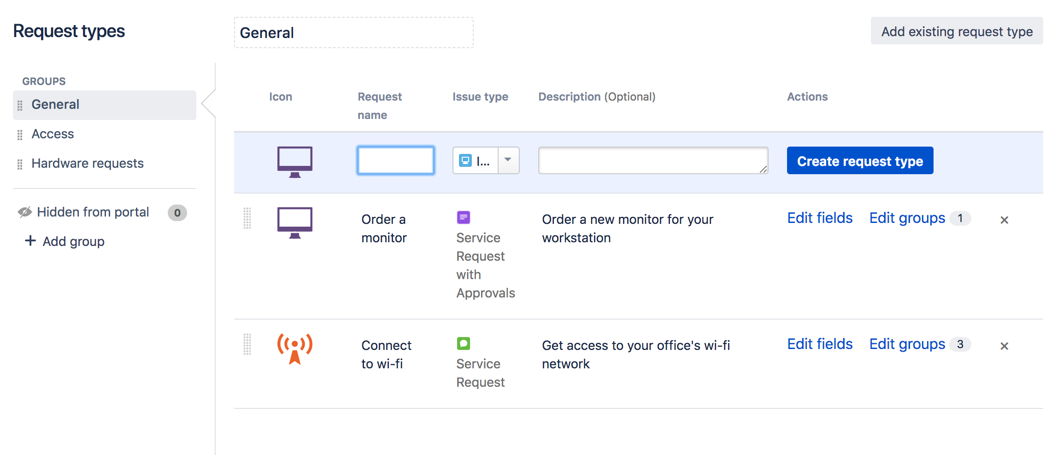
You can edit the fields that customers see, to display the necessary information only. Do it in the Edit fields section, under Visible fields.
Note: It’s possible to manage your requests in groups. Groups are categories assigned to request types. Atlassian advises that it’s best to form a group when you have at least seven requests of a similar type.
Queues in Jira Service Management
Queues are lists of requests that the team needs to care of. You can access them from the Queues section on the project sidebar.
Remember, that Agents can’t add new queues or configure existing ones. This is why Jira Service Management queues allow Admins to automatically prioritize issues. You can also reorder them and set up due dates accordingly.
When it comes to managing queues in large organizations, native JSM functionalities may not be enough. For example, teams have separate queues for each project. This makes it hard for agents handling multiple projects. They waste time switching between queues and might miss requests. This causes chaos and delays.
To solve this, we made Queues for Jira & JSM app. It shows all tickets from Jira Service Management, Jira Software, and Jira Work Management in one place. Teams can easily handle all their tasks and avoid missing anything. They can customize their view and group queues based on their needs.

With Queues for Jira & JSM, migrating queues and columns is quick. You can assign projects and team members to specific queues for better organization and security. You can also control who sees which queues for confidentiality. This makes ticket management easier, and agents can work better.
Adding agents to the service project
There are two roles you can grant at this point:
- Customers who create requests
- The Team that responds to these requests
To add agents, you just invite them to the team. To do this, select Invite Team in your project sidebar. And that’s it. Now, you can assign them requests from previously prepared queues.
Match your Customer Portal to your project’s needs
In Jira Service Management, you have some basic customization options. The tool enables you to add a project name and logo to your Customer Portal, so your customers know for sure they contact the right team.
If you wish to make it more appealing, you need the Theme Extension for Jira Service Management app.
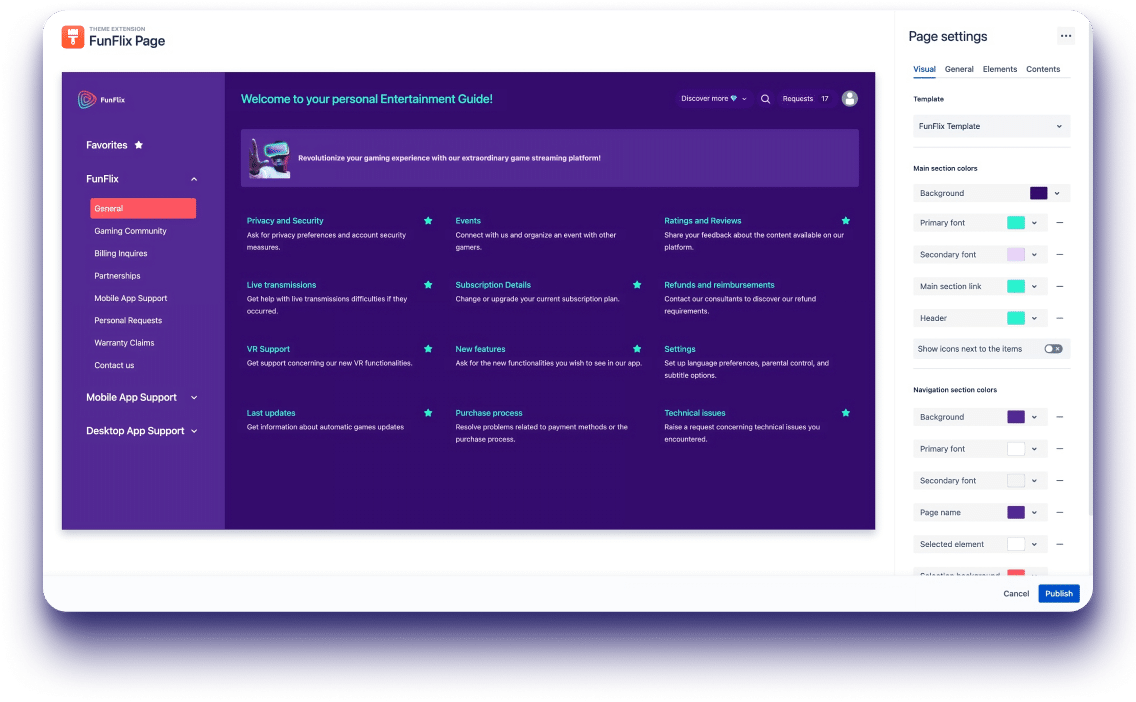
Theme Extension for Jira Service Management
This plugin lets you customize your Help Center with your brand’s colors and logos. You can also add links, a footer, and a flexible Searcher to make it more useful. The best part? You don’t need to know any fancy markup language. Our app has an easy-to-use panel for designing your Help Center.
Plus, Theme Extension offers Templates Gallery, so you can start your customization from pre-made designs. It also lets you create different looks for Customer Portals, which is handy for managing multiple projects at once.
And don’t forget about Permissions feature. It controls who can see your Pages, Projects, Portal Groups, and Request types. You can decide who has access and set restrictions for different users. Sounds interesting?
SLAs, Reports, and a Knowledge Base
You’re almost set up! We can move on to some more advanced features. Here in this article, we would like to briefly describe what else can you do with JSM:
- SLAs – Service-level agreements (SLAs) help you make sure you meet your customers’ expectations on time. They consist of a time metric and a corresponding goal.
- Reports – they can be used to visualize your team’s performance so you can track the progress and optimize workflow.
- Knowledge Base – with the complete Confluence knowledge base, customers can look up the answers to their questions before they contact agents. Besides self-service, it can also be useful when it comes to training newcomers and sharing good practices.
As a Jira Admin, you can set up all these features in your Project settings.
Get started with Jira Service Management Data Center Agents
After you get an invitation, you can move on straight to queues. This is the place where you can display all requests that you need to take care of.
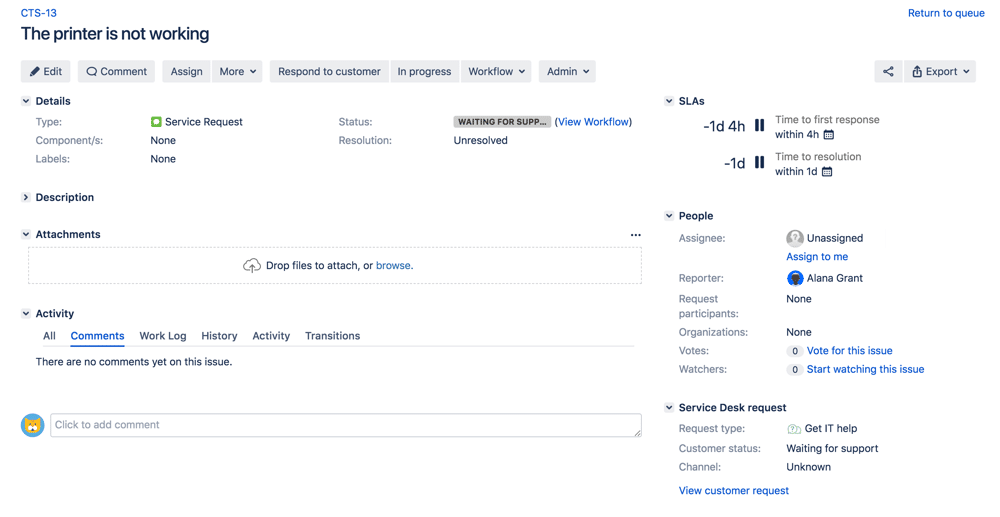
Commenting on issues
When you open an issue from the list, you’ll be able to see its details and comment on them. Comments can be shared with clients or just be visible internally. What’s more, you can add images or other attachments. This comes in handy when you need to explain something more visually. It’s also possible to add emojis and react to comments. It certainly brings a nice touch to the communication.
Of course, if you prefer a more formal style, you can always disable reactions in the global settings.
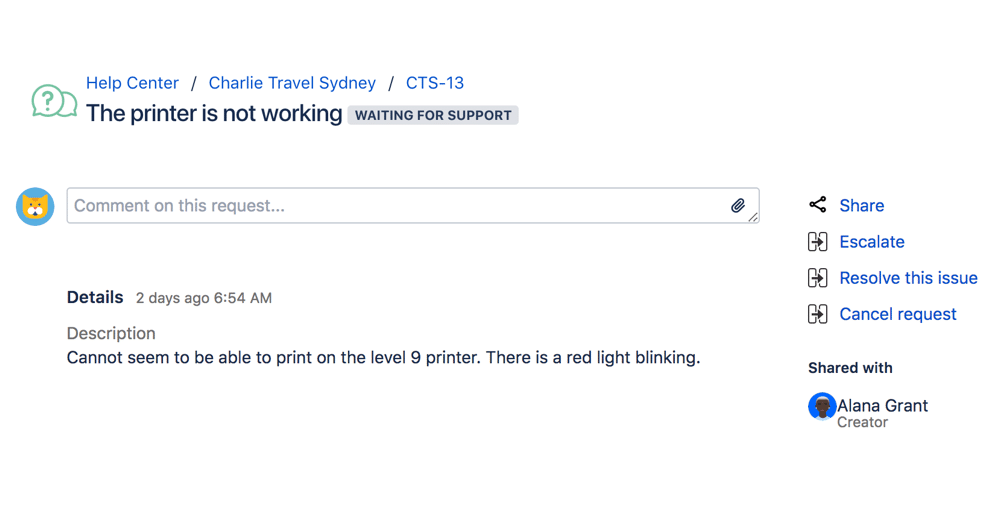
Sharing issues
If you need help in resolving an issue, Jira Service Management got you. The tool allows you to share a problem with one of your colleagues or even with clients who experienced a similar case. There are several ways to do it. You can click the Share button, use mentions (@username), or add watchers or request participants.
Create the Knowledge Base and provide self-service
As an Agent, you’re encouraged to make the most of your knowledge base, but keep in mind that first, you need to ask your Jira Administrator to set up the connection between JSM and Confluence. This allows you to use an auto-search and find out which articles are performing best.
The well-maintained knowledge base helps agents resolve issues faster. With consistent and up-to-date documents, even new agents can get up to the most common problems quickly. This, on the other hand, will allow others to focus on more complex requests.
How to configure a Jira Service Management Portal your customers will love? A 5 step-by-step guide.
Step 1: Organize services clearly
Help your customers quickly find what they need by grouping services logically. Use headings like “Tech Help” or “Billing” so they can navigate intuitively.
Step 2: Simplify request forms
Simplify the process for customers by creating straightforward request forms. Use specific headings and ask only for the information you truly need.
Step 3: Use automation wisely
Improve response time and efficiency with smart automation. Set up automatic replies to let customers know their request is received or update them on their inquiry’s status. Keep the human touch, though! A personalized approach is the key to success in business.
Step 4: Provide helpful FAQs and knowledge bases
Empower customers to find answers independently by providing easy-to-read FAQs. Make your Knowledge Base clear and accessible. Self-service will surely be appreciated not only by your customers but also by agents.
Step 5: Get feedback and improve
Encourage customer feedback! Then, act on the feedback accordingly. This will demonstrate your commitment to making their experience seamless and enjoyable.
Frequently Asked Questions
-
Can Jira be used for service management?
Jira Software is more for software projects. If you’re dealing with service management, you should go for Jira Service Management instead. Atlassian created this tool to help businesses with ITSM and customer service. It supports agents in handling requests and incidents. Jira Service Management comes with customizable service desks, automation, and reporting features. Teams can also extend JSM features with dedicated apps from the Marketplace.
-
What is the difference between Jira Service Management and Jira Service Desk?
In January 2022, Jira Service Desk was rebranded into Jira Service Management. The change reflects a broader focus on service management beyond IT service desks. Jira Service Management is a more extensive platform. It builds upon the foundation of the Jira Service Desk but gives a wide range of ITSM capabilities.
-
Why do you need Jira Service Management for ITSM?
When it comes to customer support in ITSM, responsiveness is crucial. When a company is quick to help and gets things done on time, it makes customers happy. It also shows that the company can be trusted and is reliable. This good reputation brings in more customers and helps the company stay ahead of others. Plus, when there are problems, solving them efficiently keeps the company’s image positive.
-
What are Jira Service Management ITSM capabilities?
How exactly the tool can help you manage your ITSM processes? Let’s break down what Jira Service Management can do for you:
Request Management
- Efficiently handle service requests from customers or departments.
- Simplify the issue submission, approval, and fulfilment processes.
Incident Management
- Quickly respond to and resolve issues reported by users.
- Organize incidents based on severity and impact on business operations.
Problem Management
- Identify and address the root causes of repetitive incidents.
- Prevent the recurrence of known problems.
Change Management
- Manage and control changes to IT infrastructure and services.
- Ensure that changes don’t impact service quality negatively.
Asset Management
- Track and manage IT assets throughout their lifecycle.
- Optimize asset usage, reduce costs, and ensure compliance with policies.
Configuration Management
- Maintain a detailed and updated record of configuration items (CIs).
- Help understand the dependencies among different components of the IT infrastructure.
Knowledge Management
- Create and organize a centralized knowledge base.
- Support users and agents with easy access to information, FAQs, and solutions.