A Guide to Forms & Dynamic Forms in Jira Service Management
Updated on February 16, 2024
Are you tired of long, overly detailed forms with questions unrelated to your situation?
If you were to honestly answer this question from your customer’s perspective, what would you say?
More importantly, could you say you do everything to reduce your Jira Service Management forms’ length and improve their readability?
If not, don’t worry. That’s what this article is here to do. Learn everything you need to know about dynamic forms in Jira Service Management and how they can transform your service request process.
This article will guide you through creating more efficient, user-friendly forms that not only enhance the user experience but also streamline the information collection process for your team. Get ready to simplify your forms, boost customer satisfaction, and improve your service management workflow with dynamic forms.
What are forms in Jira Service Management?
Forms in Jira Service Management are customizable interfaces you can use to collect data from users. They help with the creation and management of service requests, incident reports, and more.
They serve as a structured way to gather necessary information from requestors. That way you can make sure that service teams have all the details they need to resolve requests.
We can categorize Forms in Jira Service Management into two main types: static forms and dynamic forms. Each type serves a different purpose and offers different levels of interactivity and customization.
Static forms
Static forms are the most basic type of forms used in Jira Service Management. They consist of a predetermined set of fields that collect specific information from users. These fields don’t change based on user input; they remain constant regardless of how the form is filled out.
Characteristics of static forms:
Fixed structure
The layout and the fields of the form are predefined and don’t adapt based on the user’s responses.
Simplicity
These forms are straightforward to create and fill out. They’re suitable for straightforward requests that don’t require conditional logic.
Wide application
Static forms are useful for collecting standardized information where the requirements are clear and unchanging. Examples include contact details, simple service requests, or basic incident reporting.
Dynamic forms
Dynamic forms, on the other hand, are more advanced and interactive. They can change in real-time based on the inputs or selections made by the user. This adaptability is made possible through conditional logic. Using it, we can show or hide fields, change field options, or even alter the form’s flow based on the user’s responses.
Characteristics of dynamic forms
Conditional logic
Fields can appear or disappear based on previous selections. It makes the form more relevant and less overwhelming for the user.
Enhanced user experience
By only presenting relevant fields, dynamic forms streamline the submission process. It improves user satisfaction and the quality of submitted data.
Complex data collection
Ideal for complex service requests or incidents that require a more nuanced understanding or varying information, based on the situation.
Customization
They can be customized. It enables organizations to tailor the form precisely to their process requirements.
Comparison and use cases
Static forms
Best suited for straightforward, routine requests where the information needed is always the same. Examples include basic helpdesk requests, employee onboarding forms, or vacation requests.
Dynamic forms
Ideal for situations where the information required may vary significantly depending on the context of the request. Examples include:
- IT service requests that differ based on the type of service,
- bug reporting where the information needed changes based on the software component affected,
- facilities requests that vary by location,
- collecting feedback from users.
What’s worth mentioning, native JSM forms can be quite limited. Depending on the complexity of your project, you may want to integrate apps from the Atlassian Marketplace. Let’s see an example and learn how these apps may differ from native forms.
| Feature | Native Jira Service Management Forms | Extension for Jira Service Management: Dynamic Forms |
| Custom field types | Standard fields such as text, number, date, checkboxes, and dropdowns. | Offers additional types, including attachment fields, providing enhanced data collection capabilities. |
| Conditional logic | Basic support. There are only choice fields available, with one condition to use “is equal”. | Supports a wide range of conditions, allowing for more complex logic, including multiple conditions for showing field(s). |
| Integration with Jira Workflows | The need to map form fields to Jira fields. | Enhanced integration, with no need to map form fields to Jira fields, using native fields directly. |
| Data validation and formatting | Basic validation based on field type (e.g., required fields, date formats). | Advanced validation options, including custom validation rules for complex data integrity checks. |
Where can forms be used?
In Jira Service Management, there are three places where you can use forms.
Creating new issues
You can use forms to create new issues in Jira Service Management. Using links to forms, team members can submit information even outside the customer portal. This feature is particularly useful for internal processes or when collecting information from users who might not have access to the customer portal.
This option is limited to admins, agents, and collaborators in a Service Desk Team role.
Adding to existing issues
You can add forms to the issues that are already created. Agents or admins can add them to collect additional information or to follow up on specific details. This is useful for situations where you need more data during the issue resolution process.
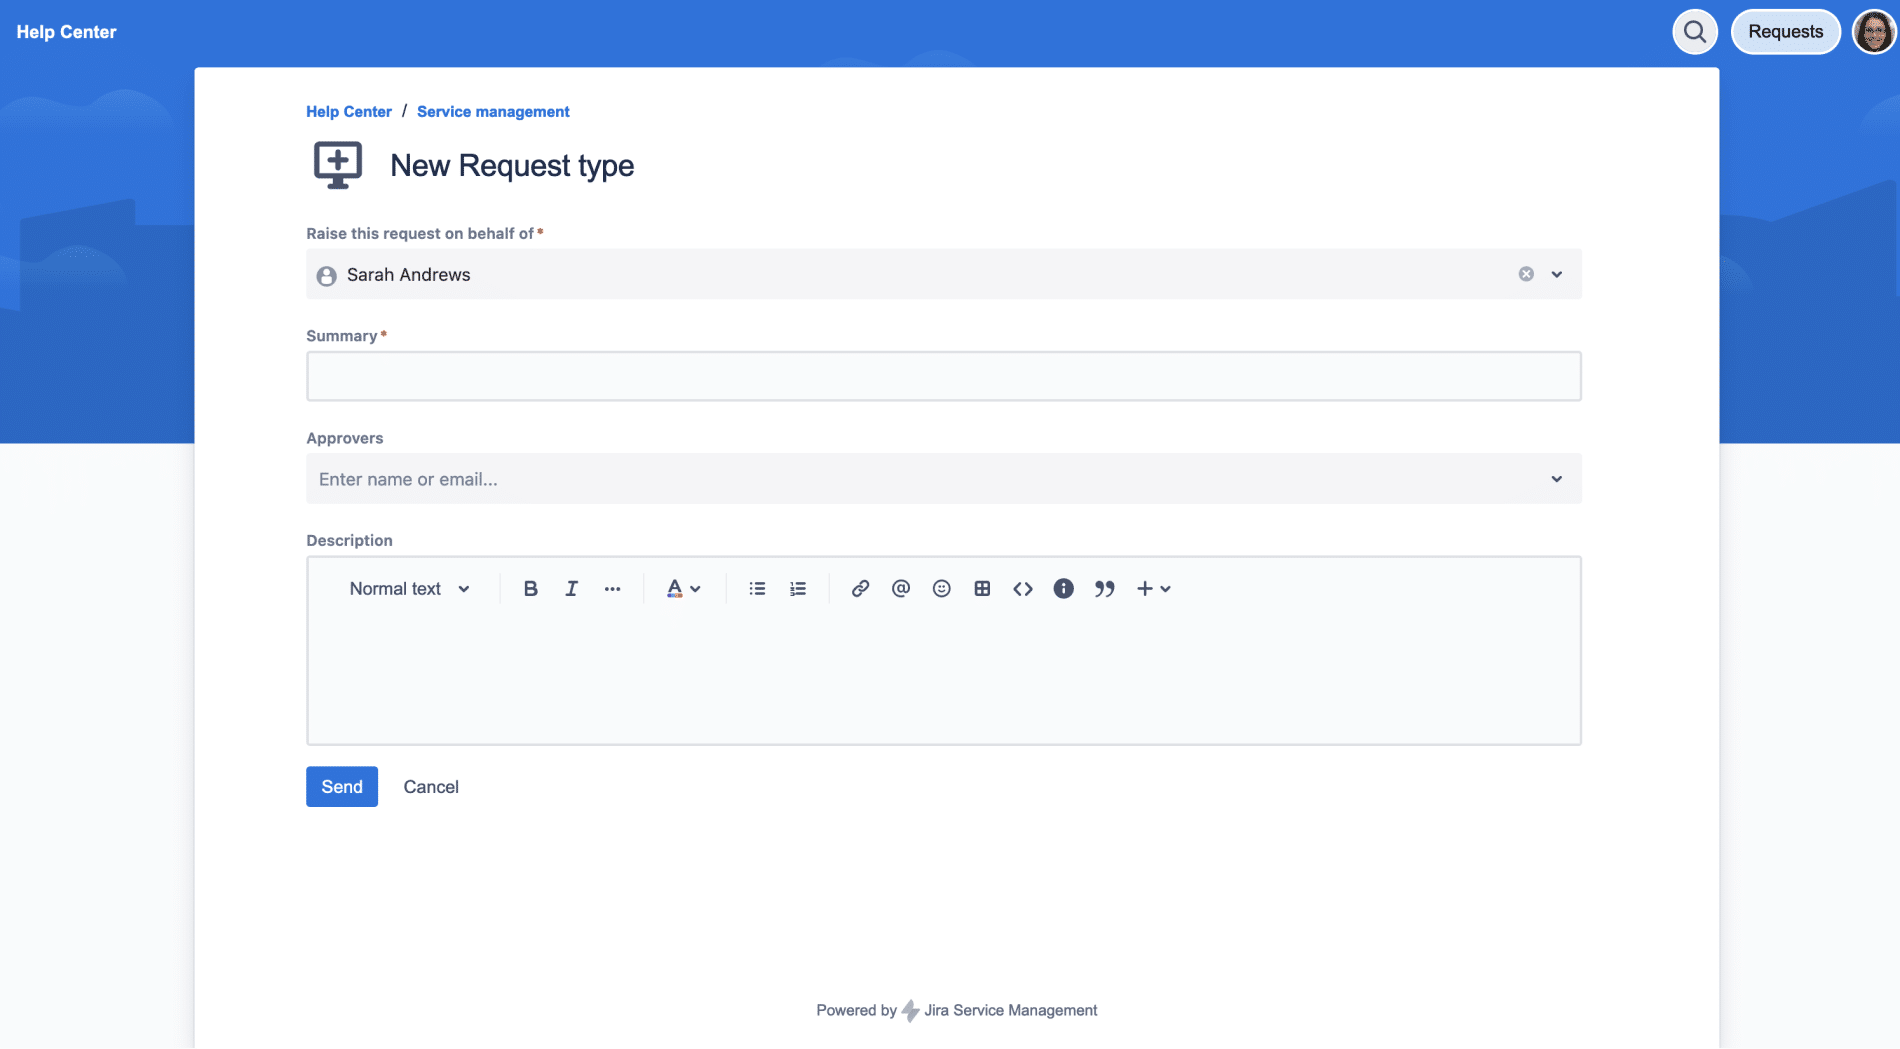
Request forms for customers
You can also integrate forms into the service request process. When customers go to raise a request in the portal, the form will appear as part of the request form for them to fill out. This method helps in gathering detailed information right when the request is made. It ensures clarity and completeness of the request details.
How to create forms in Jira?
It depends if you want to create static or dynamic forms. We prepared instructions for both of these scenarios.
How do I create a request form in Jira Service Management?
To create a static request form native to Jira Service Management, follow these steps:
Step 1: Access project settings
- Navigate to your service project in Jira Service Management.
- Click on Project settings at the bottom of the project sidebar.
Step 2: Configure request types
- Within Project settings, select Request types.
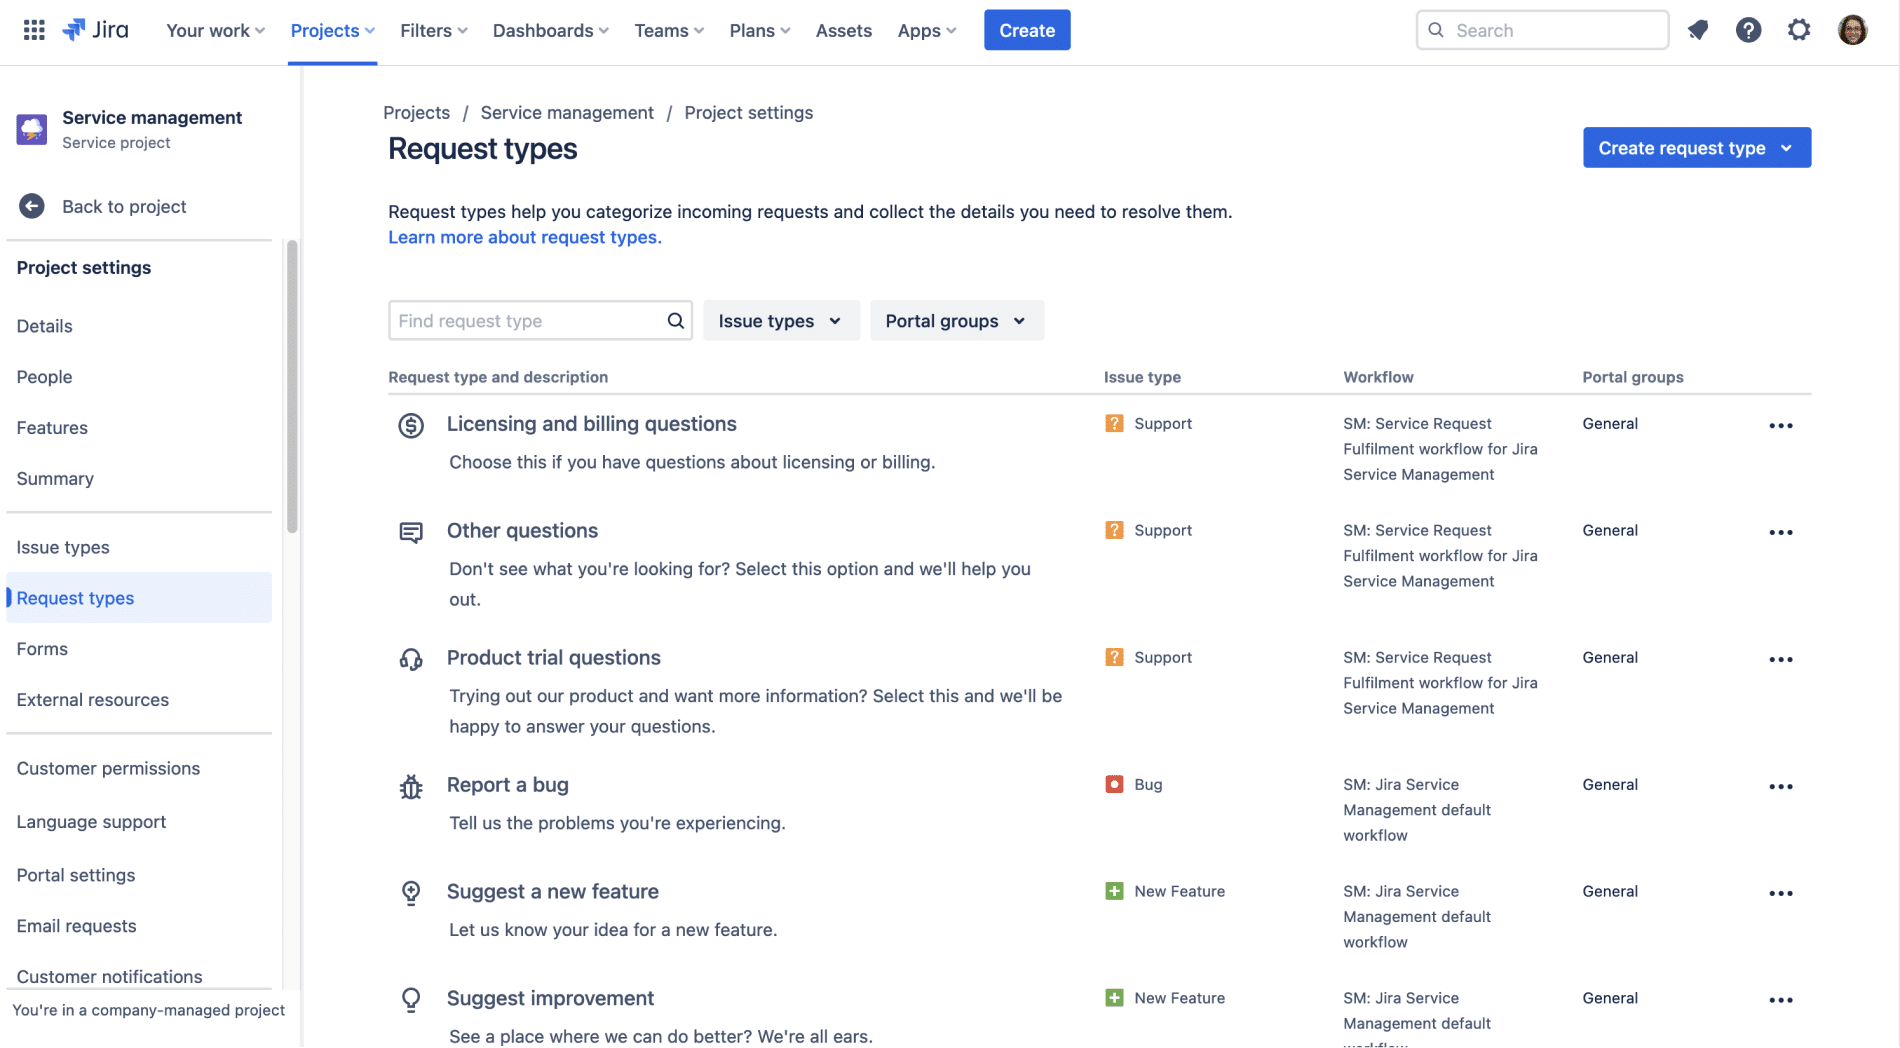
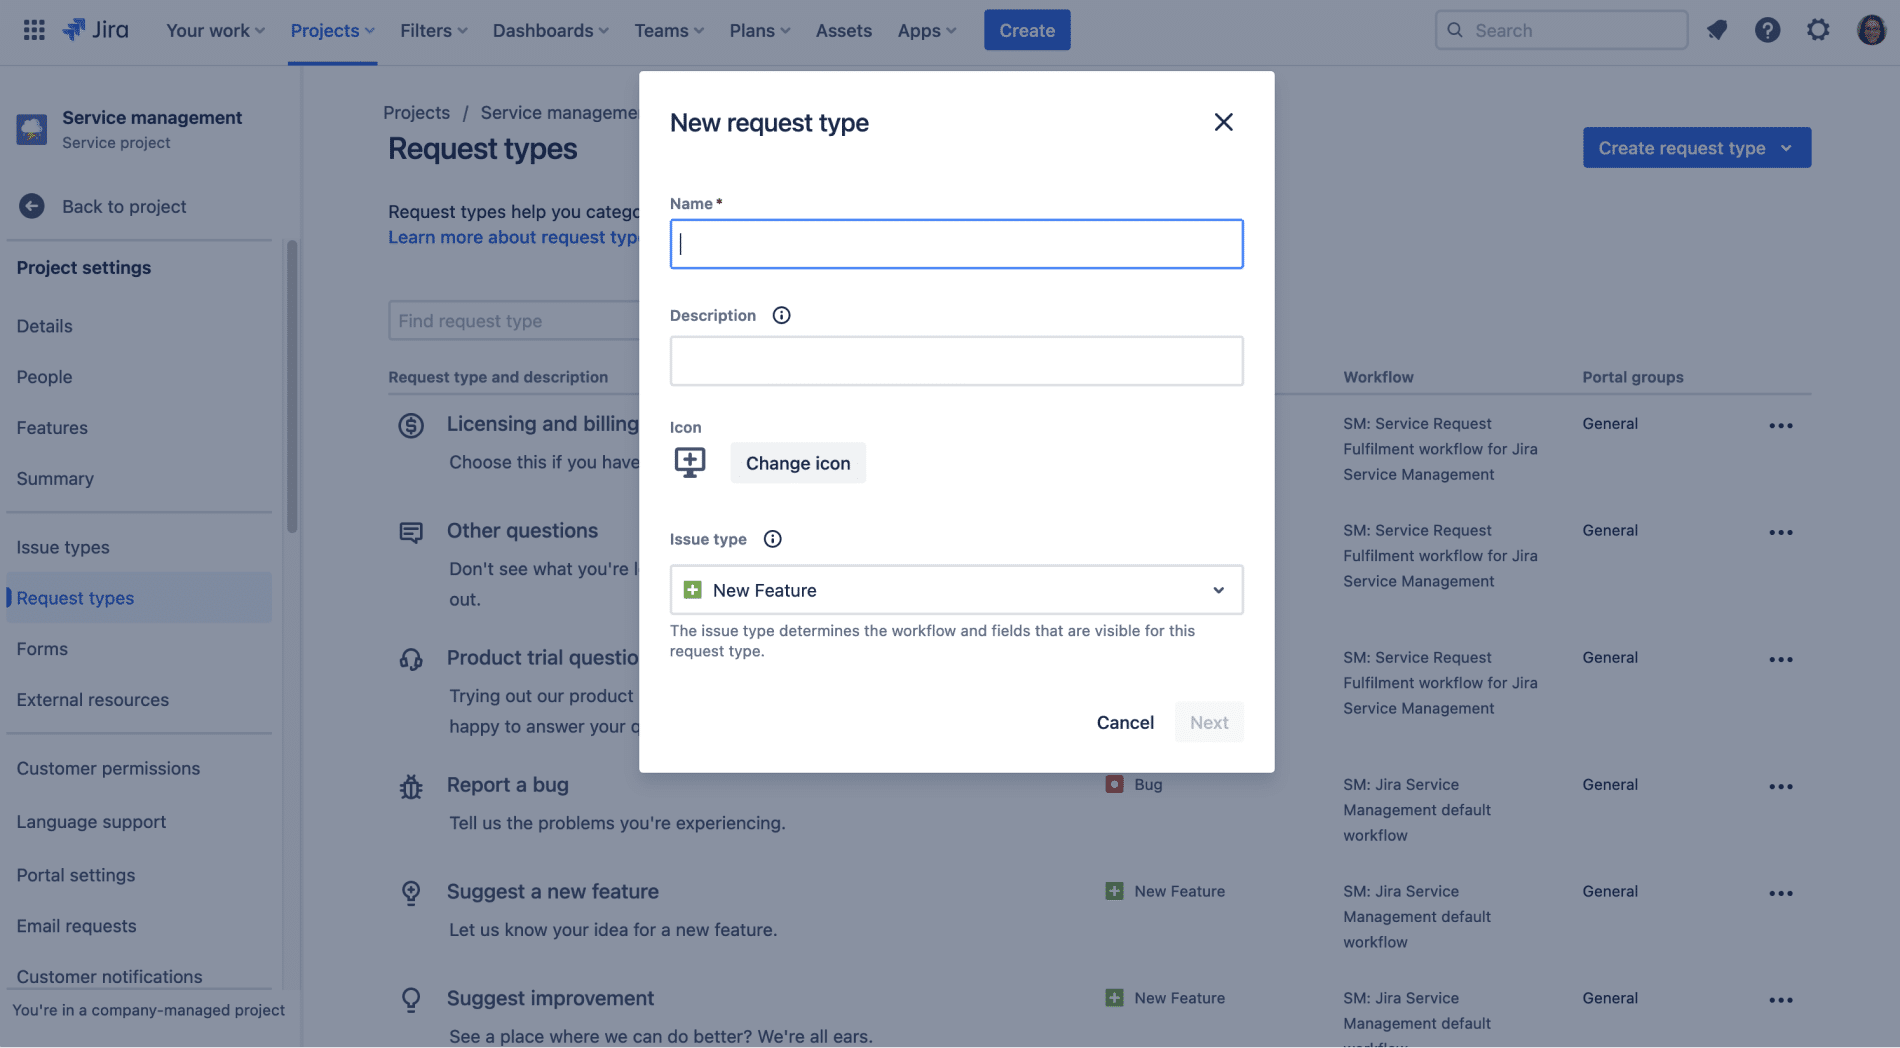
- Choose an existing request type to modify or click + Create request type to create a new one.
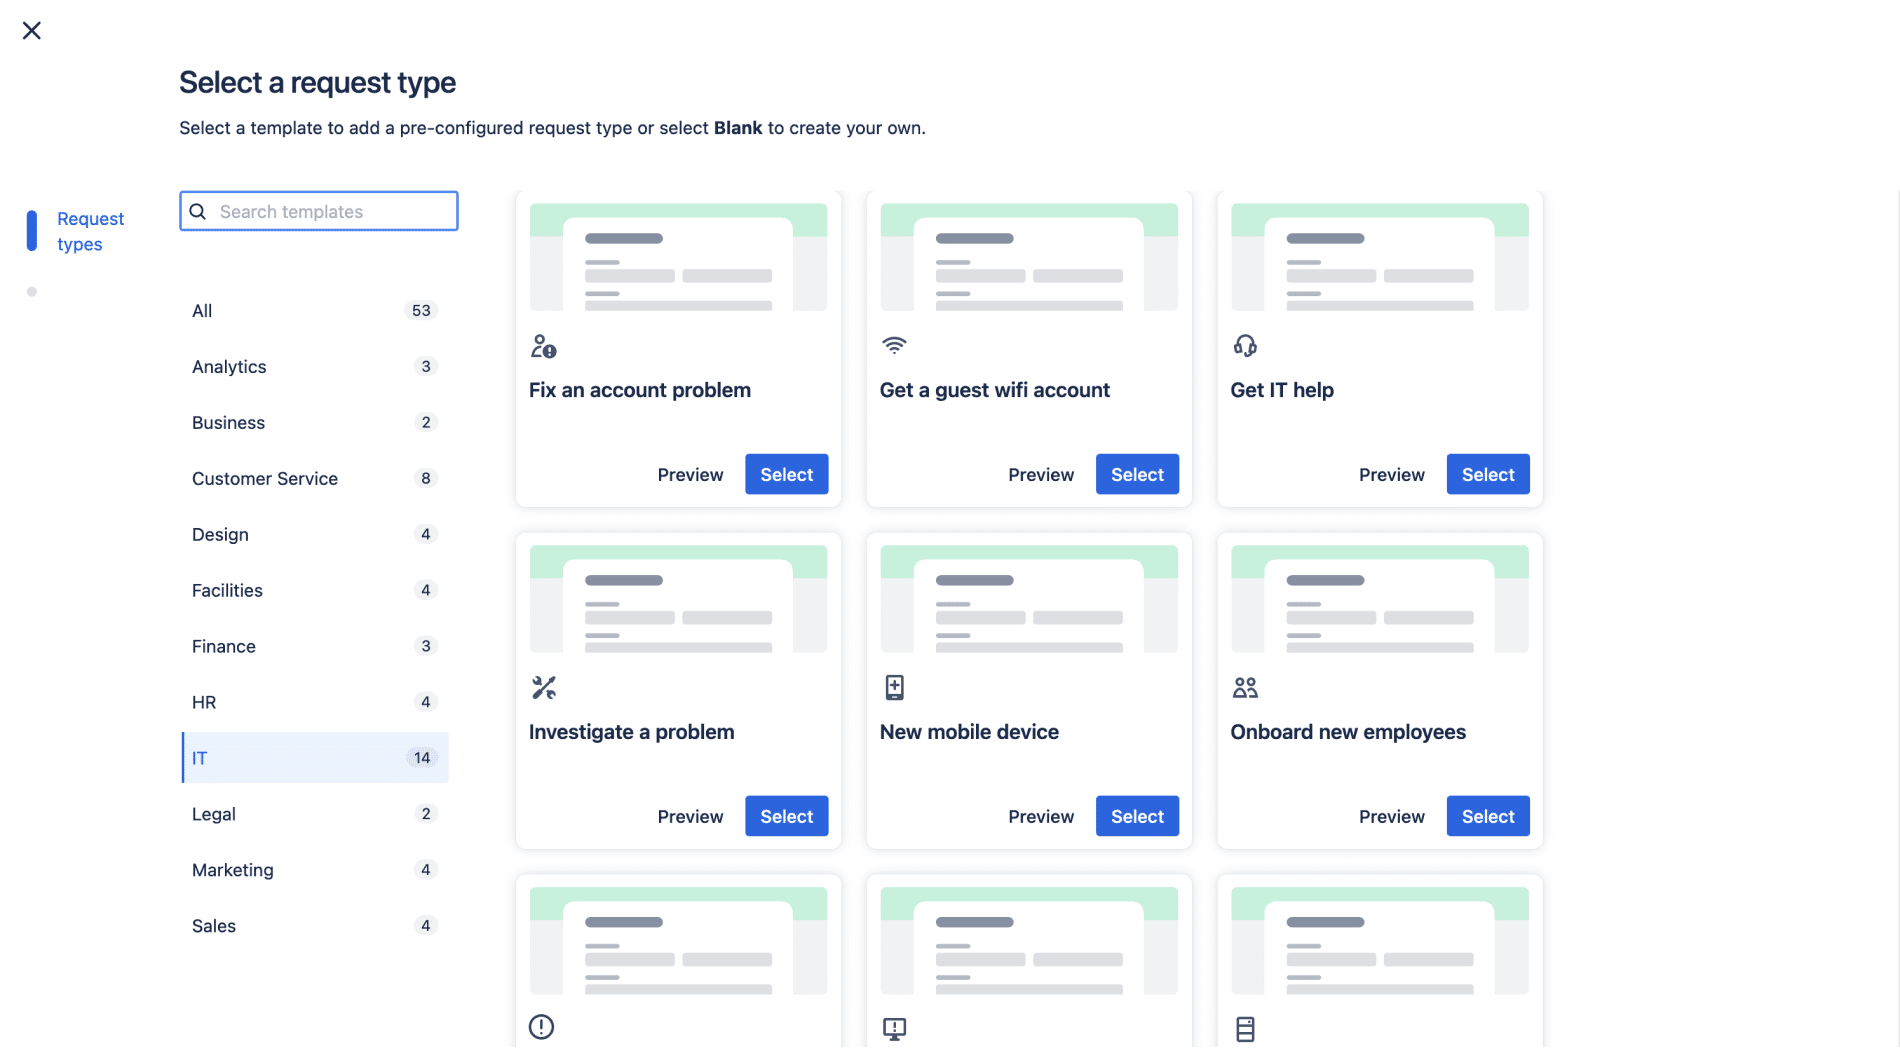
- Then, click on the Create request from template or Create blank.
- This area allows you to manage which fields appear on the customer’s request form.
Step 3: Add, arrange and configure fields
- Choose the right fields from the Fields panel and drag them to the right place.

- Drag and drop fields to arrange the order in which they appear on the form.
- Configure each field by setting it as required or optional, based on the information you need to collect.

Step 4: Save changes
- Once you’ve added and arranged all necessary fields, click Save to apply the changes to your request form.
Step 5: Preview and adjust
- Use the View option available in the request type settings to see how the form will appear to customers.
- Make any necessary adjustments to ensure the form is clear and captures all required information.
How do I create a dynamic form in Jira Service Management?
Creating dynamic forms natively within Jira Service Management involves using the built-in capabilities of Jira’s Forms feature (formerly known as ProForma), which allows for conditional logic and more interactive forms. Here’s how to create a dynamic form.
Step 1: Access your project
- Navigate to your Jira Service Management project.
Step 2: Open project settings
- Click on Project settings located at the bottom of the project sidebar.
Step 3: Locate forms
- In the Project settings menu, select Forms. This section is where you manage and create forms.
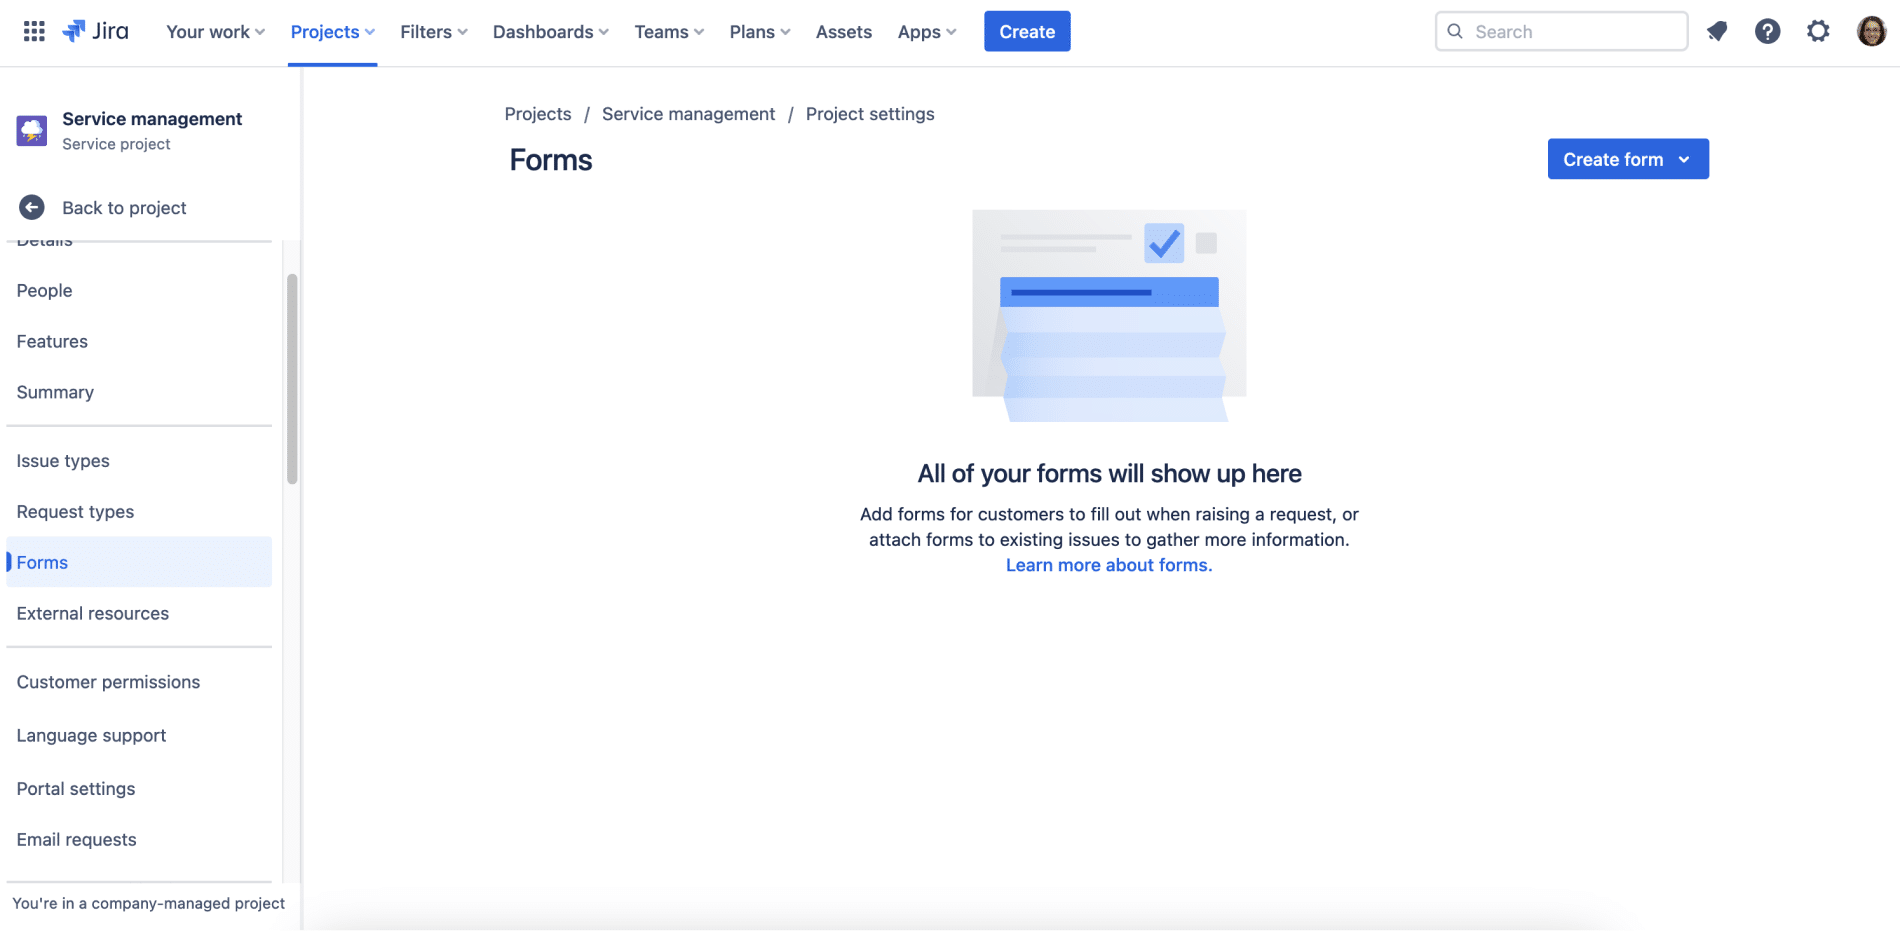
Step 4: Create a new form
- Click on Create form to start building a new form. You’ll be prompted to choose between Create from template and Create blank and then to name your form and describe it.

Step 5: Add fields to your form
- Use the form builder to add fields to your form.

Step 6: Put in place conditional logic
- For fields that should only appear based on specific conditions, set up conditional logic.
- You can do that by clicking on the Add section tab. Then, in the Show section check Conditionally.
- Define the conditions under which the field should be displayed. You can only use choice fields with the ‘is equal’ condition in native forms.

Step 7: Organize your form
- Arrange the fields in a logical order. You can group related fields and use section headings to make the form easier to navigate.

Step 8: Test your form
- Preview the form to see how it works. Fill it out as if you were a user to ensure that the dynamic elements function correctly and that the form collects information as intended.
Step 9: Save and implement the form
- Once you’re satisfied with the form, save your changes.

- Add the form to the appropriate request types or make it available for use in your service project as needed.
Step 10: Monitor the form
- Monitor the form’s usage and gather feedback to make any necessary adjustments.
How do I create a dynamic form in Jira Service Management using the Extension app?
Extension for Jira Service Management is available on Cloud and Data Center.
The Cloud version of the app also involves only 3-step setup of Dynamic Forms. It goes as follows:
- First, add a dynamic field.
- Then, configure conditions.
- Finally, configure validators.
Let’s go through the process step-by-step.
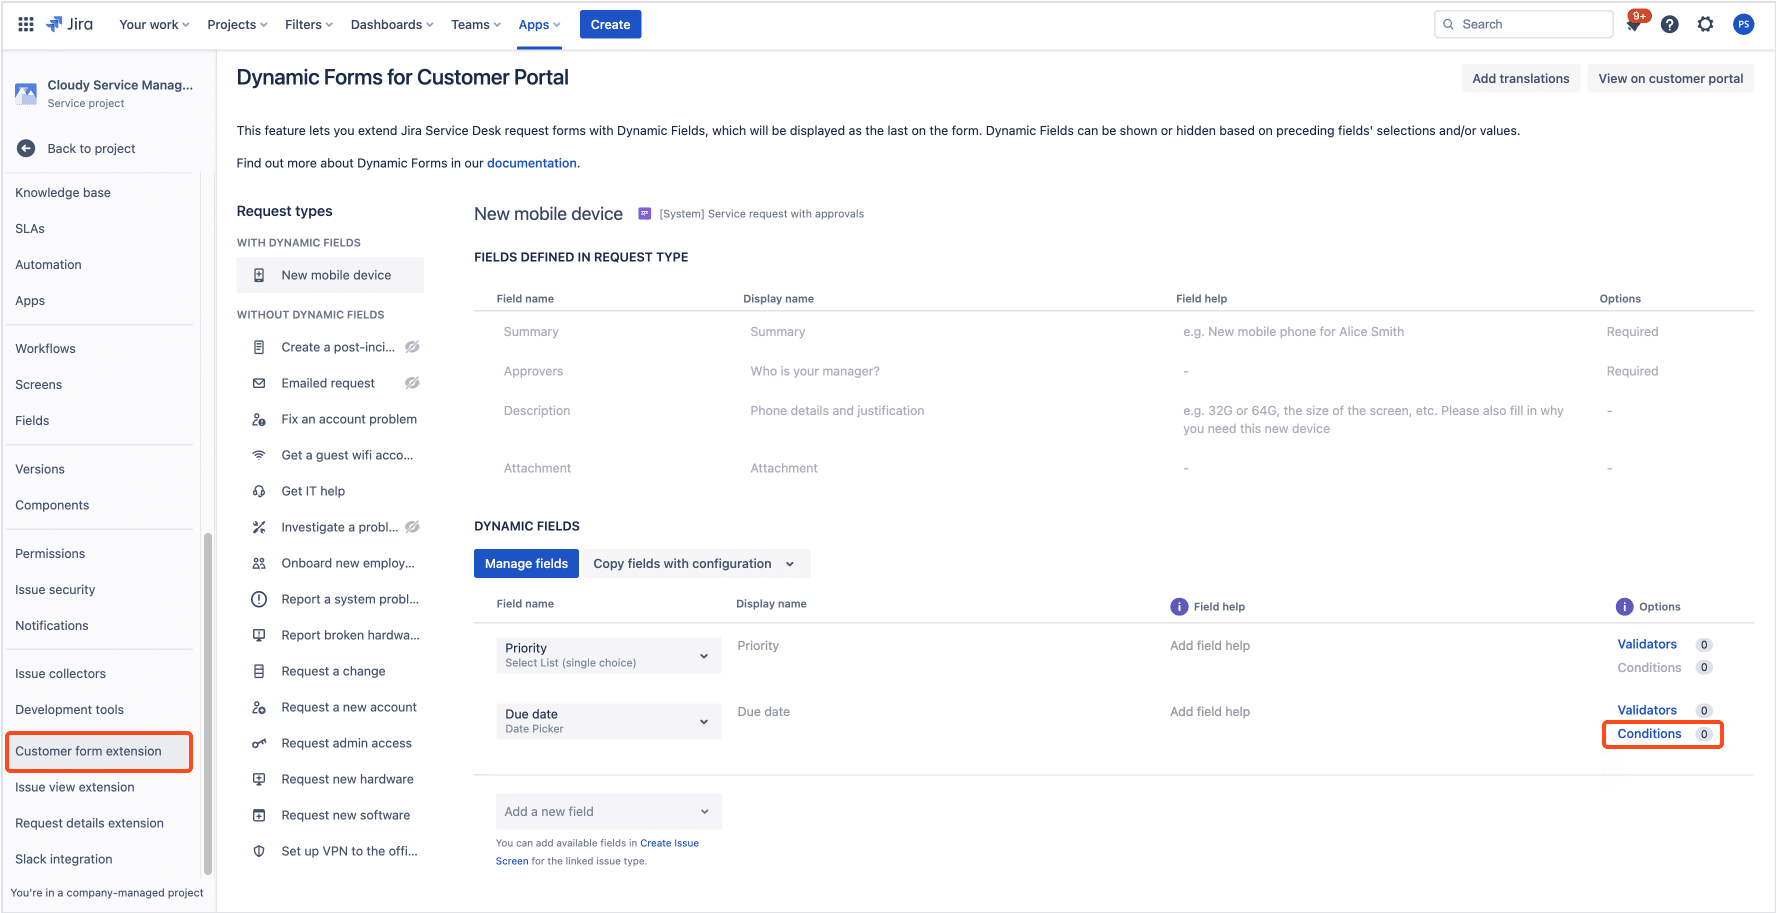
Step 1: Access project settings
Firstly, go to Project settings and then the Customer form extension. Choose a request type from the list available there.
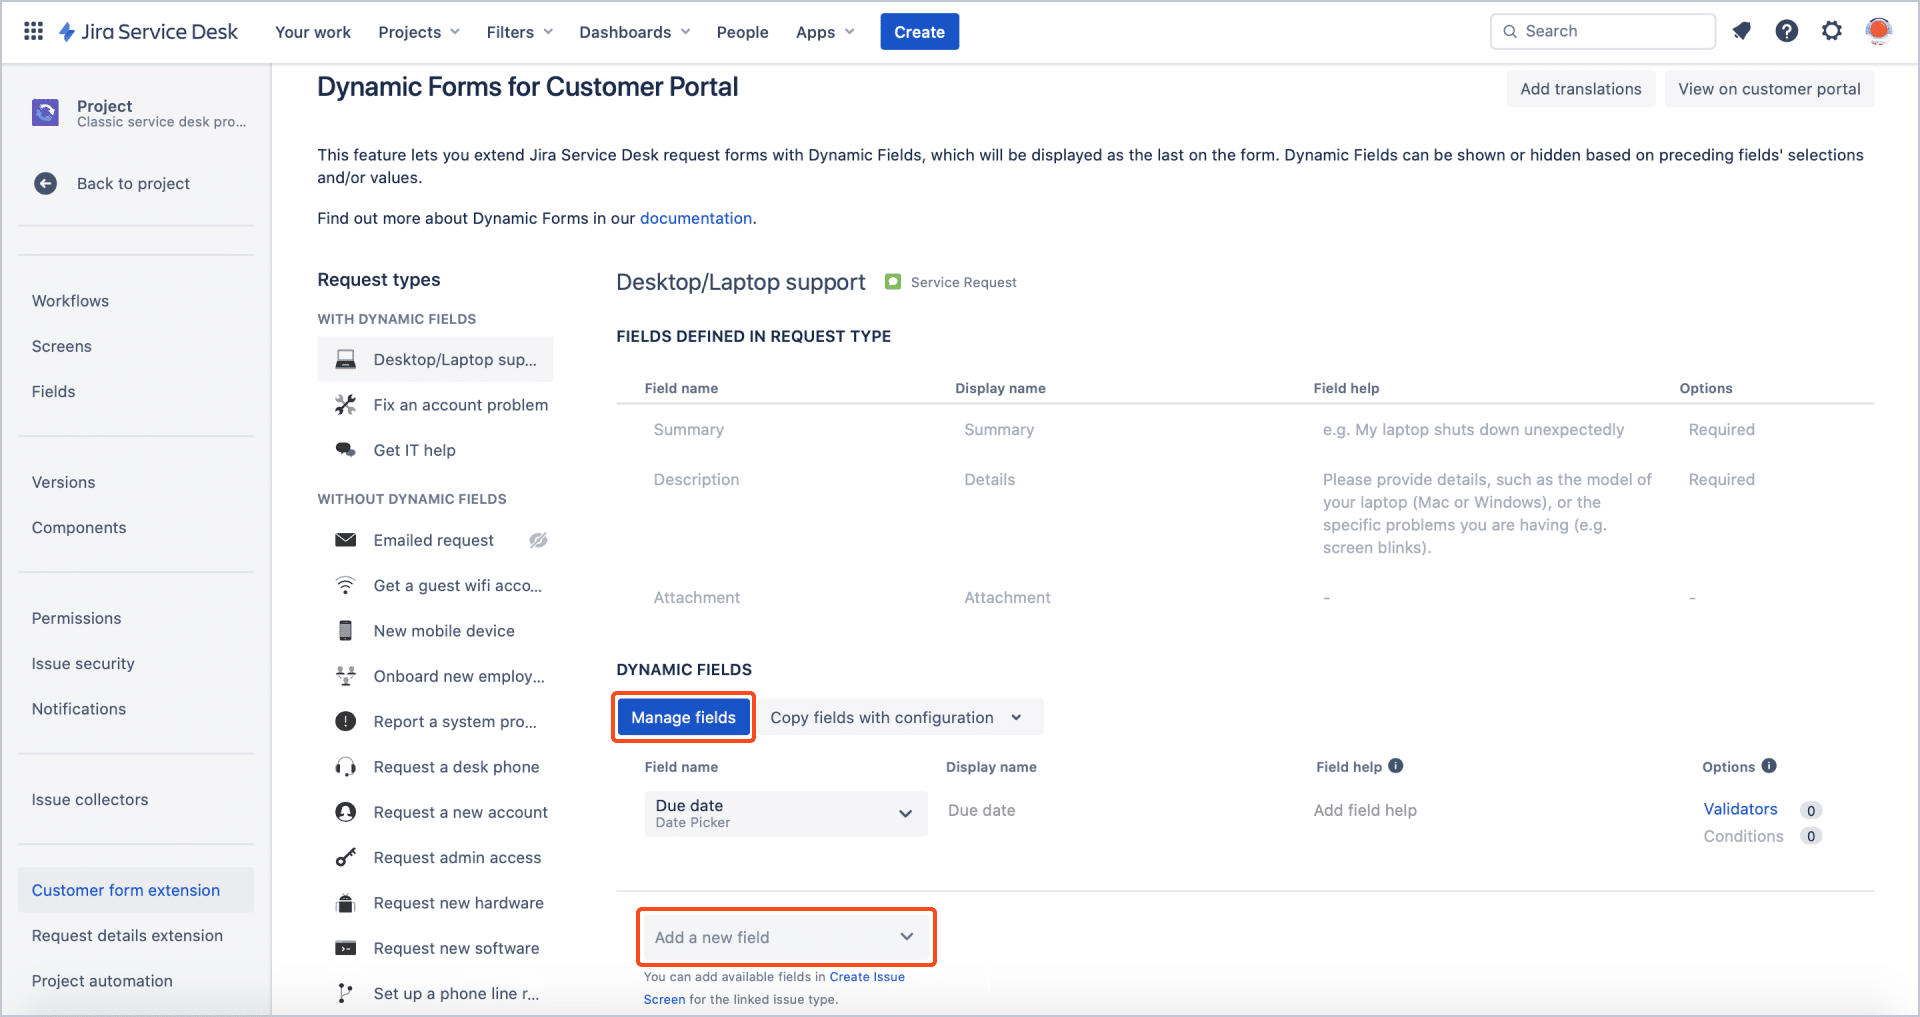
Step 2: Choose the dynamic field
In the second step, you need to choose the dynamic field and then click on Add a new field. Once clicked, the field is automatically added.
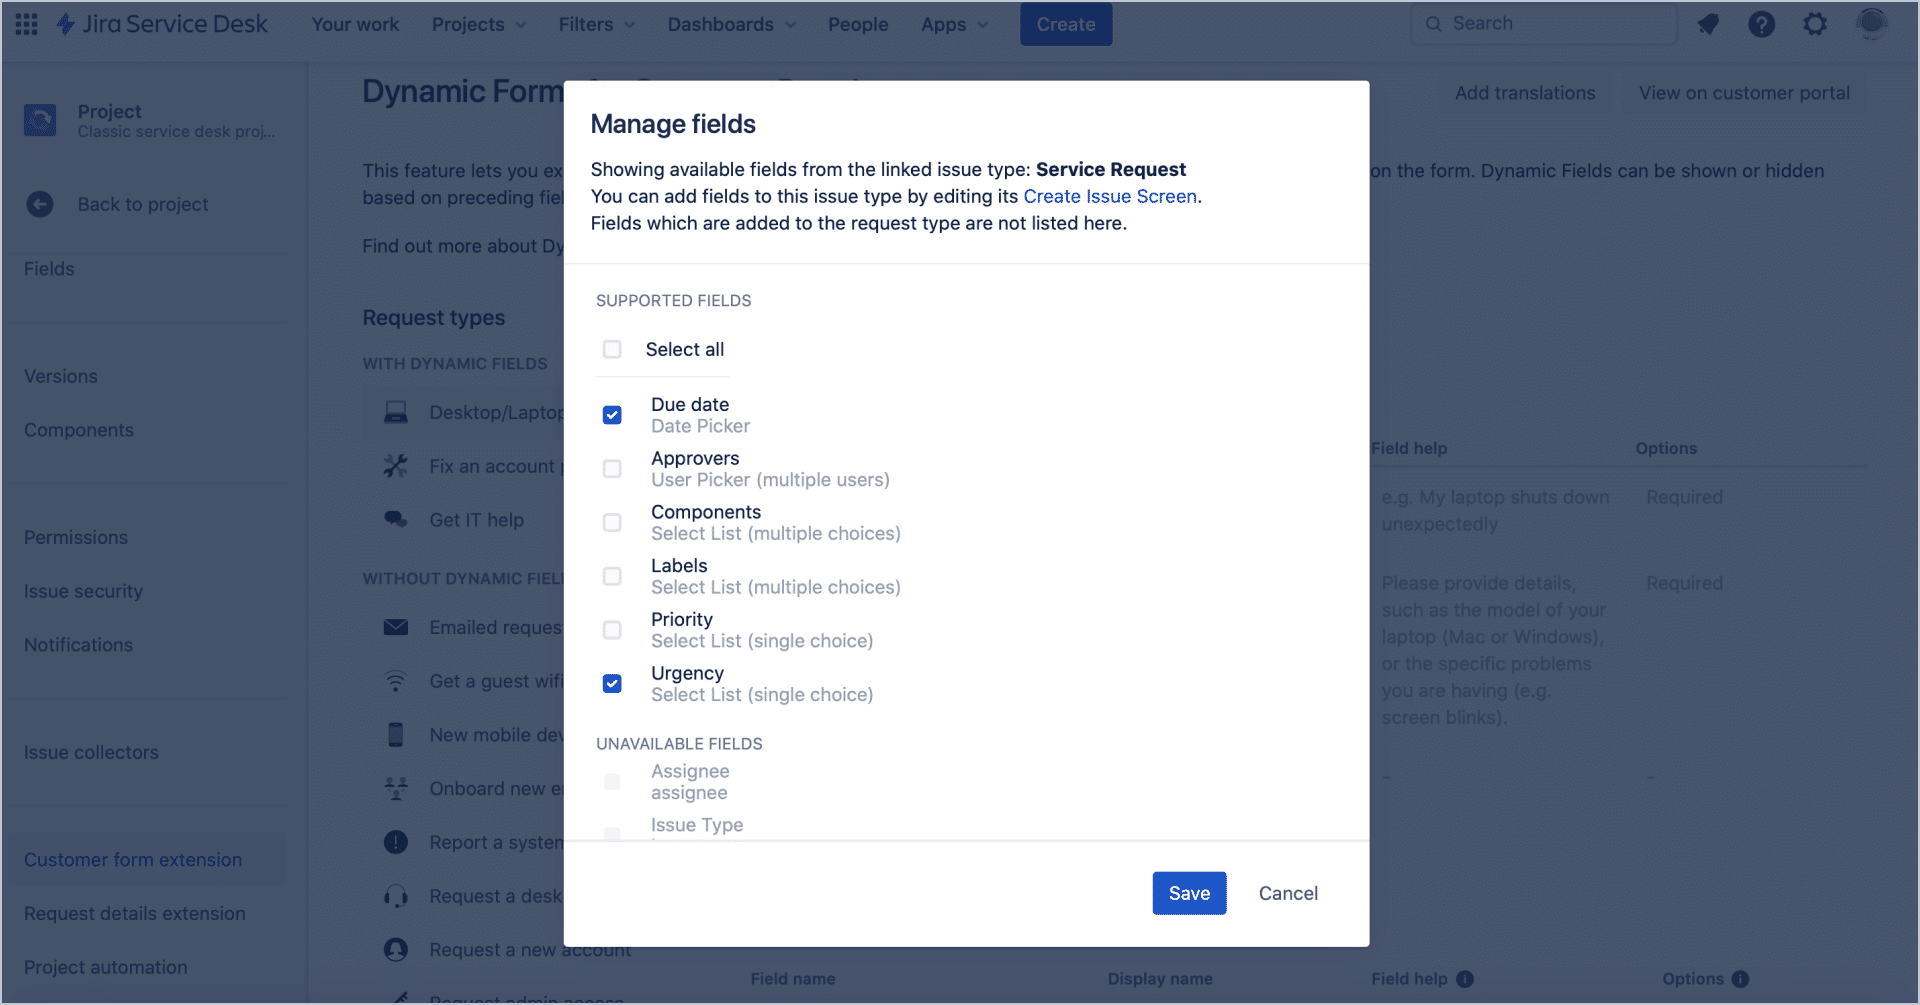
Next, click on Manage fields.
When the new dialog box shows up, you can either manually pick the appropriate field or click on Select all.
Step 3: Add name and field help
Next, you can name the dynamic field and add Field help to it. The latter helps users understand what they need to input in the field.
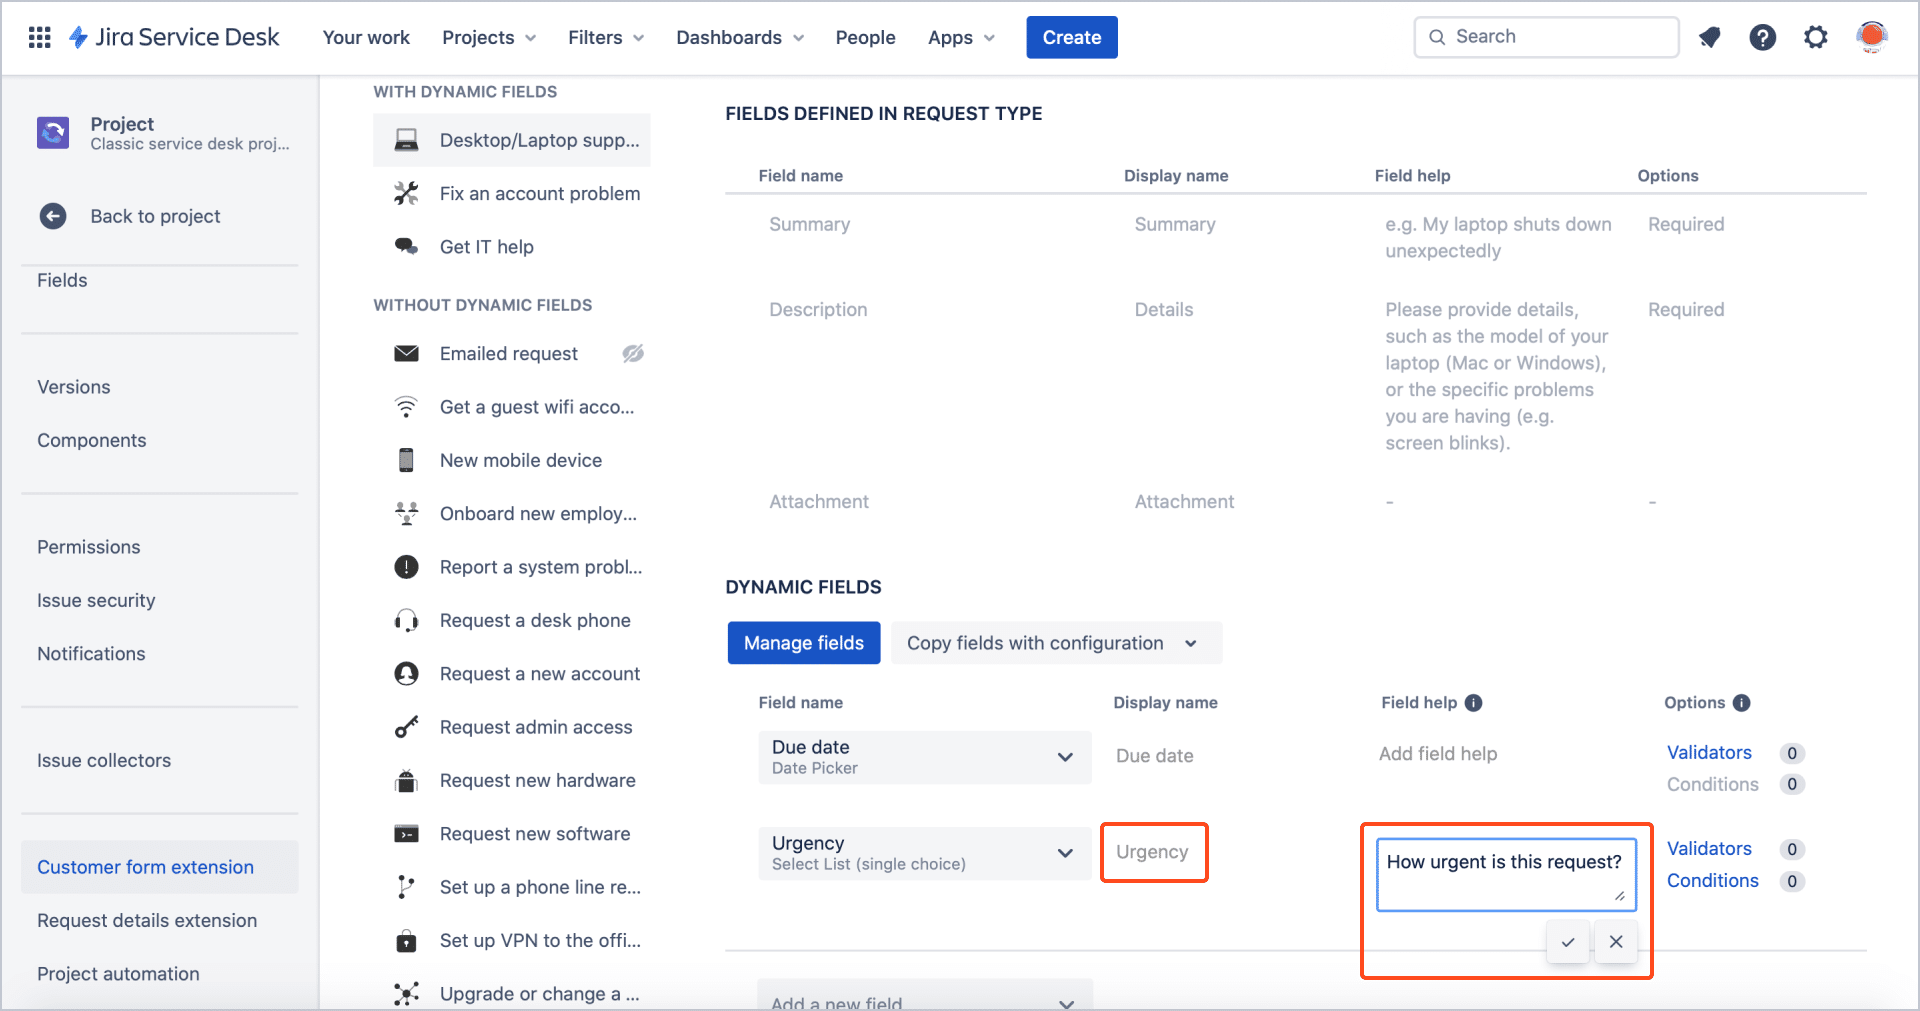
Step 4: Arrange the dynamic fields
Lastly, you can use drag and drop to arrange the dynamic fields you created.
Learn more in the app’s documentation.
Step 5: Configure the field conditions
Firstly, click on Conditions.
Once the dialog box shows up, choose the field which value you want to compare.
Then, add a condition and type its value in the box to the right. Click Save.
You can see an example below:
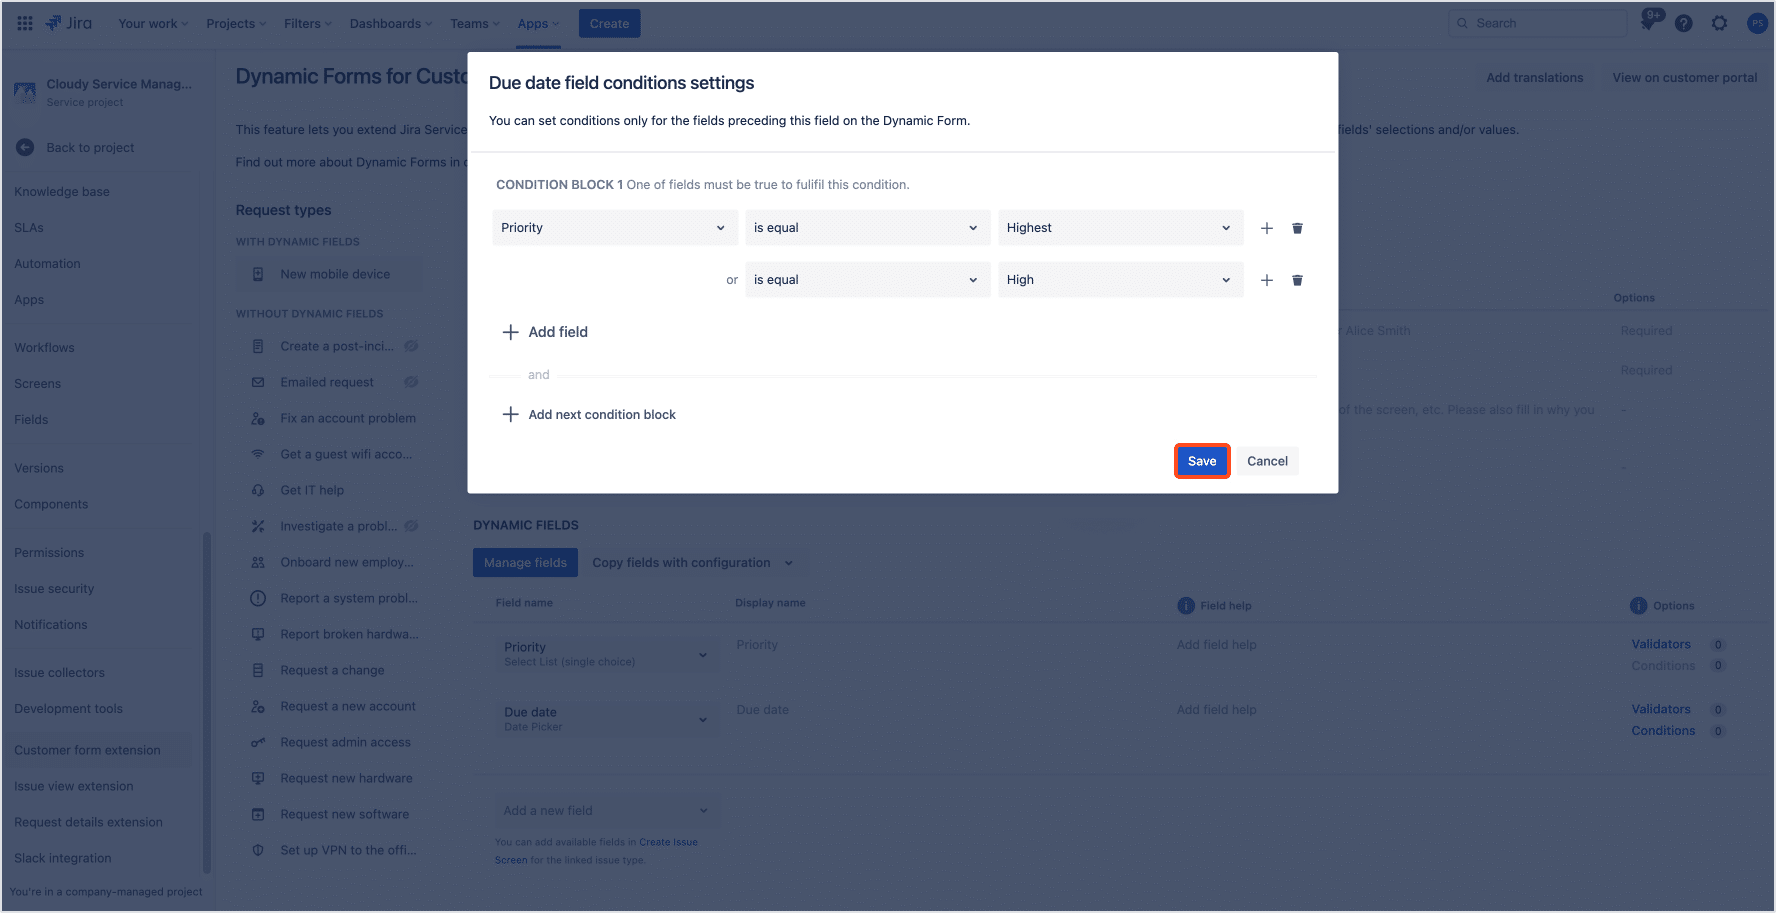
Repeat the process to add more conditions.
See the list of all available conditions here.
Step 6: Configure the field validators
Click on Validators.
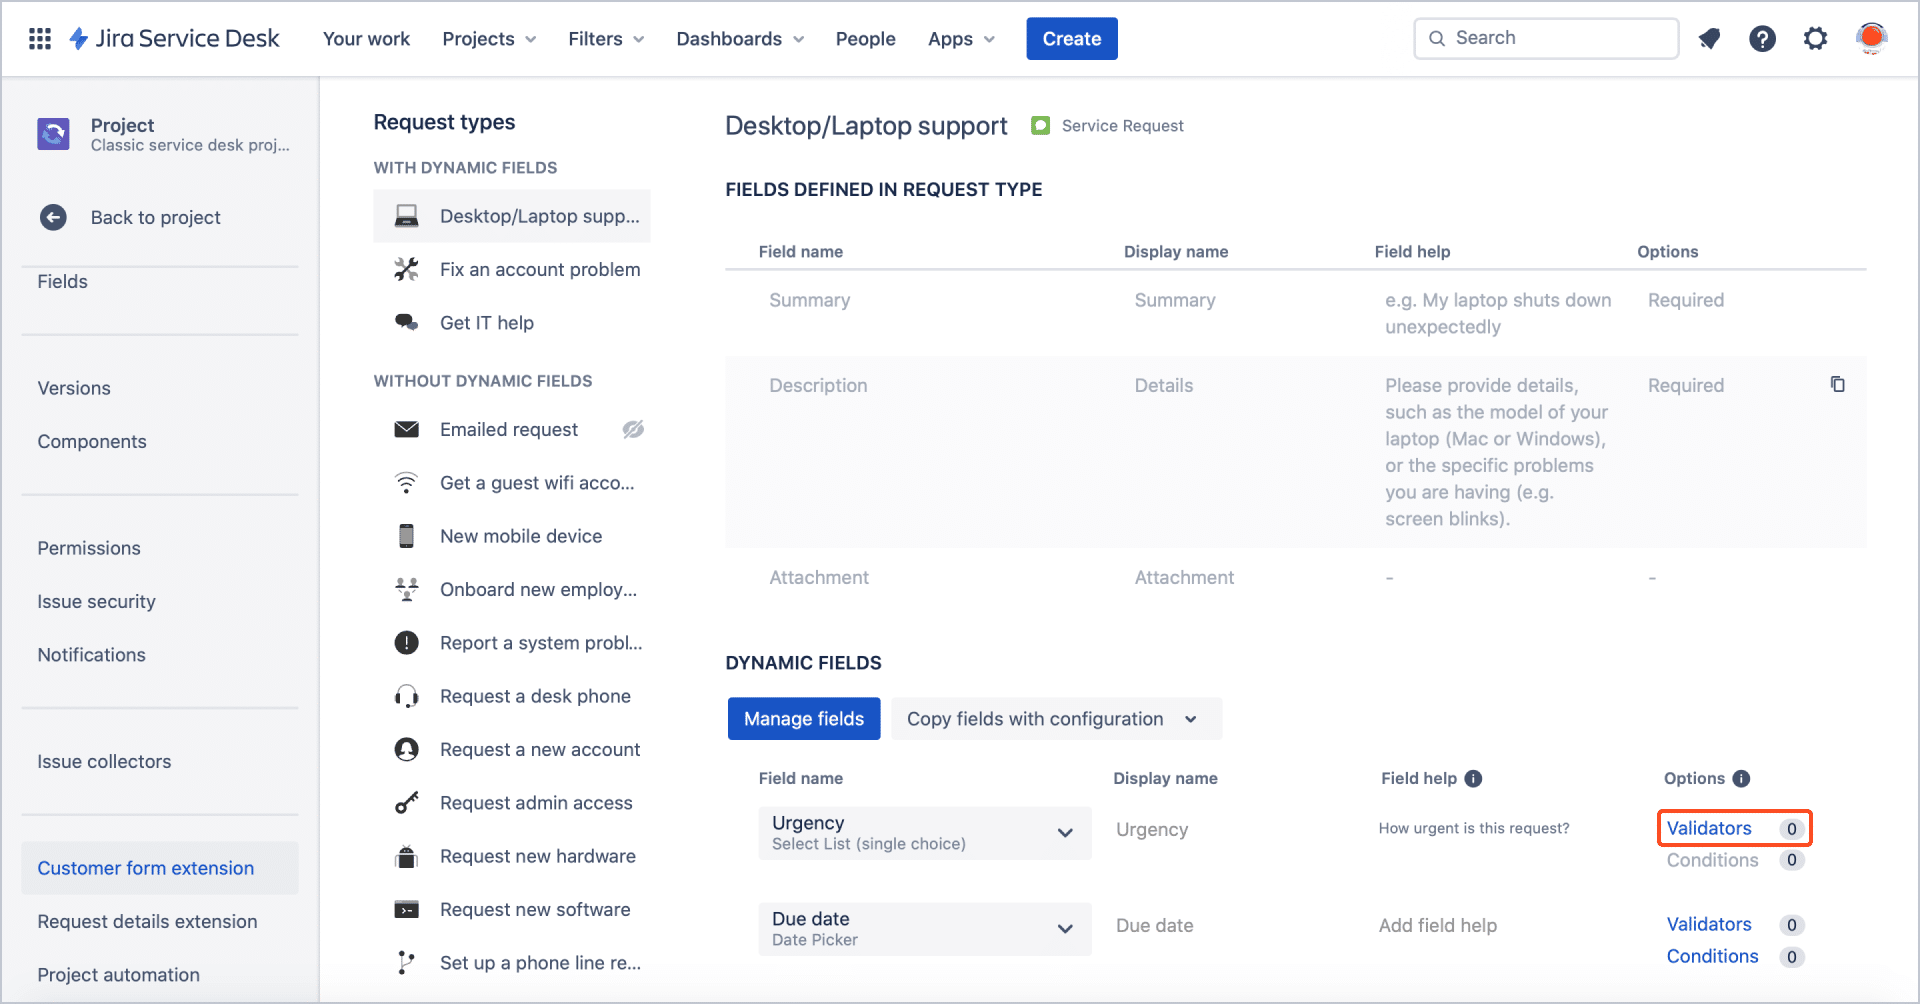
Once the dialog box pops up, select Rule name.
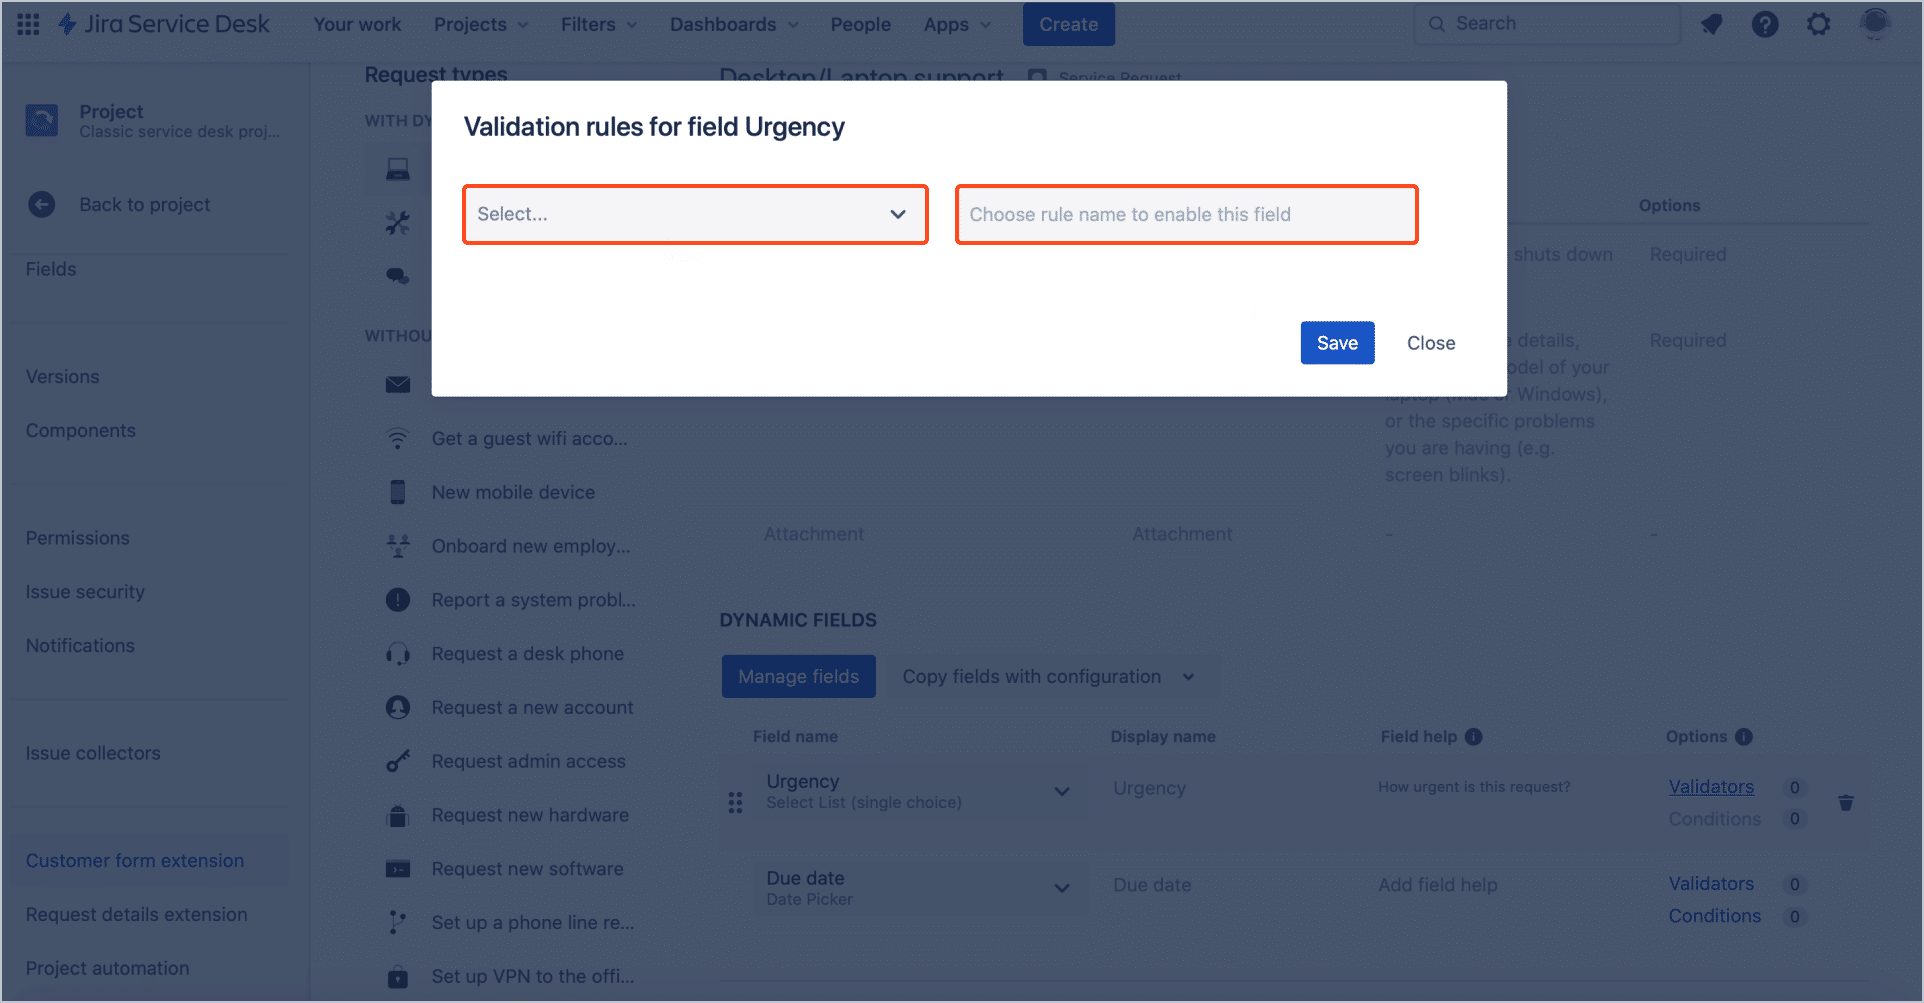
Next, type the validator value in the box to the right (if necessary) and click Save.

See the list of all available validators here.
Jira forms in action: examples
Let’s dive into real-life examples to show you how standard Jira Service Management forms differ from the dynamic forms. We use the Extension for Jira Service Management app as an example.
Example 1: IT support ticket submission
Using basic forms:
An employee needs to report a software issue. They select “Software Issue” from a dropdown menu and fill in a general description field. However, the form doesn’t prompt for specific information like software version or error codes, which are crucial for troubleshooting. The IT team often needs to follow up for more details, delaying the resolution process.
Enhanced with Dynamic Forms
When the employee selects “Software Issue,” additional fields appear, asking for the software name, version, and to attach any error screenshots. This targeted information allows the IT team to immediately start diagnosing the problem without back-and-forth emails. It leads to quicker resolutions and a better user experience.
Example 2: HR onboarding requests
Using basic forms:
A new hire fills out a form to request their onboarding equipment. The form includes a long list of all possible equipment and access needs, many of which are not relevant to their role. The new hire has to sift through all options, which can be overwhelming and time-consuming.
Enhanced with Dynamic Forms:
The form initially asks the new hire to select their department. Based on the selection, only relevant equipment options and access rights for that department are displayed. For instance, a developer sees options for a high-spec laptop and access to coding tools, whereas a salesperson sees options for a standard laptop and CRM access. This tailored approach streamlines the entire onboarding process. It improves the experience for new hires and ensures they receive exactly what they need for their role.
Example 3: Facility maintenance requests
Using basic forms:
An employee wants to report a maintenance issue in their office. The form they fill out is generic, asking for a description of the issue without specifying the type of problem or location details. The facilities team often has to contact the employee for additional information, such as the exact location and nature of the issue, delaying the maintenance work.
Enhanced with Dynamic Forms:
Upon selecting “Maintenance Issue,” the employee is prompted to specify the type of issue (e.g., electrical, plumbing) and the affected office location through dynamic dropdowns. For electrical issues, they’re also asked to describe the appliance and attach photos if possible. This precise information enables the facilities team to quickly assign the right technician and ensure they come prepared with the necessary tools. It significantly speeds up the repair process.
Example 4: Bug reporting for a software product
Context:
A software development company uses Jira Service Management to manage bug reports from its users. The company has several software products, each with its own set of versions and known issues.
Using basic forms:
When a user wants to report a bug, they are presented with a form where they select the product from a dropdown menu. Based on this single selection, they might see a field to input the version number. However, the form cannot adapt further based on both the product and version selected, which limits the ability to collect precise information relevant to specific product-version combinations.
Enhanced with Dynamic Forms:
In this improved scenario, when a user selects a software product, the form dynamically updates to not only ask for the version but also adjusts subsequent fields based on the combination of product and version selected.
For example:
1. Product selection: The user selects “Product A” from a dropdown.
2. Version selection: Based on “Product A,” another dropdown asks for the version, and the user selects “Version 2.0.”
3. Conditional fields displayed:
- If the user chooses “Product A” and “Version 2.0”, the form displays a field asking if the user is experiencing one of the common issues known for this version. Then they can choose “Issue A” or “Issue B,” allowing them to select any/all applicable options.
- Then, based on the product-version combination, a field appears asking the user to describe their problem in detail. They can include specific error messages or scenarios where the bug occurs.
- For users reporting a bug not listed in the common issues, an upload field shows up. It encourages them to attach logs or screenshots.
This approach uses multiple conditions (the specific product and its version) to tailor the form dynamically. That way we make sure that the information collected is as relevant and detailed as possible for the support team. It reduces the need for follow-up questions, accelerates the troubleshooting process, and enhances the overall efficiency of the bug resolution workflow.
Conclusion
In conclusion, Jira Service Management offers versatile form solutions tailored to diverse needs. For simple use cases, its static forms provide a simple and efficient way to collect essential information. On the other hand, dynamic forms are ideal for more complex scenarios. They adapt in real-time to user responses and streamline the data collection process. Whether your needs are basic or complex, Jira Service Management has the tools to create a seamless form experience for your users.
FAQ
-
Can you do forms in Jira?
Yes, you can create and use forms in Jira, specifically within Jira Service Management. Forms in Jira Service Management help collect information easily. They are used for tasks like requests and incident reports. This makes work easier for service teams.
-
Can Jira be used for service management?
Yes, Jira can be used for service management through its dedicated tool, Jira Service Management (JSM). Jira Service Management is designed specifically for IT service management (ITSM) and customer service support, expanding Jira’s capabilities beyond project management and issue tracking.
-
Are Jira Service Management forms free?
Yes, the forms natively available in Jira Service Management are free to use. You don’t need any additional license to use them.
-
Can I use conditional logic in Jira forms?
Yes, since Atlassian acquired the Proforma app, you can use conditional logic in Jira Service Management.
-
How do I add a form to a ticket in Jira?
You can add a Jira form to an issue manually or by using automation rules. To do the first, simply choose Add form from the toolbar on the issue view. After finding the form you want to use, click Add.
To create an automation rule, go to Service project settings or Project settings > Automation.
-
What are request types in Jira Service Management?
Request types in Jira Service Management are templates for service requests. They act as a bridge between customers making requests and agents working on them. Each type collects the exact information needed for a specific service request. This ensures teams have what they need to quickly solve issues or meet service needs.
In Jira Service Management, you can create as many request types as you want and customize them to your needs.